- 6.2: Creating accessible apps
- What you should already KNOW
- What you will LEARN
- What you will DO
- App overview
- Task 1. Download and open the project
- 1.1 Download and open the sample app
- 1.2 Test the app with TalkBack
- Task 2. Add accessibility
- 2.1 Inspect and fix the code in Android Studio
- 2.2 Add focus to views
- Task 3. Add an EditText view with a label
- 3.1 Add views and test the app in TalkBack
- 3.2 Add explicit labels for EditText views (API 17 and higher)
- Solution code
- Coding challenge
- Summary
- Related concept
- Missing accessibility label: in Android Studio Warning
- Answer:
- Answer:
- Accessible Text Input in Android
- Why are EditText objects difficult?
- How to make EditText objects accessible
- Programmatically
- EditText Example
- No Accessibility Markup – A11y Violation
- Using Placeholder Text – A11y and Usability Violation
- Using labelFor Attribute – A11y Best Practice
- Using Hints – WARNING!
- Best Practice
6.2: Creating accessible apps
Contents:
Accessibility is a set of design, implementation, and testing techniques that enable your app to be usable by everyone, including people with disabilities.
Common disabilities that can affect a person’s use of an Android device include blindness, low vision, color blindness, deafness or hearing loss, and restricted motor skills. When you develop your apps with accessibility in mind, you make the user experience better not only for users with these disabilities, but also for all of your other users.
Accessibility usually does not require a full overhaul of your app’s design or code. Accessibility does require you to pay attention to details and test your app under the same conditions your users may encounter.
Android includes several accessibility-related features, to help you optimize your app’s user interface (UI) for accessibility. In this lesson, you learn how to test your app and add features that enhance its accessibility.
What you should already KNOW
You should be familiar with:
- Creating, building, and running apps in Android Studio.
- Creating views and layouts in both Android Studio’s design editor and XML.
What you will LEARN
You will learn how to:
- Test your app for accessibility in a variety of ways.
- Add attributes to your XML layouts that assist with making your app more accessible for your users.
What you will DO
- Download and run a starter app.
- Test the app with Google TalkBack (Android’s screen reader) to identify possible accessibility issues. TalkBack gives spoken feedback so that you can use your device without looking at the screen.
- Run Android Studio’s code inspector to identify missing accessibility-related attributes.
- Update the app to resolve the accessibility issues revealed in testing.
App overview
The SimpleAccessibility app demonstrates how to add accessible features to your app’s UI. The app, when complete, looks like this: 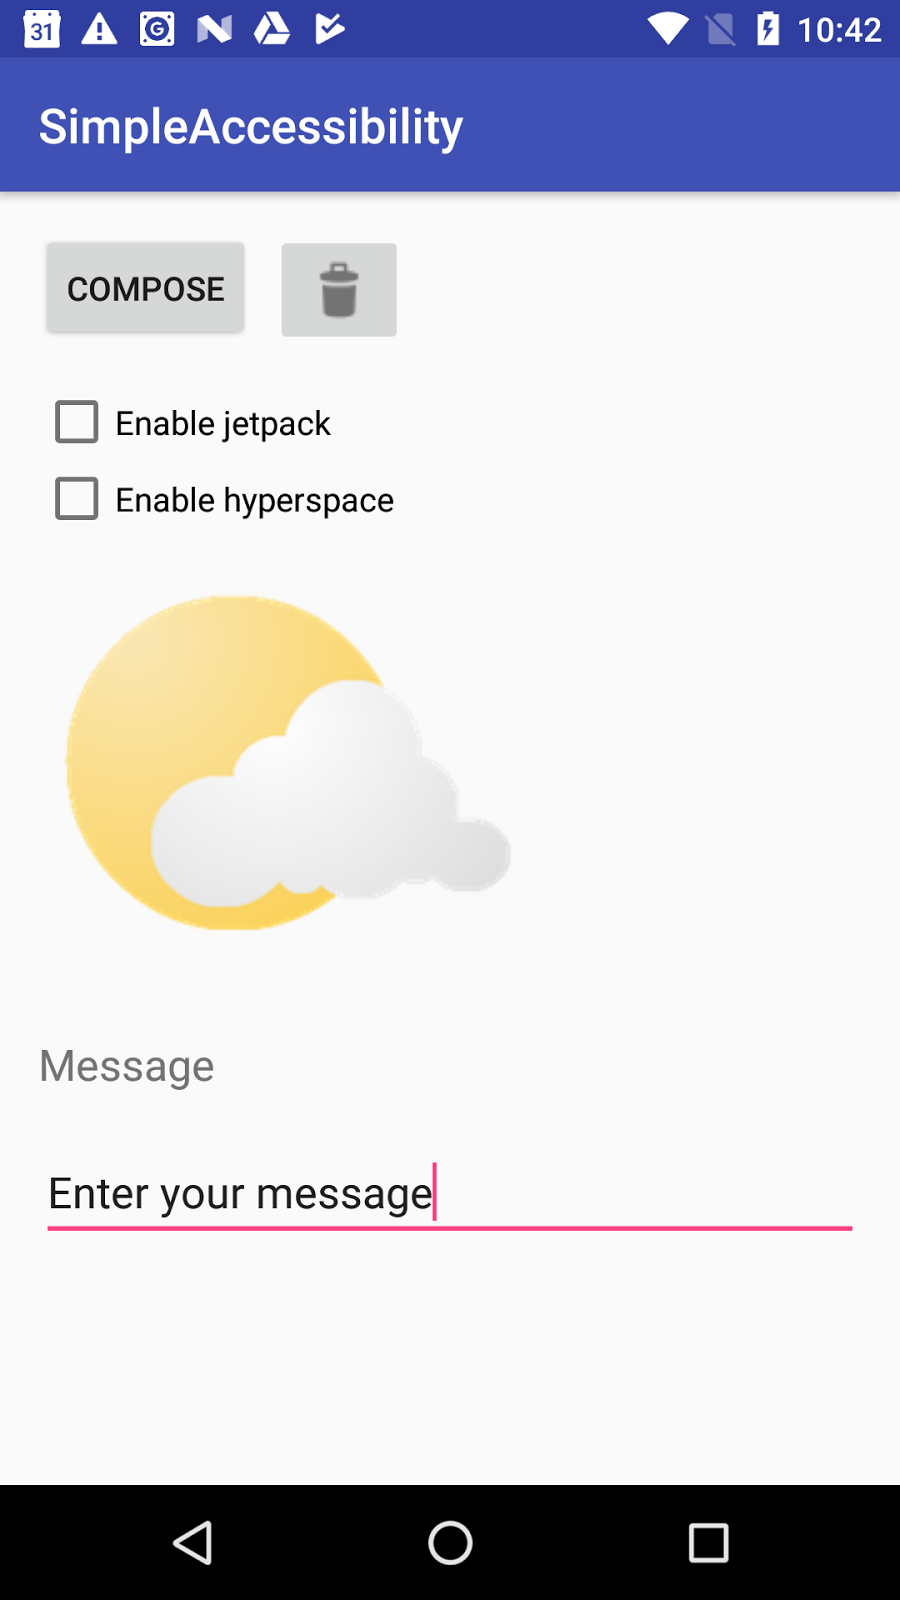
None of the views have click handlers, so the app does not have any actual functionality. The focus for this app (and this lesson) is in the layout XML code and in the attributes that enable accessibility.
Task 1. Download and open the project
In this task, you run the starter app for SimpleAccessibility and explore it in TalkBack.
1.1 Download and open the sample app
- Download the SimpleAccessibility-start app and unzip the file.
- Open the app in Android Studio.
The SimpleAccessibility app contains a number of views in a layout, including buttons ( Button and ImageButton views), checkboxes, and an image. All the accessibility functions you learn about in this practical are implemented in the layout. 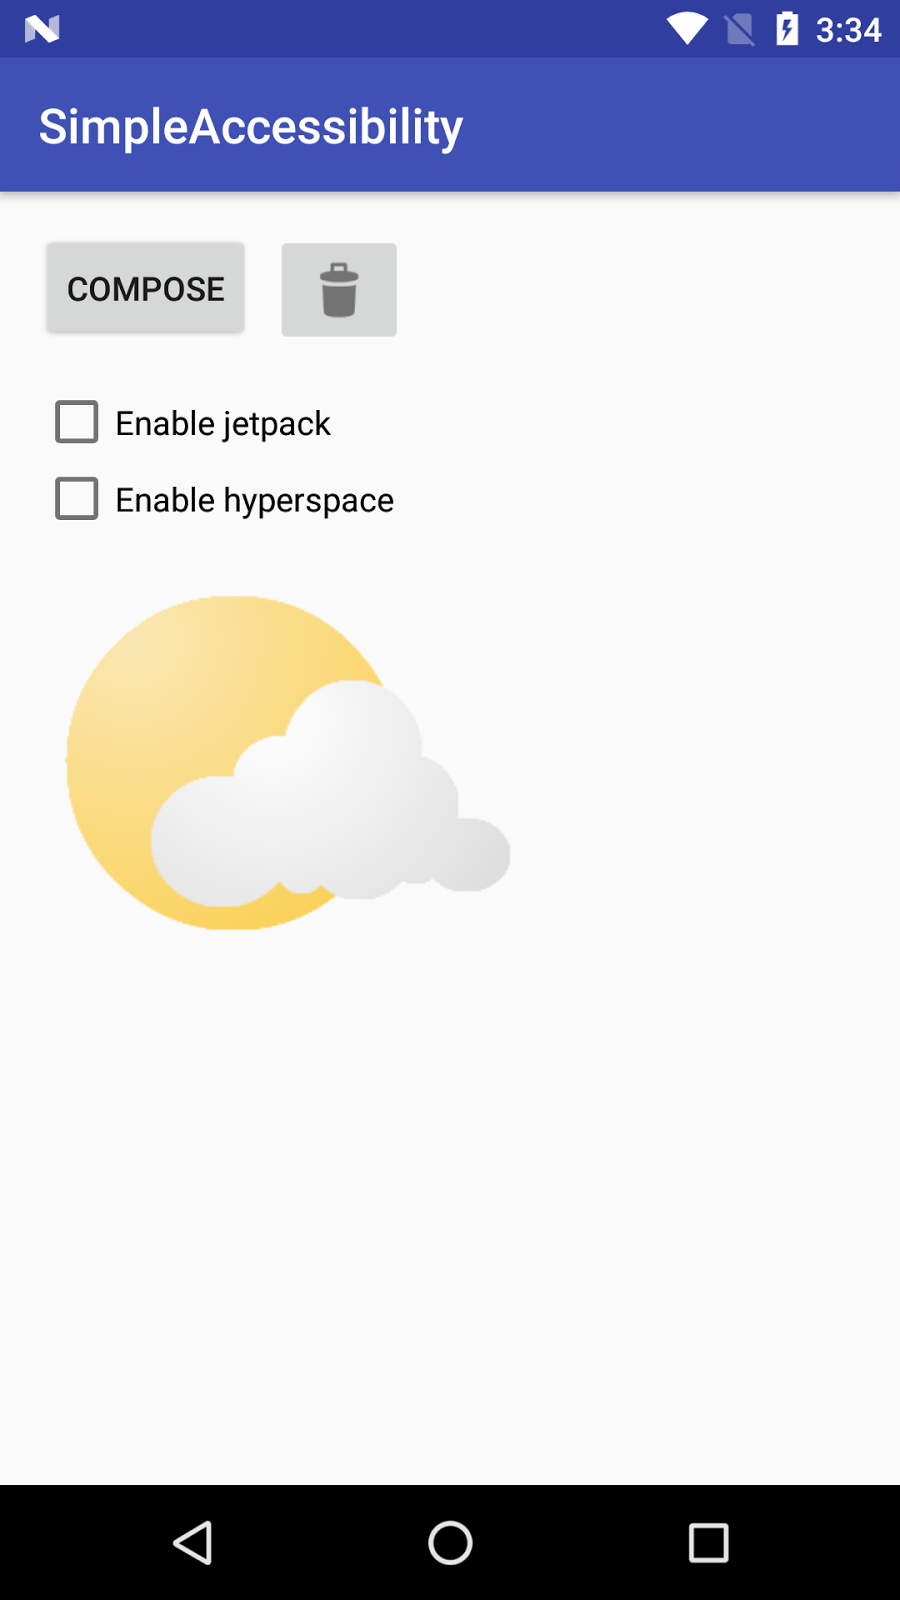
1.2 Test the app with TalkBack
TalkBack is Android’s built-in screen reader. When TalkBack is on, the user can interact with their Android device without seeing the screen. Users with visual impairments may rely on TalkBack to use your app. In this task, you manually explore the app with TalkBack enabled, to expose possible accessibility problems.
To test the app with TalkBack enabled, use these steps:
- On a device, navigate to Settings > Accessibility > TalkBack.
- Tap the On/Off toggle button to turn on TalkBack.
Tap OK to confirm permissions. After TalkBack is on, you can navigate the Android UI in one of these ways:
- Tap a UI element to hear the description for that element. Double-tap to select.
- Swipe right or left to navigate through the elements in sequence. Double-tap anywhere to select.
- Drag your finger over the screen to hear what’s under your finger. Double-tap anywhere to select.
Build and run your app in Android Studio.
When your app starts with TalkBack enabled, no item is initially focused. TalkBack reads the title of the app.
Tap each element or swipe to hear the descriptions for the elements in sequence. Note the following:
- The spoken feedback for the Compose button is the button title itself.
- The feedback for the image button is «unlabelled button.»
- The feedback for a checkbox is the checkbox label and the current state of the checkbox (selected or cleared.)
- No feedback is available for the partly cloudy image. The image is not even a focusable element.
Swipe from left to right to navigate between focusable elements on the screen. Note that the focus moves from top to bottom. The partly cloudy image is not focusable.
Task 2. Add accessibility
Experimenting with TalkBack and the starter app in the previous task exposed problems in how the app’s views are identified for vision-impaired users. In this task, you fix some of these problems.
2.1 Inspect and fix the code in Android Studio
Android Studio highlights places in your XML layout code that have potential accessibility problems, and makes suggestions for fixing those problems. For accessibility, Android Studio checks two things:
- Missing content descriptions on ImageView and ImageButton objects. Because these views do not have text associated with them, the TalkBack screen reader can’t describe them without an explicit description.
- Missing label indicators (API 17 or higher). Text views are often used as labels for some other view in the layout, for example, as a label to indicate the content for an EditText . A label indicator specifies the other view that this view is a label for.
To inspect and fix your code for accessibility, use these steps:
- In Android Studio, open the res/layout/activity_main.xml file, if it’s not already open. Switch to the Text tab.
- Note that the ImageButton and ImageView elements have yellow highlights on them. When you hover over the elements, the message reads, «Missing contentDescription attribute on image.»
- Add an android:contentDescription attribute to the ImageButton view, with the value «Discard.» Extract this string into a resource.
- Add an android:contentDescription attribute to the ImageView , with the value «Partly Cloudy.» Extract this string into a resource.
- Build and run your app.
- Navigate your app with TalkBack turned on. The trash-can button now has a reasonable description, but you still can’t focus on the partly cloudy image.
2.2 Add focus to views
In addition to readable descriptions, make sure that users can navigate your screen layouts using hardware or software-based directional controls such as D-pads, trackballs, keyboards, or on-screen gestures.
Most views are focusable by default, and the focus moves from view to view in your layout. The Android platform tries to figure out the most logical focus order based on each view’s closest neighbor. Generally, views are focussed from left to right and top to bottom. In some cases, you want to make your views explicitly focusable or change the focus order to reflect how the user uses your app.
In the case of the SimpleAccessibility app, the partly cloudy image is not focusable, even with a content description added. Assuming that the partly cloudy image is there to show the current weather, you must add a focusable attribute to that image so that TalkBack can read the content description.
To make the partly cloudy image focusable, use these steps:
- Find the partly cloudy ImageView element in the XML layout.
- Add the android:focusable attribute to the ImageView :
Build and run the app. With TalkBack enabled, navigate to the partly cloudy image. TalkBack reads the image’s content description.
Task 3. Add an EditText view with a label
In this task, you add an EditText view and an associated label (a TextView ). EditText views and TextView labels are a special case for handling accessibility in your app.
3.1 Add views and test the app in TalkBack
- Add a TextView to the app’s layout below the ImageView . Give it the android:text attribute of «Message.» Extract that string into a resource.
- Add an EditText just below the TextView . Give it an ID of @+id/edittext_message , and the android: hint attribute «Enter your message.» Extract that string into a resource.
- Build and run the app and navigate to the new views. Experiment with entering text in TalkBack.
Note these things:
- For text views, TalkBack reads the text that’s in the android:text attribute. Here, the text is «Message.» You do not need content descriptions for text views.
For EditText views, TalkBack reads the text that’s in the android:hint attribute. Here, the text is «Enter your message.» If android:hint does not exist, TalkBack reads the text that’s in android:text instead.
In EditText views, it’s better to use android:hint rather than android:text for the default text.
When the app starts, the first EditText has the initial focus.
3.2 Add explicit labels for EditText views (API 17 and higher)
If you target your app to Android 4.2 (API level 17) or higher, use the android:labelFor attribute when labeling views that serve as content labels for other views. For readable descriptions, TalkBack prefers explicit labels (using android:labelFor ) over attributes such as android:text or android:hint .
Explicit labels are only available in API 17 or higher, and Android Studio can highlight missing labels for EditText views as part of code inspection. The SimpleAccessibility app uses the default minimum SDK of 15. In this task, you change the API level to enable explicit labels. Then you add the appropriate label attribute.
- Open the build.gradle (Module: app) file and change minSdkVersion from 15 to 17 .
- Click Sync Now to rebuild the project.
In the activity_main.xml layout file, delete the android:hint attribute from the EditText .
The EditText element is now highlighted in yellow. When you hover over the element, the message reads, «No label views point to this text field with an android:labelFor=»@+id/edittext_message» attribute.»
Add the android:labelFor attribute to the TextView that serves as a label for this EditText :
The highlight on the EditText disappears.
Build and run the app. TalkBack now reads the contents of the label to identify the EditText .
Solution code
Coding challenge
Challenge: If the content of a view changes programmatically as the app runs, you need to update the content descriptions to reflect the new state.
- Modify the SimpleAccessibility app to include a click handler for the Discard (trash can) button. When the button is clicked, toggle between two images: the default trash can and a lock icon. (You can use @android:drawable/ic_lock_lock for the lock icon.)
- Use the setContentDescription() method to change the content description when the button image changes.
- Test the app in TalkBack. Verify that the correct content description appears for each image.
Hints:
Get an image drawable from the resources:
Get a string from the resources:
Compare two drawables:
Summary
- Adding accessibility to your app does not require significant code changes. You can add many accessibility features to an existing app through attributes in the XML layout. Use Android’s TalkBack feature to test your app for users with low vision.
- Android Studio can highlight missing accessibility attributes (content descriptions and labels) in your app’s layout.
- To provide readable descriptions of buttons, add android:contentDescription attributes to ImageView and ImageButton elements.
- To provide the ability to navigate your app’s UI, use focus and focus order.
- Add android:focusable attributes to ImageView views that are not by default focusable.
- You don’t need to add content descriptions or focus to decorative images.
- For EditText views, use android:hint instead of android:contentDescription .
- If your app supports API 17 or higher, use the android:labelFor attribute to indicate that a view is a label for some other view.
Related concept
The related concept documentation is in Accessibility.
Источник
Missing accessibility label: in Android Studio Warning
Posted by: admin June 15, 2020 Leave a comment
Missing accessibility label: where minSdk , you should provide
an android:hint Editable text fields should provide an android:hint
or, provided your minSdkVersion is at least 17, they may be referenced
by a view with a android:labelFor attribute. When using
android:labelFor , be sure to provide an android:text or an
android:contentDescription . If your view is labeled but by a label in
a different layout which includes this one, just suppress this warning
from lint.
How can fix this warning?
Answer:
I had I same problem. I fix it like this
Use @String/example for name your method
Follow these steps
Go to Res>Values>Stings.xmladd a string like this
- and go to your Text or button Attributes and replace text use String
if required asking of hind just add this code with your hint
Answer:
Provide an android:hint Editable text fields should provide an
android:hint or, provided your minSdkVersion is at least 17, they may be referenced by a view with a android:labelFor attribute.
When using android:labelFor, be sure to provide an android:text or an android:contentDescription.
If your view is labeled but by a label in a different layout which includes this one, just suppress this warning from lint.
Источник
Accessible Text Input in Android

This post was co-authored by Chris McMeeking and Melinda Kothbauer.
The default text entry field in Android is the EditText object. EditText objects are difficult because the common practices for making Android UI elements accessible (content descriptions), do not work. Android provides the framework to make EditText objects accessible, but it is important to know what, when, and how to use the built-in tools. In this post we will discuss:
- Difficulties unique to EditText objects
- How to make EditText objects accessible
- An in depth discussion of an example found within our open source Android app
- Best Practices regarding EditText objects
Why are EditText objects difficult?
In order for both sighted and non-sighted users to use EditText objects effectively, they need to know what information the EditText requires. Without some sort of association to the required information, no one can accurately input the information that developers intended to go in the EditText object.
Developers commonly use hints to provide this information to users. However, hints are not consistently accessible. With the huge variety of Android devices and TalkBack versions, hints are announced improperly more often than not. The main problem with hints is that they disappear when a user enters text. This is unhelpful for sighted users, as they can no longer see which information goes into which EditText object, but even worse for non-sighted users. Once text is entered, TalkBack will no longer announce the hint, and instead announces the entered text. Therefore, placing important contextual information within the hint is an Accessibility violation. NOTE: This is version dependent, for example Nexus 6 with Android 5.2+ exhibits this behavior, but Samsung Galaxy 4, with Android 4.4 does not.
Other methods, such as visible labels beside the corresponding EditText object, are improvements over hints. Nevertheless, they still lack proper accessibility mark-up since TalkBack does not automatically associate the visible label with the EditText object. A TalkBack user scrolling through views does not know which label goes with which EditText object.
How to make EditText objects accessible
Making EditText objects accessible is not difficult. All that is required is a visible label beside the corresponding EditText object that is properly associated with its EditText object via the labelFor attribute either placed in xml layout or programmatically.
In XML, adding an association for an EditText object is simple. All you need to do is add a unique id attribute (line 8 below) for the desired EditText object and a labelFor attribute (line 4 below) to the associated TextView object.
Programmatically
It is also possible to create the labelFor association programmatically using one of the two following functions:
setLabelFor(View labeled) or setLabeledBy(View label) .
[code language=”java”]
View view = inflater.inflate(R.layout.fragment_edit_text_fixed, container, false);
TextView textView = (TextView) view.findViewById(R.id.aac_edit_text_fixed_heading_1);
EditText editText = (EditText) view.findViewById(R.id.aac_edit_text_fixed_edit_text_1);
textView.setLabelFor(editText);
[/code]
These functions are relatively self-explanatory; simply send the appropriate view (the EditText if using setLabelFor or the TextView if using setLabeledBy ). These functions are especially useful when creating dynamic lists or views programmatically rather than a pre-defined xml layout.
EditText Example
This discussion references our open source Android app. Please get this running on your device and turn TalkBack on. Before continuing find the “Edit Texts” story, located in the main menu, and navigate to the broken tab. The following discussion will refer to the broken tab view as well as the fixed tab view.
No Accessibility Markup – A11y Violation
On the broken tab, you will see two examples of how NOT to code with EditText objects. In the first example, it is clear to a sighted user what information belongs in which EditText. That being said, if you turn on the TalkBack simulation (by clicking the eye icon in the upper right hand corner) and scroll through these views, it is unclear which label is associated with which EditText object.
Using Placeholder Text – A11y and Usability Violation
In the second example, it is again clear to a sighted user where to type in what – at first. These EditText objects appear to have hints, but the text is actually just hardcoded text that will never repopulate the field once edited (try it!) as hints do sometimes, depending on the Android version, device, etc. It is clear that this method is ineffective for both sighted and non-sighted users.
Using labelFor Attribute – A11y Best Practice
Now navigate to the fixed tab. At first glance, the two examples look nearly identical to the broken ones – it is important to remember that adding accessibility features will not change your layout much! The difference here lies in the code. The top example with visible labels are all correctly associated with their corresponding EditText objects using the xml labelFor attribute. Now when you scroll through the views using TalkBack, the label is announced with the EditText object’s information, removing all ambiguity.
Using Hints – WARNING!
The second example on the fixed tab is particularly interesting. It uses hints to convey all information about what belongs in the EditText object. This is a commonly accepted way to mark up EditTexts both for usability and accessibility; however, neither of those goals are accomplished consistently using hints. Depending on your device, Android version, TalkBack version, etc. you may get different TalkBack announcements when scrolling through these EditText objects. Try it before editing them, while editing, and after removing all changes to see the differences. From a pure usability standpoint, if you are asked to enter some piece of information (for example, a first name), and you begin to enter your information, the hints will disappear. The helpful information is now gone and you have no way to ensure you entered the correct information in the correct EditText object. What if it was actually asking for the last name first? You have no way to double check.
Best Practice
Hints are commonly used as accessibility markup; however, they are often misused in this way. Hints should not contain critical contextual information. This information should go into a visible label that is appropriately associated with the EditText object using the labelFor attribute. Hints can then be used to help clarify required information, for instance when a specific format is desired (such as a phone number or date) or to give an example of information that can go in the EditText object. In such instances, they should likely be accompanied by form validation techniques (blog post coming soon), to ensure the formatting requirements are enforced in an accessible way. The important take away is that hints containing important contextual information are almost always an accessibility violation.
Источник


