- Подключение модуля телеметрии к телефону
- Mission planner для андроид
- Загрузите последнюю версию ПО Mission Planner для установки
- Запустите установку
- Запустите Mission Planner
- Обновление ПО и проблемы при запуске
- Installing Mission Planner
- Windows Installation
- Open Mission Planner
- Updating Mission Planner
- Mission Planner on Android
- Mission Planner on Linux
- DOWNLOADS: Firmware
- Firmware
- ArduCopter APM 2.x Firmware
- ArduCopter APM 1.0 Firmware
- Bootloader
- APM2.x Autopilot
- License
- Safety
Подключение модуля телеметрии к телефону
Иногда бывает полезно, чтобы не таскать ноутбук в поле, воспользоваться мобильными устройствами для контроля или настройки коптера с контроллером APM. Рассмотрим вопрос подключения.
Чтобы сделать подключение телеметрии, нам понадобится телефон или планшет на Android с поддержкой OTG. Повезло, если на устройстве присутствует драйвер для телеметрии (был у меня раньше планшет iconBIT 7″ NetTAB SKY 3G DUO и заработало все сразу). Если не повезло, то необходимо драйвер установить вручную.
Один из способов предложил Виталий Кошель (у него устройство с Андроид 4.2.2 на процессоре MTK6592) на форуме RCDesign.
1. Необходимо скачать драйвер по ссылке.
2. Разархивировать архив на устройстве и запустить файл TN_147_Java_D2xx_for_Android_Demo.apk.
3. Установить ПО под Android для APM: DroidPlanner2 или AndroPilot.
4. Извлечь, воткнуть модуль телеметрии в разъем USB OTG, подождать немного.
5. Моно запускать ПО и пробовать подключиться к контроллеру APM.
Пробуем и отписываемся о результатах.
Update 29.06.2014: Советую посмотреть видеоинструкцию от Юлиана, где речь идет об подключении телеметрии к телефону.
Update 01.07.2014: Материал по подключению Bluetooth с буржуйского форума.
This is a guide to using bluetooth with your ANDROID device not your PC, I have had bluetooth working at times with my PC but it is extremely flaky and IMO not worth the effort.
There are currently two options for telemetry to connect to your APM mavlink data remotely, 433-915 Mhz radios or Bluetooth.
433-915 Mhz radios are the best option for complete control during missions, but there is a bit of setup involved and in some cases legal consideration with the frequencies depending where you live, and interference with some onboard components, these can all be mitigated but if all you want to do is change some parameters at the field, change flight modes and setup some simple missions then bluetooth is great for that and easy to place on your model.
At this time I couldn’t get «Follow Me» mode to work.
2: Connecting the Bluetooth Module to the FTDi adapter.
I got two servo plugs and pulled the plastic cases of both ends and heatshrinked all the exposed conducters.
DO NOT DIRECTLY CONNECT THE TWO , without double checking the connections, MOST are not matched.
FTDi -> Bluetooth Module
GND -> GND
5V -> VCC
TX -> RXD
RX -> TXD
3: Changing BAUD rate on the Bluetooth module.
If your are not using a Mavlink OSD ie a Minim, then check which Baud rate the module ships with then change parameter SERIAL3_BAUD in Mission planner to match that of the module. The two I linked to above come shipped with a baud rate of 115200.

If your using a Mavlink OSD connected to the telemetry port on your APM, the above parameter will likely already be set to 57600 to enable the Minim OSD to work, so leave that alone and now we need to change the baud rate on the bluetooth module to 57600 to enable it to be used side by side out of the telemetry port with the Minim OSD.
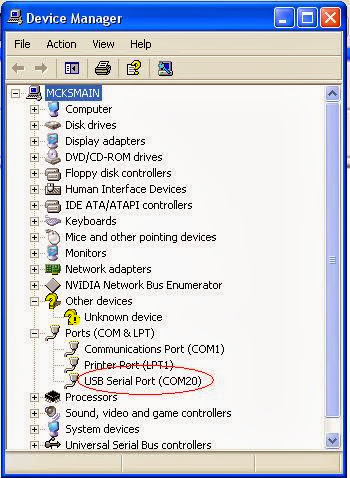
Find out which port the FTDi adapter is connected to;
open Device Manager on your PC and open the ports list and plug the FTDi and bluetooth module into your PC.
Hopefully it will appear in the list and note that port number, in my case port 20.
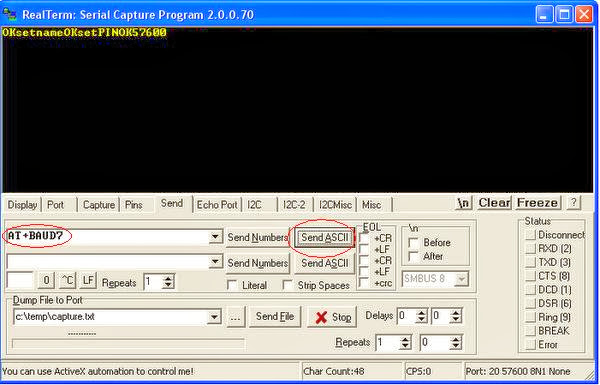
Open Realterm program and click on the Port tab, select 115200 (or whatever baud your module ships with) in the baud list, look for port number we discovered in the last step in the port drop down list, check «Open» is down and click «Change».

Test connection by clicking the «Send» tab, type «AT» in text box, click on «Send ASCII», realterm should respond with «OK»

Change the name that displays on your Android device whilst pairing.
Type AT+NAMEQuad (no spaces) then click «SEND ASCII»
If successful «OKsetname» will display.

Change pairing pin.
Type AT+PIN1234 (no spaces) then click «SEND ASCII»
If successful «OKsetPIN» will display.

Change baud rate to 57600bps
Type AT+BAUD7 (no spaces) then click «SEND ASCII»
If successful «OK57600» will display.
Other BAUD rate codes;
1—-1200bps
2—-2400bps
3—-4800bps
4—-9600bps
5—-19200bps
6—-38400bps
7—-57600bps
8—-115200bps
9—-230400bps
A—-460800bps
B—-921600bps
C—-1382400bps
At this stage configuration of the Bluetooth module is complete, but if you need to make any more changes you’ll have to go back to port tab and change the baud rate to 57600 to reconnect.
4: Connecting the Bluetooth module to the APM
If your using a Mavlink OSD ie Minim, you can just run it parallel to that.
If not refer to below diagram.

5: Download Android GCS and Pair module to your android device and enjoy!
http://www.diydrones.com/forum/topic…er-android-gcs
Right click the APK download and choose «save link as».
Props to Seth for continuing developement of GCS.
Update 06.07.2014: Еще материал (4pda.ru) о том, как заставить работать порт на устройствах. (источник 1, источник 2).
Кстати запустил GPS и на ICS 4.0 ZT280_H1_2n_C91_Android4.0_1224_V1.2
Алгоритм практически тот же, пару пунктов добавилось:
Запуск GPS на 4 Андроиде
Делал так:
Скопировал модуль pl2303.ko в system/lib/modules
далее:
1) insmod /system/lib/modules/pl2303.ko
2) chmod 777 /dev/ttyUSB0 (у меня свисток стал на порт ttyUSB0)
3) Установил программу SerialPort_1.1.apk с маркета, выставил скорость на порту 9600, данные пошли
4) В файле /system/build.prop изменить строку: gps.enable=false на gps.enable=true
5) Идем: настройки/Для разработчиков и ставим галочку на пункте Фиктивные местоположения
6) Перезагружаем планшет
7) Установил программу InternalGPS4GTab_alpha3.apk с http://forum.xda-developers.com/showthread…333&page=37
В программе указал что приемник на порту ttyUSB0 нажал старт
8) вышел на улицу, запустил google maps, dongle GPS замигал, и на карте показало мое местоположение, также работает IGO
качать модули отсюда ftp://zenithink.cn/dyliao/zt-280/lib/
копируете модули с расширением *.ko по пути /system/lib/modules/
Далее скачиваете с маркета программу GScript
Создаете новый скрипт с таким содержанием:
Сохраняете, запускаете, Свисток должен быть обязательно подключён иначе будет ругаться команда chmod
А далее по пунктам 3,4,5.
Нас интересует файл ftdi_sio.ko.
Update 28.01.2015: Еще информация от пользователя ВлАс.
Если вы нашли ошибку на странице, то нажмите Shift + Enter или нажмите здесь, чтобы уведомить нас.
Источник
Mission planner для андроид
ПО Mission Planner является бесплатным, с открытым исходным кодом доступный для Windows. Эти инструкции проведут вас через установку Mission Planner для компьютера.
Загрузите последнюю версию ПО Mission Planner для установки
Скачать последнюю версию Mission Planner
Выберите самую последнюю MSI и выберите Загрузить.
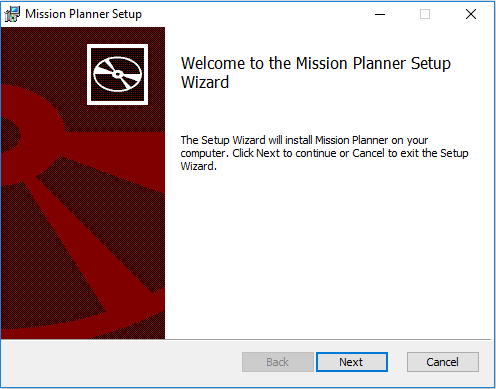
Запустите установку
Откройте файл установщика Microsoft (. MSI) и выберите Выполнить для запуска утилиты установки.
Планировщик Миссия Installation Utility
Следуйте инструкциям установки, утилита автоматически обновит и установит необходимые драйвера. Если вы получаете сообщение об ошибке установки DirectX, пожалуйста, обновите ваш DirectX плагин в центре загрузки.
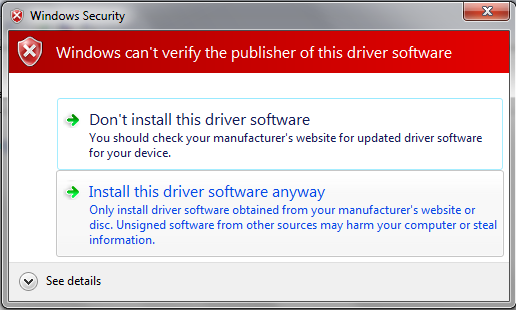
Если вы получаете предупреждение как на картинке ниже, выберите «Установить программное обеспечение этого драйвера», чтобы продолжить.
Выберите установки драйвера в любом случае.
Mission Planner обычно устанавливается в C: \ Program Files (x86) \ APM папка Планировщик или C: \ папка Планировщик Program Files \ APM. Там же находятся файлы журнала устаноки. На рабочем столе должен появится значек программы во время установки.
Запустите Mission Planner
После завершения установки, запустите Mission Planner, нажав на иконку. Mission Planner автоматически уведомляет вас о доступных обновлениях. Пожалуйста, всегда запускать последнюю версию ПО.
Обновление ПО и проблемы при запуске
Иногда после автоматической загрузки обновления ПО программа может попросту не запуститься, это связано с некоректным обновлением (иногда не по вашей вине) для этого рекомендуем обновлять через скачивание и установку ПО Mission Planner
Источник
Installing Mission Planner
Mission Planner was designed for native Windows installation. However, it is possible to use it under Linux (with some occasional issues) and there is a Beta version for Android OS.
Windows Installation
The following instructions show how to install Mission Planner on Windows. These instructions will be suitable for most users. For advanced users and non-standard installations, instructions are found here: . A useful video guide for advanced installation of Mission Planner is located here.
Double click on the downloaded .msi file to run the installer
Follow the instructions to complete the setup process. The installation utility will automatically install any necessary software drivers. If you receive a DirectX installation error, please update your DirectX plug-in from the Windows Download Center.
If you receive the warning pictured below, select Install this driver software anyway to continue.
Mission Planner is normally installed in the C:\Program Files (x86)\Mission Planner folder.
An icon to open the Mission Planner is created according to your instructions during the installation.
Open Mission Planner
Once installation is complete, open Mission Planner by clicking on its system icon.
Then you can either:
If ArduPilot firmware is not already installed on the autopilot, see Loading Firmware to boards without existing ArduPilot firmware .
Updating Mission Planner
Mission Planner automatically notifies you about available updates (when it is connected to the Internet).
Please always run the most current version of Mission Planner.
Mission Planner on Android
A version for Android is in development and can be downloaded from the Google Play Store here.
The latest version is also available here. Download to device, and double click on it to install.
Mission Planner on Linux
It is possible to run most Windows based programs on many Linux Distributions using MONO. Mission Planner does run under MONO but will have occasional issues and/or crashes. QGC and MAVProxy are alternatives that run stably in Linux, but if Mission Planner is really desired, you can follow these steps:
Download and install the latest version of MONO from here
Download Mission Planner as a zip file from here and unzip to a directory.
Источник
DOWNLOADS: Firmware
The latest firmware for all of the vehicles is available from the firmware server. This includes:
This page provides additional links to a number of specific builds that are considered “significant” — for example, the last builds of Copter to fit on the APM2.x board.
The firmware server additionally hosts GCS installers and other tools:
Firmware
The following firmware is “special” in that it represents some significant milestone — e.g. “the last version of a build for a particular autopilot”.
ArduCopter APM 2.x Firmware
ArduCopter v3.2.1 firmware for APM 2.x. This is the last build of ArduCopter that still fits on the APM 2.x boards.
ArduCopter APM 1.0 Firmware
ArduCopter v3.2.1 firmware for APM 1.0. This is the last build of ArduCopter that still fits on the APM 1.0 boards.
Bootloader
Bootloaders for various electronics created by ArduPilot Group
APM2.x Autopilot
Bootloader for APM2.x autopilot series
You need AVR programmer with ISP connector to burn these boot loaders.
License
This program is free software: you can redistribute it and/or modify it under the terms of the GNU General Public License as published by the Free Software Foundation, either version 3 of the License, or (at your option) any later version.
This program is distributed in the hope that it will be useful, but WITHOUT ANY WARRANTY; without even the implied warranty of MERCHANTABILITY or FITNESS FOR A PARTICULAR PURPOSE. See the GNU General Public License for more details.
Safety
Operating a powered vehicle of any kind can be a lot of fun. However, nothing will ruin your day at the park more quickly than an accident or running afoul of the law. Since we want you to have a great experience, please make sure that you do all of the following:
- Operate within all local laws and regulations. For example, in the United States, current regulations require you to operate most UAVs under 400 foot above ground level, within line of site, and away from obstructions and populated areas. Since these regulations vary from place to place, even within the same country, ensure that you understand what you need to do to stay compliant.
- Never operate the vehicle or software in a way that could be dangerous to you, other people, or property. Propellers, while rotating, could easily cut you; if a UAV fell on a person or object, it could cause injury; a UAV caught in power lines could cause an outage. As Ben Franklin said, “An ounce of prevention is worth a pound of cure.”
- Always keep in mind that software and hardware failures happen. Although we design our products to minimize such issues, you should always operate with the understanding that a failure could occur at any point of time and without warning. As such, you should take the appropriate precautions to minimize danger in case of failure.
- Never use the software or hardware for manned vehicles. The software and hardware we provide is only for use in unmanned vehicles.
 © Copyright 2021, ArduPilot Dev Team.
Источник


