- Чтение QR-кодов с помощью API Mobile Vision
- Вступление
- Предпосылки
- 1. Установка Google Play Services SDK
- 2. Редактирование манифеста приложения
- 3. Чтение QR-кода с фотографии
- Шаг 1: преобразовать фотографию в Bitmap
- Шаг 2. Создание детектора штрих-кода
- Шаг 3: Прочитайте QR-код
- 4. Чтение QR-кода с помощью камеры
- Шаг 1: Определите макет
- Шаг 2. Создайте Activity
- Вывод
- How to Use the Google Cloud Vision API in Android Apps
- Prerequisites
- 1. Enabling the Cloud Vision API
- 2. Adding Dependencies
- 3. Configuring the API Client
- 4. Detecting and Analyzing Faces
- Step 1: Encode the Photo
- Step 2: Make a Request
- Step 3: Use the Response
- 5. Reading Text
- Conclusion
Чтение QR-кодов с помощью API Mobile Vision
Вступление
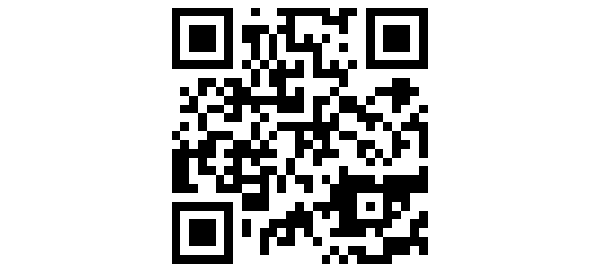
QR-коды стали вездесущими в последние годы. Я уверен, что вы видели один в газетной рекламе или на рекламном щите. С точки зрения непрофессионала, QR-коды, как и все другие штрих-коды, являются изображениями, которые предназначены для чтения на машинах. Обычно они представляют собой небольшую строку, например сокращенный URL-адрес или номер телефона. Вот пример QR-кода, который содержит URL домашней страницы Tuts +:
В отличие от традиционных штрих-кодов, для которых требуется специальное оборудование, QR-коды могут быть точно прочитаны любым смартфоном с приличной камерой.
Последний выпуск SDK для сервисов Google Play включает в себя API для мобильных устройств, который, помимо прочего, позволяет разработчикам Android легко создавать приложения, способные обнаруживать и считывать QR-коды в режиме реального времени. В этом уроке я собираюсь помочь вам начать работу с ним.
Предпосылки
Чтобы следовать этому уроку, вам понадобится:
- последняя версия Android Studio
- Android-устройство с камерой
1. Установка Google Play Services SDK
Прежде чем использовать API мобильного видения в своем приложении, вы должны добавить SDK 7.8 сервисов Google Play в качестве зависимости compile в build.gradle модуля вашего приложения .
groovy compile ‘com.google.android.gms:play-services:7.8.0’
Когда вы нажмете кнопку « Синхронизировать сейчас» , вы увидите ошибку, которая выглядит следующим образом:
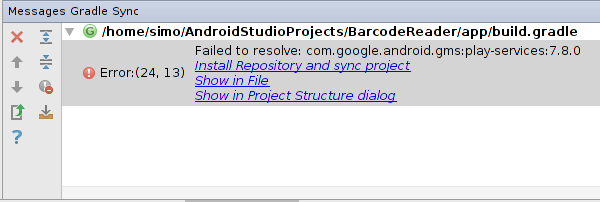
Нажмите на ссылку Установить репозиторий и синхронизировать проект, чтобы установить SDK.
2. Редактирование манифеста приложения
Добавьте следующую строку в AndroidManifest.xml вашего приложения, чтобы автоматически установить библиотеки обнаружения штрих-кода на устройства, которые пытаются запустить ваше приложение:
Кроме того, поскольку вы будете использовать камеру устройства для захвата QR-кодов, вам следует запросить разрешение android.permission.CAMERA .
3. Чтение QR-кода с фотографии
Давайте теперь напишем некоторый код, который может считывать QR-код из фотографии, хранящейся в папке ресурсов вашего приложения. Я собираюсь назвать фото myqrcode.jpg . Если у вас нет фотографий, содержащих QR-коды, вы можете получить их у Flickr .
Шаг 1: преобразовать фотографию в Bitmap
Поскольку API для мобильного видения требует в качестве входных данных Bitmap , сначала необходимо преобразовать фотографию в Bitmap . Для этого откройте фотографию, используя метод AssetManager класса AssetManager и передайте InputStream возвращенный методу BitmapFactory . Для простоты, сделайте это внутри метода onCreate вашей Activity .
java Bitmap myQRCode = BitmapFactory.decodeStream( getAssets().open(«myqrcode.jpg») );
Шаг 2. Создание детектора штрих-кода
Чтобы обнаружить QR-коды (и другие типы штрих-кодов), вы должны использовать экземпляр класса BarcodeDetector . Следующий код показывает, как создать его с помощью BarcodeDetector.Builder :
java BarcodeDetector barcodeDetector = new BarcodeDetector.Builder(this) .setBarcodeFormats(Barcode.QR_CODE) .build();
Обратите внимание, что детектор по умолчанию будет обнаруживать штрих-коды всех поддерживаемых форматов. Я использовал метод setBarcodeFormats чтобы явно указать, что детектор должен обнаруживать только QR-коды.
Шаг 3: Прочитайте QR-код
Используйте Frame.Builder чтобы создать Frame с использованием Bitmap , созданного ранее.
java Frame myFrame = new Frame.Builder() .setBitmap(myQRCode) .build();
Вызовите метод detect BarcodeDetector чтобы сгенерировать SparseArray содержащий все QR-коды, которые BarcodeDetector обнаружил на вашей фотографии.
java SparseArray barcodes = barcodeDetector.detect(myFrame);
Каждый элемент SparseArray содержит объект Barcode . Чтобы получить необработанное содержимое QR-кода, вы можете использовать поле rawValue объекта rawValue . Тем не менее, я предлагаю вам использовать более displayValue для чтения поле displayValue . Вот некоторый код, который печатает содержимое первого QR-кода, обнаруженного API:
« `java // Проверить, был ли обнаружен хотя бы один штрих-код if (barcodes.size ()! = 0) <
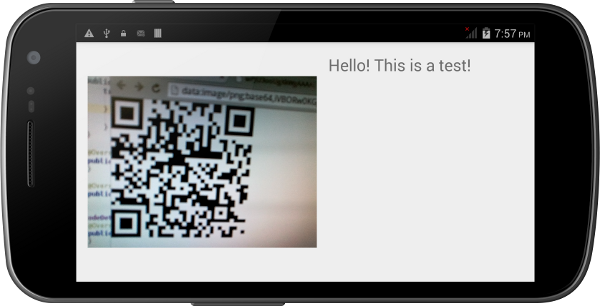
Если вы запустите свою Activity сейчас, вы сможете увидеть сообщение, содержащееся в QR-коде вашей фотографии.
4. Чтение QR-кода с помощью камеры
API мобильного видения также позволяет вам в реальном времени обнаруживать и считывать штрих-коды с помощью камеры вашего устройства. Давайте создадим новую Activity которая делает именно это.
Шаг 1: Определите макет
Создайте новый XML-файл макета с именем activity_main.xml . Макет должен иметь SurfaceView для отображения кадров предварительного просмотра, снятых камерой. Если вы хотите, вы также можете добавить TextView для отображения содержимого QR-кодов, которые обнаруживает API.
После использования RelativeLayout для позиционирования обоих виджетов XML-файл макета должен выглядеть примерно так:
Шаг 2. Создайте Activity
Создайте новый класс Java с именем MainActivity.java . Сделайте его подклассом Activity и переопределите его метод onCreate . Внутри метода onCreate вызовите setContentView чтобы применить макет, созданный на предыдущем шаге. Затем используйте findViewById чтобы получить ссылки на виджеты, определенные в макете.
« `java setContentView (R.layout.activity_main);
cameraView = (SurfaceView) findViewById (R.id.camera_view); barcodeInfo = (TextView) findViewById (R.id.code_info); « `
Чтобы получить поток изображений с камеры устройства и отобразить их в SurfaceView , создайте новый экземпляр класса CameraSource.Builder с помощью CameraSource.Builder . Поскольку для CameraSource требуется BarcodeDetector , создайте его с BarcodeDetector.Builder класса BarcodeDetector.Builder . При желании вы можете настроить размеры предварительного просмотра камеры с setRequestedPreviewSize метода setRequestedPreviewSize .
« `java barcodeDetector = new BarcodeDetector.Builder (this) .setBarcodeFormats (Barcode.QR_CODE) .build ();
cameraSource = new CameraSource .Builder (this, barcodeDetector) .setRequestedPreviewSize (640, 480) .build (); « `
Затем добавьте обратный вызов в SurfaceHolder SurfaceView чтобы вы знали, когда можно начать рисовать кадры предварительного просмотра. Обратный вызов должен реализовывать интерфейс SurfaceHolder.Callback .
« `java cameraView.getHolder (). addCallback (new SurfaceHolder.Callback ()
Внутри метода surfaceCreated метод start объекта CameraSource чтобы начать рисовать кадры предварительного просмотра. Поскольку метод start ожидает, что вы обработаете IOException , вы должны вызывать его из блока try. catch .
Аналогично, внутри метода surfaceDestroyed метод stop объекта CameraSource чтобы прекратить рисование рамок предварительного просмотра.
Ваша Activity почти готова. Однако вам все равно нужно сообщить BarcodeDetector что он должен делать при обнаружении QR-кода. Создайте экземпляр класса, который реализует интерфейс Detector.Processor и передайте его методу setProcessor объекта BarcodeDetector . Android Studio автоматически сгенерирует заглушки для методов интерфейса.
« `java barcodeDetector.setProcessor (новый Detector.Processor ()
Внутри метода receiveDetections получите SparseArray объектов Barcode , вызвав метод getDetectedItems класса Detector.Detections . Теперь вы можете написать код, чтобы сделать что-то с обнаруженными QR-кодами, потому что я уже показал вам, как работать с объектами SpareArray ранее в этом руководстве.
Вот как вы можете отобразить displayValue QR-кода в TextView :
« `java final SparseArray barcodes = detections.getDetectedItems ();
Обратите внимание, что вы должны встроить вызов метода setText в вызов метода post из TextView , так как receiveDetections не выполняется в потоке пользовательского интерфейса. Несоблюдение этого требования приведет к ошибке во время выполнения.
Теперь вы можете скомпилировать и запустить ваше приложение. Направьте камеру вашего устройства на QR-код, и вы сможете сразу увидеть его содержимое.
Вывод
В этом руководстве вы узнали, как использовать API мобильного видения для считывания QR-кодов со статических изображений, а также из потоков с камер в реальном времени. Хотя в этом руководстве мы работали только с QR-кодами, вы также можете использовать API для чтения других популярных форматов штрих-кодов, таких как UPC-A и EAN-13.
Чтобы узнать больше об API мобильного видения, я рекомендую посетить документацию API.
Источник
How to Use the Google Cloud Vision API in Android Apps
Computer vision is considered an AI-complete problem. In other words, solving it would be equivalent to creating a program that’s as smart as humans. Needless to say, such a program is yet to be created. However, if you’ve ever used apps like Google Goggles or Google Photos—or watched the segment on Google Lens in the keynote of Google I/O 2017—you probably realize that computer vision has become very powerful.
Through a REST-based API called Cloud Vision API, Google shares its revolutionary vision-related technologies with all developers. By using the API, you can effortlessly add impressive features such as face detection, emotion detection, and optical character recognition to your Android apps. In this tutorial, I’ll show you how.
Prerequisites
To be able to follow this tutorial, you must have:
- a Google Cloud Platform account
- a project on the Google Cloud console
- the latest version of Android Studio
- and a device that runs Android 4.4 or higher
If some of the above requirements sound unfamiliar to you, I suggest you read the following introductory tutorial about the Google Cloud Machine Learning platform:


1. Enabling the Cloud Vision API
You can use the Cloud Vision API in your Android app only after you’ve enabled it in the Google Cloud console and acquired a valid API key. So start by logging in to the console and navigating to API Manager > Library > Vision API. In the page that opens, simply press the Enable button.


If you’ve already generated an API key for your Cloud console project, you can skip to the next step because you will be able to reuse it with the Cloud Vision API. Otherwise, open the Credentials tab and select Create Credentials > API key.


In the dialog that pops up, you will see your API key.
2. Adding Dependencies
Like most other APIs offered by Google, the Cloud Vision API can be accessed using the Google API Client library. To use the library in your Android Studio project, add the following compile dependencies in the app module’s build.gradle file:
Furthermore, to simplify file I/O operations, I suggest you also add a compile dependency for the Apache Commons IO library.
Because the Google API Client can work only if your app has the INTERNET permission, make sure the following line is present in your project’s manifest file:
3. Configuring the API Client
You must configure the Google API client before you use it to interact with the Cloud Vision API. Doing so primarily involves specifying the API key, the HTTP transport, and the JSON factory it should use. As you might expect, the HTTP transport will be responsible for communicating with Google’s servers, and the JSON factory will, among other things, be responsible for converting the JSON-based results the API generates into Java objects.
For modern Android apps, Google recommends that you use the NetHttpTransport class as the HTTP transport and the AndroidJsonFactory class as the JSON factory.
The Vision class represents the Google API Client for Cloud Vision. Although it is possible to create an instance of the class using its constructor, doing so using the Vision.Builder class instead is easier and more flexible.
While using the Vision.Builder class, you must remember to call the setVisionRequestInitializer() method to specify your API key. The following code shows you how:
Once the Vision.Builder instance is ready, you can call its build() method to generate a new Vision instance you can use throughout your app.
At this point, you have everything you need to start using the Cloud Vision API.
4. Detecting and Analyzing Faces
Detecting faces in photographs is a very common requirement in computer vision-related applications. With the Cloud Vision API, you can create a highly accurate face detector that can also identify emotions, lighting conditions, and face landmarks.
For the sake of demonstration, we’ll be running face detection on the following photo, which features the crew of Apollo 9:


I suggest you download a high-resolution version of the photo from Wikimedia Commons and place it in your project’s res/raw folder.
Step 1: Encode the Photo
The Cloud Vision API expects its input image to be encoded as a Base64 string that’s placed inside an Image object. Before you generate such an object, however, you must convert the photo you downloaded, which is currently a raw image resource, into a byte array. You can quickly do so by opening its input stream using the openRawResource() method of the Resources class and passing it to the toByteArray() method of the IOUtils class.
Because file I/O operations should not be run on the UI thread, make sure you spawn a new thread before opening the input stream. The following code shows you how:
You can now create an Image object by calling its default constructor. To add the byte array to it as a Base64 string, all you need to do is pass the array to its encodeContent() method.
Step 2: Make a Request
Because the Cloud Vision API offers several different features, you must explicitly specify the feature you are interested in while making a request to it. To do so, you must create a Feature object and call its setType() method. The following code shows you how to create a Feature object for face detection only:
Using the Image and the Feature objects, you can now compose an AnnotateImageRequest instance.
Note that an AnnotateImageRequest object must always belong to a BatchAnnotateImagesRequest object because the Cloud Vision API is designed to process multiple images at once. To initialize a BatchAnnotateImagesRequest instance containing a single AnnotateImageRequest object, you can use the Arrays.asList() utility method.
To actually make the face detection request, you must call the execute() method of an Annotate object that’s initialized using the BatchAnnotateImagesRequest object you just created. To generate such an object, you must call the annotate() method offered by the Google API Client for Cloud Vision. Here’s how:
Step 3: Use the Response
Once the request has been processed, you get a BatchAnnotateImagesResponse object containing the response of the API. For a face detection request, the response contains a FaceAnnotation object for each face the API has detected. You can get a list of all FaceAnnotation objects using the getFaceAnnotations() method.
A FaceAnnotation object contains a lot of useful information about a face, such as its location, its angle, and the emotion it is expressing. As of version 1, the API can only detect the following emotions: joy, sorrow, anger, and surprise.
To keep this tutorial short, let us now simply display the following information in a Toast :
- The count of the faces
- The likelihood that they are expressing joy
You can, of course, get the count of the faces by calling the size() method of the List containing the FaceAnnotation objects. To get the likelihood of a face expressing joy, you can call the intuitively named getJoyLikelihood() method of the associated FaceAnnotation object.
Note that because a simple Toast can only display a single string, you’ll have to concatenate all the above details. Additionally, a Toast can only be displayed from the UI thread, so make sure you call it after calling the runOnUiThread() method. The following code shows you how:
You can now go ahead and run the app to see the following result:


5. Reading Text
The process of extracting strings from photos of text is called optical character recognition, or OCR for short. The Cloud Vision API allows you to easily create an optical character reader that can handle photos of both printed and handwritten text. What’s more, the reader you create will have no trouble reading angled text or text that’s overlaid on a colorful picture.
The API offers two different features for OCR:
- TEXT_DETECTION , for reading small amounts of text, such as that present on signboards or book covers
- and DOCUMENT_TEXT_DETECTION , for reading large amounts of text, such as that present on the pages of a novel
The steps you need to follow in order to make an OCR request are identical to the steps you followed to make a face detection request, except for how you initialize the Feature object. For OCR, you must set its type to either TEXT_DETECTION or DOCUMENT_TEXT_DETECTION . For now, let’s go with the former.
You will, of course, also have to place a photo containing text inside your project’s res/raw folder. If you don’t have such a photo, you can use this one, which shows a street sign:


You can download a high-resolution version of the above photo from Wikimedia Commons.
In order to start processing the results of an OCR operation, after you obtain the BatchAnnotateImagesResponse object, you must call the getFullTextAnnotation() method to get a TextAnnotation object containing all the extracted text.
You can then call the getText() method of the TextAnnotation object to actually get a reference to a string containing the extracted text.
The following code shows you how to display the extracted text using a Toast :
If you run your app now, you should see something like this:


Conclusion
In this tutorial you learned how to use the Cloud Vision API to add face detection, emotion detection, and optical character recognition capabilities to your Android apps. I’m sure you’ll agree with me when I say that these new capabilities will allow your apps to offer more intuitive and smarter user interfaces.
It’s worth mentioning that there’s one important feature that’s missing in the Cloud Vision API: face recognition. In its current form, the API can only detect faces, not identify them.
To learn more about the API, you can refer to the official documentation.
And meanwhile, check out some of our other tutorials on adding computer learning to your Android apps!
Источник


