- Разработка мультитач веб-приложений
- События
- Приложения с поддержкой прикосновений
- Важные Моменты
- Поддержка устройств
- Инструменты разработчика
- Android Touch Screen Not Working? How to Deal with This Issue? [MiniTool Tips]
- Summary :
- Quick Navigation :
- Part 1: Are You Facing Android Touch Screen Not Working Issue?
- Part 2: How to Recover Data from Unresponsive Android Phone
- Part 3: How to Fix a Touch Screen that Doesn’t Respond
- Situation 1: Software Problem
- Situation 2: Physical Damage
- Part 4: Summary
- ABOUT THE AUTHOR
Разработка мультитач веб-приложений
Мобильные устройства такие как сматрфоны или планшеты обычно имеют емкостный экран, чувствительный к прикосновениям для расширенного взаимодействия с пользователем.
С каждым днем мобильные приложения становятся все сложнее и сложнее. Веб-разработчикам тоже нужен API для использования всех возможностей тачскрина. Например, какой-нибудь аркаде или файтингу нужна необходимость нажатья нескольких кнопок, эту возможность может предоставить экран с поддержкой мультитач.
Apple ввел свое touch events API в iOS 2.0, вскоре устройства на Android тоже получили такую возможность и touch events API стал стандартом де-факто. Недавно была собрана рабочая группа W3C для работы над touch events specification.
В этой статье я рассмотрю touch events API, которое нам предоставляют устройства на iOS и Android, мы изучим какие приложения можно создавать, используя touch events API. В статье куча полезных примеров и техник, которые позволяют упростить написание приложений с touch events API.
События
Эти три основных события представлены в спецификации и поддерживаются многими устройствами:
touchstart: прикосновение к DOM element (аналог mousedown).
touchmove: движение пальца по DOM element (аналог mousemove).
touchend: палец убран с DOM element (аналог mouseup).
Каждое событие включает в себя три списка точек прикосновения (списки пальцев):
touches: список всех точек прикосновения на экране.
targetTouches: список точек на текущем элементе.
changedTouches: список пальцев, участвующих в текущем событии. Например, в событии touchend это тот палец, который был убран.
Каждый элемент списка представляет из себя объект формата:
identifier: уникальный идентификатор пальца, который сейчас на течскрине
target: DOM element, который является целью события
координаты client/page/screen: точка возникновения события на экране
radius и rotationAngle: эллипс, который описывает форму пальца
Приложения с поддержкой прикосновений
События touchstart, touchmove и touchend предоставляют достаточно мощный API для создания любых взаимодействий, основанных на прикосновении включая все обычные мультитач жесты — зум, вращение и так далее.
Этот пример позволяет вам перетаскивать DOM element, используя одноточечное прикосновение:
Ниже есть пример, который отображает все прикосновения на экране. 
Картинка кликабильна
Вот его код:
Демки
Появилось уже большое количество приложений с поддержкой мультитач, одно из них рисовалка, основанная на canvas, созданная Paul Irish
И демка Browser Ninja — клон Fruit Ninja, использующая CSS3 transforms, transitions и canvas:
Важные Моменты
Предотвращение зума
Настройки по умолчанию не очень подходят для мультитач, часто ваши движения пальцами воспринимаются мобильным браузером как команды для зума или скролла.
Для отключения зума вам необходимо приписать следующий мета-тег:
Предотвращение скролла
Некоторые мобильные устройства имеют поведение по умолчанию для жеста «скролл» (touchmove), такие как классический оверскролл в iOS, что приводит к возвращению страницы назад, если скролл превысил допустимые рамки. Это сбивает с толку в мультитач приложениях, но может быть легко отключено:
Рисуйте аккуратно
Если вы пишете мультитач приложение, которое включается в себя сложное многопальцевые жесты, то будьте осторожны с ними так как вы будете получать очень много событий. Рассмотрим предыдущий пример, в котором рисовались все точки прикосновения. Вы можете это сделать таким образом:
Этот метод не масштабируется с числом пальцев на экране. Вместо этого вы можете использовать цикл для отрисовки всех пальцев и получения значительно лучше производительности:
Таймеры на setInterval — это не очень хороший способ для создания анимаций, т.к. он не синхронизируется с циклом перерисовки браузера. Современные десктопные браузеры предоставляют функцию requestAnimationFrame, которая лучше подходит для цикличных анимаций — она производительней и тратит меньше батареи. Как только она будет поддерживаться всеми современными браузерами использование setInterval будет плохим тоном.
Использование targetTouches и changedTouches
Важно понять, что event.touches это массив всех пальцев, которые контактируют с экраном, не только те, что касаются DOM element’а. Наиболее подходящим обычно является event.targetTouches или event.changedTouches.
Наконец, если вы разрабатываете под мобильные устройства, вы должны знать важные моменты, которые описаны в статье Eric Bidelman и в документе W3C.
Поддержка устройств
К сожалению не все устройство поддерживают события прикосновения в должном качестве. Я написал скрипт для диагностики, который отображает информацию о поддержке touch API тем или иным устройством, а также точность touchmove. Я протестировал Android 2.3.3 на Nexus One и Nexus S, Android 3.0.1 на Xoom, и iOS 4.2 на iPad и iPhone.
В двух словах, все эти браузеры поддерживают touchstart, touchend, и touchmove.
В спецификации описаны ещё 3 события, но ни один из браузеров не поддерживает их:
touchenter: палец входи в DOM element.
touchleave: палец покидает DOM element.
touchcancel: касание прервано (зависит от реализации).
Все протестированные браузеры также предоставляют списки прикосновений — touches, targetTouches и changedTouches. Однако, ни один из браузеров не поддерживает ни radiusX ни radiusY ни rotationAngle, которые определяют форму пальца.
Событие touchmove, срабатывает порядка 60 раз в секунду на всех протестированных устройствах.
Android 2.3.3 (Nexus)
В браузере Android Gingerbread (Nexus One и Nexus S) отсутствует поддержка multi-touch. Это известная проблема.
Android 3.0.1 (Xoom)
В браузере Xoom есть поддержка мультитача, но она работает только на одном DOM элементе. Браузер не может корректно обработать два параллельных события на разных DOM элементах. Другими словами, следующий код будет обрабатывает два параллельных события:
iOS 4.x (iPad, iPhone)
Устройства на iOS в полной мере поддерживают Touch API.
Инструменты разработчика
В мобильной разработке всегда проще прототипировать на компьютере и по необходимости использовать живое мобильное устройство для теста. Мультитач это одна из всех вещей, которую сложно протестировать на обычном ПК, т.к многие ПК не поддерживают мультитач.
Необходимость тестирования на мобильных устройствах может увеличить цикл разработки, т.к. каждое изменение вы должны залить на сервер, а затем на устройство (прим. пер. Очень сомнительное затруднение). На мобильных устройствах отсутствуют необходимые инструменты разработчика.
Решение этой проблемы — симулирование события прикосновения на вашем ПК. Одноточечное прикосновение можно симулировать мышкой. Мультитач может быть симулирован на устройствах с поддержкой мулититач, например на новых Apple MacBook.
Одноточечные события
Если вы желаете симулировать одноточечное событие на вашем ПК, то попробуйте Phantom Limb, которая симулирует события прикосновения на страницах.
Также существует плагин Touchable для jQuery, который обединяет события мыши и прикосновения.
Мультитач события (решение только для MAC)
/Library/Internet Plug-Ins/.
2. Скачайте приложение TongSeng TUIO для MagicPad и запустите сервер.
3. Скачайте JavaScript библиотеку MagicTouch.js для симуляции событий прикосновения, совместимых со стандартом.
4. Подключите magictouch.js и плагин npTuioClient:
Я тестировал этот метод только в Chrome 10, но он должен работать и в других современных браузерах.
Если ваш ПК не поддерживает мультитач вы можете симулировать события прикосновения, используетя другие TUIO трекеры такие как reacTIVision. Подробная информация доступна на сайте проекта TUIO.
Ваши жесты могут пересекаться с жестами OS. На OS X вы можете настроить системные события в System Preferences > Trackpad
Мультитач события поддерживаются все большим числом мобильных браузеров, Я очень рад, что новые веб-приложения используют этот API в полную силу.
От переводчика
В комментариях к оригинальной статье также проскакивала ссылка: Touching and Gesturing on the iPhone
Предложения, пожелания, критика приветствуется!
Источник
Android Touch Screen Not Working? How to Deal with This Issue? [MiniTool Tips]
By Stella | Follow | Last Updated December 11, 2020
Summary :
If you are an Android user, you may encounter Android touch screen not working issue one day. When this issue happens, do you know how to recover data from such an unresponsive Android device? Besides, do you know how to fix this problem? Please find some available solutions in this article.
Quick Navigation :
Part 1: Are You Facing Android Touch Screen Not Working Issue?
Compared with keyboard phone, touch screen phone wins a lot of users all over the world nowadays due to its advantages, such as high speed, easy operation, durability, and more.
When you are enjoying its merits, you may also face some issues. Android touch screen not working is a typical problem.
In general, this unresponsive Android touch screen issue can be divided into two situations: software problem and physical damage.
When you are facing this issue, you will be unable to operate your Android phone normally, let alone use the data on it. So, you have to fix your Android phone touch screen to make your Android device return to normal state.
In fact, there are different solutions to solving different kinds of Android touch screen not working issues. However, before fixing this issue, we recommend you to recover data from unresponsive Android phone to a safe location to keep your Android data safe.
Then, in the following contents, we will show you how to recover data from your Android phone with touch screen not work issue in part 2, and how to fix Android touch screen not working issue which is caused by software problem and physical damage in part 3.
Please keep on reading to get some useful information.

Do you know how to get contacts off Android phone with broken screen effectively? In this article, we will introduce you two available ways to do this job.
Part 2: How to Recover Data from Unresponsive Android Phone
To recover data from your unresponsive Android phone, you need to use a piece of free Android data recovery software. When you are looking for such a tool on the internet, you will find many choices.
But, which one is reliable and effective? In this post, we recommend you to use MiniTool Mobile Recovery for Android.
This software is designed to recover data from all kinds of Android phone with its two powerful recovery modules: Recover from Phone and Recover from SD-Card.
The recoverable data contain deleted and existing ones and the data types this software can retrieve are various, including photos, videos, messages, contacts, call logs, music files, documents, and more.
In addition, this software will save your Android data to your computer, and you are able to use these files directly after Android data recovery.
Now, we suggest using the Free Edition of this software to have a try, and this free software allows you to recover 10 files of one type each time.
As to Android touch screen not working issue, you need to use Recover from Phone module to recover your Android device data. Before using this recovery module, there are some matters you should pay attention to:
Firstly, when you want to use an Android data recovery program to retrieve your Android data from the device directly, you need to root your Android device in advance. Otherwise, this software will not work successfully.
MiniTool Mobile Recovery for Android is not an exception. But, now you are unable to operate your Android device normally. So, you should guarantee that your Android device has been rooted before.
Secondly, the USB debugging of your Android device should have been enabled before and you should connect your phone to the computer which you have always allowed USB debugging on it because you need to do these two operations by tapping on your Android touch screen.
But, you know the Android touch screen doesn’t work now. Thus, you need to make sure that the above jobs have been done already.
Thirdly, please make sure your Android device is still on. If not, this software will be unable to detect the data on the device.
For example, your Android phone is dropped to the ground heavily, the touch screen is broken and you are unable to turn your Android device on successfully, we will regret to tell you that this software can’t help you to recover the data on it.
In this situation, you had better send it to an official authorized store to repair your phone.

Do you know how to recover data from broken Android phone? Here, MiniTool Mobile Recovery for Android is introduced in this post to solve this issue.
As long as you are sure your Android device can meet these prerequisites, you can follow these steps to recover its data:
Step 1: Connect your Android phone to your computer via USB cable and open this software to enter its main interface as follows. Here, you will see its two recovery modules. To recover data from your Android device directly, you need to click on Recover from Phone module to continue.

Step 2: This software will identify your Android device automatically and then enter the following Device Ready to Scan interface.
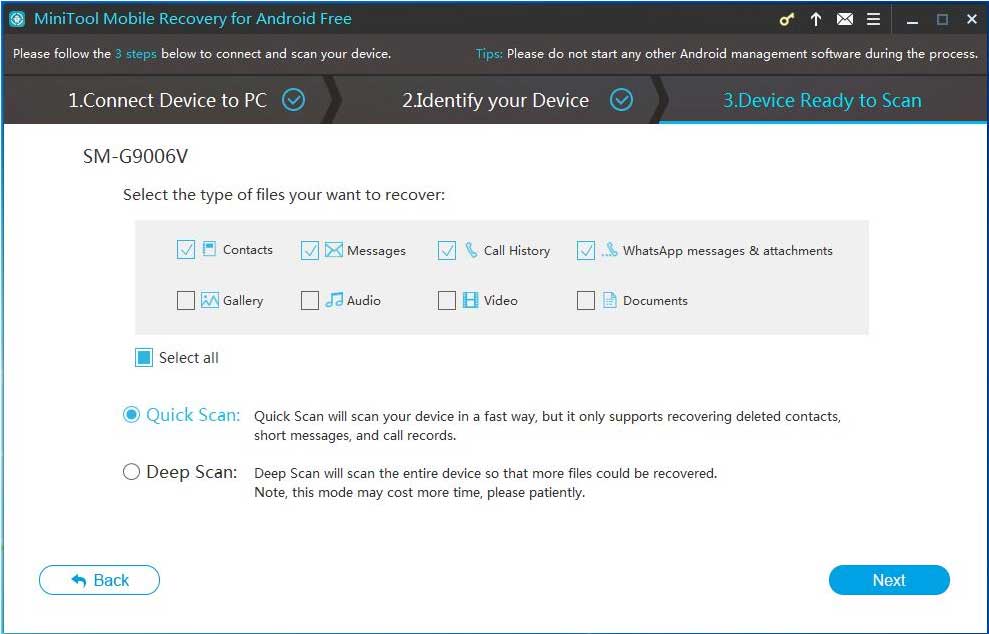
There are two scan methods in the Device Ready to Scan interface: Quick Scan and Deep Scan.
Which one is your choice? Please read the following introduction and choose one scan method according to your own need.
The first scan method Quick Scan is used to recover your text data on your Android device, including contacts, messages, call logs, and WhatsApp messages & attachments. When you choose to use this scan method, these text data types will be checked by default.
But, you are allowed to uncheck the unnecessary data types if you want. In addition, this scan method will scan your Android device in a fast way.
The other scan method Deep Scan will scan your entire Android device and recover all your Android device data.
When you check this scan method, all the data types will be checked by default and you are not allowed to uncheck the data types you don’t want to recover. This scan method will cost you a long time. You should be patient.
Then, you can check one scan method according to your actual situation and click on Next button to continue.
Step 3: When the scan process is completed, you will enter the scan result interface as shown below. On the left side of this interface, you will see the supported recoverable data types list. Here, you can choose one data type from the list and view its result in this interface.
For example, if you want to recover messages from your Android device with unresponsive touch screen, you can click Messages from the left list to make this software only show you the selected data type.
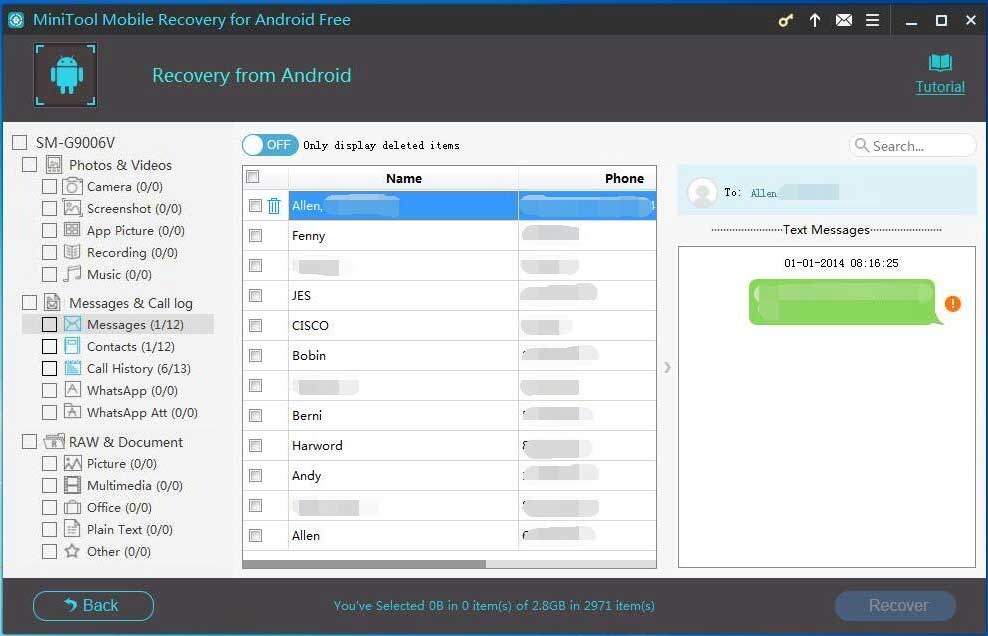
Obviously, you will see that the deleted files are in red and the existing ones are in black. Besides, you are even allowed to preview some types of data, such as photos, messages, contacts, call histories, and more.
Then, you can select the target files you want to recover and click on Recover button to continue.
Step 4: This software will show you a small pop-out window. In this window, you will see a storage path which is specified by this software. If you want to save the selected files to this default location, please just click on Recover button in this small window.
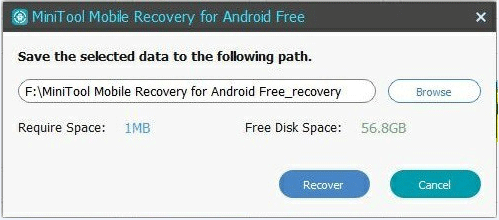
Of course, you can also click on Browse button to choose another location on your computer to save these files.
Step 5: After you click on Recover button to save the selected files, you will see the following pop-out window. In the lower left corner of this interface, you will see a View Result button. You can click on this button to enter the specified storage path and view the recovered Android files directly.

You can see that this software is really useful to recover data from unresponsive Android phone. If your friends are facing this issue, you can share this software with them.
The Free Edition of this software only allows you to recover 10 files of one type each time (please see the detailed introduction in this previous article: Limits in MiniTool Mobile Recovery for Android Free).
If you want to break these limitations to recover more files from your device with unresponsive Android touch screen, you can choose to get an advanced of this software from the MiniTool official site.
As to Android touch screen not working issue, Recover from SD-Card module is not involved to solve this issue.
But, if you want to know how to use this recovery module to recover your Android data from SD card of your phone, you can refer to this post to learn the related information: How Can You Recover Deleted Files from SD Card Android?
Part 3: How to Fix a Touch Screen that Doesn’t Respond
Now, it’s time to tell you how to fix the Android touch screen not working issue. As it is mentioned in the first part, this issue has two situations: software problem and physical damage. So, this part will be divided into two sections accordingly.
Situation 1: Software Problem
Way 1: Try to restart your Android device
If your Android phone or tablet is equipped with a removable battery, you can just take it out, then put it back in and turn on your Android device as usual.
If you don’t have a removable battery, please see the following guidance:
Here, we take Samsung phone as an example. Hold the Power button and Volume Down button at the same time for a while until the touch screen becomes black. After 1 minute or so, please restart your Android device again.
In many cases, the touch screen will return to normal state after you reboot the Android device.
If this problem persists, please try way 2.
Way 2: Remove the SD card & SIM card
Android touch screen not working issue may be caused by faulty Android SD card or SIM card sometimes. In this situation, you can force to power off your Android device (see the steps in way 1), remove the back cover of your Android phone and then take off the SD card & SIM card.
After that, you can restart your Android phone or tablet to check whether its touch screen can work normally or not.
If this way still doesn’t work for you, you can use the third way.
Way 3: Restore your Android device to factory settings
Factory reset will delete all the files and settings on your Android device. To keep your Android data safe, you had better back up your data on the device. Since the Android touch screen doesn’t respond, you are unable to back up the files to your Google Account.
Here, we recommend you to use MiniTool Mobile Recovery for Android to back up your files to your computer. Please refer to this article to do this job: How to Transfer Files from Android to PC Effectively?
Then, you can follow these steps to restore your Android phone or tablet to factory settings.
Step 1: Put your Android phone into Recovery Mode
Different Android devices have different ways to enter Recovery Mode. Here, take Samsung Galaxy S7 as an example: force to shut down your Android device, then press Power, Volume Up and Home buttons at the same time to enter the Recovery Mode.
Step 2: Choose wipe data/factory reset option to make it work
Press Volume buttons to choose wipe data/factory reset option and press Power button to select this option. Then, highlight Yes option and use Power button to confirm it.
Step 3: Quit Recovery Mode to reboot your Android phone
After factory reset process, you will see the Recovery Mode menu again. Next, please use Power button to choose reboot system now option to restart your Android device.
If these three ways can’t help you to fix this issue, you’d better send it to the official store and ask for professional after-sales service.
Situation 2: Physical Damage
If the Android touch screen is cracked or water damaged, you need to replace the damaged touch screen or repair your Android device. Just contact the official manufacturer and do as it tells you.
Part 4: Summary
Until now, you know how to recover data from unresponsive Android phone with the Recover from Phone module of MiniTool Mobile Recovery and different ways to fix the unresponsive Android touch screen. When you are facing Android touch screen not working issue, just try these solutions mentioned in this post to help you out.
Should you have any question when you are using MiniTool Mobile Recovery for Android, you can describe your issue in the email and send it to [email protected] . Meanwhile, you can also leave a message in the following comment area. Any useful suggestions are also appreciated here.
ABOUT THE AUTHOR

Position: Columnist
Stella has been working in MiniTool Software as an English Editor for more than 4 years. Her articles mainly cover the fields of data recovery including storage media data recovery and phone data recovery, YouTube videos download, partition management, and video conversions.
Источник


