- Pagination in Android with Paging 3, Retrofit and kotlin Flow
- Non library approach
- Android Jetpack Paging 3 and Flow
- A comprehensive guide to implementing Modern Paging on Android(JAVA)
- itsdevbrat/Paging2
- You can’t perform that action at this time. You signed in with another tab or window. You signed out in another tab or…
- Paging2 library for Android
- Android RecyclerView Pagination with Paging Library using MVVM, RxJava, Dagger 2 and LiveData
- Paging Library Components
- DataSource
- PagedList
- PagedListAdapter
- Consuming REST API using Retrofit Library with the help of MVVM, Dagger 2, LiveData and RxJava 2…
- This blog is all about implementing REST API in the Android app using Retrofit Library by using MVVM, RxJava 2…
Pagination in Android with Paging 3, Retrofit and kotlin Flow

Haven’t you asked how does Facebook, Instagram, Twitter, Forbes, etc… let you “scroll infinitely” without reach a “end” of information in their apps? Wouldn’t you like to implement something like that?
This “endless scrolling” feature is commonly called “Pagination” and it’s nothing new. In a brief resume, pagination help you to load chunks of data associated with a “page” index.
Let’s assume you have 200 items to display in your RecyclerView. What you would do normally is just execute your request, get the response items and submit your list to your adapter. We already know that RecyclerView by it’s own is optimized for “recycle our views”. But do we really need to get those 200 items immediately? What if our user never reach the top 100, or top 50? The rest of the non displayed items are still keep on memory.
What pagination does (in conjunction with our API) is that it let us establish a page number, and how many items per page can we load. In that way, we can request for the next page of items only when we reach the bottom of our RecyclerView.
Non library approach
Before paging 3, you could have implemented Pagination by adding some listeners to your RecyclerView and those listeners would be triggered when you reach the bottom of your list. There are some good samples about it, here is a video with a vey detailed explanation (it’s on Indi, but it is understandable anyways).
A real PRODUCTION ready example is on the Plaid app. Look at their InfinteScrollListener class.
Android Jetpack Paging 3 and Flow
Today you gonna learn how to implement Pagination by using paging 3 from the android jetpack libraries. For my surprise the codelab of Paging 3 was one of the most easiest I have ever done. Florina Muntenescu did a great job with each step of the codelab, go check it out and give it a try. If you want to go straight to the sample code, check this pull request and see step by step how I implement paging 3 to this project.
Источник
A comprehensive guide to implementing Modern Paging on Android(JAVA)

As far as implementing this topic is concerned there are tutorials out there, but most of them are incomplete, with no ins and outs explained. Most of them don’t even discuss how can we show a loading spinner while data is being fetched. I have been through that hard time. So let me save yours!
So in this article I will discuss paging along with some advanced topics
- How to implement multiple view types
- Show a loading spinner when data is being fetched
And thats all there is to learn in this library.
itsdevbrat/Paging2
You can’t perform that action at this time. You signed in with another tab or window. You signed out in another tab or…
Well, you can directly use the code to quickly plugin this feature into your app, or else you can continue reading to further understand the topic.
Let’s start by quickly understanding what paging is?
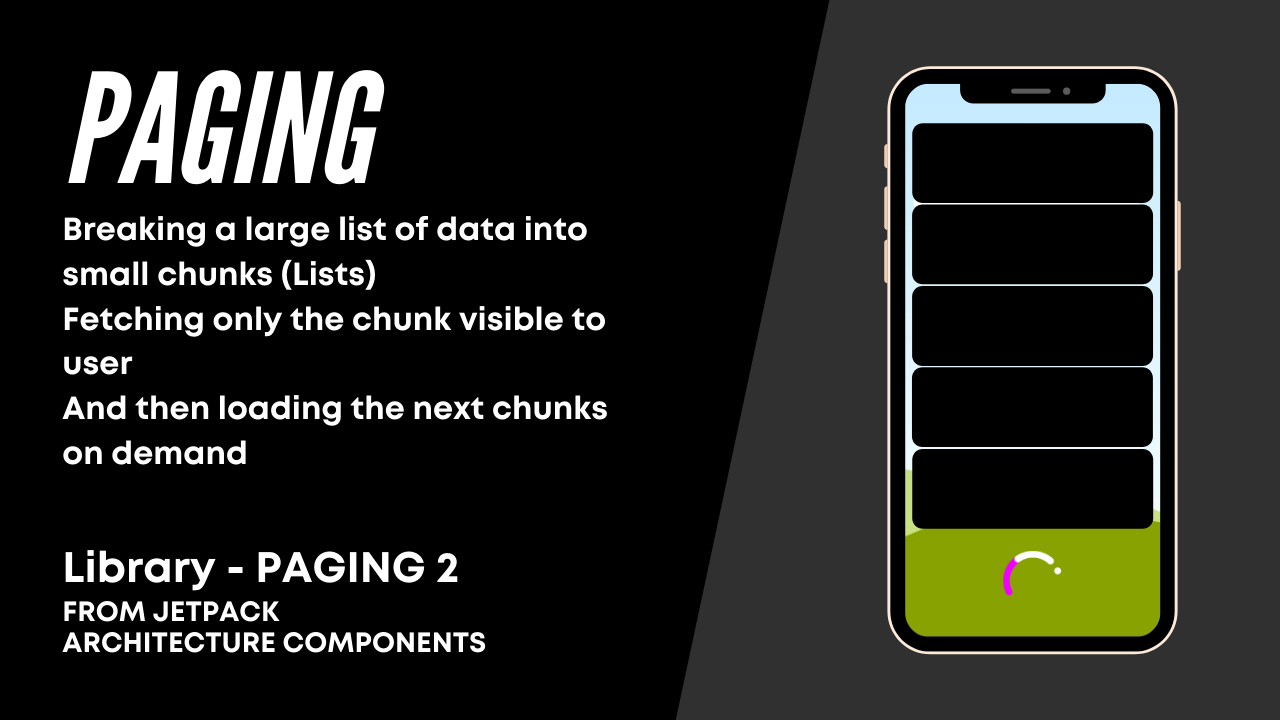
So basically if you have thousands of items to show in your Recycler View, it doesn’t make sense to download all the thousands of items in one network call.
- Will utilize too much bandwidth
- User can hardly see 5 to 10 items at a time
So that’s where we do pagination or paging, we only download a small chunk, for eg: 10 items at a time, and if the user reaches towards 10th item download the next 10 items and keep doing this.
At this point, if you think that “Oh!, Its quite simple to implement, attach a recycler scroll listener to the recycler view, and if the user reaches the end of the first 10 posts make a back-end call, fetch and load the next 10 posts and so on” Well, this is correct and this is how we used to implement paging on android before the paging library was introduced by google. So you might be thinking then why a library was introduced for this.
Well, there were some gotchas with the previous implementation!
- Lots of network call duplication
- Memory inefficiency
That’s why folks at google created a library specifically for this as a part of Android Jetpack Architecture Components.
Well, there is a Paging3 library introduced by google but that’s a Kotlin first library and I tried to port it to JAVA but I was not able to as some of the Kotlin features were not present in JAVA
So for JAVA developers, I guess we have to go with Paging2 for now.
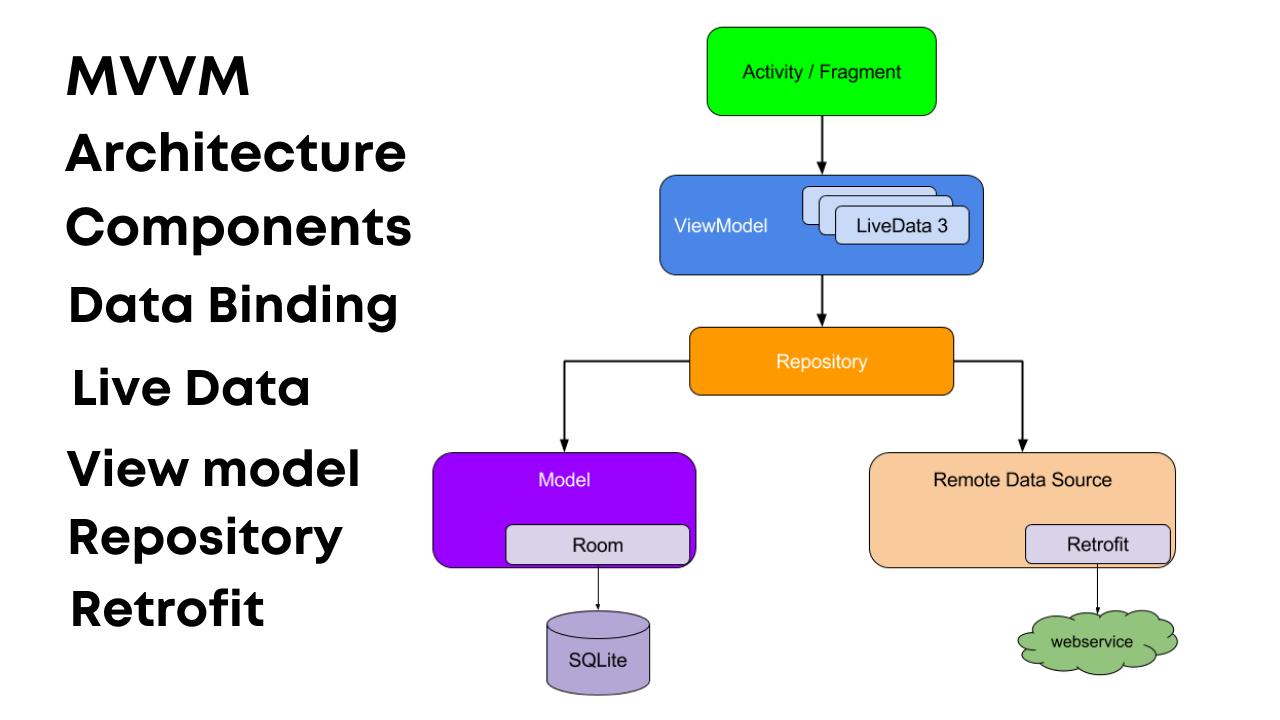
Disclaimer: If you are hearing Jetpack Architecture Components for the first time or if you are not aware of the terms in the below diagram, I would suggest you to start learning about these and come back.
Building android apps with Jetpack Architecture Components is a modern way of creating Android Applications that are efficient, performant, and has fewer lines of code
Before starting with Paging Library there is one fundamental topic I want you to be clear upon and that’s the evolution of Recycler-View Adapters in android

From the above classification, we can conclude that if you are still using recycler adapter for your recycler views you need to level up and start using a list adapter instead, as a list adapter forces you to write an efficient recycler view.
“But wait, we were implementing paging right then why this topic?” Because to implement paging we can’t use this simple recycler adapter not even a list adapter we have to use a PagedListAdapter and this is nothing but a further extension to the list adapter however with an identical implementation. So, now we’ve got our fundamentals clear now we can move on to understanding the Paging2 library
Paging2 library for Android
So there will be a total of 6 important components that we’ll have to understand and implement.

As from the name itself you would have figured out that this component is going to supply us the data for the recycler view.
So, from where is the data source gonna get the data? Well, that could be any source either from a web API or a local database.
However, in this library, we have 3 types of data sources and based on our use -case we have to choose one.

We use this data source when we have to load data at arbitrary positions, i.e when there is a possibility that the user first loads the first 10 items(1–10) and then jumps to a position where it should load the next 10 items starting from let’s say 70th item(70–80).
for eg: A contacts app.

2. Item Keyed Data Source
We use this data source when the next chunk of data to load depends on the last item in the current chunk loaded.

3. Page Keyed Data Source
We use this data source when the chunks are given page numbers.
For eg: see the below animation

For this article, I am going to use the page keyed data source as it is very commonly implemented in most APIs out there. The API that we are going to use for this implementation is a custom JSON Placeholder API. However, you have to just change the URL according to your API endpoint rest all will be the same.
This API returns a list of 20 posts based on the page number provided as a query parameter.
Lets look at the DataSource class,
PostsDataSource extends PageKeyedDataSource which has 3 methods that we have to override
And in all these 3 methods
We have to perform 2 basic steps,
- Make and API call
- Once the response is available pass it to the callback.onResult(…) method
Lets look at these 3 methods now,
- loadInitial(..): This method is called only once and is called to fetch the first page.
- loadAfter(…):This method is called to make an API call to download the next page data (after the current page) as the user reaches towards end of the current page.
- loadBefore(..): This need not be implemented as previous pages have already been loaded.
To show a loading spinner when data is being fetched we have a MutableLiveData that holds the loading state.
Based on this loading state value we will later in our PagedListAdapter decide which viewType to show,
- Loading state is ONGOING or FAILED we will show a LoadingView.
- Loading state is SUCCESS we will show the PostView.
This component is there to create an instance of the above-selected data source in our case a P ageKeyedDataSource instance
Why not create the instance directly using the new keyword? Well, this has to do with implementing clean architecture using factory design pattern in java. ( Using a factory class to instantiate an object is one of the 23 design patterns)
Well, the code is commented well, and is self explanatory.
Well, if you have ever implemented MVVM in android you might know about this component. Still, for those who don’t know, this component’s main functionality is to abstract away the implementation details of how to fetch the data and whether to fetch data from the internet or local database.
In our implementation, this will create a PostDataSource instance using PostDataSourceFactory create(..) and will return an instance of a PagedList based on the PagedListConfig passed.
PagedListConfig is basically the configuration of how many items to download in each page which is decided by pagesize, how many pages to fetch for the first load of Recycler-View items and many more.
Paged list is like an ArrayList (as this also implements AbstractList) which holds chunked data (pages) from a data source.
This component is the mediator between the data layer (repository) and the UI layer (activity/fragment).
It calls the repository to get the data as a paged list and pass it to the activity or fragment.
This component is responsible to get the data as a paged list from the view model component and create an instance of a PagedListAdapter and pass the paged list that it receives from the ViewModel to the PagedListAdapter.
As we discussed at the start of the post that we will have to use a PagedListAdapter to implement paging using the Paging2 library.
Well, the implementation is identical to RecyclerAdapters implementation hence doesn’t need much explanation.
However as promised at the start of article we will discuss how to implement multiple viewTypes and show a loading spinner when data is being fetched
Well getaItemViewType(..) method is used to implement multiple viewTypes.
For eg: in our implementation we are using this method to show 2 viewTypes one is the Post view and the other is loading view
- If we are at the last position of current page and loading state is either ONGOING or FAILED we show a loading spinner
- Else we will show the Post view
Now let’s have a look at the overall data flow

- The ViewModel triggers the repository method to create the PostDataSource using the PostDataSourceFactory.
- The data is fetched by the DataSource and is passed on to DataSourceFactory.
- BoundaryCallback is a function that triggers fetching of pages for the first time it calls loadInitial (…) and then loadAfter(…) method as the user reaches to the end of the page being displayed each and every time.
- The data is in turn passed to Repository and a PagedList is built out of it.
- This PagedList is then passed on to the UI layer through the ViewModel where the PagedListAdapter takes care of displaying the data.
Finally let’s have a look at our folder structure
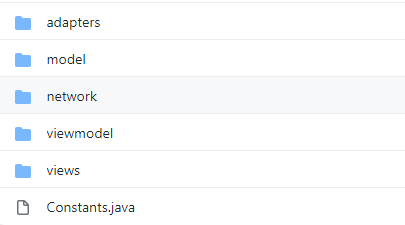
1. Adapters will have the PostRecyclerAdapter, LoadingViewHolder, and PostViewHolder classes
2. The model folder will have PostDataSource in the datasources folder, POJO for a Post in entities folder, and PostRepository in the repositories folder.

3. The network folder has the Api interface and RetrofitClient implementation
4. The viewmodel folder will have the MainActivityViewModel and MainActivityViewModelFactory classes
5. The views folder will have the MainActivity class
6. Constants file to hold any constants to be used throughout the project. We are currently storing the load state constants i.e ONGOING, FAILED, and SUCCESS
Well, I have discussed all the fundamentals along with 6 important components that you will need to implement to perform paging.
However there are few things that I haven’t discussed as they are pretty easy and fall under normal android development topics,
- The retrofit implementation for performing network calls
- The XML for activity/fragment or the recycler view item
- The MainActivityViewModelFactory class to instantiate the MainActivityViewModel
So, hope you liked this. If you have any suggestions or improvements that I should do in my articles let me know them in the comments section.
Источник
Android RecyclerView Pagination with Paging Library using MVVM, RxJava, Dagger 2 and LiveData

At Google I/O this year we saw the introduction of Paging Library, a part of Android Jetpack and an Architecture Component to load data in an efficient way within your app’s RecyclerView. While consuming REST API if we are getting data on a large scale but we want to show data in a portion at a time when we will go for pagination logic. Before Paging Library we usually used to handle pagination using onScrollListner etc. in RecyclerView but to implement this we include much more logic for paging data and displaying lists, to notify our RecyclerView. To get rid of all these hectic logic what we always used to keep in mind while developing app a new concept introduced by Google and i.e. Paging Library.
Several advantages of using Paging Library are:
1. Data requests consume less network bandwidth and fewer system resources. Users who have metered or small data plans appreciate such data-conscious apps.
2. Even during data updates and refreshes, the app continues to respond quickly to user input.
Paging Library Components
Paging library consists of three main component and these are…
DataSource
Datasource is the base class for loading data. There is the various way to load data into your list, you can use it by extending any one of its 3 subclasses and these are…
PageKeyedDataSource
If you want to load data based on the page number in the DataSource than you can use PageKeyedDataSource. We will have to increment page number sequentially until all pages loaded successfully.
ItemKeyedDataSource
This type of DataSource used where you need to load data of a page which required data from the previous page. For example, suppose you want to load chat data of element N and you need chat_id of element N-1.
PositionalDataSource
It will be useful for sources that provide a fixed size list that can be fetched with arbitrary positions and sizes means use PositionalDataSource if you are loading pages of a requested size at arbitrary positions, and provide a fixed item count.
PagedList
PagedList is a wrapper list that holds your data items and tells the DataSource when to load the elements or you can say it is a list which loads its data in chunks (pages) from a DataSource. Items can be accessed with get(int) and further loading can be triggered with loadAround(int). To display data from PagedList we will use PagedListAdapter.
Creating PagedList loads the first chunk of data from the DataSource immediately, and should, for this reason, loading be done on a background thread.
PagedList.Config is used to control when and how many items PagedList loads.
PagedListAdapter
This class is responsible for presenting data loaded by PagedList and it is the implementation of RecyclerView.adapter. It uses DiffUtil as a parameter to calculate data differences and do all the updates for you.
when a new page is loaded, the PagedListAdapter signals the RecyclerView that the new data has arrived, this lets the RecyclerView replace any placeholders with the actual items.
These were the basic concept about the component of Paging Libary. Let’s start with coding part how to use these in the real world. I will use MVVM, RxJava, LiveData and Dagger in sample app for Paging Library implementation if you are not aware of these concept then you are requested to refer to my previous article (link is mentioned below) which will be very useful for understanding how to use MVVM , RxJava, LiveData, Dagger with Rest Api call using Retrofit.
Consuming REST API using Retrofit Library with the help of MVVM, Dagger 2, LiveData and RxJava 2…
This blog is all about implementing REST API in the Android app using Retrofit Library by using MVVM, RxJava 2…
Let’s start code, I will fetch article from news API and show you just title and image of each news article, have a quick look of the app’s Gradle.
To implement Paging Library first we add a dependency in our app’s gradle file.
Here in gradle file, you can see I used multiple dependencies for different library and I also enabled dataBinding to true for implementing binding in my adapter class. To learn about data-binding in deep refer to this link. I will just show you its implementation.
Now move further in code, first of all let me show you a few important classes before moving DataSource/PagedListAdapter class implementation.
This is repository class where we just write methods for fetching articles.
This is ApiCallInterface where we used Retrofit to hit API.
In Urls class, we just added the required URL for fetching news articles.
In Constant class the most important thing is the API_KEY, you will have to generate your own API_KEY to fetch the news articles. Please go to this link and generate your API_KEY by clicking on Get API Key and use it. I used sources[] to just fetch news article from 4 to 5 sources you can change it but there is no need to change it to just test it.
Look at UtilsModule.java, I used this class for injecting objects, that means you create the object once and reuse it throughout your application where required and by just inject that object, there is a lot of way of dependency injection but here we will use Dagger API.
I used here dagger:2.13 for dependency injection , you can learn more from this article about dagger.
You have to create a module class using annotation @Module which will create objects by using @Provides and @Singleton annotation. I created here few objects those are needed for this project. For instance, to consuming rest API you need to have the retrofit object so I create here Retrofit object and we will inject it wherever it needed like “@Inject Retrofit retrofit”.
Let’s come on the DataSource and PageListAdapter classes. Since we have to fetch news article from API and loading 10 records in a single page and increment page number sequentially. To achieve this we simply use PageKeyedDataSource as I discussed earlier when to use which one of the three subclasses of DataSource.
Before implementing PageKeyedDataSource we write the implementation of DataSource.Factory class which will interact with ViewModel directly and provides the response using LiveData.Let’s see code implementation…
DataSourceFactory is responsible for retrieving the data using the DataSource and PagedList configuration which we will create later in this article in our ViewModel class.
Now have a look at DataSource implementation.
The following code shows how we can create PageKeyedDataSource for our NewsDataSourceClass class to fetch news article.
When we extend PageKeyedDataSource, there will be three method override i.e. loadInitial(LoadInitialParams,LoadInitialCallback), loadBefore(LoadParams, LoadCallback) and loadAfter(LoadParams,LoadCallback). First DataSource class will execute loadBefore(…) method and just after method loadInitial(…) will execute. We fetched news initially in loadInitial(…) on passing start page number (i.e. 1) as you can see in code. It has a callback.onResult will produce data to add in PagedList.
Callback for loadInitial(LoadInitialParams,LoadInitialCallback) to return data and, optionally, position/count information. A callback can be called only once and will throw if called again.
If you can compute the number of items in the data set before and after the loaded range, call the three parameter onResult(List, int, int) to pass that information.
It is always valid for a DataSource loading method that takes a callback to stash the callback and call it later. This enables DataSources to be fully asynchronous, and to handle temporary, recoverable error states (such as a network error that can be retired).
Let’s come on ViewModel implementation.
In our ViewModel class, we used the PagedList.Config i.e.
Here we are loading just 4 pages and each page containing 10 records. PagedList’s Builder class contain few important methods and they are used while building PagedList.Config. It Configures how a PagedList loads content from its DataSource.
We used .setEnablePlaceholders(true) which show enablePlaceholders it means there is a placeholder that is visible to the user until the data is fully loaded. So for instance, if we have 10 items that are needed to be loaded and each item contains an image when we scroll through the screen, we can see placeholders instead of the image since it is not fully loaded.
We used .setInitialLoadSizeHint(10) that shows size hint for the initial load of PagedList, often larger than a regular page.in our case, it is 10.
The last method we used is .setPageSize(10) that means the number of items to load in the PagedList or size of each page loaded by the PagedList.
After configures a PagedList now time to build it with DataSource.Factory using LivePagedListBuilder. It creates a LivePagedListBuilder with required parameters i.e. DataSource.Factory and a PagedList.Config . build() method of LivePagedListBuilder will constructs the LiveData
and we will observe constructed LiveData
in our activity. If you will look in above code implementation you will see a listLiveData object of type LiveData
> is used to achieve this and it is being observed in our activity.
There is another LiveData progressLoadStatus, we are using it to show progress status in our UI. And its implementation is …
We used here Transformations.switchMap it is basically transformations for a LiveData class. You can use transformation methods to carry information across the observer’s lifecycle. The transformations aren’t calculated unless an observer is observing the returned LiveData object.
Because the transformations are calculated lazily, the lifecycle-related behavior is implicitly passed down without requiring additional explicit calls or dependencies.
In our code implementation we show you in NewsDataSourceClass that we used a livedata object to just put the status of loading data and that we are observing in our UI by using switchmap in ViewModel which indicates that whenever livedata of NewsDataSourceFactory class will change it will fetch current status of progress and put into progressLoadStatus which will be observed in activity. I will show you activity code implementation than it will be more clear.
Now move further in our Activity code implementation. Below is the Activity class implemented for this project.
In PagingDemoAct we are observing LiveData and submitting it to the adapter by using a submitList method which is part of PagedListAdapter, and we are also observing progress status for loading chunk of data for a page.
Now have a look of our adapter class.
Here I am extending PagedListAdapter as I discussed at the beginning of this blog that to implement paging library I will use PagedListAdapter. In adapter class, I am setting just image and title of the article.
PagedListAdapter is an implementation of RecyclerView.Adapter that presents data from a PagedList. It uses DiffUtil as a parameter to calculate data differences and do all the updates for you.
The DiffUtil is defined in the new model class Class in my sample app scenario, see its code implementation…
I am just comparing the title of the article to differentiate news article. One more thing that I used the data-binding library to bind data to UI.
You can refer to this article to know more about data-binding.
As I am not mentioning my API_KEY in sample project, so please go to this link and generate your API_KEY by clicking on Get API Key and use it by putting it into Constant class.
That was all about this article, give a clap if you like the article. You can refer to more article for reference.
Источник


