- [Guide][Android-x86] Mount Internal Windows Partition (NTFS) in Android-x86
- Breadcrumb
- jemshi101
- How To: Re-partition Your Android Tablet Or Smartphone? (All Options Included: Change Size, FS Type, Etc…)
- Why Re-Partition?
- Requirements
- Partitioning Steps
- Explaining The Steps
- Important Things To Note:
- Partition Layout
- About system-only OTAs
- Using vendor overlay
- Implementing vendor overlay
- Vendor overlay implementation example
- Validating vendor overlay
- Updating to system-as-root
- Updating partitions
- Setting up dm-verity
- vboot 1.0
- vboot 2.0
- Using device-specific root folders
[Guide][Android-x86] Mount Internal Windows Partition (NTFS) in Android-x86
Breadcrumb

jemshi101
Senior Member
Mount Internal Windows Partition (NTFS) in Android-x86.
Android-x86 project is one of the new and exciting offshoot of Android platform solely developed by the community. Our Android community has contributed very heavily for the development of Android as one of the most loved platform for both users and the development community as a whole. Custom ROMs such as CyanogenMod, OmniROM, SlimRom, AOKP, Paranoid Android and many more community developed ROM’s rock our beloved devices, including latest flagships to aged Legends such as HTC HD2, Motorola Defy(+). One such community developed Android ROM is the Android-x86 Project.
Android-x86 project aims porting the android experience as whole to the x86 architecture platform. This includes our laptops, desktops and x86 based tablets. Although android is a mobile platform specifically developed for phones, tablets and newly introduced wearable devices such as smart watches and Google Glass eyewear, google has not introduced the android as an operating system into the desktop-laptop segment. Google is sticking with its Chrome OS for desktops and is now trying to introduce android app to the Chrome OS. Android-x86 project patches that gap for us.
Android-x86 is like an elixer for our old desktops and laptops wiith lower capability processors and rams, such as pentium and atoms by introducing a modern OS with a lower requirement. It gives those devices a new life. But it is also not perfect yet and has many drawbacks. One such drawback is that it can’t mount the internal NTFS partitions of the HDD, in case of the Multibooting Android-x86 with Windows Operating Systems. Many has tried it before but failed. Recently I came upon a chinese website which depicted a process of mounting internal ntfs partitions using a library named mount_nfsd_fuse.
Steps :
1. Download the mount_nfsd_fuse file from the download link provided below or here
2. Place the the downloaded file in the /system/xbin/ folder using a root enabled file manaager, eg. ES File Explorer, Root Explorer and and change to approriate permission.
3. Open Terminal ( If no terminal app installed, download one from Google Play), and obtain Su permission.
4. Mount the NTFS partitions using the code for example :
mkdir /storage/D
mount_nfsd_fuse /dev/block/sda2 /storage/D
format : mount_nfsd_fuse /dev/block/(partition) /(mount point)
5. (Optional) You can automate the process of mounting on boot by adding these lines to the /etc/init.sh file.
6. You can make a Windows style My Computer Icon using ES explorer widget pointing to the mounting folder such as in my example /Storage use it as a my computer alternative for android.
NOTE : All internal HDD partitions are stored at /dev/block/ folder. And so far I have failed mounting C drive , sda1, and sda10 partitions. Feel free to poke around.
Disclaimer : I’m note the developer of this tool and i take no responsibility for any damages caused.
Источник
How To: Re-partition Your Android Tablet Or Smartphone? (All Options Included: Change Size, FS Type, Etc…)
A general and inclusive walk-through on how to re-partition an Android device: create, delete or resize partitions, change file system types, labels and more… The guide before you consists of 2 parts: The first – a general explanation regarding the partitioning process and the tools needed. The second part – a live example of how
The guide before you consists of 2 parts:
- The first – a general explanation regarding the partitioning process and the tools needed.
- The second part – a live example of how it’s done on a real device (physical, as opposed to virtual) with genuine screenshots.
Note: as much as I’d like to, I do not currently possess the resources to grant readers technical support. The guide itself, in the vast majority of cases should be sufficient help. For any individual issue please refer to online forums which are meant for that purpose.
Why Re-Partition?
If you’re here out of curiosity or any other reason than necessity, you may wonder: “why would anyone want to repartition a smartphone / tablet?”.
To answer, each person probably has their own reason, a couple of such I can think of are:
- In the case of an upgrade, when there’s not enough space on one partition but others has aplenty.
- When you don’t have enough space to install more apps – since your data partition is full – so you want to resize that partition.
Of course, some cases can be resolved via a more simple solution, however, if you want to deal with the problem directly and not just bypassing it – repartition is perhaps the best way to go.
On the same note though, I must warn anybody who tries repartitioning his/her Android device.
Requirements
– ADB (Android Debug Bridge) installed – the reason we use ADB is it gives us a wider range of options in comparison to other software, such as Odin for instance, which only has limited set of features when it comes to repartitioning.
– Partitioning tool – you may already have one installed on your device by default (I’ll explain later where to look for it), but just in case you haven’t here’s one for ARM 32-bit:
Note, if you’re unsure about the architecture type of your device, you may try look for it online or use Android system info apps like this one.
– CLI (Command Line Interface) familiarity – the guide revolves around executing various commands in order to go through the partitioning process. There’s no GUI (Graphical User Interface) software that can achieve the same results at the moment.
– Backup (Optional) – I recommend you backup everything prior to making any changes.
Partitioning Steps
In order to re-partition your device, basically, these are the steps you’ll need to make:
1. Connect your device to your PC.
2. Open up a command shell, on Windows you’d probably use CMD / PowerShell, on Mac / Linux – Terminal.
2-a. Reboot into recovery mode. (Optional, depends on the partition you plan to modify)
3. Use ADB to connect to your device.
4. Launch a partitioning software.
5. Start partitioning.
6. Reinstall any required system file in case you’ve deleted those and afterwards you may exit the shell and reboot your device.
Explaining The Steps
1. We use another machine, in this case our PC, in order to re-partition Android, because we want to have access to our Android system just in case something goes wrong during the partitioning, and also, since Android system cannot be run and resized at the same time.
2. This step is rather self explanatory. We must use a flexible tool that will assist us re-partitioning.
2-a. If you wish to modify any partition other than the recovery partition, I recommend booting into recovery mode in order to do so.
Being inside recovery mode wouldn’t interfere with the process as you may delete the system partition and its files. Furthermore, it might become handy in case you’ll need to reinstall Android system.
3. ADB is an official Android developers tool and it also happens to be the most suitable tool for the job at the moment.
To make sure ADB recognizes your device, issue:
If you’re device is recognized you’ll see output similar to this:

Check that ADB recognizes your device
To connect to your device you issue both:
adb root
adb shell
You should see a new command line host-name with a “#” sign next to it which indicates you’re connected as root user.
Note, you may need to navigate the command line shell into adb directory prior to issuing the commands.
4. In this step we launch the partitioning program we’re going to use by typing the name of the program and the right path to the block where our partitions lie (some devices may have more than one block).
Type fdisk /PATH/TO/DEVICE/BLOCK or parted /PATH/TO/DEVICE/BLOCK.
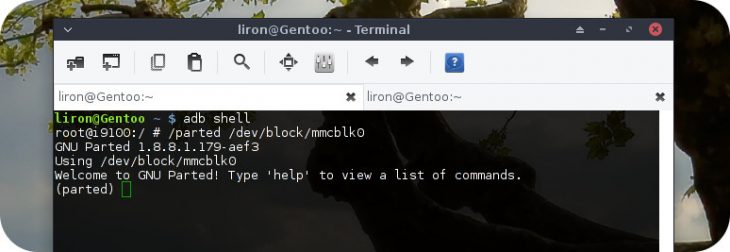
In case you get an output similar to the following in return: /sbin/sh: parted: not found then it means parted tool is probably not installed.
Look for partitioning tools inside /sbin directory (or /system/bin if it’s mounted), and use what you find in there.
If you don’t have any partitioning tool pre-installed on your device, you may use the one mentioned in the ‘Requirements’ section if your device is of similar architecture, otherwise, google for a suitable one online.
To install the partitioning tool on your device, first exit the device shell (type exit, press enter), then issue the following (extract the file in case it is compressed prior to doing so):
adb push /LOCATION/OF/PARTITIONING-TOOL /DESTINATION/OF/PARTITIONING-TOOL
This will install the partitioning tool on your device where it’ll remain until you reboot (upon reboot, Android automatically deletes unfamiliar files).
If Android complains you don’t have writing permissions to push the program into it, execute:
adb shell mount -o remount,rw /
This should remount the file system root directory with read & write permissions.
5. Step 5 may seem the shortest of all the above steps but it’s actually the longest and most important one.
Since this step depends on what you’re actually intending to do with your device – it doesn’t say much, it is an open step, open for your decisions that is.
By typing the help command of your partitioning tool you’ll get a list of the options available to you. For example, these are a few of the options you’ll see in parted:
- rm NUMBER – will delete a partition
- mkpart – will create a partition
- unit UNIT – will set unit type, for example “unit b” will set parted to use bytes, “unit gb” for Giga bytes, etc… (Tip: use bytes for maximum accuracy).
- name NUMBER NAME – lets you name the partition (upon making any changes, don’t forget to name the partitions properly).
- q – quit parted.
Important Things To Note:
- fdisk executes your commands only when changes are saved whereas Parted executes them instantly.
- fdisk may not fully support GPT partition table, thus in case yours is GPT, it’s recommended to use Parted instead.
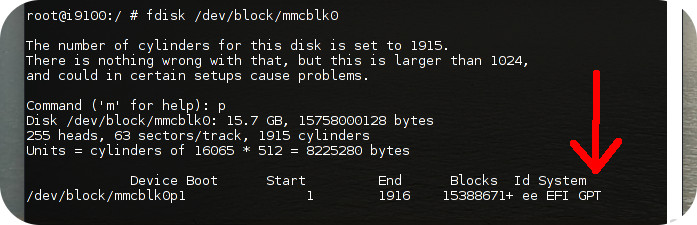
fdisk indicates a GPT table
6. When you’re done partitioning, reinstall required system files by using the recovery mode options available on the device, and only then exit the shell and reboot. Otherwise, you may not be able to boot at all. 🙁
Check out page #2 for a step by step example.
Источник
Partition Layout
In Android 10, the root file system is no longer included in ramdisk.img and is instead merged into system.img (that is, system.img is always created as if BOARD_BUILD_SYSTEM_ROOT_IMAGE was set). Devices launching with Android 10:
- Use a system-as-root partition layout (automatically enforced by the build with no options to change the behavior).
- Must use a ramdisk, which is required for dm-linear.
- Must set BOARD_BUILD_SYSTEM_ROOT_IMAGE to false . This setting is used only to differentiate between devices that use a ramdisk and devices that don’t use a ramdisk (and instead mount system.img directly).
The meaning of a system-as-root configuration differs between Android 9 and Android 10. In an Android 9 system-as-root configuration, BOARD_BUILD_SYSTEM_ROOT_IMAGE is set to true , which forces the build to merge the root file system into system.img then mount system.img as the root file system (rootfs). This configuration is mandatory for devices launching with Android 9 but is optional for devices upgrading to Android 9 and for devices running lower versions of Android. In an Android 10 system-as-root configuration, the build always merges $TARGET_SYSTEM_OUT and $TARGET_ROOT_OUT into system.img ; this config is the default behavior for all devices running Android 10.
Android 10 makes further changes to support dynamic partitions, a userspace partitioning system that enables over-the-air (OTA) updates to create, resize, or destroy partitions. As part of this change, the Linux kernel can no longer mount the logical system partition on devices running Android 10, so this operation is handled by the first stage init.
The following sections describe the system-as-root requirements for system-only OTAs, provide guidance on updating devices to use system-as-root (including partition layout changes and dm-verity kernel requirements). For details on changes to ramdisk, see Ramdisk Partitions.
About system-only OTAs
System-only OTAs, which enable Android releases to update system.img and product.img without changing other partitions, require a system-as-root partition layout. All devices running Android 10 must use a system-as-root partition layout to enable system-only OTAs.
- A/B devices, which mount the system partition as rootfs, already use system-as-root and don’t require changes to support system OTAs.
- Non-A/B devices, which mount the system partition at /system , must be updated to use a system-as-root partition layout to support system OTAs.
For details on A/B and non-A/B devices, refer to A/B (Seamless) System Updates.
Using vendor overlay
Vendor overlay allows you to overlay changes to the vendor partition at device boot time. A vendor overlay is a set of vendor modules in the product partition that get overlaid on the vendor partition when the device boots, replacing and adding to the existing modules.
When the device boots, the init process completes the first stage mount and reads the default properties. Then it searches /product/vendor_overlay/ and mounts each subdirectory on its corresponding vendor partition directory, if the following conditions are met:
- /vendor/ exists.
- /product/vendor_overlay/ / has the same file context as /vendor/ .
- init is allowed to mount on the file context of /vendor/ .
Implementing vendor overlay
Install vendor overlay files in /product/vendor_overlay/ . Those files overlay the vendor partition when the device boots, replacing files of the same name and adding any new files. Vendor overlay can’t remove files from the vendor partition.
Vendor overlay files must have the same file context as the target files they replace in the vendor partition. By default, the files in the /product/vendor_overlay/ directory have the vendor_file context. If there are file context mismatches between vendor overlay files and the files they replace, specify that in the device-specific sepolicy. File context is set at the directory level. If the file context of a vendor overlay directory doesn’t match the target directory, and the correct file context isn’t specified in the device-specific sepolicy, that vendor overlay directory isn’t overlaid onto the target directory.
To use vendor overlay, the kernel must enable OverlayFS by setting CONFIG_OVERLAY_FS=y . Also, the kernel must be merged from the common kernel 4.4 or later, or patched with «overlayfs: override_creds=off option bypass creator_cred» .
Vendor overlay implementation example
This procedure demonstrates implementing a vendor overlay that overlays the directories /vendor/lib/* , /vendor/etc/* , and /vendor/app/* .
Add prebuilt vendor files in device/ / /vendor_overlay/ / :
Install the prebuilt vendor files to product/vendor_overlay in device/google/device/device.mk :
Define file contexts if the target vendor partition files have contexts other than vendor_file . Because /vendor/lib/* uses the vendor_file context, this example doesn’t include that directory.
Add the following to device/google/device-sepolicy/private/file_contexts :
Allow the init process to mount the vendor overlay on file contexts other than vendor_file . Because the init process already has permission to mount on the vendor_file context, this example doesn’t define the policy for vendor_file .
Add the following to device/google/device-sepolicy/public/init.te :
Validating vendor overlay
To validate the vendor overlay configuration, add files in /product/vendor_overlay/ / and check if the files are overlaid on the files in /vendor/ .
For userdebug builds, there is a test module for Atest:
Updating to system-as-root
To update non-A/B devices to use system-as-root, you must update the partitioning scheme for boot.img and system.img , set up dm-verity, and remove any boot dependencies on the device-specific root folders.
Updating partitions
Unlike A/B devices that repurpose /boot as the recovery partition, non-A/B devices must keep the /recovery partition separate as they don’t have the fallback slot partition (for example, from boot_a to boot_b ). If /recovery is removed on non-A/B device and made similar to the A/B scheme, recovery mode could break during a failed update to the /boot partition. For this reason, the /recovery partition must be a separate partition from /boot for non-A/B devices, which implies that the recovery image will continue to be updated in a deferred manner (that is, the same as in devices running Android 8.1.0 or lower).
The following table lists image partition differences for non-A/B devices before and after Android 9.
| Image | Ramdisk (before 9) | System-as-root (after 9) |
|---|---|---|
| boot.img | Contains a kernel and a ramdisk.img : | Contains a normal boot kernel only. |
| recovery.img | Contains a recovery kernel and a recovery ramdisk.img . | |
| system.img | Contains the following: | Contains the merged content of original system.img and ramdisk.img : |
The partitions themselves don’t change; both ramdisk and system-as-root use the following partition scheme:
Setting up dm-verity
In system-as-root, the kernel must mount system.img under / (mount point) with dm-verity. AOSP supports the following dm-verity implementations for system.img .
vboot 1.0
For vboot 1.0, the kernel must parse Android-specific metadata on /system , then convert to dm-verity params to set up dm-verity (requires these kernel patches). The following example shows dm-verity related settings for system-as-root in kernel command line:
vboot 2.0
For vboot 2.0 (AVB), the bootloader must integrate external/avb/libavb, which then parses the hashtree descriptor for /system , converts it to dm-verity params, and finally passes the params to the kernel through the kernel command line. (Hashtree descriptors of /system might be on /vbmeta or on /system itself.)
vboot 2.0 requires the following kernel patches:
The following example shows dm-verity related settings for system-as-root in kernel command line:
Using device-specific root folders
With system-as-root, after the generic system image (GSI) is flashed on the device (and before running Vendor Test Suite tests), any device-specific root folders added with BOARD_ROOT_EXTRA_FOLDERS are gone because the entire root directory content has been replaced by the system-as-root GSI. The removal of these folders might cause the device to become unbootable if a dependency on the device-specific root folders exists (for example, they’re used as mount points).
To avoid this issue, don’t use BOARD_ROOT_EXTRA_FOLDERS to add device-specific root folders. If you need to specify device-specific mount points, use /mnt/vendor/ (added in these changelists). These vendor-specific mount points can be directly specified in both the fstab device tree (for first-stage mount) and the /vendor/etc/fstab.
Content and code samples on this page are subject to the licenses described in the Content License. Java is a registered trademark of Oracle and/or its affiliates.
Источник


