- Moving images on the screen in Android
- Android Game Development – Moving Images on Screen
- How to move photos on your phone to a microSD card
- Products used in this guide
- How to change directories in the camera app
- How to move photos you’ve already taken to a microSD card
- Time for more photos
- Picking the right microSD card for photography
- Best value for microSD
- Samsung EVO Select (256GB)
- Manage your files on your phone
- Solid Explorer File Manager (Free w/IAPs at Google Play Store)
- These are the best microSD cards you can buy for Android
- Expand your Galaxy S10 storage with these microSD cards
- These are the best microSD cards for the Galaxy S8
- Ara Wagoner
- Jeramy Johnson
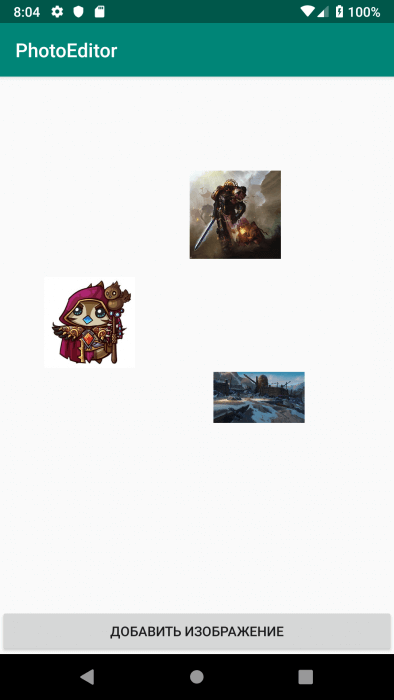
Moving images on the screen in Android
Moving various objects is often used in mobile games and various multimedia applications. In this article, we will look at how to add images to the screen and move them freely.
To do this, we need to perform the following steps:
- Create layout with the FrameLayout component.
- Create an ImageView programmatically for the added image and set it to OnTouchListener
- Define user actions in the onTouch() method
- Change LayoutParams values according to the current ImageView location
First, create a new project with empty activity.
In the activity_main.xml layout, delete the old layout and replace it with the new one. In this case, FrameLayout will be used as a container for added images.
Define the created layout elements in the MainActivity code.
To select and crop added images, we use the uCrop library, which can be found on GitHub. Implement it by adding the following lines to the project’s build.gradle file:
Then, in the build.gradle file of the app module, you need to implement the library itself:
After that, you need to register library activity in the AndroidManifest.xml of the application.
Now you need to get images to add to the application. With the help of intent, we call the file manager, with which we find the appropriate images on the device. To do this, set up button click handler as follows.
To get the Uri of the selected file, you need to override the onActivityResult() method in the activity code, adding the following code to it:
The getFileName() method is used to get the file name from Uri, you can see it in the source code of the project later.
When we have the Uri of the selected file, we can use the uCrop library to crop the image as we need. This can be done using the following lines in the startCrop() method.
After calling start(), library activity will open in which you can work with the image. As soon as the work is finished, the intent with the Uri of the cropped image will return to our activity. In this case, it will be easier for us to access the file itself, since its path and name are known. You can get it all in the same onActivityResult() as follows.
Here we immediately create a new ImageView, to which we set the size and load the Bitmap obtained from the file into it.
Now images are simply added to the screen and you can’t interact with them in any way. To handle touches for images, we add the OnTouchListener variable to the activity code, in which the onTouch() method will be overrided. This method allows you to catch various touches and gestures, but we only need the following user actions:
- User touched image;
- The user moves a finger across the screen;
- The user removed his finger from the screen;
Thus, the processing code will look like this:
Here we determine the current coordinates of the image when the user touches it, then calculate the change in coordinates and update them in the image when the user removes a finger from the image. There is also a condition due to which the image should not go beyond the screen.
Now all that remains is to set this touch handler for the created ImageView in createImageView().
That’s all. Now, by launching the application, we can freely move images around the screen.
Thus, with a few lines of code, you can create a simple application for interacting with images on the screen.
You can view the source code of the application by clicking on the link to GitHub.
Источник
Android Game Development – Moving Images on Screen
Posted by: Impaler in Android Games July 9th, 2011 9 Comments Views
- launch an Android application in full screen
- use a separate thread which controls the application (the game loop)
- load an image from the resources
- acquire the canvas and draw the image onto it
- handle basic touch gestures
The task I’m setting for this entry is simple: have the droid travel through the screen. It should never leave the surface and it should bounce back when it hits the wall which is the edge of the screen.
If you remember the image is just a representation of the droid. So we will modify the droid object and we’ll add some abilities. Just one for the time being. Our droid is movable. It can move. This implies that it has speed. We will vest it with the ability of movement. To achieve this we will add a move() method and this method will just update the X and Y coordinates based on its Speed. Speed will be a class in itself and the Droid will contain it. I will do a concrete implementation now but later on I will be using the Strategy Pattern.
Create the Speed.java class.
We’ll use direction constants to determine the movement direction on the axis. The droid has a vertical and a horizontal speed and at each game update the coordinates are set considering the direction of the movement.
The droid will be allowed to move only on the area of the canvas. That is a rectangle and our 2D coordinate system. Unlike in the math classes the origin is in the top left corner. So for the droid to start from the top left corner of the screen its coordinates will be 0,0. To move in a diagonal line the speed will be 1 for both the X and Y components of the speed vector. To move towards the bottom right the directions will be: 1 (right) for the X axis and 1 (down) for the Y axis.
To have the droid move horizontally the speed of the Y vector must be 0. A value of 0.5 for Y and 1 for X will make the droid travel at a 22.5 degrees to the X axis. Simple geometry.
In the Speed we have the vector components (x and y) and the directions along with the getters and setters. The two methods (toggleXDirection() and toggleYDirection() ) just change the direction with one call. We’ll see later at collision detection (with the wall of the screen) that it is pretty useful.
The game loop (MainThread.java) gets an important modification as it gets the game update method introduced. The following code snippet is the updated run() method which has just one line added:
The run() method:
We will create the corresponding method in the MainGamePanel. This method is in charge of updating the state of all the objects in the application. Currently only the droid. Because the droid is moving we will introduce a basic collision detection with the walls. The logic is simple. Check if the droid is moving towards left then check if the droid’s position is at the wall and if it is then change its direction. Bear in mind that the droid’s position is the center of the image so we need to use the image’s width and height to get the accuracy right.
We also update the position of the droid. To keep the update method simple we delegate the update of the droid’s position to the droid itself. So the droid will get an update method which will keep updating its position if the droid is not being picked up by a touch gesture. Check the previous post for this.
Check the code: MainGamePanel.java
getWidth() and getHeight() return the width and height of the view. The panel is a view, remember?
The Droid.java file’s update() method:
I also changed the render’s name in the MainThread.java so now it is render instead if onDraw. Just that I like it better as it follows the update -> render naming.
Run the application and you should see a screen like the following one with the droid moving in a 45 degrees angle and bouncing off the walls as it hits them. You can also drag the droid around.
To exit the application click (touch) the lower part of the screen.
 |
| Moving Droid |
Download the full source code and eclipse project here.
Reference: Moving Images on the Screen with Android from our JCG partner Tamas Jano from “Against The Grain” blog.
Источник
How to move photos on your phone to a microSD card
 Source: Ara Wagoner / Android Central
We wish all phones came with unlimited storage out of the box, but at least many Android phones have the option to expand that storage with microSD cards. Not every phone supports a microSD card — looking at you, Google Pixel 4 — but for those that do, the microSD card can give you more space for your app data, your music and movies, and, of course, your photos! That said, you can only reap these benefits if you take the time to set up your device to take advantage of it.
Products used in this guide
- Best card for photography: Samsung 256GB EVO Select microSD ($50 at Amazon)
- Third-party file manager: Solid Explorer File Manager (Free w/IAPs at Google Play Store)
How to change directories in the camera app
Your camera app picks a spot to save photos based on the available storage. In most cases, the default is typically the phone itself. Changing that will make your life a lot easier, especially after you have a microSD card installed.
This will ensure that any new photos you take are automatically stored to the microSD card rather than internal storage.
Note: these steps are taken from the Samsung Galaxy Note 9 and Samsung Camera app, but the steps should be more or less the same on most devices that include a microSD slot.
- Open your Camera app.
Tap Settings (the gear icon).
![]() Source: Android Central
Source: Android Central
Tap SD card.
![]() Source: Android Central
Source: Android Central
Now the camera app will send newly taken photos to the microSD card. What about all the photos you’ve already taken that are taking up storage space on your internal storage? We need to move those over to the microSD card.
How to move photos you’ve already taken to a microSD card
To move files from internal storage to the microSD card, we’ll need a file manager app. Some phones come with file manager apps already installed, like Samsung’s My Files app, but if yours doesn’t, there are plenty of third-party apps that will work like Solid Explorer. We’ve used the Samsung My Files for these steps on a Samsung Galaxy Note 9, but the steps should be the same on most devices.
- Open your file manager app.
- Open Internal Storage.
Open DCIM (short for Digital Camera Images).
 Source: Android Central
Navigate back to your file manager menu, and tap on SD card.
Source: Android Central
Tap Done to initiate the transfer.
![]() Source: Android Central
Source: Android Central
Time for more photos
Source: Ara Wagoner / Android Central
Once your photos are set up, you can snap away, content in the knowledge that you don’t be filling your internal storage to the brim and bogging down your phone. It is also worth mentioning, however, that while it’s easy to assign camera photos to go to the microSD card, on many phones, you cannot reassign screenshots to capture to SD the same way. Be sure to come back now and then and copy your screenshots over to SD to keep them from filling up your phone. You can also back up everything with Google Photos if you’d prefer.
Picking the right microSD card for photography
MicroSD cards don’t usually come with your phone unless it’s part of an accessory bundle, but these cards are easy to find at most electronic and department stores. You can almost always find good cards on sale, so keep an eye on Thrifter if you don’t need a microSD card right this second.
Best value for microSD
Samsung EVO Select (256GB)
The best microSD money can buy
We suggest picking up a Samsung EVO U3 microSD card. It’s available in four storage capacities, from 32GB up to 512GB, and with a U3 speed rating, it should be able to handle your photo and video-taking tasks.
Samsung makes really great microSD cards that are perpetually on discount. This 256GB card we’ve linked above is an incredible value that will let you free up a ton of space on your phone.
Manage your files on your phone
Most phones include a file manager among its stock apps, but if you’re looking for an alternative, we’ve got a solid recommendation.
![]()
Solid Explorer File Manager (Free w/IAPs at Google Play Store)
Solid Explorer File Manager does a great job helping you to locate and relocate all the files on your phone.
We may earn a commission for purchases using our links. Learn more.
![]()
These are the best microSD cards you can buy for Android
A microSD card makes it easy to move your files, photos, and music from device to device without having to rely on steady Wi-Fi or costly data. It also helps if you like to load your phone with apps. These are the best microSD cards you can buy for an Android device.
![]()
Expand your Galaxy S10 storage with these microSD cards
Instead of spending more on your Galaxy S10 for more internal storage, take advantage of that microSD slot and save with external storage.
![]()
These are the best microSD cards for the Galaxy S8
Here’s how to give your GS8 some more storage — fast. MicroSD cards are affordable, available, and can be transferred for use on your next phone once your S8 is retired, making them a worthy investment.

Ara Wagoner
Ara Wagoner is a Writer at Android Central. She themes phones and pokes YouTube Music with a stick. When she’s not writing about cases, Chromebooks, or customization, she’s wandering around Walt Disney World. If you see her without headphones, RUN. You can follow her on Twitter at @arawagco.

Jeramy Johnson
Jeramy is proud to help Keep Austin Weird and loves hiking in the hill country of central Texas with a breakfast taco in each hand. When he’s not writing about smart home gadgets and wearables, he’s defending his relationship with his smart voice assistants to his family. You can follow him on Twitter at @jeramyutgw.
Источник


