- MVVM на Android с компонентами архитектуры + библиотека Koin
- Введение
- Представление
- Модель представления
- Модель
- Как реализовать паттерн MVVM
- Сценарий приложения и реализация модели
- View-Model
- Представление
- Конкретизация объектов и внедрение зависимостей
- Заключение
- MVVM with Kotlin Coroutines and Retrofit [Example]
- Suspend Function
- Launch and Async
- Coroutine Scope
- Coroutines in your Android Project
- Making it work with Retrofit?
- Declaring our interface.
- Building Retrofit Service
- ViewModel with Coroutines
- Coroutines and LiveData
- Exception Handling in Kotlin Coroutines
- Kotlin Coroutines With Retrofit Example
- Required Dependencies
MVVM на Android с компонентами архитектуры + библиотека Koin

Jan 13, 2020 · 7 min read

Введение
С MVVM ( Model— View-ViewModel) процесс разработки графического интерфейса для пользователей делится н а две части. Первая — это работа с языком разметки или кодом GUI. Вторая — разработка бизнес-логики или логики бэкенда (модель данных). Часть V iew model в MVVM — это конвертер значений. Это значит, что view model отвечает за конвертирование объектов данных из модели в такой вид, чтобы с объектами было легко работать. Если смотреть с этой стороны, то view model — это скорее модель, чем представление. Она контролирует большую часть логики отображения. Модель представления может реализовывать паттерн медиатор. Для этого организуется доступ к логике бэкенда вокруг набора юз-кейсов, поддерживаемых представлением.
В этом туториале мы попробуем определить каждый компонент паттерна MVVM, чтобы создать небольшое приложение на Android в соответствии с ним.
На следующей картинке — разные элементы, которые мы собираемся создать при помощи компонента Architecture и библиотеки Koin для внедрения зависимостей.

Архитектуру ниже можно разделить на три различные части.
Представление
Содержит структурное определение того, что пользователи получат на экранах. Вы можете поместить сюда статическое и динамическое содержимое (анимацию и смену состояний). Тут может не быть никакой логики приложения. Для нашего случая в представлении может быть активность или фрагмент.
Модель представления
Этот компонент связывает модель и представление. Отвечает за управление ссылками данных и возможных конверсий. Здесь появляется биндинг. В Android мы не беспокоимся об этом, потому что можно напрямую использовать класс AndroidViewModel или ViewModel.
Модель
Это уровень бизнес-данных и он не связан ни с каким особенным графическим представлением. В Android, согласно “чистой” архитектуре, модель может содержать базу данных, репозиторий и класс бизнес-логики. Картинка ниже описывает взаимодействие между разными компонентами.

Как реализовать паттерн MVVM
Чтобы реализовать паттерн MVVM, важно начать с компонентов, которым для работы нужен другой компонент. Это и есть зависимость.
А с момента появления компонента архитектуры, логичное общее решение — реализовать Android-приложения при помощи модели с изображения ниже. Там вы увидите стрелки, которые ведут от представления (активности/фрагмента) к модели.
А это значит, что View знает о View-Model, а не наоборот, и View Model знает о Model, и не наоборот. То есть у представления будет связь с моделью представления, а у модели представления будет связь с моделью. Строго в таком порядке, никак иначе. Благодаря такой архитектуре приложение легко поддерживать и тестировать.

Чтобы программировать быстро и эффективно, вам нужно начать с моделирования, так как модели не нужны другие компоненты для работы.
Сценарий приложения и реализация модели
Чтобы понять, как функционирует паттерн MVVM, мы напишем небольшое приложение, в котором будут все компоненты с предыдущей картинки. Мы создадим программу, которая покажет данные. Мы их взяли по этой ссылке. Приложение будет сохранять данные локально для того, чтобы потом оно работало в режиме оффлайн.
Приложение будет обрабатывать данные такой структуры. А для простоты я выберу всего лишь некоторые параметры. У класса GithubUser есть room-аннотация и у данных в локальной БД будет такая же структура, как и у данных в API.
У пространства DAO есть только два метода. Один — добавление информации в БД. Второй — ее извлечение.
Пространство базы данных выглядит так:
Во второй части мы реализуем Webservice, который отвечает за получение данных онлайн. Для того будем пользоваться retrofit+coroutines.
Если вы хотите узнать, как пользоваться Retrofit вместе с сопрограммами, загляните сюда .
В третьей части мы реализуем репозиторий. Этот класс будет отвечать за определение источника данных. Для нашего случая их два, так что репозиторий будет только получать данные онлайн, чтобы потом сохранить их в локальной базе данных.
Как сами видите, у репозитория есть конструктор с двумя параметрами. Первый — это класс, который представляет онлайн-данные, а второй — представляет данные оффлайн.
View-Model
После того, как мы описали модель и все ее части, пора ее реализовать. Для этого возьмем класс, родителем которого является класс ViewModel Android Jetpack.
Класс ViewModel создан для того, чтобы хранить и управлять данными, связанными с UI относительно жизненного цикла. Он позволяет данным пережить изменения конфигурации, например, повороты экрана.
View-model берет репозиторий в качестве параметра. Этот класс “знает” все источники данных для нашего приложения. В начальном блоке view-model мы обновляем данные БД. Это делается вызовом метода обновления репозитория. А еще у view-model есть свойство data. Оно получает данные локально напрямую. Это гарантия, что у пользователя всегда будет что-то в интерфейсе, даже если устройство не в сети.
Подсказка: я пользовался вспомогательным классом, который помогал мне управлять состоянием загрузки
Представление
Это последний компонент архитектуры. Он напрямую общается с представлением-моделью, получает данные и, например, передает их в recycler-view. В нашем случае представление — это простая активность.
В представлении происходит отслеживание того, как изменяются данные, как они автоматически обновляются на уровне интерфейса. Для нашего случая в представлении также отслеживается состояние операций загрузки в фоновом режиме. В процесс включено свойство loadingState, которое мы определили выше.
Вот вы и увидели, как я получил экземпляр view-model, используя для этого внедрение. А как это сработает, мы увидим дальше.
Конкретизация объектов и внедрение зависимостей
Наблюдательные заметят, что пока я еще не создал репозиторий и его параметры. Мы будет это делать точно при помощи внедрения зависимостей. А для этого в свою очередь мы берем библиотеку, Koin подходит идеально.
Так мы создадим важные объекты. Нашему приложению они нужны там же и нам останется только вызвать их в разные точки программы. Для этого и нужна магия библиотеки Koin.
В Module.kt есть объявление объекта, который нужен приложению. А в представлении мы берем inject, который говорит Koin, что нужен объект view-model. Библиотека в свою очередь старается найти этот объект в модуле, который мы определили ранее. Когда найдёт, назначит ему свойство userViewModel. А если не найдёт, то выдаст исключение. В нашем случае, код скомпилируется правильно, у нас есть экземпляр view-model в модуле с соответствующим параметром.
Похожий сценарий применится к репозиторию внутри view-model. Экземпляр будет получен из модуля Koin, потому что мы уже создали репозиторий с нужным параметром внутри модуля Koin.
Заключение
Самая сложная работа инженера ПО — это не разработка, а поддержка. Чем больше кода имеет под собой хорошую архитектуру, тем проще поддерживать и тестировать приложение. Вот почему важно пользоваться паттернами. С ними проще создать стабильно работающие программы, а не бомбу.
Вы можете найти полный код приложения у меня на GitHub по этой ссылке.
Источник
MVVM with Kotlin Coroutines and Retrofit [Example]


Coroutines are a neat new feature of the Kotlin language that allow us to write asynchronous code in a more idiomatic way. — This also means you can write asynchronous code the same way you would normally write synchronous code in your project.
Already, I have explained about MVVM in detail in my another post. Please check that for better understanding of MVVM. in this post, I am focusing on coroutines and retrofit working together.
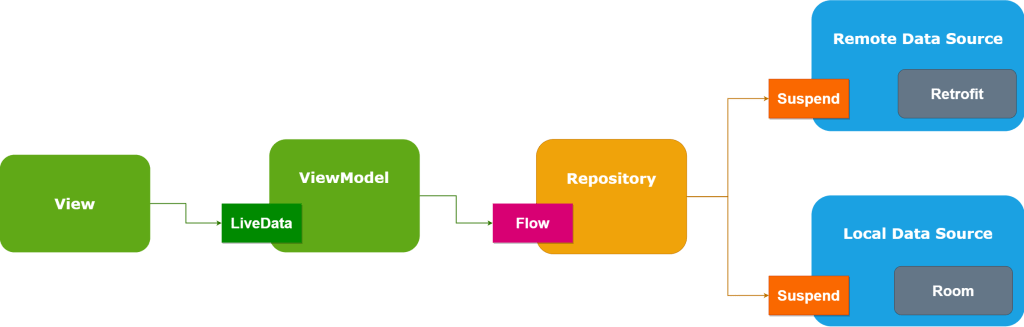
The flow diagram for the coroutines with retrofit in viewModel.
Coroutines are helpful in two main problems,
- A long-running task that can block the main thread
- Main safety allows you to ensure that any suspend function can be called from the main thread
According to the Kotlin docs it is stated that coroutines are a lightweight alternative to threads.
“Coroutines provide a way to avoid blocking a thread and replace it with a cheaper and more controllable operation”
Before we begin I would like to briefly address the concept and the commonly used functions in Coroutine.
Coroutines build upon regular functions by adding two new operations. In addition to invoke (or call) and return, coroutines add suspend and resume.
- suspend — pause the execution of the current coroutine, saving all local variables
- resume — continue a suspended coroutine from the place it was paused
Suspend Function
A suspending function is just a regular Kotlin function with an additional suspend modifier which indicates that the function can suspend the execution of a coroutine.
You can only call suspend functions from other suspend functions, or by using a coroutine builder like launch to start a new coroutine.
We use call back functions when we get response from our Async task. Suspend and resume work together to replace callbacks.
To understand suspend functions, we should also know about provided dispatchers by Kotlin.
To specify where the coroutines should run, Kotlin provides three dispatchers that you can use:
- Dispatchers.Main — Use this dispatcher to run a coroutine on the main Android thread. This should be used only for interacting with the UI and performing quick work. Examples include calling suspend functions, running Android UI framework operations, and updating LiveData objects.
- Dispatchers.IO — This dispatcher is optimized to perform disk or network I/O outside of the main thread. Examples include using the Room component, reading from or writing to files, and running any network operations.
- Dispatchers.Default — This dispatcher is optimized to perform CPU-intensive work outside of the main thread. Example use cases include sorting a list and parsing JSON.
Lets, see this with an example -> We are calling our api through coroutines. So, we use Dispatchers.IO.
When we call getAllMovies() suspend method, then it suspends our coroutine. The coroutine on the main thread will be resumed with the result as soon as the withContext block is complete.
Note: Using suspend doesn’t tell Kotlin to run a function on a background thread. It’s normal for suspend functions to operate on the main thread.
Launch and Async
launch and async are the most commonly used Coroutine builder.
launch – Launches new coroutine without blocking current thread and returns a reference to the coroutine as a Job . The coroutine is canceled when the resulting job is cancelled .
async – Creates new coroutine and returns its future result as an implementation of Deferred . The running coroutine is canceled when the resulting object is cancelled .
Take a look at this piece of code as an example.
From the example, the difference between launch and async is that async can return the future result which has a type of Deferred , and we can call await() function to the Deferred variable to get the result of the Coroutine while launch only executes the code in the block without returning the result.
Coroutine Scope
Coroutine Scope defines a scope for coroutines. Every coroutine builder (like launch, async, etc) is an extension on CoroutineScope. When the scope dies, the Coroutines inside will be out of the picture too. Fortunately, the Android lifecycle-viewmodel-ktx provides a really easy way to get a Coroutine Scope in the ViewModel. I will show you how to do so later.
Coroutines in your Android Project
To begin add the following library to your build.gradle file dependencies:
Note : You’ll also need to be on kotlin version 1.3 or better.
Making it work with Retrofit?
Retrofit is a type-safe HTTP client for Android and Java.
Starting from Retrofit 2.6.0 you no longer require the Call Adapter as Retrofit now includes built-in support for Kotlin suspend modifier on functions.
In order to begin, let’s add the retrofit dependencies into our app level build.gradle file:
Declaring our interface.
For this example I am using https://howtodoandroid.com/movielist.json api to get list of movies.
Observe the below snippet for our interface:
You may notice that instead of Call , we now have a function with the suspend modifier defined in our interface function.
According to Retrofit documentation this function will, behind the scenes behave as a normal Call.enqueue operation.
Also we wrap our response in a Response object to get metadata about our request response e.g. information like response code.
We no longer have to await() anymore as this is handled automatically! As with all networking on Android its done on the background. And this is a very clean way of doing so!
Building Retrofit Service
Our Retrofit instance will look like the following code snippet:
ViewModel with Coroutines
A CoroutineScope keeps track of all coroutines it creates. Therefore, if you cancel a scope, you cancel all coroutines it created. This is particularly important if you’re running coroutines in a ViewModel.
If your ViewModel is getting destroyed, all the asynchronous work that it might be doing must be stopped. Otherwise, you’ll waste resources and potentially leaking memory. If you consider that certain asynchronous work should persist after ViewModel destruction, it is because it should be done in a lower layer of your app’s architecture.
Add a CoroutineScope to your ViewModel by creating a new scope with a SupervisorJob that you cancel in onCleared() method. The coroutines created with that scope will live as long as the ViewModel is being used.
Coroutines and LiveData
LiveData is an observable value holder for UI and we are expected to be able to access the value from the main thread. With the release of livedata-2.1.0-alpha1, google provided the interoperability between LiveData and Coroutines.
Exception Handling in Kotlin Coroutines
If you consider the above example, you can see we are wrapping our code inside a try-catch exception. But, when we are working with coroutines we can handle an exception using a global coroutine exception handler called CoroutineExceptionHandler.
To use it, first, we create an exception handler in our ViewModel,
and then we attach the handler to the ViewModelScope.
So, our code looks like,
Kotlin Coroutines With Retrofit Example
Now, lets see the example of list movies using kotlin coroutines and retrofit.
Required Dependencies
Here are the things you need to add to your build.gradle
First, setup the retrofit service.
Next step is to setup the repository.
Setup the ViewModel,
Finally, in our MainActivity setup the viewmodel and call the getAllMovies() method of the viewModel.

Thanks for reading. checkout this example in GITHUB.
Источник


