- Настройка cisco jabber для android
- Настройка Cisco Jabber for Android
- Исходные параметры
- Настройка стационарного телефона
- Настройка свойств пользователя
- Проверка
- Пробный логин Cisco Jabber
- Настройка Cisco Jabber for Android на CUCM
- Настройка свойств пользователя
- Jabber for Android — Quick Start Guide
- Available Languages
- Download Options
- Contents
- Introduction
- Prerequisites
- Software Requirements
- Hardware Requirements
- Configuring Phone Services
- Jabber Softphone
- Configuring Voicemail
- Unity Connection Configuration
- CUCM Configuration
- Configuring Directory
- LDAP Directory Services
- UDS Directory Services
- Configuring CUCM End Users
- Service Discovery
- Downloading and Installing Cisco Jabber
- Logging in to Jabber
Настройка cisco jabber для android

— Samsung Galaxy S II (AT&T) running Android 2.3
— Samsung Galaxy S International (GT-I9000) running 2.2.1 or 2.3
— Samsung Galaxy Tab International (GT-P1000) running 2.2.1 or 2.3
Однако, как показывает практика, работает джаббер и на отличных от самсунга устройств..главное условие здесь — версия андроида 2.2 или 2.3
Итак, скачиваем бесплатно джаббер из андроид-маркета себе на телефон, устанавливаем..затем необходимо провести определенные манипуляции на корпоративном колл-менеджере..я покажу на примере CUCM 8.6.1, однако всё ниженаписанное справедливо и для более низких версий с той разницей, что на версиях 8.5 и ниже необходимо устанавливать и настраивать dial-rules (проверить необходимость этого на практике не могу, т.к. этих версий под рукой нет).
Прежде чем добавить на CUCM новое андроид-устройство, необходимо установить device-темплейт для него — device COP file, который называется cmterm-android_8.6.2v17.cop.sgn
Скачать последнюю версию этого файла можно здесь. Для скачивания необходим ССО с соответствующими правами.
После скачивания идем в Cisco Unified OS Administration. Далее выбираем Software Upgrades — Install/Upgrade. Дальше выбираем способ, каким будем закачивать файлик на CUCM (я всегда использую ftp) и, собственно, устанавливаем его. После установки рестартуем сервис Cisco Tftp.
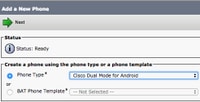
Теперь можно приступить непосредственно к добавлению устройства. Идем в Cisco Unified CM Administration, далее Device — Phone — Add New. В списке Phone Type выбираем Cisco Dual Mode for Android. Откроется почти стандартное окошко добавления нового аппарата. И здесь всё проставляем как обычно: девайс пул, CSS и т.п.
Теперь необходимо остановить внимание на нескольких важных пунктах настройки
Device Name должно обязательно быть написано большими буквами и обязательно начинаться с префикса BOT — BOTPETROV, например
Sip Profile — создаем свой новый..в первую очередь для того, чтобы джаббер-клиент нормально работал в фоне. Идем в Device — Device Settings — SIP Profile и создаем новый профайл со следующими настройками:
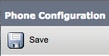
После ввода всех настроек жмем Save и Apply.
Далее конфигурируем DN для этого устройства — всё как обычно.
Вот собственно и всё. надеюсь ничего не забыл..
Источник
Настройка Cisco Jabber for Android

В данном материале подробно рассматривается настройка пользователя, имеющего стационарный телефон, а также мобильный телефон Samsung Galaxy, на который мы установим Cisco Jabber For Android.
Исходные параметры
CUCM Version 11.5
Имя Ivan
Фамилия Zolotov
Город Tyumen
Login izolotov
DN 1356
Настройка стационарного телефона
Заходим в свойства телефона и выставляем:
- Description: 1356 — Tyumen — Ivan Zolotov
- Device pool: Tyumen_pool
- Calling Search Space: Tyumen_Internal_css
- Owner User ID: izolotov
Жмем Save, затем для применения параметров Apply. При этом телефон перезагрузится.
На той же странице слева вверху щелкнем “Line 1” и зайдем в свойства линии и заполним следующие поля:
- Directory Number: 1356
- Route Partition: Oncluster_pt
- Description: 1356 — Tyumen — Ivan Zolotov
- Alerting name: 1356 Ivan Zolotov
- ASCII Alerting name: 1356 Ivan Zolotov
- Calling Search Space: Tyumen_Internal_css
- Выставляем CSS Tyumen_Internal_css для параметров Call Forward:
- Forward All
- Forward Busy Internal
- Forward Busy External
- Forward No Answer Internal
- Forward No Answer External
- Display (Internal Caller ID): 1356 Ivan Zolotov
- ASCII Display (Internal Caller ID): 1356 Ivan Zolotov
- Line Text Label: 1356 Ivan Zolotov
- ASCII Line Text Label: 1356 Ivan Zolotov
- Нажимаем Save (без этого не появится кнопка Associate end users)
- Users Associated with Line – выбираем заведенного пользователя
- Нажимаем Save – Apply
Настройка свойств пользователя
User Management -> End User
Controlled Devices, жмём Device Associations – находим стационарный телефон и добавляем его
Permissions Information, добавляем Standard CCM End Users.
Проверка
Стационарный телефон должен успешно звонить и принимать звонки.
Пользователь должен успешно заходить на Cisco Unified Communications Self Care Portal
Пробный логин Cisco Jabber
Даже без предварительных настроек на CUCM. Пользователь уже должен успешно логиниться в Cisco Jabber:
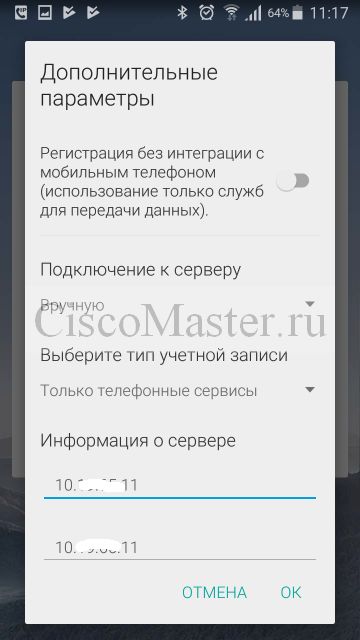
Для начала настроим параметры сервера: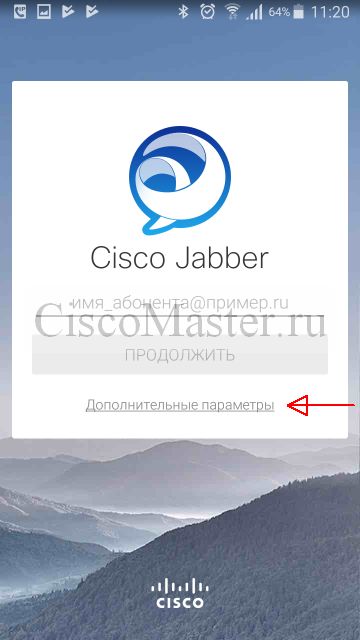
Далее логинимся пользователем в формате username@AD_domain_name_fqdn + доменный пароль этого пользователя.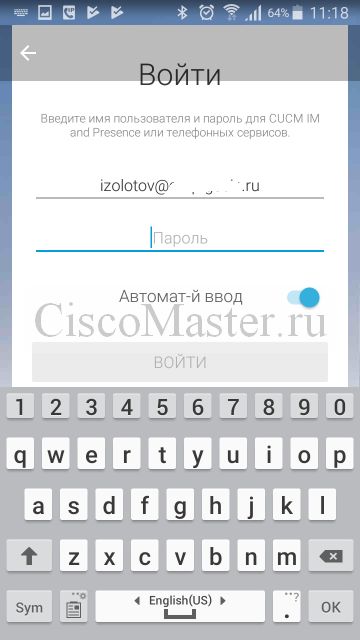
После успешного логина мы увидим: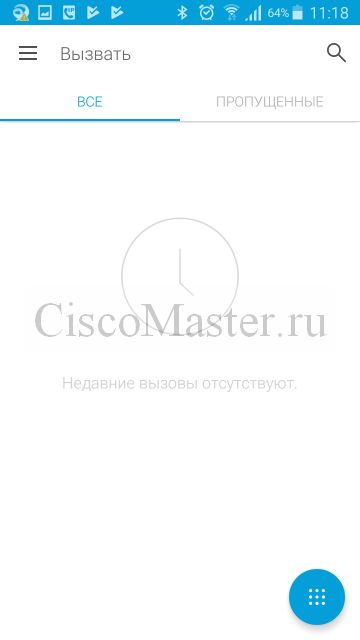
Но при попытке вызвать клавиатуру будет выдаваться ошибка: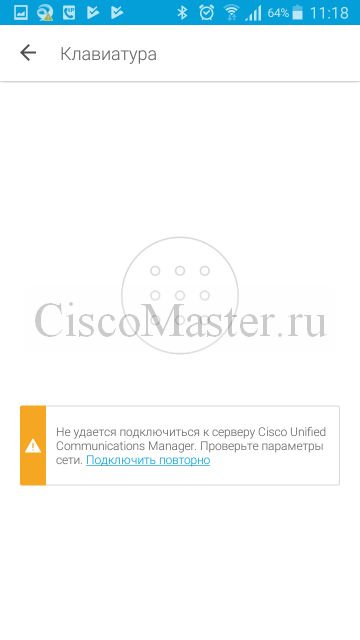
Настройка Cisco Jabber for Android на CUCM
Настроим теперь Cisco Jabber for Android в качестве второго аппарата.
Перед началом следует проверить что наш Device pool поддерживает кодек G.711.
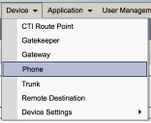
Идём
Device > Phone > Add > Cisco Dual Mode for Android
Вводим параметры устройства:
- Device Name: BOTIZOLOTOV
- Имя Device Name должно быть UPPERCASE и должно начинаться с BOT
- Длина до 15 символов
- Может включать симвоолы A to Z, 0 to 9, dash (-), or underscore (_)
- Рекомендуется задавать в формате BOTUSERNAME
- Description: 1356 — Tyumen — Ivan Zolotov
- Device pool: Tyumen_pool
- Phone Button Template: Standard Dual Mode for Android
- Calling Search Space: Tyumen_Internal_css
- Owner User ID: izolotov
- Primary Phone: выбрать соответствующий desktop Phone
- Device Security Profile: Cisco Dual Mode for Android — Standard SIP Non-Secure Profile
- SIP Profile: Standard SIP Profile
- Нажимаем Save – Apply
На той же странице слева вверху щелкнем “Line 1” и зайдем в свойства линии и заполним следующие поля:
- Directory Number: 1356
- Route Partition: Oncluster_pt
Система автоматом «узнает» этот DN и подгрузит все параметры данного DN. - Нажимаем Save – Apply
После этого при логине в Jabber мы уже сможем принимать и отправлять звонки.
Настройка свойств пользователя
User Management -> End User
Controlled Devices, жмём Device Associations – находим Jabber телефон и добавляем его
Источник
Jabber for Android — Quick Start Guide
Available Languages
Download Options
Contents
Introduction
This document describes the necessary steps required for a successful deployment of Cisco Jabber for Android with basic features. This is a quick start guide and will not cover any of the advanced features supported by Cisco Jabber for Android.
Prerequisites
Cisco recommends you have a basic understanding of the Cisco Unified Communications Manager (CUCM) administration web page as well as experience with basic phone configurations.
Software Requirements
This guide assumes the following software versions are in use:
- Cisco Unified Communications Manager (CUCM) version 10.5(2) or higher.
- Cisco Unified IM and Presence (IM&P) version 10.5(2) or higher.
- Cisco Unity Connection (CUXN) version 10.5 or higher.
- Jabber for Android 12.1 or higher.
- Android Operating System 4.4 or later.
Hardware Requirements
The below hardware specifications are the suggested minimum requirements for running Cisco Jabber for Android on a Android operating system:
- CPU
- 1.5-GHz dual-core
- 1.2-GHz quad-core or later
- Display
- Minimum display resolution requirement for two-way video is 480 x 800.
- Minimum display resolution requirement for IM only is 320 x 480.
Note: Cisco Jabber for Android is not supported on Android devices that are based on an Intel chipset or Android devices with Tegra 2 chipset
Configuring Phone Services
Jabber Softphone
Jabber for Android provides a option to supply phone services through a Cisco Dual Mode for Android device which is often referred to as a BOT or Softphone.
To configure a BOT device, log in to the CUCM Administration web page and navigate to Device > Phone.
From the Find and List Phones menu select Add New.

Once on the Add a New Phone menu search the phone type drop down for the Cisco Dual Mode for Android device type. Once selected click Next.
The table below (Table 1.0) contains all the fields that must be configured when setting up a Cisco Dual Mode for Android (BOT) device in CUCM. Majority of required fields have default configurations and don’t need to manually configured unless otherwise required for your deployment. You must manually configure all the fields where the Configured by Default column in the table below is set to NO.
Tip: Cisco recommends that all Cisco Dual Mode for Android devices be configured with a device name prefix of BOT. For example, you provision a user named Holly Day with a BOT device. Her CUCM end user user ID Is hday so her BOT device name would be BOTHDAY.
Table 1.0
| Required Fields | Default Parameter | Configured by Default | Description |
| Device Name | Must be manually added, device name should begin with BOT. | NO | Enter a name to identify software-based telephones |
| Device Pool | Must select one of the available device pools. | NO | Choose the device pool to which you want this phone assigned. The device pool defines sets of common characteristics for devices, such as region, date/time group, and softkey template. |
| Phone Button Template | Standard Client Service Framework | NO | Choose the appropriate phone button template. The phone button template determines the configuration of buttons on a phone and identifies which feature (line, speed dial, and so on) is used for each button. |
| Common Phone Profile | Standard Common Phone Profile | YES | C hoose a common phone profile from the list of available common phone profiles |
| Location | Hub_None | YES | Use locations to implement call admission control (CAC) in a centralized call-processing system. The location specifies the total bandwidth that is available for calls to and from this location. A location setting of Hub_None means that the locations feature does not keep track of the bandwidth that this Cisco Unified IP Phone consumes. A location setting of Phantom specifies a location that enables successful CAC across intercluster trunks that use H.323 protocol or SIP. |
| Built In Bridge | Default | YES | Enable or disable the built-in conference bridge for the barge feature by using the Built In Bridge drop-down list box (choose On, Off, or Default) |
| Privacy | Default | YES | For each phone that wants Privacy, choose On in the Privacy drop-down list box. When privacy is enabled, the system removes the call information from all phones that share lines and blocks other shared lines from barging in on its calls. |
| Device Mobility Mode | Default | YES | Turn the device mobility feature on or off for this device or choose Default to use the default device mobility mode. Default setting uses the value for the Device Mobility Mode service parameter for the device. |
| Owner User ID | Set the user ID | NO | From the drop-down list box, choose the user ID of the assigned phone user. The user ID gets recorded in the call detail record (CDR) for all calls made from this device. Assigning a user ID to the device also moves the device from «Unassigned Devices» to «Users» in the License Usage Report. |
| Use Trusted Relay Point | Default | YES | From the drop-down list box, enable or disable whether Cisco Unified CM inserts a trusted relay point (TRP) device with this media endpoint. A Trusted Relay Point (TRP) device designates an MTP or transcoder device that is labeled as Trusted Relay Point. |
| Always Use Primary Line | Default | YES | From the drop-down list box select (Off, On or Default). Default — Cisco Unified Communications Manager uses the configuration from the Always Use Prime Line service parameter, which supports the Cisco CallManager service |
| Always Use Prime Line for Voice Message | Default | YES | From the drop-down list box select (Off, On or Default). Default — Cisco Unified CM uses the configuration from the Always Use Prime Line for Voice Message service parameter, which supports the Cisco CallManager service. |
| Packet Capture Mode | None | YES | This setting exists for troubleshooting encryption only; packet capturing may cause high CPU usage or call-processing interruptions. |
| BLF Presence Group | Standard Presence Group | YES | |
| Device Security Profle | Must be manually selected. | NO | You must apply a security profile to all phones that are configured in Cisco Unified Communications Manager Administration . Installing Cisco Unified Communications Manager provides a set of predefined, nonsecure security profiles for auto-registration. To enable security features for a phone, you must configure a new security profile for the device type and protocol and apply it to the phone. If the phone does not support security, choose a nonsecure profile. |
| SIP Profile | Must be manually selected. | NO | Choose the default SIP profile or a specific profile that was previously created. SIP profiles provide specific SIP information for the phone such as registration and keepalive timers, media ports, and do not disturb control. Typically the Standard SIP Profile for Mobile Devices would be used on a BOT device. |
| Certificate Operation | No Pending Operation | YES | This field is related to CAPF enrollment. |
| DND Option | Call Reject | YES | When you enable DND on the phone, this parameter allows you to specify how the DND features handle incoming calls. |
Once you have configured all the required field for the BOT configuration save the configuration by selecting the Save button.
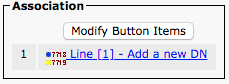
Now that you have created a BOT you will need to add a directory number to the device. This can be done by select the Add a new DN option located at the top left of the BOT configuration.
Note: This document does not cover the complete line configuration for the BOT device. Line configuration is a standard configuration that must be performed for all phones and is not a configuration that is specific to BOT devices.
Tip: Once you have configuring a directory number your BOT device make sure to associate the CUCM end user to the directory number. This can be done by scrolling to the bottom of the directory number configuration and selecting Associate End Users. This configuration is required if you plan to use Jabber for phone presence.
Configuring Voicemail
Jabber for Android is able to retrieve and playback voicemail messages that have been stored on Cisco Unity Connection. To setup voicemail for Jabber for Android please follow the steps below:
Unity Connection Configuration
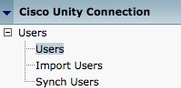
Start by logging into Cisco Unity Connection web administration web page and navigating to Users > Users.
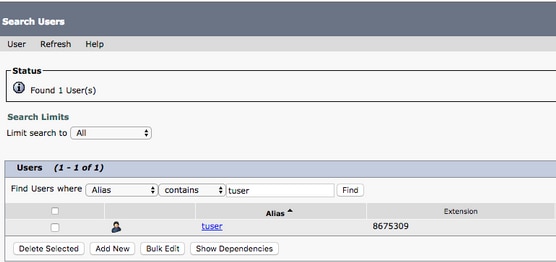
When presented with Search Users page search for and select your Jabber for Android users mailbox.
Once presented with the Edit User Basics page of the user Mailbox notate the Calls of Service that is configured.

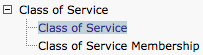
Via the left hand navigation pane navigate to Class of Service > Class of Service.
When presented with the Search Class of Service page search for and select the class of service you previously notated.
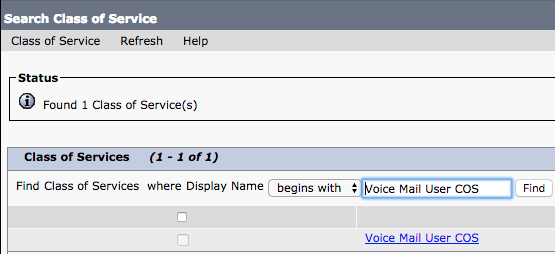
Once on the Edit Class of Service page verify that the following:
- Verify that the check box is checked for the Allow Users to Use the Web Inbox and RSS Feeds feature.
- Also verify that the Allow Users to Use Unified Client to Access Voicemail feature is enabled by checking the box near the feature name.
Once the Class of Service configuration has been verified navigate to System Settings > Advanced > API Settings in the left navigation pane. Enable all three of the settings presented on the API Configuration page.

CUCM Configuration
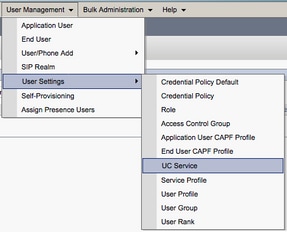
Now that Unity Connection is setup we will move on to the CUCM configuration for Jabber for Android voicemail. Start by navigating to User Management > User Settings > UC Service.
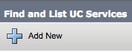
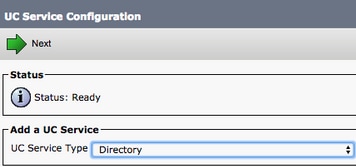
Once on the Find and List UC Services page select Add New.
When presented with the UC Service Configuration page select Voicemail from the UC Service Type drop down then select Next.

You will then be presented with the UC Service Configuration page. Start by selecting Unity Connection from the Product Type dropdown. You will also need to configure a Name for the Voicemail UC Service as well as provided the IP, Hostname or Fully Qualified Domain Name (FQDN) of the Unity Connection server that is running the REST and Jetty services.

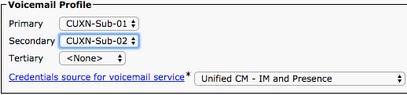
Note: Up to three Voicemail UC Services can be assigned to a UC Service Profile.
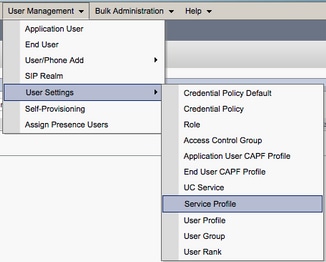
Now that the Voicemail UC Service(s) are defined we will assign them to the Service Profile. Start by navigating to User Management > User Settings > Service Profile.

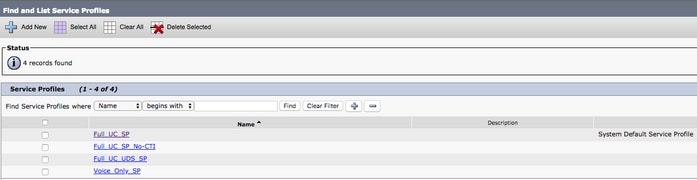
From the Find and LIst Service Profiles menu search for and select the service profile used by your Jabber for Android users or create a new service profile by selecting Add New.


Once on the Service Profile Configuration page scroll down to the Voicemail Profile section and assign the Voicemail UC Service(s) to the service profile then select Save.
Note: The Jabber for Android setup above assumes that Unity Connection is using LDAP authentication. In cases where mailboxes are not LDAP integrated please refer to the Cisco On-Premises Deployment Guide.
Configuring Directory
Jabber for Android is dependent on directory services for resolution of corporate contacts. Jabber is able to perform directory resolution through Lightweight Directory Access Protocol (LDAP) or CUCM User Data Services (UDS). Please refer to the sections below for information on configuration of LDAP or UDS directory services for Jabber for Android.
LDAP Directory Services
Jabber for Android supports three well known LDAP directory services, as seen below:
- Active Directory Domain Services
- OpenLDAP
- Active Directory Lightweight Directory Service (AD LDS)
This guide will provide the steps to configure Jabber for Android 12.1 or above to integrate with Active Directory Domain Services, as this is a common integration.
Start by logging into the CUCM Administration web page and navigating to User Management > User Settings > UC Service.

Once on the Find and List UC Services page select Add New.

When presented with the UC Service Configuration page select the Directory from the UC Service Type drop down and select Next.
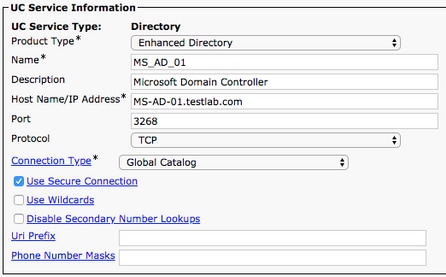
You will then be presented with the UC Service Configuration page. Select Enhanced Directory from the Product Type drop down. You will also need to configure a Name for the Directory UCService as well as provided the IP, Hostname or Fully Qualified Domain Name (FQDN) of the directory server.
By default the Connection Type will be set to Global Catalog which assumes that a Microsoft Domain Controller is being used as the the directory source. If a Global Catalog server is in use the Port number in the configuration should be set to 3268. Cisco does recommend the use of a Global Catalog server as a directory resource as it provides more efficient resolutions of queries.
Tip: In cases where you are not using a domain controller for Microsoft Active Directory Domain Services the Directory UC Service should have the Port set to 389 to Connection Type should be set to Ldap.
Note: Up to three Directory UC Services can be assigned to a UC Service Profile.
Now that the Directory UC Service(s) are defined we will assign them to the Service Profile. Start by navigating to User Management > User Settings > Service Profile.
From the Find and LIst Service Profiles menu search for and select the service profile used by your Jabber for Android users or create a new service profile by selecting Add New.

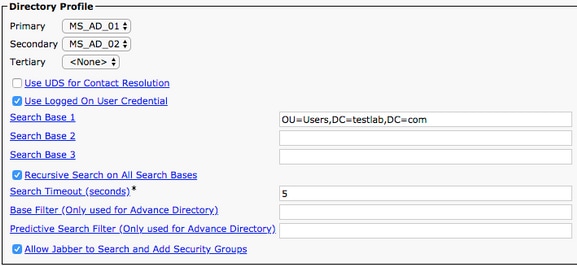
Once on the Service Profile Configuration page scroll down to the Directory Profile section and assign the Directory UC Service(s) to the service profile. You will also need to define the Active Directory search base, this should be the organization unit or directory where your corporate users exist.
While configuring the Directory Profile section you will also have to configure a directory authentication method. Check the check box near the «Use Logged On User Credential» to prevent anonymous queries and force Jabber to authenticate with the credentials that were entered during Jabber log in. If the Use Logged On User Credential is left unchecked Jabber will attempt to perform a nonymous access to the directory server. Anonymous directory access is not recommended by Cisco.
Once you are done configuring the Directory Profile select Save.
Note: If you are using CUCM 10.X — 11.5.X the Directory Profile section of the Service Profile will also include username and password fields that allow for a dis tinguished name to be used as the user ID that is authorized to run queries on the LDAP server. In CUCM 12.X if you want to use a single user ID for authentication for directory services you will need to use the ConnectionUsername and ConnectionPassword parameters in the jabber-config.xml.
Caution: Cisco Jabber queries contact source using various attributes, not all of these attributes are indexed by default. To ensure efficient searches the attributes used by Cisco Jabber must be indexed on the directory server. For more information please refer to the LDAP Prerequisites section of the Jabber Planning Guide.
UDS Directory Services
CUCM User Data Services (UDS) provides a contact source API that can be used by Jabber over Cisco Expressway mobile and remote access for the contact resolution and it is an optional contact service for clients on the corporate network. The UDS contact source uses the Unified CM end user table information to provide a directory resolution.
Start by logging into the CUCM Administration web page and navigating to User Management > User Settings > Service Profile.

From the Find and LIst Service Profiles menu search for and select the service profile used by your Jabber for Android users or create a new service profile by selecting Add New.

Once on the Service Profile Configuration page scroll down to the Directory Profile section and check the check box labeled Use UDS for Contact Resolution then select Save.
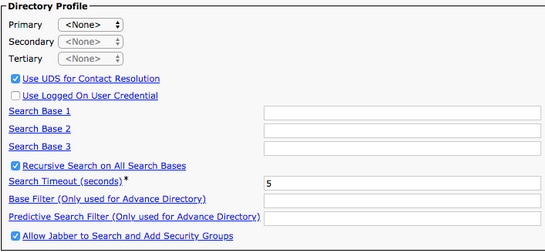
Once UDS Is enabled on the service profile Jabber for Android will automatically discover the CUCM UDS servers during the Jabber log in process.
Configuring CUCM End Users
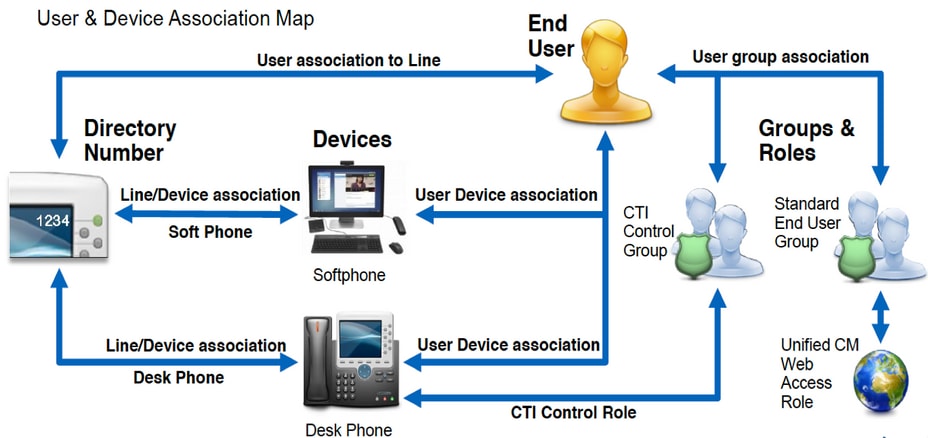
The CUCM end user configuration is a crucial step in deploying Jabber for Android as many of Jabbers features are dependent on this configuration. The image below depicts all the Jabber configurations that are dependent on the CUCM end user configuration.
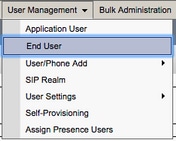
To configure the Jabber for Android CUCM end user start by logging into the CUCM Administration web page and navigating to User Management > End User.
From the Find and LIst Users menu search for and select the CUCM end user you wish to configure for Jabber for Android.

Once on the End User Configuration web page scroll down to the Service Settings section, here you can assign the end user the services you want them to use. To enable a user to be able to log in to Jabber for Android you must enable the Home Cluster service by checking the check box next to the service name.
If your end users will be using Jabber for Android for instant messaging you will need to enable their end user for the service by checking the check box next to the field labeled Enable User for Unified IM and Presence.
Next you will want to assign a service profile by selecting a service profile from the UC Service Profile drop down. The service profile is used to provide the Jabber client with CUCM UC service configuration. .
Note: If you don’t assign a service profile to the CUCM end user then the user will automatically use the service profile that is set as the system default service profile.

Next scroll down to the Device Information section. Here you can manage the CUCM end users controlled devices. Assign the user their softphone (BOT). CUCM provides this list of device to Jabber for Android during Jabber log in.

You can assign a device to a user by selecting the Device Association button. You will then be presented with the User Device Association menu. From here you can search for the CUCM end users devices. When you find a device place a check mark in the check box next to the device and select Save Selected Changes.

Now scroll down to the Directory Number Association section and select the CUCM end users primary extension from the Primary Extension drop down.

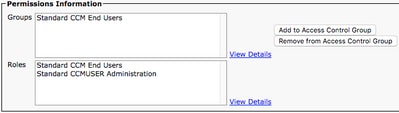
Next scroll down to the Permissions Information section. Here will will assign the permissions that are needed by Jabber for Android.
The table below (Table 1.1) lists all the required roles, their privileges and the reason why Jabber needs the role assigned.
Table 1.1
| Roles | Privileges/Resources | Jabber Role Usage |
| Standard CCM End Users | Grant an end user log-in rights to the Cisco Unified CM User Options. | Jabber SOAP Authentication |
| Standard CCMUSER Administration | Allows access to the Cisco Unified CM User Options. | Jabber SOAP Authentication |
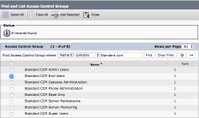
To assign a permission group to the CUCM end user select the Add to Access Control Group button.
Next, search for the access control group you would like to add and select the checkbox located near the access control groups name. When finished select the Add Selected button.
Service Discovery
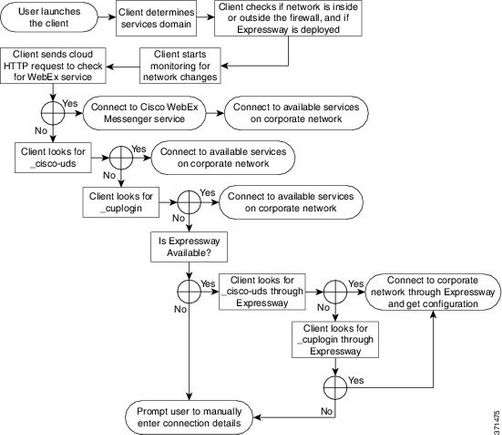
For the Cisco Jabber client to be able to log in it must first be aware of the services (CUCM, IM&P or Expressway) it will use for authentication and configuration retrieval. Cisco recommends configuring automatic service discovery through the use of Domain Name System (DNS) Service Location (SRV) records as this provides a seamless user experience and ease of administration.
The image below is graphical depiction of the Jabber automatic service discovery process.
To add DNS SRV record to Microsoft DNS Manager navigate to your domain and expand the tree. Right click on the _tcp folder and select Other New Records.
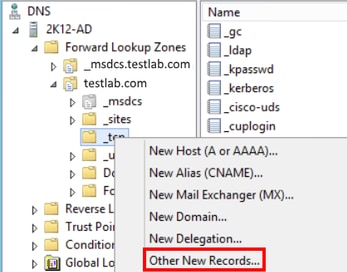
When presented with the Resource Record Type window, highlight the Service Location (SRV) then select Create Record.
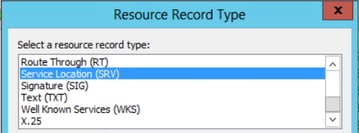
Next you will be presented with the «New Resource Record» pane. Here you will configure a SRV record for each of the CUCM servers that will be used for Jabbers initial UDS home cluster lookup.
Below is a configuration example for the _cisco-uds SRV record. In this example the _cisco-uds record resolves to three CUCM nodes within a CUCM cluster.
Downloading and Installing Cisco Jabber
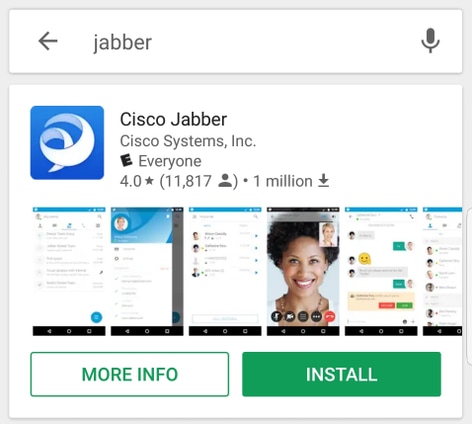
Start by opening the Android Play Store on the Android device.

Once in the Play Store application search for Jabber using the play store search bar. Once you have found the Cisco Jabber application simply select the application and choose the option to INSTALL.
Logging in to Jabber
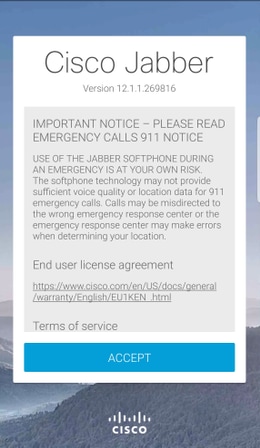
To perform a first time login for Jabber for Android, start by finding the Cisco Jabber application on the Android device and launching it .

Once the Jabber for Android application launches you will be presented with the End user license agreement. Please read through the notices and terms of service. If you wish to continue select Accept.
Jabber will then request permission to integrate with the Android phone’s native calling, contacts and storage features. If this is acceptable and you wish to continue with Jabber logIn select GET STARTED.

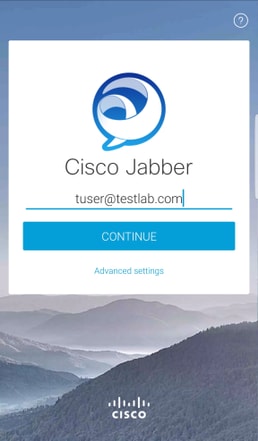
Next the Jabber application will display the service discovery login screen. Here you will provided the Jabber username and the domain that will be used for service discovery (example. tuser@testlab.com). To proceed with login select the CONTINUE button.
Once service discovery has finished you will be prompted to provide the credentials for Jabber log. Provide a valid Jabber username and password and select SIGN IN.
Источник


