Native bridge android x86
Устанавливаем Android на ваш компьютер/ноутбук через виртуальную машину Oracle VM VirtualBox или VMWare Workstation.
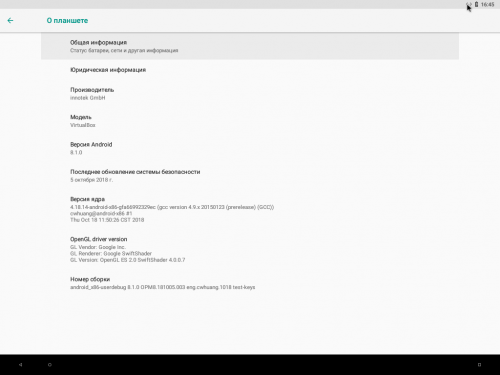
Самая последняя и стабильная версия на данный момент: Android 8.1 Oreo с патчем безопасности 5 января 2019 (сборка образа: 17 января 2019)
Android 9.0 в виртуальных машинах работает очень плохо и в большинстве случаев не запускается, если есть информация о том, как заставить его стабильно запускать, пишите в ЛС, добавлю в шапку.
1. Сама виртуальная машина Oracle VM VirtualBox 5.22 (версия 6.0 на данный момент плохо дружит с Android-x86, пока пользуемся стабильной 5.2)
2. Образ Android. Его скачиваем с сайта Android-x86.org
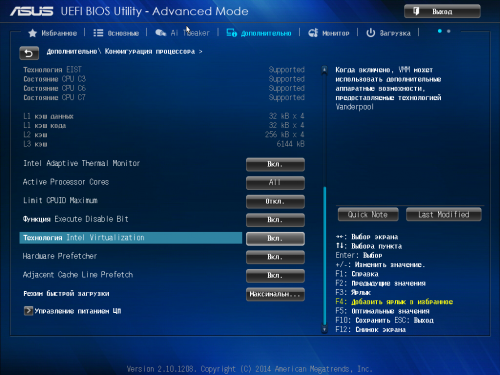
3. Включение функции виртуализации у вашего процессора в биосе вашего хоста (у разных материнских плат и процессоров этот параметр в меню называется по разному, нужно искать, пример на моей материнской плате на картинке)
|
0.1. Скачиваем и устанавливаем программу. 1.1. Создаём виртуальную машину с любым названием, тип системы: Linux, версия: Ubuntu (разрядность не важна). 2.1. Запускаем машину. Теперь у вас есть уже рутированный Android с прошивкой для разработчиков.
Как изменить разрешение экрана? Она определяет разрешение и количество памяти для цвета. VirtualBox 6.0 не хочет запускать Android Как включить полную поддержку программ, написанных для ARM в Android-x86? Что работает и что не работает в последней версии (Android 8.1)? Сообщение отредактировал Smit7564 — 28.04.20, 22:47 Спасибо, все понятно расписал, +++++++ тебе! Добавлено 31.01.2014, 18:38: Правда можно вместо Virtual box можно использовать ЛЮБОЙ эмулятор. Я лично пробовал через MS virtual pc Источник Android-x86Run Android on your PC
Release Note 8.1-r6(2021/06/23)Key FeaturesThe 8.1-r6 is mainly a security updates of 8.1-r5 with some bugfixes. We encourage users of 8.1-r5 or older releases upgrade to this one.
Released FilesThis release contains these files. You can choose one of them depends on your devices. Most modern devices should be able to run the 64-bit ISO. For older devices with legacy BIOS, you may try the 32-bit ISO.
32-bit ISO: android-x86-8.1-r6.iso 64-bit rpm: android-x86-8.1-r6.x86_64.rpm 32-bit rpm: android-x86-8.1-r6.i686.rpm 64-bit ISO with kernel 4.9: android-x86_64-8.1-r6-k49.iso sha1sum: 313124ea2f8647b09321e20b56e0d5cb9417e0de To use an ISO file, Linux users can dump it into a usb drive by dd command like: where /dev/sdX is the device name of your usb drive. Windows’s users can use the tool Win32 Disk Imager to create a bootable usb stick. Please read this page about how to install it to the device. Except the traditional ISO files, we also package android-x86 files into a Linux package rpm. It allows Linux users to easily install the release into an existing Linux device with a standalone ext4 root partition. On an rpm based device (Fedora/Red Hat/CentOS/SUSE. ), just install it like a normal rpm package: This will update your older installation like 7.1-r5 or 8.1-r5 if you have. On a deb based device (Debian/Ubuntu/LinuxMint/. ), please use the alien tool to install it: All files will be installed to the /android-8.1-r6/ subdirectory and boot entries will be added to grub2 menu. Reboot and choose android-x86 item from the menu to boot Android-x86. Alternatively, you can launch Android-x86 in a QEMU virtual machine by the installed qemu-android script: Note Android-x86 running in QEMU and the real machine (after rebooting) share the same data sub-folder. To uninstall it : Source codePlease read this page for how to compile source code. To build 8.1-r6 with kernel 4.9, sync the source tree as above commands, and add KERNEL_DIR=kernel-4.9 to the build command like: Источник Native bridge android x86Android OS на x86 В этой теме обсуждаются вопросы общие для всех Андроидов на платформе x86, конкретно проект портирования Android-х86, а также его братья, не имеющие отдельных тем обсуждения на нашем форуме.
Вопросы, касающиеся только проектов Phoenix OS , Remix OS x86 и Bliss-x86 , обсуждаются в своих темах.
Раздел под Android рекомендуется форматировать в ext3 или ext4 (для версии 5.0 Lollipop и новее) чтобы иметь >4ГБ места под свои нужды и избежать проблем с SuperSU и другим софтом. Форматирование раздела лучше произвести до установки Android сторонним ПО (Acronis, GParted, др.): родной установщик не всегда справляется с этой задачей. title Android-x86 5.1-rc1 title Android-x86 5.1-rc1 (Debug mode) title Android-x86 5.1-rc1 (Debug nomodeset) title Windows Тут default указывает номер пункта, котоый будет выбран автоматически после истечения timeout секунд. root и rootnoverify указывают с какого диска, и с какого его раздела загружать выбраную операционную систему. Как и в случае с default, нумерация начинается с нуля. Параметры загрузки прописываются в конец строки, которая начинается со слова kernel. Такими параметрами можно повлиять на многие аспекты работы Андроида с железом. К примеру настроить работу с внешним монитором. GRUB 2 — следующая версия GRUB. Разработчики писали GRUB 2 «с нуля», чтобы добиться переносимости и модульности. set timeout=60 Источник Как установить libhoudini на пользовательскую установку Android x86В настоящее время я делаю специально созданный Android Marshmallow x86 64 на мини-ПК. Я успешно установил Android, и теперь я пытаюсь установить libhoudini на буровой установке, чтобы он мог играть в приложения и игры ARM (перенос приложений на x86 невозможен, поскольку они являются сторонними приложениями). Как мне его установить и использовать? Когда я захожу в репозиторий Github, в нем есть только ссылки на файлы .sfs. А также нет никакой документации или руководства о том, как его установить и использовать. 2 ответаТак что мне действительно удалось найти довольно новое руководство по этому поводу, и я успешно установил и использовал libhoudini на своей установке. В новейших isos для Android-x86 с сайта http://www.android-x86.org действительно есть сценарий bash. исполняемый файл, который поможет нам установить libhoudini . Итак, вот шаги:
ПРИМЕЧАНИЕ. Если вы посмотрите на сам скрипт, вы увидите, что скрипт попытается загрузить необходимый файл, если на вашем устройстве его нет. Но есть вероятность, что сервер файла будет недоступен, и wget будет повторяться бесконечно. В таком случае вам нужно сделать следующее:
Надеюсь, это поможет всем, кто хочет запускать приложения ARM на Android-x86 с помощью libhoudini. Ура. Первый ответ от @Bawenang очень полезен, но, к сожалению, ссылки http://goo.gl в скрипте enable_nativebridge теперь перенаправляются Google на HTTPS. wget на android-x86 не поддерживает SSL, поэтому загрузка не выполняется. Обходной путь — отредактировать сценарий и вставить правильную ссылку, например те, что с этой страницы, довольно легко набрать: В скрипте вам нужно заменить только один из URL-адресов, например для x86 замените тот, перед которым стоит v=7x или v=8x . Источник Native bridge android x86Native Bridge Android This Kotlin library is the native part of a RPC communication bridge between your app and the webview javascript. To function, it relies on a javascript counterpart to be setup. The library has been tested on Android 4.4.4 and later, but will probably also work on older Android versions. Note: For simplicity, we’re using the term «webview javascript» to mean «the javascript hosted in a site shown in the webview». The library will soon be made available in a public Maven repo. Until then use the latest .aar in Releases. The library has a dependency on Jackson 2.8.9, which needs to be added for the .aar to compile: Instead of using android.webkit.WebView , use no.nrk.NativeBridgeWebView . If you’re already extending WebView , you must instead extend NativeBridgeWebView . For deserializing and serializing data, create classes implementing the TopicData.In and TopicData.Out interfaces. TopicData.In corresponds to the JSON received from the webview javascript, while TopicData.Out corresponds to the data we want to pass to the webview javascript. You will then need to add a handler. The handler makes it possible for the native app and the webview javascript to communicate. To do this, use the nativeBridgeWebView.connection.addHandler(topic: String, callback: (T, WebViewConnection) -> Unit) function. The first parameter, topic , is a string that you and the developer responsible for implementing the javascript has agreed on. The webview javascript and the native app use the same topic to communicate. The second parameter is a closure, where T is your class implementing TopicData.In , and WebViewConnection is the webview.connection that can be used to send TopicData.Out to the webview javascript. If an error occurs, the app will pass data about this to the webview javascript, so the webview javascript can act accordingly. If we have a topic available, the errors will be passed on the same topic . If not, the errors will be passed on the topic errors . As of version 1.0.0, the following errors can be returned:
Example error response: When we’re able to determine a topic : When we’re not able to determine the topic , we will pass the errors on the errors topic: Источник  Когда к мобильному устройству присоединены наушники  ОС Google Android развивается, и по всему видимому |