- Sample VoIP Calling App in Android
- Key Components & Libraries Used
- Prerequisites
- PushNotificationService
- CallConnectionService
- CallConnection
- CallHandler
- Calling Android Native Code in Flutter
- Flutter
- 1. Create a new Flutter project
- 2. Create the MethodChannel
- 3. Create a Flutter Function that Calls the Native Android code
- 4. Flutter UI to display the result
- Complete Code Example in Flutter
- Android Kotlin. Creating the FlutterMethodChannel
- Android Kotlin. The receiveBatteryLevel() Function
- Using Native Incoming Call UI for your React Native App (How I Wrote My First Native Module)
- Native call UI trying to be implemented:
- Intro
- Using react-native-callkeep
- Initial problems with android
- Writing a native module for android
- Conclusion
Sample VoIP Calling App in Android

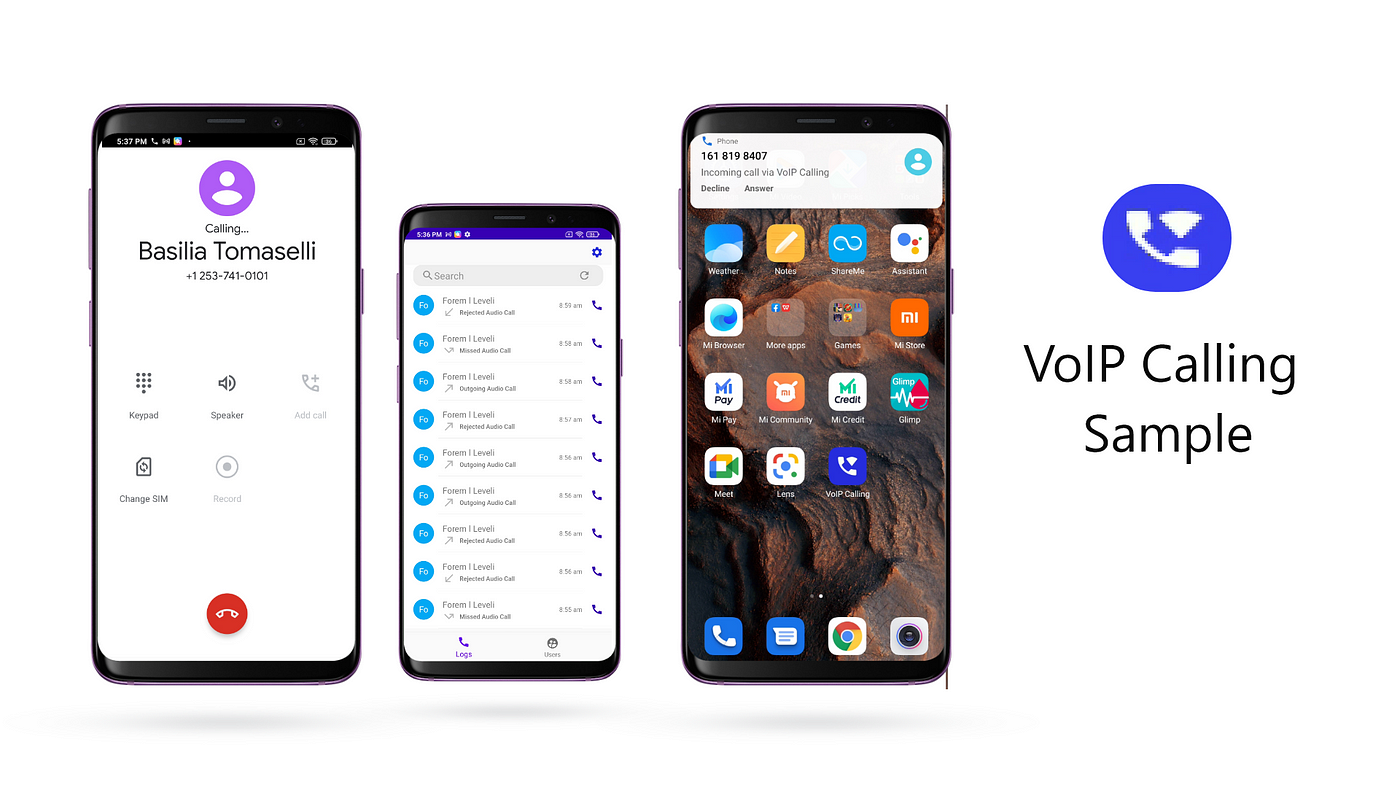
This article describes the designing & implementation of a sample VoIP calling app using CometChat Pro. CometChat Pro is Messaging & Call SDK that provides enormous features for developers to integrate chat. Using CometChat Pro UI Kit, developers can easily integrate real-time messaging & calling support in their app. By the end of this article, you will create a fully functioning Sample VoIP Calling App.
Key Components & Libraries Used
CometChat Android UI Kit — An ready to use UI Kit library which will help us to develop real-time messaging & call support in our sample app within a few minutes.
Firebase — To receive an event when the app is not in the foreground we will use Firebase Push Notification.
ConnectionService — An abstract class that will help you to build VoIP Calls in a sample app. It uses a built-in System UI to manage a call which is also called System Managed. If you wish to use your own UI to manage calls you can use Self-Managed Service.
Prerequisites
Before diving into more details please ensure that you have checked the below points.
— Android studio installed in your system.
— Android Device or Emulator to run your app.
- We will begin by fetching the code from GitHub.
You can clone the project from the Sample VoIP Calling repository.
- It’s necessary to have CometChat Account to run the app.
You can create your account in CometChat and replace the credentials with yours.

Also, please make sure to setup Push Notification Extension in CometChat.
Please click here to know How to setup Push Notification in CometChat.
- Next step is to setup Firebase Account and create a new project. Once the project is created, setup an Android App in the Firebase Project and add google-services.jsonfile in your “ app” folder
- Once the above mentioned configurations are done you can open the project in Android Studio. You will find the project contains two packages ‘ app’ which is our sample app and ‘ uiKit’ is a library provided by CometChat.
- In ‘ app’ you will find the ‘ utils’ package under which we have files to handle Push Notification and VoIP calls.
PushNotificationService
It extends FirebaseMessageService which is used to handle Push Notification received from Firebase. We are using it to notify the message sent to a user when they are not active. We are also handling incoming & outgoing calls through it.
onMessageReceived() : This method gets triggered whenever you receive a push notification from firebase.
CometChatHelper.processMessage() : This method is provided by CometChat SDK to get BaseMessage from “ data” received as JSON Object in Remote Message.
initiateCallService(call : Call) : This method is used to initiate a call through ConnectionService whenever a Call type message is received.
showMessageNotification(baseMessage: BaseMessage, title: String, alert: String) : This method is used to display and handle the notification for the message when is being received by the particular user.
CallConnectionService
CallConnectionService is custom connectionservice class which is binded with the app to handle incoming & outgoing calls. You will find onCreateIncomingConnection(), onCreateOutgoingConnection() methods in it.
onCreateIncomingConnection() : This method get triggered whenever telecomManager.addNewIncomingCall() get success on receiving a call.
onCreateIncomingConnectionFailed() : This method get triggered whenever telecomManager.addNewIncomingCall() fails to receive a call.
onCreateOutgoingConnection() : This method get triggered whenever telecomManager.placeCall() get successfully executed to place outgoing call.
onCreateOutgoingConnectionFailed() : This method get triggered whenever telecomManager.placeCall() get failed to place an outgoing call.
Currently, we are using CALL_PROVIDER as Capability of ConnectionService. So you can see your system’s native calling UI for incoming & outgoing calls.
You can change it SELF_MANAGED if you wan’t to show your own custom UI for incoming & outgoing calls.
CallConnection
It is a Connection class that is used to initiate a connection when a user receives an incoming or outgoing call. It usually helps the ConnectionService class to handle the connection requests and their callbacks. It includes certain methods like onAnswer(), onReject(), onHold(), onDestroy(),etc. Whenever the user receives an incoming call and if the user accepts the call then onAnswer() will be triggered. Similarly, if user rejects the call then onReject() is triggered.
onAnswer() : Whenever this method gets triggered, we use CometChat.acceptCall() which will start the CometChat Call Service and start the call session.
onReject() : Whenever this method gets triggered, we use CometChat.rejectCall() which will reject the CometChat Call Service and end the call session.
onDisconnect() : This method gets triggered whenever the initiator of a call ends the calls before the receiver accepts the call. This will ends the call session and make it a Missed Call.
CallHandler
It is a class that is used to handle and integrate ConnectionService in your app. Below are its methods that are used in your app.
Источник
Calling Android Native Code in Flutter
In this tutorial, we will create a small Flutter function that calls android’s Kotlin native code to read the value of the battery level.
Flutter uses a flexible system that allows you to call platform-specific APIs whether available in Kotlin or Java code on Android.
Flutter’s built-in platform-specific API support does not rely on code generation, but rather on a flexible message-passing style.
Basically, the Flutter part of the app sends messages to its host iOS or Android part of the app, over a platform channel. The host listens on the platform channel, receives the message and calls platform-specific API’s using the native programming language, then sends the response back to the client(Flutter part of the app).
To make it work we will need to do the following:
- Create a new Flutter project,
- Create a MethodChannel object,
- Implement a function that calls the native Android code,
- Prepare UI to display the result,
- Implement a new function in Swift that reads the battery level.
Flutter
A named channel is used for communicating with platform plugins using asynchronous method calls. Method calls are encoded into binary before being sent, and binary results received are decoded into Dart values. The MethodCodec used must be compatible with the one used by the platform plugin.
1. Create a new Flutter project
To start off we will need to create a new Flutter project in Android Studio(or any IDE that you might be using), if you don’t know how to create a project you can refer to the “Hello World App in Flutter” tutorial.
2. Create the MethodChannel
Then we will construct the channel. We will use a MethodChannel with a single platform method that will return the battery level of the host by declaring the following constant:
3. Create a Flutter Function that Calls the Native Android code
Below is a short code example that uses the MethodChannel and demonstrates how to write a function to get the battery level on the device.
As you can see in the code we created a Future function called “_getBatteryLevel()” that awaits for the “platform.invokeMethod(‘getBatteryLevel’)” which is the function we will discuss further down in the Android function section. The Flutter app will first check the platform. Once the platform is confirmed, the app will listen to the platform channel and check for the function that’s being called.
4. Flutter UI to display the result
As you can see we declared a String variable _batteryLevel and gave it a value “Battery Level”. Then we have declared a Future void _getBatteryLevel() function which is asynchronous. Inside the void, we are declaring an empty String “batteryLevel”. Then we wrap the call in a try-catch statement in case the method fails. In the try part of the statement, we will check the native method check battery and pass it in the batteryLevel as a String, then catch any error that might occur. After the try-catch statement, we simply set the state of _batteryLevel to a “batteryLevel” value.
Complete Code Example in Flutter
Below is a complete code example in Flutter. Before running the app we will need to work in the MainActivity file inside the android folder.
Android Kotlin. Creating the FlutterMethodChannel
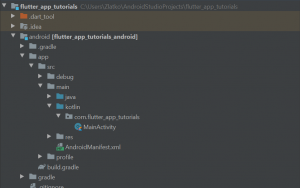
In the MainActivity file override the “application:didFinishLaunchingWithOptions” function and create a “FlutterMethodChannel” that will be tied to the samples.flutter.dev/battery channel name. To find the MainActivity file, open the “android” folder in your flutter project, open the “app” folder, then “main” folder, and in the “kotlin” folder we will find the file “MainActivity”. Have a look at the screenshot below for the location:
Android Kotlin. The receiveBatteryLevel() Function
We are now ready to create the receiveBatteryLevel() Kotlin function that will actually read and return the buttery level value on the device. To do that we will use the native Android Battery API. Add the following function at the bottom of “MainActivity” class.
Here is a complete MainActivity file for reference:
After this, you should be able to see the output on your app, after running it should look like this:

After pressing the “Get Battery Level” button, this should be your output:

Note: If you use an emulator you will probably get “battery info unavailable”.
I hope this Flutter tutorial was helpful for you. If you are interested in learning Flutter, please check other Flutter tutorials on this site. Some of them have video tutorials included.
Источник
Using Native Incoming Call UI for your React Native App (How I Wrote My First Native Module)

A story about my struggles implementing native call display functionality and how this led me to writting my own native module for android. Suitable for developers who are interested in how to get started with native modules for android within React Native or implementing native UI for incoming calls.
A project I was working on required native call UI to be implemented so that when users received a call notification from firebase their phone would ring as if they were receiving a native call. This was a really interesting feature to build but it did not come without difficulty. The library react-native-callkeep was used to implement this solution, this library acts as a fully managed connection service for implementing call UI using react native. However, the project had its own in-call UI we wanted to use, therefore we only wanted to use the incoming call functionality of callkeep. This solution seemed to work fine for iOS with the base recommended implementation, with the downside that it didn’t work as smoothly for the latest android versions we wanted to run (android with a minimum api of 27). To get android working properly for these versions I had to write a native module which mimicked the backToForeground function from react-native-callkeep.
Native call UI trying to be implemented:


Intro
When I first realised the project I was working on would need an incoming call display that transitions into a React Native app I (foolishly) didn’t think much of it, and assumed a simple library would solve most of my worries. As a team we decided to use the react-native-callkeep library which seemed to have all of the functionality required, which was to be able to display incoming call UI after a notification is received.
This implementation however, started to show a few issues when testing functionality on the latest android versions. These issues then led me down a track which ended with implementing a native android module. Writing this native module eventually did result in the desired functionality, although, to properly explain my decision into doing this I need to start from the beginning.
Using react-native-callkeep
The base implementation of callkeep is pretty straight forward and works well out of the box, when initially experimenting with it, the only problem I ran into was that it wouldn’t display the native incoming call UI on certain android emulators. Switching from an android 11 emulator to an android 10Q emulator seemed to do the trick (note: this was only a problem for the emulator as the same functionality seemed to work on a real android 11 phone).
After following the basic installation guide (Found here), I would recommend setting up a callkeep class in your project. The basics to get the display incoming call UI to work for my project was:
This setup will get you the basics that you will need to handle displaying the incoming call UI along with a base setup for answering and ending calls. The key functions here to get only the incoming call UI working is the RNCallKeep.displayIncomingCall and RNCallKeep.endCall .
Initial problems with android
After my initial experiments with callkeep it seemed that IOS worked fine out of the box, however, there were some difficulties to get the same functionality working for android. The difficulties I came across with android are summarised below:
Emulator was not displaying the incoming call UI when correct command was called ( RNCallKeep.displayIncomingCall )
- After experimenting with different emulators and getting the functionality to work, this led me to the conclusion that the android 11 emulator was not set up correctly to use this library.
- Changing to an android 10Q api 29 android fixed this issue, and the incoming call UI was successfully displayed
Answering the call from the incoming UI display on android was not navigating me to the app, the UI acted as if I had never answered the call.

- Solving this issue required some experimenting, but in the end was solved by calling RNCallKeep.endCall on the callAnswered listener and then navigating to the correct page on our app.
- Calling the RNCallKeep.endCall seemed to prompt android to stop displaying the UI and run the rest of the commands in the answered call listener function
- This step needed to be done on android only.
When a call was received, if android was locked, the user would not be navigated to the app but would instead be stuck at their home screen.

- The functionality required here instead of this issue would be for the user to be prompted to unlock their phone, and then be navigated to the app.
- This condition was a bit trickier and required me to dive into the realms of native app development as discussed below.
Writing a native module for android
Fulfilling the functionality required by the lockscreen took some further investigation, the callkeep library instructs you to call the android only function RNCallKeep.backToForeground to bring the react-native app to the foreground. This seemed to work while the app was in background mode but not while the app was in a lockscreen state. Looking into this function I found that it was using some java functions that were deprecated for the android versions necessary for our project. This led me to recreate this backToForeground function natively with an updated set of java functions that would work for the required versions.
Since I am working in React Native to write native code and call it from typescript/javascript I needed to use the React Native bridge. The android bridging documentation from React Native (Found here) has all of the necessary steps required to set up the java module and call it from within your app. Below is an example of the java module I created to start the app activity and request the user to unlock their phone.
The main function of this module is startActivity, which when called gets the context for the React app, if the app is running the function brings the app to the foreground and checks if the keyguard needs to be dismissed, otherwise if the app is not running this function starts the apps activity as a new task. The keyguard is then dismissed by calling the dismissKeyguard function which uses the KeyguardManager to check if the android is locked or unlocked, and asks the user to dismiss the keyguard if the phone is locked.
Putting all of these steps together I could then call the native module in my react app whenever a call was accepted from the incoming UI using the answerCall listener function like so:
Conclusion
Callkeep was able to be implemented as an incoming UI solution only, in both IOS and android platforms. On android, native code was written so that answering the app from the lockscreen would start the react native app and navigate you to the correct screen. After these adjustments the React Native callkeep library ended up being a great fit for this project, performing all the required functionality. I hope this article is able to help anyone deciding between solutions to display incoming call UI, and hopefully cut down on some research and debugging time. I will finally leave you with a gif of the working functionality in all its glory, happy coding!
Источник


