- How to Customize the Navigation Bar Icons on Android Oreo
- How to Customize the Navigation Bar Icons on Android Oreo
- Prerequisites
- How to Set Custom Navigation Bar Icons in Android (No Root)
- Installing and Setting Up Custom Navigation Bar
- Set Custom Navigation Bar Icons
- Customize Navigation Bar with Custom Navigation Bar
- How to Add Custom Icons to the Navigation Bar in Android O
- How to set Custom Nav Bar Icons in Android O
- How to get Custom Icons for your Nav Bar
- Status Bar Icons
- In this document
- See also
- Android 3.0 and Later
- Overview of changes
- Size and format
- Style, colors, and effects
- Automatic dimming
- Example icons
- Android 2.3
- Size and positioning
- Style, colors, and effects
- Do’s and don’ts
- Example icons
- Android 2.2 and Earlier
- Structure
- Light, effects, and shadows
- Color palette
How to Customize the Navigation Bar Icons on Android Oreo
Ever since Google ditched hardware capacitive buttons and moved to software navigation keys with the release of the Samsung Galaxy Nexus, people have been looking for ways to customize the navigation bar. Without root access or a custom ROM, customization of the nav bar was fairly limited until it was discovered that Android Nougat’s hidden navigation bar tuner could be accessed without needing root. The same song and dance was played with Android 8.0, where it was added in an early developer previewВ but is still accessible in the final release. What’s missing from these guides, however, is that while you’re able to add, remove, or rearrange nav bar buttons, changing the navigation bar icons has been a bit trickier.
While it’s definitely possibleВ to change nav bar icons using the ADB method or Custom Navigation Bar app, the end result is that you lose the ability to do long presses on the buttons. That means you can’t long press on the home button to bring up the Google Assistant, for instance. Furthermore, the other workaround which used overlays to draw on top of the nav bar icons no longer works due to security purposes, so it seems that there’s no way to change the icons on the navigation bar without root.
Fortunately, it’s now possible to theme Android’s System UI with the Substratum theme engine. Better yet, it doesn’t require root access, and it doesn’t face any of the issues mentioned above. This method is a true replacement for the nav bar icons. In this tutorial, I’ll show you how to change the navigation bar icons on your Android Oreo device without root.
How to Customize the Navigation Bar Icons on Android Oreo
Prerequisites
We’re going to assume you’ve already read through and have setup the Andromeda add-on for Substratum which enables you to theme your phone without root. If not, please go do that now, and make sure you stop at the end of part 1 of that tutorial as that’s all you’ll need to do before you can continue with this tutorial.
Once you’ve confirmed that Substratum is working without root on your device, it’s time to get started. Go ahead and download the Substratum theme app we’ll be using to customize our nav bar, aptly called “Navbars.”
Источник
How to Set Custom Navigation Bar Icons in Android (No Root)
If there is one thing that Android does better than any other mobile operating system, it’s customization. If you’re running a rooted device, you can do pretty much anything on it. However, even without root access, Android allows users to customize their phone endlessly. With the Google Pixel, and now the Galaxy S8, we’ve seen some really cool navigation bar icons, and while those icons are not available on other devices, it doesn’t mean we can’t customize the navigation bar to get icons like that. So, if you want to customize your Android phone to have a navigation bar that looks like the Pixel, or the S8, here is how to set custom navigation bar icons in Android:
Installing and Setting Up Custom Navigation Bar
Getting custom navigation bar icons on Android is very easy, you just need an app called “Custom Navigation Bar” (Free). Once you have it installed, just follow the steps below:
- Launch the app, and tap on “Get Started”. This will take you to a screen with instructions on how to give the app permissions to change the navigation bar icons on your phone. You’ll need ADB for this, so connect your phone to your laptop, and allow USB Debugging.
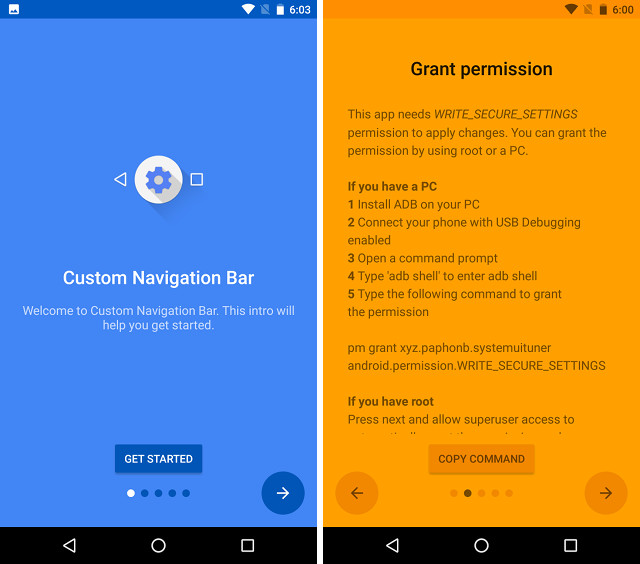
- Launch Terminal (or CMD on Windows), and type the following commands:
adb shell
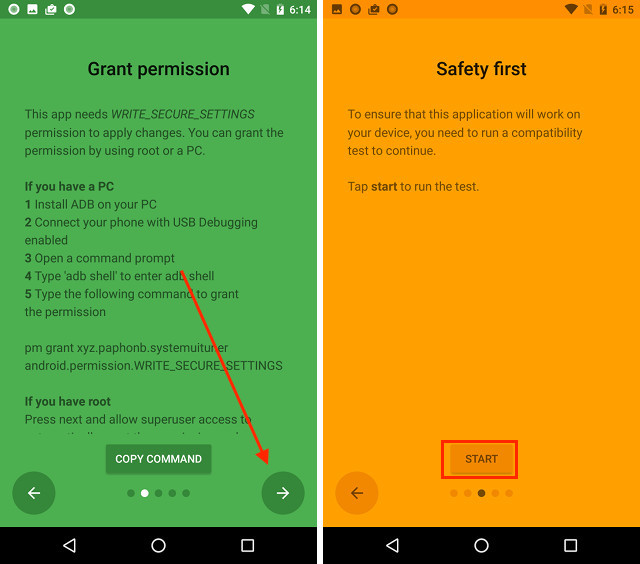
pm grant xyz.paphonb.systemuituner android.permission.WRITE_SECURE_SETTINGS

- Once you’ve done that, the yellow screen in the app will turn green, signifying that the app has the required permissions. Tap on the right arrow. You’ll be required to run a compatibility test for your phone. Just tap on “Start“.
Set Custom Navigation Bar Icons
Now that you’ve set up the Custom Navigation Bar app, you can play around with the settings and change the navigation bar icons on your phone. For demonstration, I’ll change the icons on my Nexus 5X to those of Galaxy S8. You’ll have to download the image files for the icons, that you can find readily available on the internet. Once you have that, just follow the steps below:
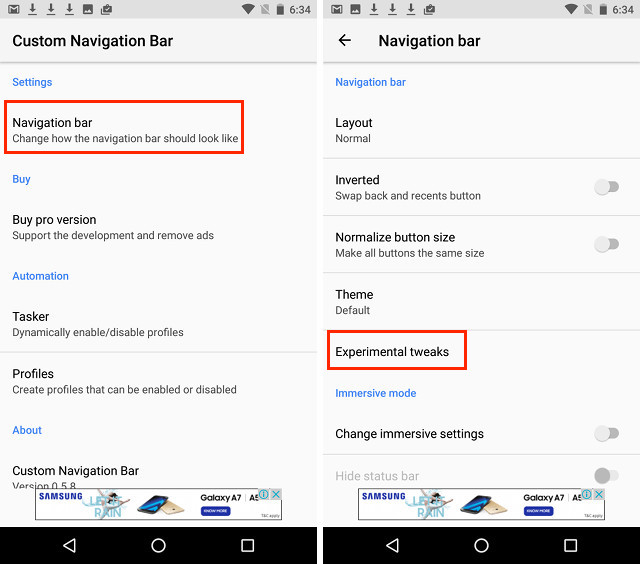
- Launch the app and tap on “Navigation Bar“. Here, tap on “Experimental Tweaks“.
- Under “Back“, tap on “Type“, and select “Keycode“.
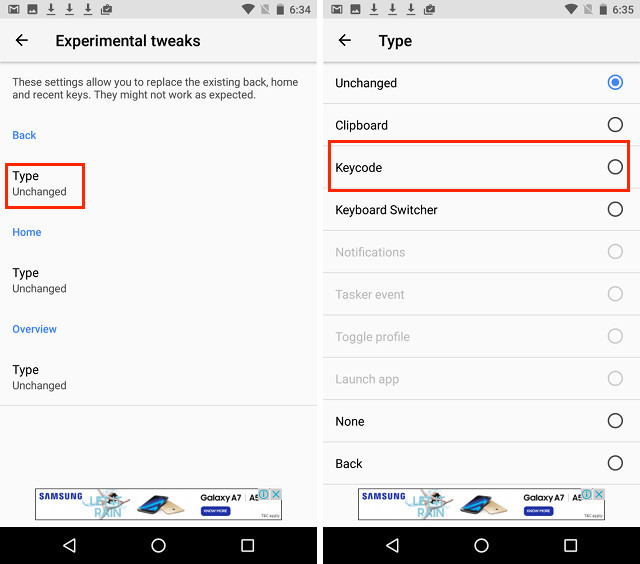
- Then, under “Back“, tap on “Keycode“, and select “Back“.
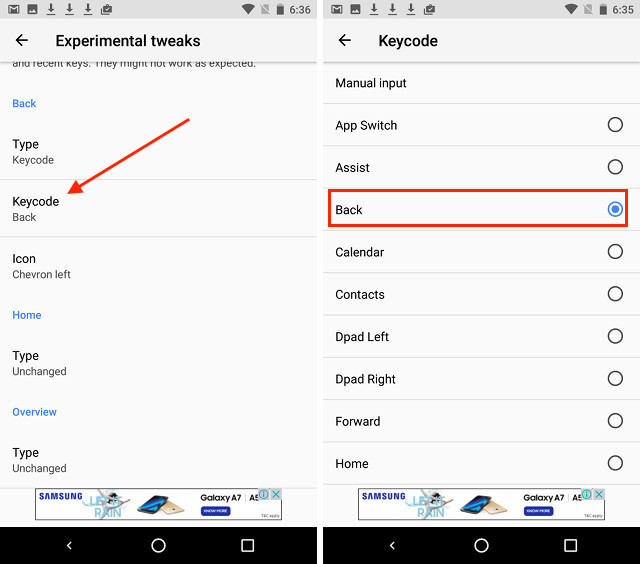
- Then, tap on “Icon“, scroll down and tap on “Browse File…“.
- Select the downloaded image for the back key, and tap on “Ok“.
- Repeat the process for each of the Navigation Bar keys, and select the appropriate images. The keycode for the “Home” key is “Home”, and for the “Recent Apps” key is “App Switch”.
Once you’ve done that, your navigation bar should have the icons that you want. Check out this Nexus 5X with a navigation bar that looks like the Galaxy S8’s or whatever else you wanted it to look like.
The Custom Navigation Bar app has a number of preset themes available as well. However, they are only available in the Pro version of the app, which will cost you
Customize Navigation Bar with Custom Navigation Bar
Custom Navigation Bar is a very powerful app that you can use to completely customize your navigation bar. You change the icons to custom icons that you want, or you can use on the preset themes in the app to apply a different look to your navigation bar with one tap. There are a lot of other features in the app as well, and it’s definitely worth a try. As always, if you know of some other, easier way to change the look of the navigation bar on your Android device, do let us know about it in the comments section below.
Источник
How to Add Custom Icons to the Navigation Bar in Android O
If you’ve been following our coverage of Android O, then you might have seen our tutorials on how to modify the navigation bar to toggle picture-in-picture mode, enable media control keys while playing music, and today how to add forward/previous buttons to quickly browse through your e-mails. The possible uses of a customizable navigation bar are huge, and our first three tutorials only scrape the surface. But while we do have a couple of more useful tutorials to share with our readers, there’s one thing we had to cover before we can move on to our next tutorials: how to add custom icons to the navigation bar keys in Android O.


Android O’s new navigation bar customizer, accessible through SystemUI Tuner, allows you to set a keycode to a navigation key. (Reminder: in order to access SystemUI Tuner, you have to pull down the status bar and long-press on the gear icon in the top right until you see a toast message telling you that SystemUI Tuner is now accessible.) Because there are so many keycodes, Android O does not offer an icon for each keycode you can place on the nav bar, but instead allows you to select from 6 icons: circle, plus, minus, left, right, and menu.


Since we figured out how to manually set keycodes from shell commands, we also wanted to figure out what icon possibilities were available. We first discovered that the two navigation bar keys are defined as two system properties under the Settings.Secure class. These two properties are named sysui_nav_bar_left and sysui_nav_bar_right , corresponding to the left nav bar key and the right nav bar key respectively. The properties take a string value, one of either clipboard , menu_ime , or key(KEYCODE_KEY:ICON_RESOURCE) .
Using a test Google Pixel device running the Android O Developer Preview, we discovered that the 6 icons shown by default correspond to particular content resources contained in the SystemUI, represented by a URI.
- com.android.systemui/2131230944 (circle)
- com.android.systemui/2131230848 (plus)
- com.android.systemui/2131231002 (minus)
- com.android.systemui/2131230907 (left)
- com.android.systemui/2131231004 (right)
- com.android.systemui/2131230913 (menu)
Since these values were pulled from the Google Pixel, it’s possible that these icon resources won’t be the same on other Google devices running the Android O Developer Preview. But since the icon resource is a content URI, we are able to replace this with a file URI scheme to point to any icon stored on our device.
How to set Custom Nav Bar Icons in Android O
A file URI looks like the following:
Combining this with our knowledge of setting custom keycodes above, we can now set any arbitrary image as our icon to be shown in the nav bar. For instance, if I want to set my left navigation bar key to KEYCODE_DPAD_DOWN (#20) with a custom down arrow icon saved as down.png and my right navigation bar key to KEYCODE_DPAD_UP (#19) with a custom up arrow icon saved as up.png, both icons stored on the root of my internal storage, my commands would look like these:
You can enter these commands using either an ADB shell or by granting the WRITE_SECURE_SETTINGS permission to SecureTask and then using Tasker to trigger nav bar changes based on certain conditions, as I’ve outlined in my previous tutorials (and will also showcase in another tutorial).
How to get Custom Icons for your Nav Bar
Of course, given the size of your nav bar, you can’t just place any image you download off of the Internet. The image needs to be the right size, otherwise it will either appear too small or most likely appear way too blown up. Getting your own image in the proper size can be a challenge if you don’t already have experience with PhotoShop or other image manipulation software, but luckily there are websites out there that offer many free icons that we can use.
The first thing you’ll need to do is determine your device’s display metrics, which is something you may already know, but in case you don’t, you can look it up on Material.io. Next, you’ll need to correlate your display density with an icon reference chart to determine what size icons you’ll need. Finally, use the free icons database to download the icon you’re looking for in the right size.
Make sure you save the icons you’ll be using in a particular folder such as /NavIcons, and name the icons something simple you can easily reference in your commands.
We hope you find this tutorial useful! For me, personally, one of my major qualms with the navigation bar customizer was the inability to select custom icons for nav keys so I would always immediately know what my nav keys are doing. But now that we’ve figured out how to place our own custom keys and custom icons on our own conditions, we can start making some real use out of our navigation bar.
Источник
Status Bar Icons
In this document
See also
New Guides for App Designers!
Check out the new documents for designers at Android Design, including more guidelines for Iconography.
Status bar icons are used to represent notifications from your application in the status bar.
As described in Providing Density-Specific Icon Sets and Supporting Multiple Screens, you should create separate icons for all generalized screen densities, including low-, medium-, high-, and extra-high-density screens. This ensures that your icons will display properly across the range of devices on which your application can be installed. See Tips for Designers for suggestions on how to work with multiple sets of icons.
Templates for creating icons in Adobe Photoshop are available in the Icon Templates Pack.
Warning:The style and dimensions of status bar icons have changed dramatically in Android 3.0 and 2.3 compared to previous versions. To provide support for all Android versions, developers should:
- Place status bar icons for Android 3.0 and later in the drawable-xhdpi-v11 , drawable-hdpi-v11 , drawable-mdpi-v11 , and drawable-ldpi-v11 directories.
- Place status bar icons for Android 2.3 in the drawable-xhdpi-v9 , drawable-hdpi-v9 , drawable-mdpi-v9 , and drawable-ldpi-v9 directories.
- Place status bar icons for previous versions in drawable-xhdpi , drawable-hdpi , drawable-mdpi , and drawable-ldpi directories.
Android 3.0 and Later
The following guidelines describe how to design status bar icons for Android 3.0 (API Level 11) and later.
Overview of changes
The design for status bar (notification) icons has been revised in Android 3.0. Status bar icons used in Android 3.0 and later are easier to create, and they allow for more flexible presentation in a variety of situations:
- Status bar icons are composed simply of white pixels on a transparent backdrop, with alpha blending used for smooth edges and internal texture where appropriate.
- Icons are square icon contents should fill the available space, although a small amount of internal padding can help maintain balance across status bar icons. See Size and format below for details.
These larger and brighter icons, while highly legible, are too intense for use on dark phone status bars. These icons would be too distracting if used directly in the status bar. Therefore:
- The system automatically resizes and dims these icons in such situations and developers do not need to supply a separate icon for this purpose. See Automatic dimming below for more on this behavior.
Size and format
Status bar icons should be 32-bit PNGs with an alpha channel for transparency. The finished status bar icon dimensions corresponding to a given generalized screen density are shown in the table below.
Note: The system will shrink and dim status bar icons to minimize distractions, allowing users to focus on the foreground activity.
Table 1. Summary of finished icon dimensions for each generalized screen density.
| ldpi (120 dpi) (Low density screen) | mdpi (160 dpi) (Medium density screen) | hdpi (240 dpi) (High density screen) | xhdpi (320 dpi) (Extra-high density screen) | |
|---|---|---|---|---|
| Status Bar Icon Size (Android 3.0 and Later) | 18 x 18 px | 24 x 24 px | 36 x 36 px | 48 x 48 px |
You can also include a few pixels of padding in status bar icons to maintain a consistent visual weight with adjacent icons. For example, a 48 x 48 pixel xhdpi status bar icon can contain a 44 x 44 pixel shape with 2 pixels on each side for padding.
Style, colors, and effects
Status bar icons are flat, pictured face on, and must be white on a transparent background.
In order to maintain consistency across all status bar notifications, status bar icons should use the styling shown in Figure 1.
| 1. | Fill color: | #ffffff |
Automatic dimming
The system may dim and shrink status bar icons to allow users to focus on the foreground activity. For example, in Android 4.0, the platform-standard status bar for handset-size devices reduces icons to 18 x 18 dip and 40% opacity in the status bar, while drawing them full-size and at full intensity in the expanded notification panel. An example of what this looks like is shown below in Figure 2.
Figure 2. Automatic shrinking and dimming behavior in Android 3.0 and later.
Example icons
Shown below are example extra-high-density status bar icons that are used throughout Android system applications.
Warning: Because resources can change between platform versions, you should not reference built-in icons using the Android platform resource IDs (i.e. status bar icons under android.R.drawable ). If you want to use any icons or other internal drawable resources, you should store a local copy of those icons or drawables in your application resources, then reference the local copy from your application code. In that way, you can maintain control over the appearance of your icons, even if the system’s copy changes. Note that the grid below is not intended to be complete.
Android 2.3
The following guidelines describe how to design status bar icons for Android 2.3 (API Levels 9 and 10).
Size and positioning
Status bar icons should use simple shapes and forms and those must be scaled and positioned inside the final asset.
Figure 3 illustrates various ways of positioning the icon inside the asset. You should size the icons smaller than the actual bounds of the asset. Status bar icons may vary in width, but only minimally.
In order to indicate the recommended size for the icon, each example in Figure 3 includes two different guide rectangles:
- The red box is the bounding box for the full asset.
- The blue box is the recommended bounding box for the actual icon. The icon box is sized smaller vertically than the full asset box to allow for varying icon shapes while maintaining a consistent visual weight.
| ||||||||||||||||||||||||
| ||||||||||||||||||||||||
| ||||||||||||||||||||||||
| 1. | Fill gradient: | 90°, from #828282 to #919191 |
| 2. | Inner shadow: | #FFFFFF , 10% opacity angle 90° distance 1px size 0px |
| 3. | Inner content: | Inner content should subtract from the outer shape and consist purely of transparent pixels. |
Do’s and don’ts
Below are some «do and don’t» examples to consider when creating status bar icons for your application.
Example icons
Shown below are standard high-density status bar icons that are used in the Android platform.
Warning: Because these resources can change between platform versions, you should not reference these icons using the Android platform resource IDs (i.e. status bar icons under android.R.drawable ). If you want to use any icons or other internal drawable resources, you should store a local copy of those icons or drawables in your application resources, then reference the local copy from your application code. In that way, you can maintain control over the appearance of your icons, even if the system’s copy changes. Note that the grid below is not intended to be complete.
Android 2.2 and Earlier
The following guidelines describe how to design status bar icons for Android 2.2 (API Level 8) and earlier.
Structure
- Rounded corners must always be applied to the base shape and to the details of a status bar icon shown Figure 5.
- All dimensions specified are based on a 25×25 pixel artboard size with a 2 pixel safeframe.
- Status bar icons can overlap the safeframe to the left and right when necessary, but must not overlap the safeframe at the top and bottom.
- Final art must be exported as a transparent PNG file.
- Templates for creating status bar icons using Adobe Photoshop are available in the Icon Templates Pack.
| Figure 5. Safeframe and corner-rounding for status bar icons. Icon size is 25×25. Light, effects, and shadowsStatus bar icons are slightly debossed, high in contrast, and pictured face-on to enhance clarity at small sizes.
Color paletteOnly status bar icons related to the phone function use full color; all other status bar icons should remain monochromatic. Источник  Когда к мобильному устройству присоединены наушники  ОС Google Android развивается, и по всему видимому |

