- Navigation component android dependencies
- Navigation in Android App Using Navigation Component
- Table of Contents
- How Navigation Component Works
- Setup
- Navigation Component Example
- Navigation graph (shopping_nav_graph)
- ProductsListFragment
- Navigation graph (checkout_nav_graph)
- AddressFragment
- PaymentActivity
- Main activity
- Main activity layout(shopping_activity)
- Menu (shop_menu)
- Navigation Component BottomNavigationView Example
- Activity
- Activity Layout
- Navigation Component Navigation Drawer Example
- Activity
- Layout
- Passing Data between Destinations
- Transitions between Destinations
- Navigation Component Examples
- About
- Android Navigation Components — Part 2
- Navigation Graph
- Navigation Destinations
- Navigation Action
- Navigation Host
- Implementing the Navigation Components in your project
- Add the Navigation Components dependencies
- Create a Navigation Graph File
- Adding Destinations to the Graph
- Hosting the Navigation Graph
- Navigating between destinations
- Passing data between destinations
- Conclusion
Navigation component android dependencies
Navigation in Android App Using Navigation Component
Android navigation component, which is one of the architecture components, can be used to implement navigation in android applications. Using navigation component, you can separate navigation flow logic from the other parts of task code. This way navigation flow can be easily modified without having to make many changes in the code. It also eliminates the need to write boilerplate code to link fragments or activities in applications.
In this tutorial, you can learn about navigation component and how to implement navigation using navigation component with an example.
Table of Contents
How Navigation Component Works
A task or a feature in an app usually consists of several screens where data is viewed, selected or entered. In android app each screen is implemented as a Fragment or an Activity.
When user starts a task, screens or destination in the flow to complete the task are shown one after another. Usually a button click or an item selection handler starts next fragment or activity (destination) in the flow.
With Navigation component framework, all the destinations of a flow are defined in the xml, which includes the definition for linking of destinations. All that needs to be done in the code to show the next screen in the flow in response to an event on a UI widget of current screen is to use Navigation component class and passing next screen destination ID defined in the xml to it.
The xml which contains navigation info needs to be created in navigation resource folder. To define destinations and links in xml, you can directly add corresponding xml elements to it in text view or it can be created using the navigation editor which can be accessed by opening the navigation xml file and clicking the design tab.

Following navigation graph xml contains two fragment destinations. Starting destination can be defined by assigning a destination id to startDestination attribute of navigation root element. In the below example searchFlights destination is the starting destination. The destination searchFlights is linked to flightsList destination by adding action element to searchFlights destination and assigning flightsList destination id to destination attribute of the action element.
After navigation xml is defined, navigation definition needs to be added to the activity which manages the flow of the task. This is done by defining a fragment in the activity layout using NavHostFragment class provided by navigation framework as fragment and adding the navigation graph to it by setting navGraph attribute to point to resource id of navigation xml.
After the navigation xml is tied to an activity, destinations defined in the xml needs to be linked to UI widgets starting from the start destination so that next screens are shown in response to the events of the widgets on previous pages. This can be done using NavController class. You need to call navigate method on NavController by passing the destination id in the widget event handler, for example button click handler.
That is how destinations are defined and connected to enable navigation in android apps using navigation component.
Setup
You need to add following navigation component dependencies to your module’s build.gradle file.
To use navigation component editor, which helps you in creating navigation graph, you need to install android studio 3.2 or later versions and enable navigation editor by going to settings, experimental and checking Enable Navigation Editor option.

Navigation Component Example
Following example shows how to use navigation component. It uses shopping and checkout tasks and defines two navigation graphs for each task. Navigation graph contains fragment and activity destinations. Shopping flow contains products list fragment destination and product details fragment destination. Checkout flow contains address fragment and payment activity.
Menu options to access these two tasks are provided as options menu on app bar.

Navigation graph (shopping_nav_graph)
Here is the navigation graph for shopping flow.
ProductsListFragment
Navigation graph (checkout_nav_graph)
AddressFragment
PaymentActivity
Main activity
The main activity inflates options menu which provides options for user to start either shopping flow or checkout flow. Launcher activity layout contains frame layout which works as a place holder for fragment destinations of the selected flow. The fragment (NavHostFragment) defined in the activity layout points to shopping flow navigation graph, so the starting screen will be product list fragment.
Main activity layout(shopping_activity)
Menu (shop_menu)
Navigation Component BottomNavigationView Example
Destinations defined in the navigation graph can be tied to menu items of bottom navigation view. To do that, menu item ids should match to the ids of destinations defined in the navigation graph. In the code, you need to use NavigationUI class to integrate menu items and destinations. Let’s see how to integrate BottomNavigationView and navigation component with an example. In this example, shopping and checkout flow destinations are defined in one navigation graph and two menu items defined for bottom navigation view connect to start destination of each flow. 
Activity
Activity Layout
Ids of the menu items are same as ids of destinations. Menu item shop points to starting destination of shopping flow and checkout menu item points to starting destination of checkout flow.
Navigation Component Navigation Drawer Example
Like bottom navigation view is used with navigation component, navigation component can be integrated with navigation drawer in the same way.

Activity
Layout
Passing Data between Destinations
In the following example, MovieDetailsFragment can receive arugment.
In the source fragment, where navigation to the next destination happens, you need to create a bundle and add the argument to it and pass it to navigate method of NavController.
In the destination fragment, get the data sent from the source fragment.
Transitions between Destinations
Navigation Component Examples
You can find complete code here

About
Android app development tutorials and web app development tutorials with programming examples and code samples.
Источник
Android Navigation Components — Part 2

Two weeks ago at the Google I/O, Google released a lot of great tools to help developers speed up their development process and build better apps.
Some of these announcements were the Android Navigation Components. The Navigation Components is a library part of the Android Jetpack set of libraries.
This library was created to help with the implementation of consistent navigation in android apps.
In my previous post, I talked about the pre-work I think you should to create or map out your app structure.
Understanding the app structure is the key to help you better start or migrate your app to use the Navigation components.
If you did not have a chance to read my previous post I would recommend you to do it so here before you continue.
In my previous post, I took as an example an app to find nearby events and allow the user to buy tickets.
At the end of the post, we ended up with the following use-case diagram:
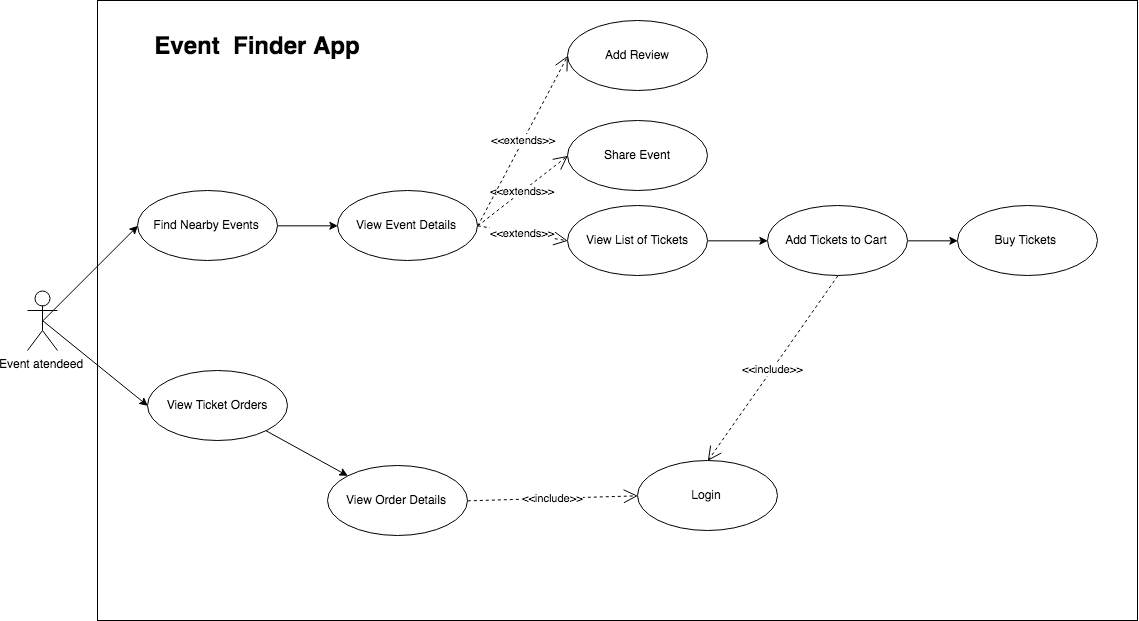
If you take this diagram and rotate it 90 degrees clockwise, you will end up with something that looks like a tree. In this tree, you will notice that:
- The most important actions the user need to do are on the higher levels.
- The least important actions the user need to do are on the lower levels.
- To achieve some of the actions the user needs to follow a set of steps.
- There are some flows that depend on nested flows(Login is a nested flow).
Before starting the implementation of the Navigation Components, let’s take a look at the main concepts of the library:
Navigation Graph
The Navigation Graph is a graph that describes a group of Navigation destinations and their connections.
If you take a look at the use case diagram above, it can be represented using a single Navigation Graph or a set of multiple Navigation Graphs depending on the implementation you decide to go with(Single Activity or Multiple Activities application).
Navigation Destinations
A Navigation Destination can be a screen or any View in your app. In the use case diagram above, a Navigation Destination is equal to the different use cases the user can do.
Navigation Action
A Navigation Action is a link that connects 1 destination with another.
An action knows which destinations it is connecting and the kind of information that will flow between them.
Navigation Host
The Navigation Host is a component that knows about all the destinations and actions in the Navigation Graph.
It handles performing the navigation within the different destinations.
Implementing the Navigation Components in your project
In order to start implementing the Navigation Components in your app, you will need to first update the version of Android Studio you are working on to the latest 3.2 Canary build.
This will ensure you have all the latest tools such as the Navigation editor available to support you with implementing navigation. You can find the latest version of Android Studio here.
Add the Navigation Components dependencies
Create a Navigation Graph File
The first step to start using the Navigation Components is to create a Navigation Graph resource file.
As I mentioned earlier, this file is where we define the different destinations in the app and how they are connected.
An app can have more than 1 Navigation Graph and these Navigation Graphs can be nested together.
To create a Navigation Graph file, perform a right click from anywhere inside your app module, select the option New -> Android Resource File.
This will open a template to create a new Android resource file.
Fill the template by giving the name of your file and use the Resource Type drop-down to select the Navigation resource type.
When you are done, press ok and the Navigation Editor for this file will be opened as shown below.
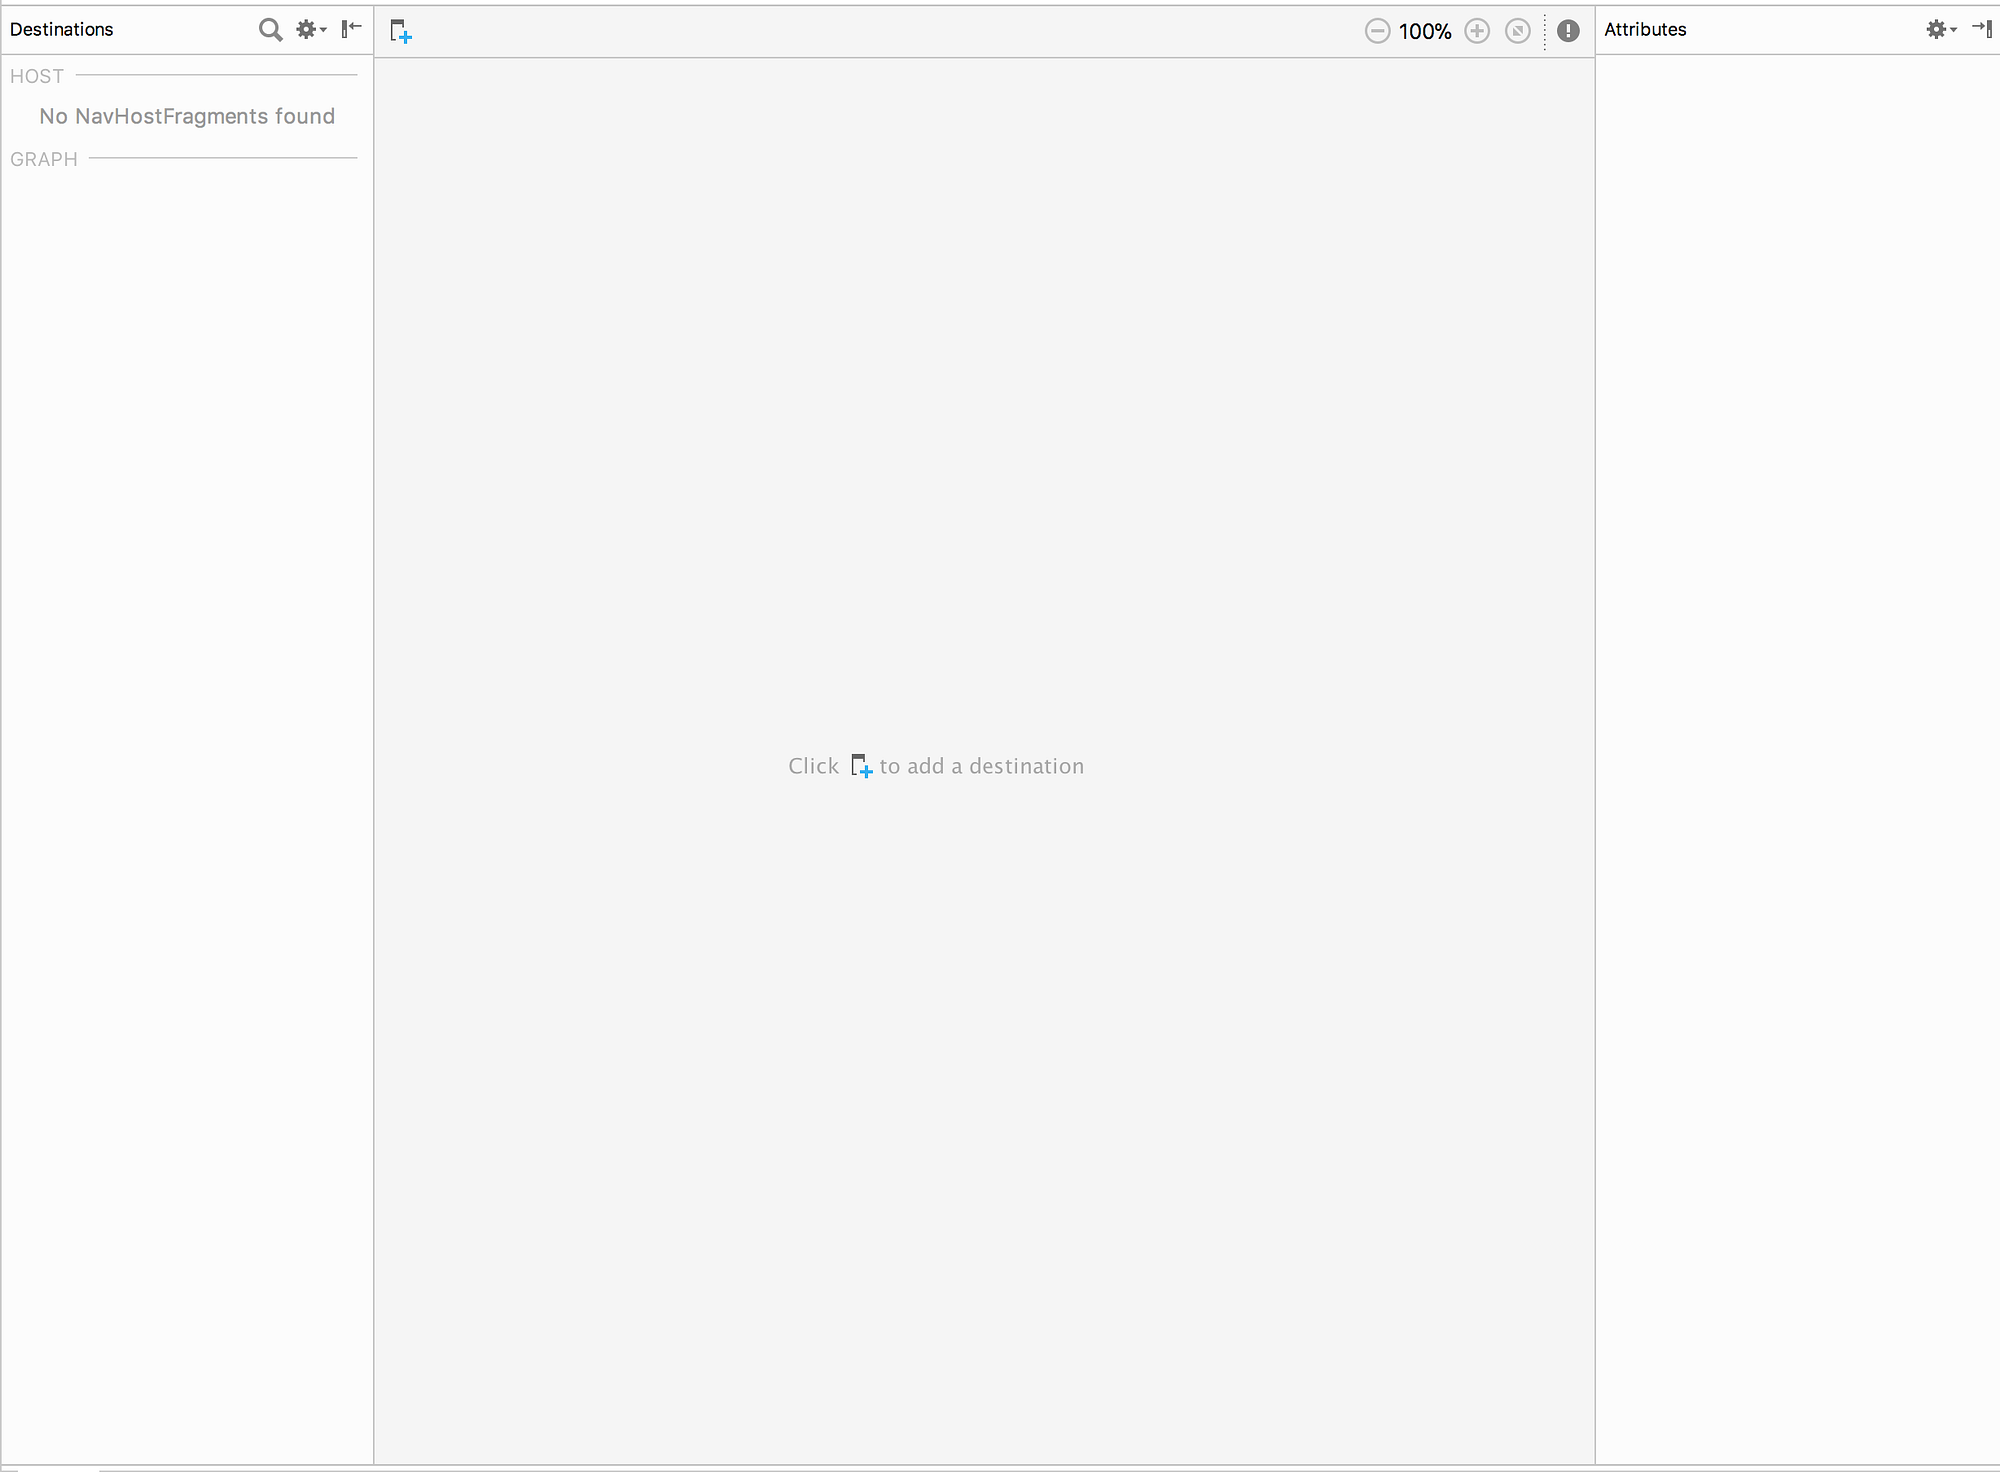
The Navigation editor shown above is divided into 3 different sections. From left to right:
- A that section shows the list of all the destinations in the graph and where is the navigation graph hosted.
- The middle and big section is where you can see a visual representation of all the destinations in the graph and their connections.
If you are using the tools namespace in your layouts, the data will be rendered here too and you can have a good view of your app and sample data. - The third and rightmost section is the attributes section. This section content shows up only if you select a destination or an action. This section will show and allow the modification of the attributes of the selected item be it an Action or a Destination
Adding Destinations to the Graph
Start building your Navigation Graph by adding the different destinations in your app. I encourage you to start building your navigation graph from top to bottom.
I find it easier this way because the topmost levels of the use-case diagram will have a small number of destinations.
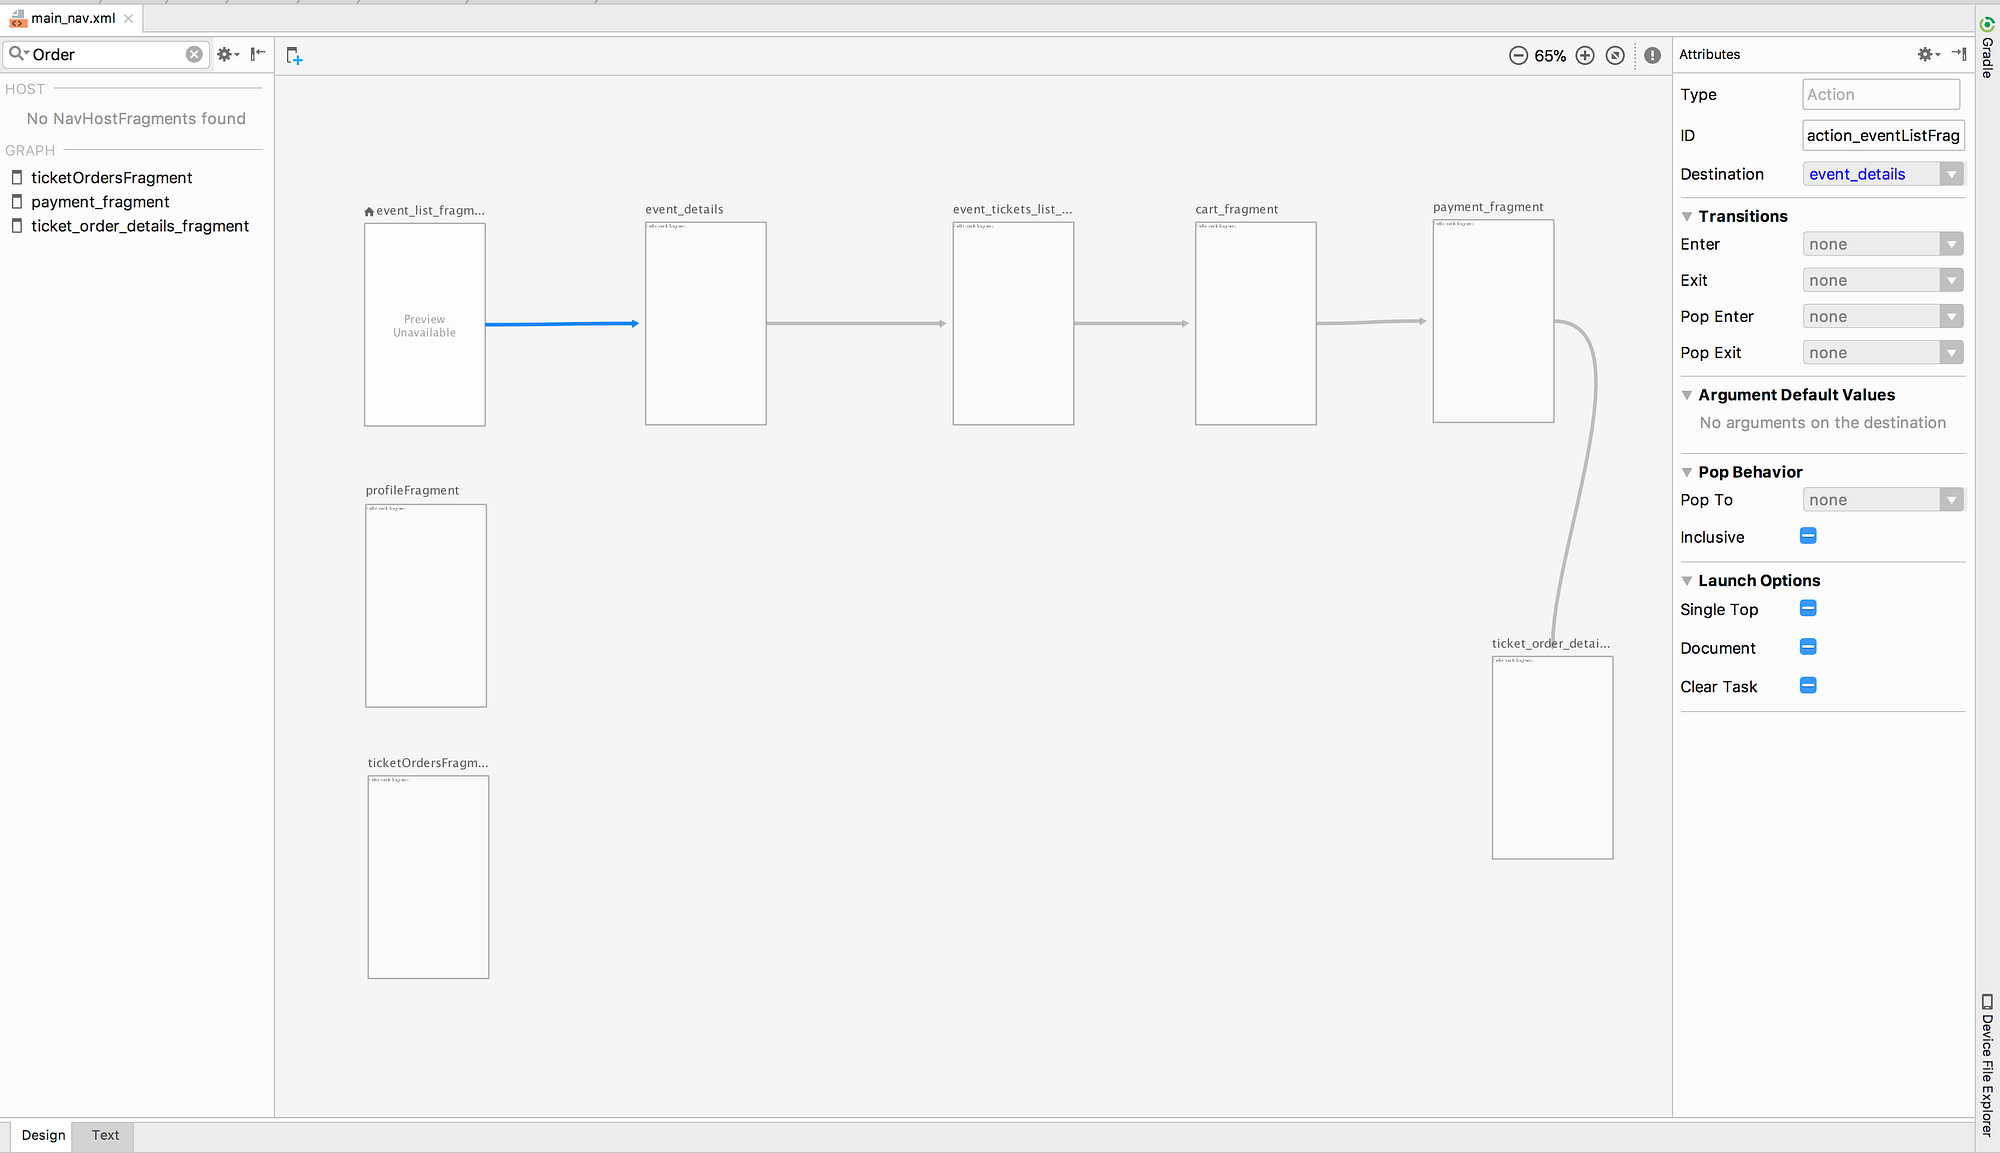
If we add the topmost destinations in the Event Finder app used as an example of this post, we will have something like this:

As you can see we have 3 destinations, that are the entry points to the app. These destinations are not connected to each other and so there will be no action linking them together.
I will show how to navigate to each one of these destinations later on.
For now, let’s add the fragments to buy tickets and have a flow of interconnected destinations.
To do that, you should first repeat the process of adding new destinations to the Navigation Graph.
To start making the connections, select the destination where you want to start and drag a line connecting the ending destination.
Doing it for the example of this post, we will now have the Navigation Graph look like this:
Hosting the Navigation Graph
As it is, this Navigation Graph does not do anything but to give a good visual representation of what is the user journey within the app.
This is because a Navigation Graph needs a special container called a Navigation Host.
This component takes a Navigation Graph and provide mechanisms to Navigate through the different destinations using a NavController .
The Navigation Host does all the heavy lifting for us such as doing the fragment transactions and all the other things needed to perform navigation .
If you are using the single Activity app type of structure that Google is suggesting now, your app will have one Activity with only one Navigation Host and one Navigation Graph.
If you are doing a migration, it is recommended to separate your flows into different Activities and provide a Navigation Graph and host for each one of the Activities during the transition stage.
It doesn’t matter if you are starting a new app or migrating an existing one, your Activity layout will likely be the same and will only contain the Navigation Host as shown below:
The two things to notice on the snippet above are the custom attributes:
- app:navGraph : defines which Navigation Graph will be associated with the Navigation Host
- app:defaultNavHost : A boolean that if set true will allow the Navigation Host to intercept when the system back button is pressed.
Now, If you launch the Activity that has the Navigation Host, it will show on screen the destination set as the starting point in the navigation graph.
pro-tip: If you want to visualize how your fragments look like in isolation, set the Fragment as the start destination in the navigation graph.
To do so, do a right click on top of the destination in the Navigation Editor and select the “Set as start destination”.
Navigating between destinations
Now that the Navigation Graph is hosted inside the NavFragmentHost , let us look at how you move from one destination to another.
In the example shown here the process of navigating to one destination is done after an event happens in the starting destination. For example, the navigation to the EventDetails Fragment happens when an event in the list is clicked.
To Navigate between destinations, the Navigation Host has a component called NavController .
The NavController component is responsible for managing the whole process of Navigation within a Navigation Host.
To perform the Navigation within destinations you need to first get the NavController from the Navigation Host.
Do this by using the static method of the NavHostFragment findNavController like this:
After getting the NavController , the navigation to the Event Details destination can be done like this:
R.id.event_details_fragment is the destination id for the EventDetailsFragment.
To navigate back to the previous destination, the process is similar and you need to first get the NavController and then call the navigateUp function like this:
You will normally implement this method to handle the press of the Up Button in a destination. When using this method the NavController will figure out what does going up mean for your destination.
Passing data between destinations
Navigating between different destinations is the core thing but most of the time we are not just going to another destination but we need to send some kind of information in the process.
We still do this by using Bundles in 2 different ways:
- A type-safe way by using the Navigation Components Safe args Gradle plugin.
- A non type-safe way by constructing the Bundle ourselves as we always did.
I will talk about safe args in the next post alongside some other things I find cool but not necessary for now.
Using the second way, to pass information between destinations, I will first create a companion object in the destination with a function named bundleArgs that will take whatever arguments the destination needs and return a Bundle.
This approach helps me keep everything related to bundling the args and extracting them inside the destination Fragment.
To navigate to this destination and pass the bundle of information, you will need to use one of the overloads of the navigate method that takes the action and arguments:
The way used to extract these arguments in the navigation destination remains the same.
Conclusion
After doing the pre-work I recommended in the previous post, implementing or migrating to the use of the Navigation Components is easy and straightforward.
This is because the api’s are clear and the tools to support them in the latest version of Android Studio are great.
By now, you are in a very good shape to start implementing the Navigation Components on your own projects and you can do that using the Single Activity application recommendation from Google if you are starting a new project or start by having multiple Activities with their own Navigation Graph if you are migrating a large app.
I look forward to seeing you in the next post to talk to you what is going on under the hood and some tips and tricks such as the extension functions provided to hook the BottomNav of the app directly with a NavController.
If you have any questions or comments, please feel free to drop them in the comments section below or send me a tweet.
Источник


