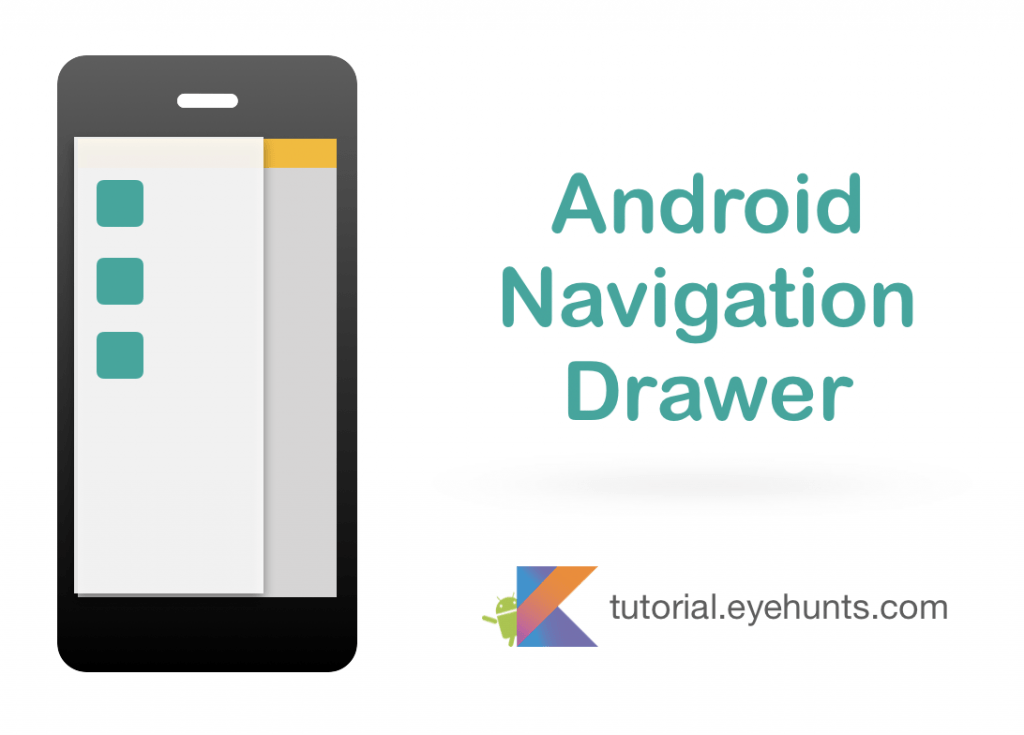
- Navigation Drawer
- Алгоритм добавления шторки в интерфейс
- Зависимости
- Фрагменты
- Навигация
- Меню для шторки
- Header для шторки
- Объединяем все вместе в макете activity
- Navigation drawer android kotlin
- Android Navigation Drawer in Kotlin
- How to create a Custom Navigation Drawer in Android using Kotlin
- Adding dependencies
- Creating the Custom Navigation Drawer Layout
- Creating the RecyclerView’s Listener
- Creating Custom Drawer’s Model
- Creating Drawer’s RecyclerView Adapter
- Setting up the Drawer
- Android navigation Drawer Tutorial and Example in Kotlin
- In this tutorial, you will learn the following:
- Add Dependencies
- Adding Toolbar to your layout
- Set the toolbar as the action bar
- Add the nav drawer button
- Let’s Build Android Navigation Drawer example in kotlin:
- Output screenshot Android Navigation Drawer :
- Download source code Android Navigation Drawer in kotlin
Navigation Drawer
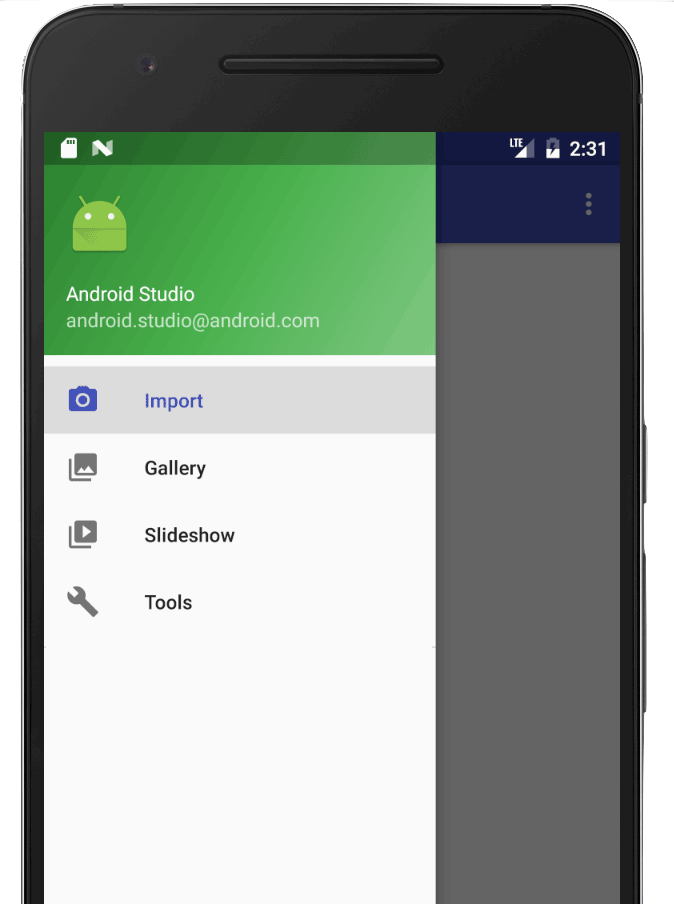
Navigation drawer — это главное меню приложения, которое выдвигается слева направо при нажатии пользователем на значок “гамбургера”. Либо свайпом слева направо. Его еще называют “шторкой” и в открытом виде выглядит так:
Когда этот элемент интерфейса только только появился, необходимо было осуществлять много манипуляций по его добавлению на экран (если не учитывать наличие специального шаблона). Ради интереса можно ознакомиться со статьей, в которой описывается весь этот нелегкий путь.
Но вот на Google I/O 2018 была предложена совершенно новая концепция навигации по приложению, для которой уже весной 2019 года выпустили стабильную версию. Первоначально носила название Navigation Architecture Component, теперь же именуется Jetpack Navigation.
Главная цель — создание приложений по типу singleActivity.
С выходом Jetpack Navigation добавление шторки в приложении значительно упростилось, уменьшилось количество кода и настроек. Ну и, конечно же, был обновлен шаблон Navigation Drawer Activity.
В примере ниже рассмотрим добавление шторки вручную.
Алгоритм добавления шторки в интерфейс
Зависимости
В этом же файле build.gradle должно быть:
Иначе словите ошибку: 
Фрагменты
Так как основная цель Jetpack Navigation — создание приложений по типу singleActivity, основной контент будет отображаться во фрагментах.
На этом этапе нужно создать классы фрагментов и макеты к ним. В моем приложении будет три фрагмента — MainFragment , SettingsFragment , AboutFragment . По внутреннему содержанию они идентичны (все отображают TextView ), а значит будет достаточно создать один файл разметки.
Макет для MainFragment, SettingsFragment, AboutFragment — fragment_page.xml
Код для класса MainFragment
Для остальных фрагментов код идентичен, разница только в отображаемом тексте.
Навигация
Теперь для созданных фрагментов нужно выстроить навигацию.
Добавляем новую директорию в ресурсы через контекстное меню New -> Android Resource Directory. В новом окне полю Resource type задать значение navigation: 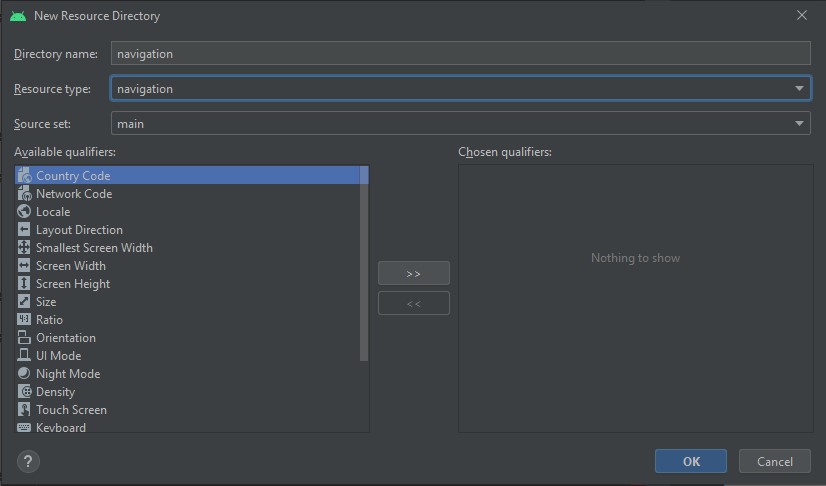
В созданной папке добавляем новый файл nav_graph.xml .
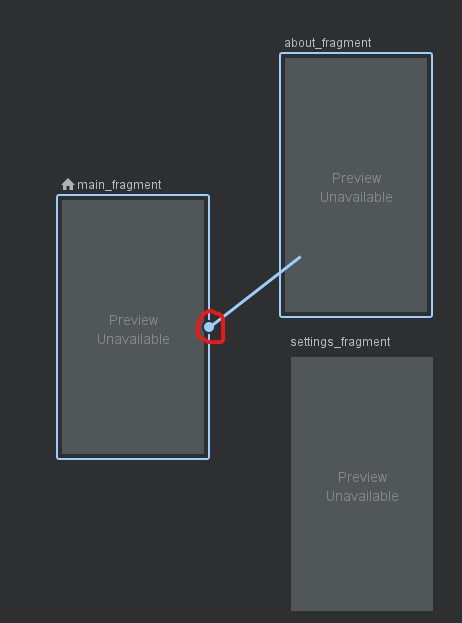
Проще всего спроектировать навигацию через визуальный конструктор. В левом верхнем углу находится кнопка “New Destination”, с ее помощью можно добавить в граф все вышесозданные фрагменты.
При выделении фрагмента в визуальном редакторе появляется кружок в центре правого края. С помощью него выстраивается цепочка переходов от фрагмента к фрагменту.
В результате в nav_graph.xml должен получится такой код:
Обратите внимание на атрибут android:label — он отвечает за заголовок, который будет отображаться в тулбаре для каждого фрагмента.
Меню для шторки
По аналогии с навигацией, нужно добавить папку в ресурсы для меню и файл nav_drawer_menu.xml :
Обратите внимание на идентификаторы в меню — для корректной работы они должны быть идентичны идентификаторам из nav_graph.xml .
Header для шторки
Создается в папке layouts, дизайн на ваше усмотрение. Вот, что получилось у меня ( nav_header.xml ):
Объединяем все вместе в макете activity
Корневым элементом макета activity обязательно должен быть DrawerLayout, так как именно он позволяет шторке выдвигаться из края экрана. Внутри DrawerLayout’а объявляется основное содержимое экрана: toolbar, контейнер для фрагментов и сама шторка — NavigationView.
Элемент является контейнером для наших фрагментов. Подробнее об особо важных атрибутах:
- Значение атрибута android:name=»androidx.navigation.fragment.NavHostFragment» говорит о том, что данный элемент в разметке будет являться хостом для фрагментов. Указывается обязательно в таком виде без изменений, так как хост должен быть производным от NavHostFragment, который в свою очередь обрабатывает смену фрагментов местами.
- app:defaultNavHost=»true» — позволяет перехватывать нажатие на системную кнопку “Назад”, т.е. не нужно ее дополнительно отслеживать и обрабатывать.
- app:navGraph=»@navigation/nav_graph» — связывает NavHostFragment с созданным нами графом навигации.
Для NavigationView устанавливаем ранее подготовленные файлы — header и меню, а также с помощью атрибута android:layout_gravity указываем с какой стороны она будет выезжать.
Источник
Navigation drawer android kotlin

Android Navigation Drawer in Kotlin
Welcome, In this chapter we are focusing on NavigationDrawer, or we can say NavigationView. NavigationView is the panel which shows you the menu, it’s hidden, but when the user swipes from left to right, this menu bar gets open or from the top when the user touches the hamburger icon (3 horizontal lines).

Before using it in your app, you should be clear when to use it and what are the use cases when an app needs the NavigationView:
- Apps with five or more top-level destinations
- Apps with two or more levels of the navigation hierarchy
- Quick navigation between unrelated destinations
Let’s start the development:
1. Create a new project and add the material dependency where our required navigationView is and sync the project.
2. First, create the main screen layout where we will see the navigation menu.
3. Here, we have DrawerLayout, which is our parent view, helps us to draw the view on the screen as its child item.
We are also using toolbar and removed the default toolbar from the styles.xml by change the parent theme
We also have a FrameLayout, so that our navigation view can come over it.
4. We have a NavigationView and two attributes in it:
5. We need to declare that what are the items which we need to show in the navigation view, the list of menu.
To create a menu, first, we need to create a menu folder inside res folder. And now, we will create a menu file by right-clicking on the menu and go to the new > menu resource file and create one.
Another, we have
We need to define the layout which is the header layout in the navigation view, the top part of the navigation view which is mostly used to describe user details or app details.
6. The layout part is completed now, let’s move to the kotlin class. Inside our MainActivity, we will first set the toolbar as a actionbar.
7. Now, we will set the actionBar to toggle state, which is used when we open and close our navogation view.
8. To get the hamburger icon, we will set the indicator
9. To make our NavigationView interactable, we need to set the listener to it.
For that, we will override the method of its interface.
And set the specific action on menuItem clicks. Here, we are showing the toast message. You can also start a new activity, or open fragment etc.
We also need to make sure that if the user press back button, we should check the navigationView should be closed first and then the app. For this, we will override the onBackPressed() method.

Let’s run this application. Cool!! This is working fine. There is much more in NavigationView like icons in the menu items etc. Try to explore more and share us with on our twitter or slack channel.
Источник
How to create a Custom Navigation Drawer in Android using Kotlin
In this tutorial, I’m going to show you how to implement a custom navigation drawer in your android app
Making a Custom Navigation Drawer gives you the freedom to make the slide menu however you like, add an image as a header, or not, add social icons at the bottom of the drawer e.t.c.
Adding dependencies
Go to the app-level build.gradle and add the two following dependencies:
Creating the Custom Navigation Drawer Layout
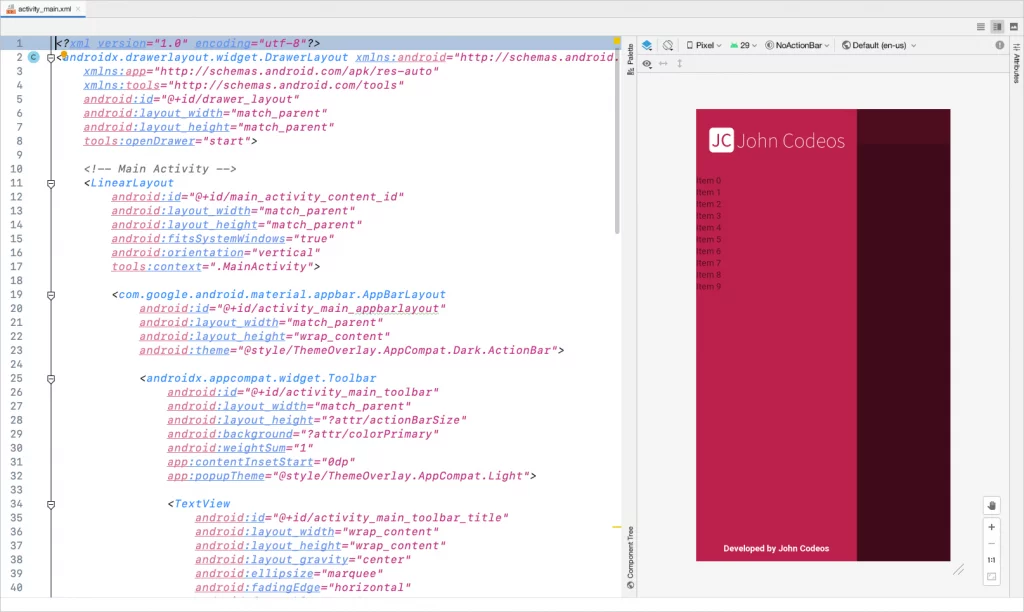
Go to the MainActivity’s layout (activity_main.xml) and add the DrawerLayout with a RecyclerView
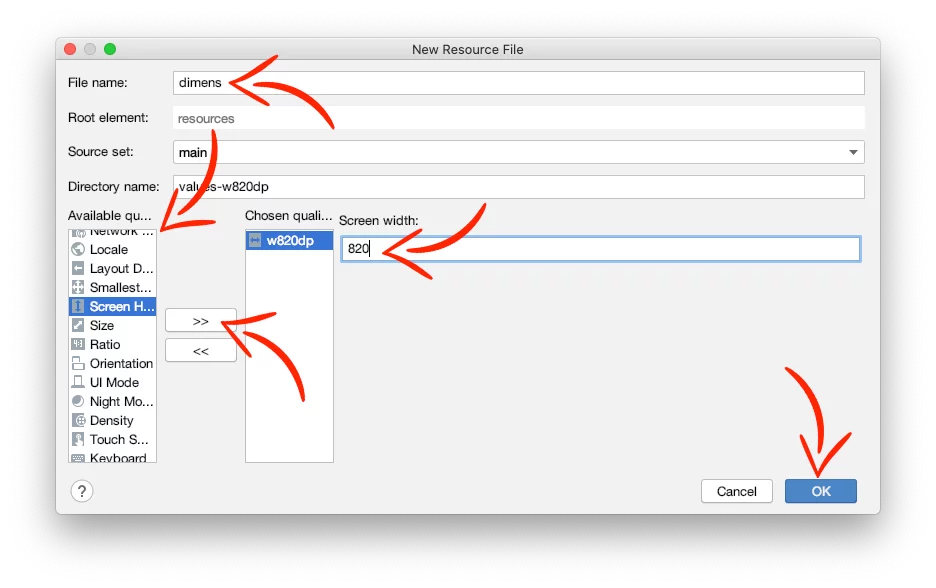
Drawer’s width changes according to the screen width of the device the app is running.
For tablets the Drawer’s width is 240dp, and 260dp for phones
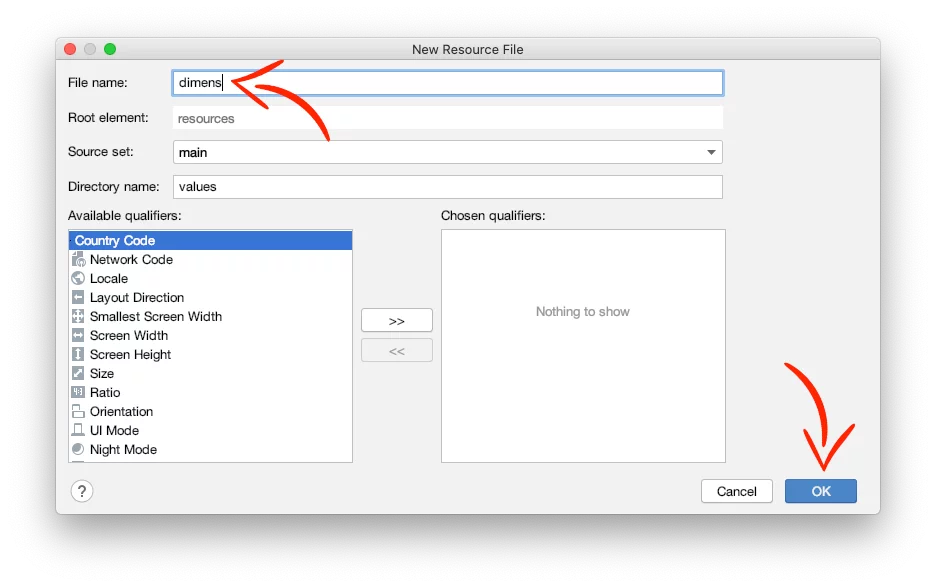
Go to res > press right-click on values folder > New > Values Resource File

For phones, give dimens as a name and press OK
And paste inside:
For tablets, give the name dimens, select Screen Width from the list, press >> and give the value 820
And paste inside:
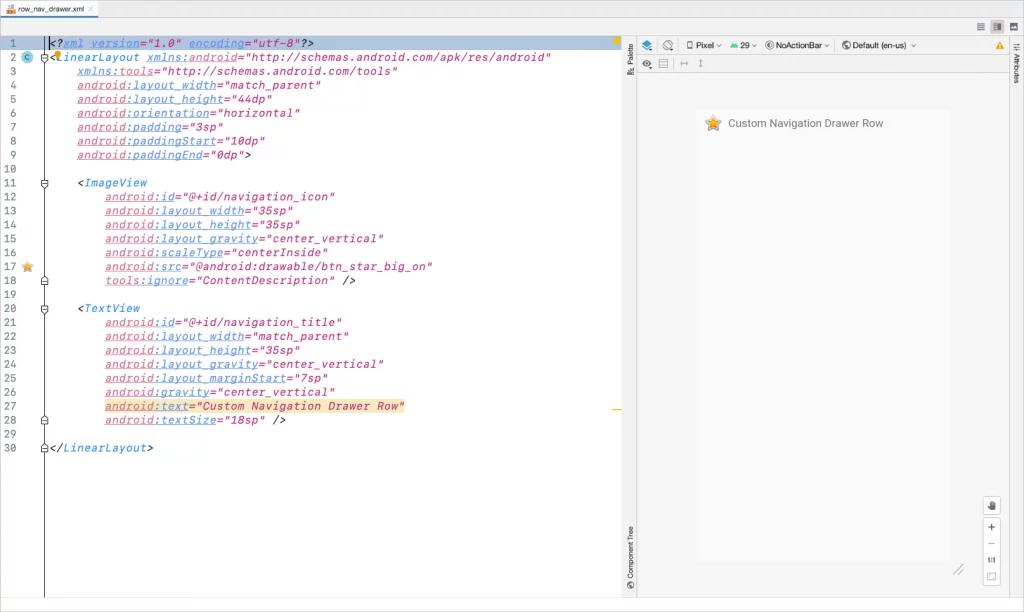
Create a new XML file (Right-click on layout folder > New > Values Resource File) for RecyclerView’s row layout (row_nav_drawer.xml)
Now, we have to create a new theme.
In this theme, we set the color of the Drawer Toggle (hamburger menu icon)

Go to res > values > styles.xml and paste the following theme inside:
Replace the theme, in the AndroidManifest.xml (manifests > AndroidManifest.xml), with the new theme

Creating the RecyclerView’s Listener
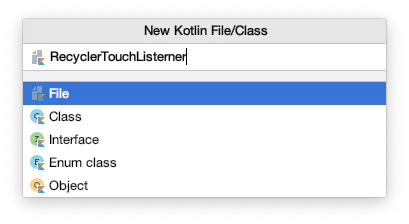
Create a new Kotlin file and name it RecyclerTouchListerner
We’re going to use this class to detect which row of the RecyclerView is selected.
Creating Custom Drawer’s Model
Create a new Kotlin file, give that name NavigationItemModel.kt and paste inside:

Creating Drawer’s RecyclerView Adapter
Create a new Kotlin file with a name NavigationRVAdapter.kt and parameters an ArrayList of the menu items and the current position of pressed item
Declare context at the beginning of the class
Create the ViewHolder
Set the number of items for the ReyclerView
And pass the data to the views (navigation icon and title)
Setting up the Drawer
In the MainActivity.kt, declare the DrawerLayout, the RecyclerView’s adapter and create an ArrayList of the menu items with the NavigationItemModel we made earlier
Set the toolbar, the recycler layout, and add the listener
If you notice, after we select an item from the menu, we close the Drawer after 200 milliseconds. This delay helps to have a smooth close animation if the Fragment or Activity you chose loads a lot of data.
Now, add the default menu item. This menu item will be selected the first you’ll see when the app starts.
In this example, the default menu item is the ‘Home’ Fragment. So, we highlight the item, which is in position 0, and we replace the Activity’s content layout with the fragment.
If your Fragment or Activity uses the keyboard, add the following code to close the keyboard when you open/close the Drawer
And add the following lines inside the strings.xml (res > values > strings.xml)
Back to the MainActivity, add the following lines to set a header image and background on the Drawer
Lastly, when you press the back button on the device, check if the Drawer is open or not, and the number of fragments in your Back Stack
If you have any questions, please feel free to leave a comment below
Источник
Android navigation Drawer Tutorial and Example in Kotlin
Android navigation Drawer: is a UI panel that, shows main navigation within an app like Gmail app has a setting, inbox, chat, etc option in navigation drawer. It’s hidden by default, the user has to slide in from the side or from the top level of the app, the user touches the drawer icon in the app bar to open android navigation.
In this tutorial, you will learn the following:
- What is Android Navigation Drawer?
- An Example of a navigation drawer in kotlin with coding
How to add Navigation Drawer in Android. Let’s starts.
Add Dependencies
Add the following dependencies to your apps module’s build.gradle file. It’s updating time to time, always add the latest one.
Adding Toolbar to your layout
You Have to remove ActionBar Theme and Add Toolbar
Then open your “values/style.xml” file and set the app theme to one without the action bar, such as Theme.AppCompat.Light.NoActionBar :
Here we are using theme: @style/ThemeOverlay.AppCompat.Dark.ActionBar , On the light app theme. You can use any other ThemeOverlay.
Like Light Toolbar on Dark app Theme @style/ThemeOverlay.AppCompat.ActionBar
Set the toolbar as the action bar
Add this in Activity class.
Add the nav drawer button
Let’s Build Android Navigation Drawer example in kotlin:
We will implement Navigation Drawer and basic functionally in this example. In the next Tutorial, we will learn the use of activity and fragments.
Step 1. Create a new project “ Build Your First Android App in Kotlin“
Step 2. Add Dependencies in the apps module’s build.gradle file
Step 3. Create “drawer_view.xml” menu
if you don’t have any menu resource file then create first “Android Resource directory” then create resource file “drawer_view.xml”
Then add the following code,
Note: we are using String directly, for good practice always add in a value/strings.xml resource file. And we are using a common launcher image in every item for simple example, you can use as per your requirements.
Step 4. Add following code in “activity_main.xml” layout file
Step 5. Open your “values/style.xml” and set the app theme
such as Theme.AppCompat.Light.NoActionBar :
Step 6. Open the “MainActivity.kt” and add following code
Step 7. Now Run the application, in an emulator or On your android device.
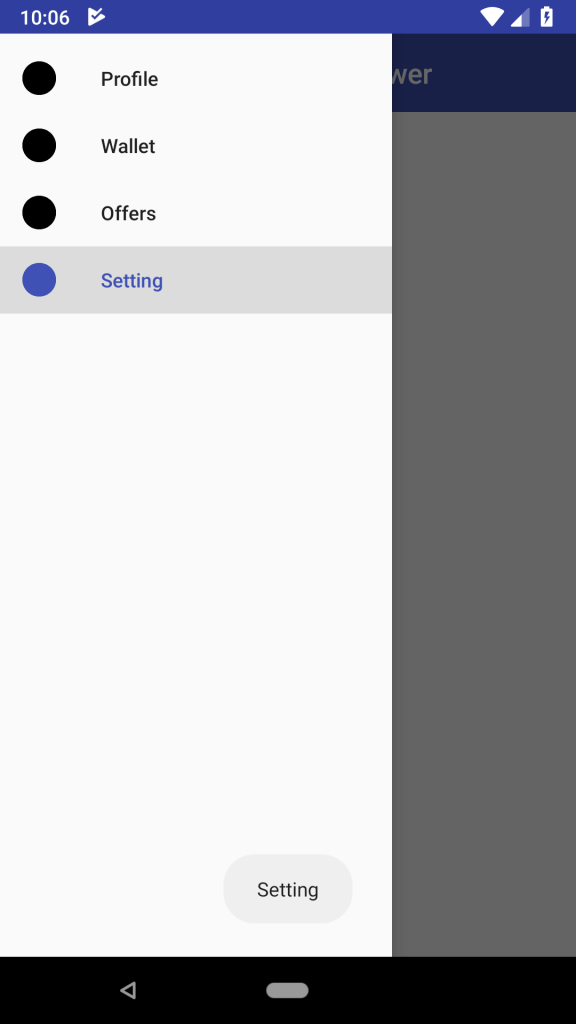
Output screenshot Android Navigation Drawer :
Download source code Android Navigation Drawer in kotlin
Do comment if you have any doubt and suggestion on this tutorial.
Note: This example (Project) is developed in Android Studio 3.1.3. Tested on Android 9 ( Android-P), compile SDK version API 27: Android 8.0 (Oreo)

Degree in Computer Science and Engineer: App Developer and has multiple Programming languages experience. Enthusiasm for technology & like learning technical.
Источник


