- Исправить в Magisk «SafetyNet не пройден: несовпадение профиля CTS»
- Инструкция как исправить: «SafetyNet не пройден: несовпадение профиля CTS» в Magisk
- Шаг 1 — Избавиться от SuperSU
- Шаг 2 — Изменить режим SELinux
- Шаг 3 — Отключить «отладку по USB»
- Шаг 4 — Используете другое ядро
- Шаг 5 — Другие проблемы
- Шаг 6 — включить режим Magisk Core Only Mode
- Шаг 7 — добавить строки build.prop
- Шаг 8 — ввести команду в терминале
- Шаг 9 — Начать все с начала
- [Советы] [Magisk] Кто столкнулся с проблемой прохождения SafetyNet — вот Вам решение.
- How to Pass Magisk SafetyNet on Rooted Android 11
- What is the Magisk SafetyNet Issue on Android 11?
- evaluationType: Basic vs Hardware
- Does your device Support SafetyNet’s Hardware-based Attestation?
- How to Pass Magisk Safety Net on Android 11 Root
- STEP 1: Enable MagiskHide
- STEP 2: Randomizing Magisk Manager with another name
- STEP 3: Hide Magisk SafetyNet from Google Apps, Services, and Frameworks
- STEP 4: Spoofing your Device Fingerprints to Pixel 3A
- STEP 5: Flash Universal SafetyNet Fix Magisk Module
- About Chief Editor
- Sadique Hassan
Исправить в Magisk «SafetyNet не пройден: несовпадение профиля CTS»
В данной статье мы попытались собрать абсолютно все способы решения проблемы в Magisk «SafetyNet не пройден: несовпадение профиля CTS».
Большинство пользователей которые ранее пользовались SuperSU переходят на новый Magisk, так как он имеет довольно множество плюшек, о которых мы говорили ранее.
Одной из главных достоинств Magisk — это возможность прятать от банковских и других приложений наличие Root прав, так как при их обнаружение, они останавливают свою работу.
Но многие пользователи, что установили Magisk Manager, столкнулись с проблемой «SafetyNet не пройден: несовпадение профиля CTS» и в этой статье мы предложим вариантов как ее исправить.
Инструкция как исправить:
«SafetyNet не пройден: несовпадение профиля CTS»
в Magisk
Ниже будут представлены 6 шагов для исправления «SafetyNet не пройден».
Шаг 1 — Избавиться от SuperSU
Если вы получали Root права с помощью ZIP файла SuperSU или CF Auto Root, который установил SuperSU на ваш Android, а после решили поменять на Magisk, то это может быть первой проблемой с SafetyNet.
Удалите SuperSu из вашего смартфона или планшета, а после прошить в Recovery файл UPDATE-unSU-signed.zip чтобы полностью вычистить все из системы.
Шаг 2 — Изменить режим SELinux
Попробуйте установить режим работы SELinux в «Permissive», а после вернуть обратно «Enforcing» и перезагрузить Android.
Шаг 3 — Отключить «отладку по USB»
Если у вас до последнего момента у вас была включена «отладка по USB«, тогда перейдите в меню «Настройки»-> «Для разработчиков» и отключить «отладку» и перезагрузить Android.
Шаг 4 — Используете другое ядро
Поищите в сети интернет стороннее ядро для своего Android, после чего проверьте не исчезла ли проблема в Magisk «SafetyNet не пройден: несовпадение профиля CTS».
Шаг 5 — Другие проблемы
Перейдите в меню настроек Magisk и отключите Busybox и Systemless hosts и перезагрузите Android.
Шаг 6 — включить режим Magisk Core Only Mode
Если все предыдущее шаги вам не помогли, тогда попробуйте включить режим работы Magisk Core Only Mode, который отключает дополнительные возможности Magisk.
Шаг 7 — добавить строки build.prop
С оригинальной прошивки (если вы используете кастом) в файле build.prop, который находиться в разделе /system, скопируйте поля со значения:
И добавьте их в файл build.prop установленной прошивки.
Шаг 8 — ввести команду в терминале
Установите приложение терминал на Android и введите в него следующие команды:
su
sh /magisk/.core/magiskhide/disable
sh /magisk/.core/magiskhide/enable
Шаг 9 — Начать все с начала
Если вам ничего не помогло, тогда попробуйте переустановить прошивку на вашим Android, а после получить Root с помощью Magisk, чтобы избавиться от проблемы «SafetyNet не пройден: несовпадение профиля CTS».
Остались еще вопросы? Пишите их в комментариях, рассказывайте, что у вас получилось или наоборот!
Вот и все! Больше статей и инструкций читайте в разделе Статьи и Хаки Android. Оставайтесь вместе с сайтом Android +1, дальше будет еще интересней!
Источник
[Советы] [Magisk] Кто столкнулся с проблемой прохождения SafetyNet — вот Вам решение.

snlogo.png (673.67 KB, Downloads: 2)
2018-05-03 14:51:44 Upload

Hi.png (296.57 KB, Downloads: 1)
2018-05-03 14:51:35 Upload
Что нужно сделать:
- Первым делом — делаем полный бекап системы!
- Заряд батареи не менее 60%
- За все действия над устройством несете ответственность только Вы.
- Для Magisk ver 13.x/14.0
1. Для Magisk версии Magisk 13.х/14.0, версии 15+ не поддерживается. Нужно: скачать фикс для SafetyNet с XDA.
2. Установить используя Magisk — модули, либо TWRP.
3. Перезагрузить смартфон
- Для Magisk 15.x
Огромная благодарность — Eni_Fadilahза статью на en.miui.com, в которой был выложен файл фикса SafetyNet универсайльный, но подготовленый для Redmi 4X (Santony).
— Если у Вас Redmi 4x (Santony):
1. Качаем фикс SafetyNet (оригинал) — Google disk
2. Устанавливаем при помощи Magisk manager или TWRP
3. Перезагружаем смартфон
Что в пакете?
Помимо всего прочего:
— SafetyNet Fix
— Разблокирует полноэкранные функции
— Boot анимация Miui 9
— Selinux Permissive mode
— Build.prop Tweak
— Папка 4X3 (Launcher)
— Шторка 5X3
— Ручной режим в камере
— Захват объекта нажатием на экран в камере
— Меняет host
— Открывает меню выбора цвета светодиода (не обольщайтесь на многих моделях действительно только белый цыет работает)
Первый метод помогает и на др. моделях смартфонов, но лично я не хочу терять свой файл host. И в настройках системы мне не нужны разные цвета индикатора, т.к. он у меня не RGB, а просто белый. А также изменения в сетки рабочего стола и шторке – я для себя давно уже сделал необходимые изменения интерфейса и мне этого достаточно.
— Если Вы все же хотите минимум изменений и чтобы проходил SafetyNet, но смартфон у Вас не SANTONY:
1. Качаем отредактированный mod (проверена работа на Redmi 5 plus с прошивкой MIUI.su, бетка)
2. Устанавливаем также через Magisk manager или TWRP
- ro.build.description=xxxx
- ro.build.fingerprint=xxxx
НЕ ЗАБЫВАЕМ: в пункте Magisk Hide выбрать программы от которых прятать Root.

m4-1.png (4.31 MB, Downloads: 1)
2018-05-03 14:48:29 Upload

m4-2.png (4.31 MB, Downloads: 1)
Источник
How to Pass Magisk SafetyNet on Rooted Android 11
UPDATE 1 (FEB 17, 2021): Added the Instructions to Flash Universal SafetyNet Fix Magisk Module after spoofing Fingerprint to Pixel 3A.
In this guide, we will show you how to pass the Magisk SafetyNet on your rooted Android 11 device. One of the biggest perks of having an open-source OS like Android is the fact that you could carry out a plethora of tweaks and customizations. The only requirement is that your device’s bootloader needs to be unlocked. Once that is done, you could install custom ROMs, flash custom recoveries like TWRP, Pixel Experience Recovery, etc. Along the same lines, you could gain administrative rights or access to the system partition. This is done by rooting the device via Magisk (with TWRP or without TWRP– by patching stock boot.img).
Once you have achieved root, you could then flash tons on Magisk Modules, Xposed Framework, Substratum Themes, and plenty of other mods. However, these tweaks have some associated risks and caveats. When it comes to risk, if the steps aren’t performed correctly, then you could end up with a bootloop, soft-brick, or hard-bricked devices. In most instances, all these could easily rectified0 by flashing stock firmware via Fastboot or using the EDL mode in case of hard-brick. But all these are just one aspect. If we talk about the caveats or drawback, then there are quite a few. The most common issues result in the inability of various apps to function normally.
For example, banking apps like Google Pay will just refuse to work. Likewise, games like Pokemon Go will not function on a rooted device. Talking about Netflix, its Widevine L1 certification degrades to L3, hence you wouldn’t be able to watch videos in HD. In all these cases, there was a simple workaround, just hide the device unlock and root status via Magisk. But now, with the latest Android version, things have become a little more complicated. However, there does still exists a nifty workaround through which you pass the Magisk SafetyNet on your rooted Android 11 device. And this tutorial will show you how this could be achieved. Follow along.
- How to Fix ctsProfile Mismatch Error on Rooted Android
- How to use Core Only Mode in the new Magisk Manager?
- Root Android 11 via Magisk Patched boot.img (without TWRP)
- Fix Magisk patched boot.img issue while Rooting Android 11
Table of Contents
What is the Magisk SafetyNet Issue on Android 11?
I would try to keep this entire explanation as simple as possible, without incorporating any technical jargon. SafetyNet was introduced by Google to keep a check on device tampering. That is, if you have performed any system-level tweaks or installed any custom binary, then this SafetyNet will be trigged. it would then warn the installed apps to proceed ahead with caution. The reason for the same is that unlocking any device or rooting it breaks the security guarantee that the OEM has to offer.
Your system partition is now easily accessible and hence could be accessed by unauthorized users. However, that usually doesn’t happen because the user who opts for these tweaks very well knows the risks associated with it and also how to fix any issue if he comes across. With that said, Google does its part and so do other apps. They simply check if SafetyNet has been tripped or not. If it has been, then the app will just refuse to function or work under limited capacity.

However, Magisk came with a pretty nifty method to bypass this restriction: you could easily hide root and unlock status from your device using a baked-in feature of Magisk. This way Safetynet wouldn’t be able to detect any modifications on your device and hence all the apps will function without any issues. But with the release of Android 11, things have taken a turn, and for worse! Up until now, SafetyNet only used two parameters to check if the device has any custom binaries installed or not. These were the ctsProfileMatch and basicIntegrity. However, there’s now a third parameter added to this list in the form of evaluationType.
evaluationType: Basic vs Hardware
It is due to this third parameter, Magisk wouldn’t be able to hide the unlocked bootloader status from your device. On the other hand, the root hiding would still work along the expected lines. So the apps that verify if your device’s bootloader is unlocked or not, will no longer be able to work on a rooted device.
But there does exist a handy workaround through which you could pass the Magisk SafetyNet on your rooted Android 11 device. This in turn will allow SafetyNet to return a False status- both for unlocked bootloader and root, although your device will be rooted and having an unlocked bootloader (well, obviously!). Follow along for the detailed instructions.
Does your device Support SafetyNet’s Hardware-based Attestation?
Before we list out the instruction steps, let’s make you aware of an important. There is a simple way of testing if your device supports the latest Hardware-based Attestation or not.

- First off, make sure that you running the latest Magisk Canary build. Then launch the app and tap on Check SafetyNet.
- If this is the first time you are performing these steps, then you will have to download the Proprietary Code as well. So tap on OK in the confirmation dialog box that appears.
- The process will now begin and should only take a couple of seconds. Once done, check out the third section at the bottom: evalType.
- If it is “BASIC“, then the Hardware-based Attestation is not yet implemented on your device. On the other hand, if it spells out “HARDWARE“, then your device is using this attestation.
How to Pass Magisk Safety Net on Android 11 Root
Now that you are aware of the method to check for evaluationType/Hardware attestation, let’s check out the steps to pass the Magisk SafetyNet on your rooted Android 11 device. We have broken down the below steps into separate sections for ease of understanding. Follow along.
STEP 1: Enable MagiskHide

- First and foremost, you will have to enable the Magisk Hide option.
- For that, launch Magisk Manager on your device.
- Then tap on the Settings icon situated at the top right.
- Scroll to the Magisk section and enable the Magisk Hide toggle.
- Fix error boot prepare- device stuck in fastboot
- Fix Android stuck in Recovery Mode: No Command screen
- Detailed Steps to Fix adb is not recognized Error
- How to Fix FAILED (remote: unknown command) Error
STEP 2: Randomizing Magisk Manager with another name
It’s now time to hide the Magisk Manager app from being identified by other apps. This in turn will be done by randomizing the app’s package name to any other name of your choice! As an example, I will be renaming it to Droidwin, so if any apps check for Magisk installation, they wouldn’t be able to find it since it has been masked under the DroidWin name. Sounds impressive, right? Well, it definitely is! Here’s what needs to be done in this regard:

- Launch Magisk Manager on your device and head over to Settings.
- Then go to the Hide Magisk Manager section and type in the new name in the space provided.
- Finally, hit OK and that’s it. Within a few seconds, the app will be randomized by the name that you had entered.
- Furthermore, its icon will also switch to the default Android app icon.


Do keep in mind that the first time you laucnh Magisk (by tapping on the name that you had given), Magisk will ask for an upgrade. Just tap on OK and wait for a few seconds. It will do the required backend work and will then boot up the Magisk Manager app for you. It is just one time process, next time onewards you could directly open the app.

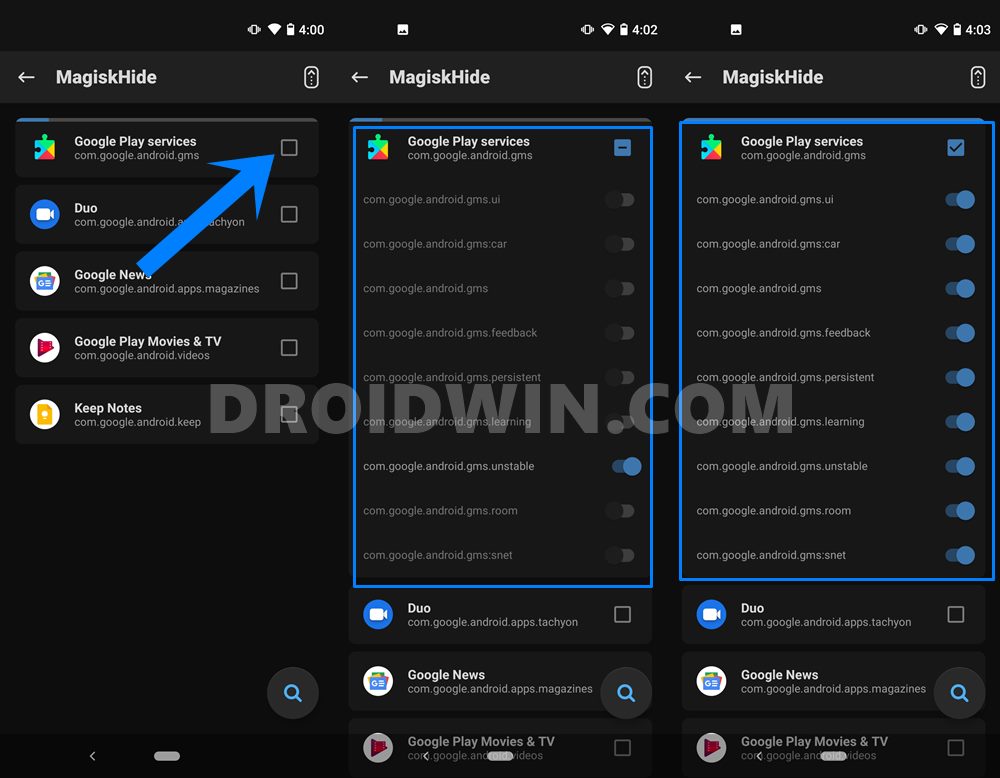
STEP 3: Hide Magisk SafetyNet from Google Apps, Services, and Frameworks
Just to be double sure, we would also be hiding the apps from the Google ecosystem. Here’s how:
- Launch Magisk Manager on your device and tap on the Shield icon situated at the bottom menu.
- Then select the MagiskHide option. It will now load all the installed apps.
- Your focus should be on finding the Google Play Services. So head over to that name and tap on it.
- Doing so will bring its associated services as well. Enable the toggle for all the processes, as shown in the image.

- Fix Magisk patched boot.img issue while Rooting Android 11
- Fix: pip is not recognized as an internal or external command
- How to Update Magisk ZIP and Magisk Manager (without TWRP)
- Fix Magisk Module Bootloop without TWRP Recovery
STEP 4: Spoofing your Device Fingerprints to Pixel 3A
Finally, it’s now time to change your device fingerprint identification and spoof it to Pixel 3A. But why? Well, this is because Pixel 3A was the last device in the Pixel series to use the old SafetyNet attestation method, which Magisk can hide from. So SafetyNet will hence perform its search using the old method itself and it wouldn’t be able to identify any system-level tweaks on your device. With the explanation now clear, here are the instructions to carry out this task:
- Launch Magisk Manager on your device and tap on the Modules icon (the fourth one).
- Search for MagiskHide Props Config and then tap on the Download button situated at the bottom right.
- Finally, tap on the Install button and wait for the process to finish. Once done, reboot your device.
- After this, you will need to install a terminal emulator app on your device. We have used the Termux app, but you could try any one of your choices.
- Now launch the app, type su and hit Enter. This will bring up the Magisk pop-up, tap Grant to give the app root access. [su command is used to get the SuperUser access].
- Then type props and hit enter. This will launch the MagiskHide module.
- After this, you will have to select the “Force BASIC key attestation” option. So type 2 and hit enter.
- Next, enter d to select the “Pick from device list” option. Enter 7 to select “Google.
- Then type in 20 to select “Google Pixel 3a.” The reason for this selection, as already mentioned before, is the fact that this device still uses the old attestation method.
- Then type in y to confirm and again y to reboot the device. Once your device reboots, just clear the data of the desired Google apps and that’s it. You have successfully passed the SafetyNet test on your rooted Android 11 device.


STEP 5: Flash Universal SafetyNet Fix Magisk Module
So I went through all of your comments and it turns out that there are some users who aren’t able to pass the SafetyNet test on their rooted Android 11. It all seems to boil down to this hardware-backed attestation method. Here is what is actually happening with most users/ In order to verify and validate the CTS profile, Google Play Services is opting for the more stringent hardware-backed attestation even if you have selected the basic attestation.
So it seems that Google is straightaway neglecting the report from the SafetyNet Attestation API that the device is using basic attestation and is rather directly going for the hardware-backed attestation. But thanks to XDA Senior Member kdrag0n he has managed to bypass this limitation as well, that too via a magisk Module. With that said, you still need to complete the first four steps mentioned above and then only should try out the instructions mentioned below.

- To begin with, download the Safetynet fix module from GitHub: safetynet-fix-v1.1.1.zip
- Now transfer this file to your device and launch the Magisk Manager app.
- Tap on the module’s icon situated at the bottom right. Then tap on Install from Storage.
- Scroll to the downloaded SafetyNet Fix module ZIP file and select it.
- The module will be flashed within seconds. Once done, hit the Reboot button situated at the bottom right.
- When your device boots up, recheck for SafetyNet via magisk and the issue would have been rectified by now.
So this was from this guide on how to fix the how to pass the Magisk SafetyNet on your rooted Android 11 device. If you have any queries, do let us know in the comments section below. We will get back to you with a solution at the earliest.
About Chief Editor
Sadique Hassan
A technical geek by birth, he always has a keen interest in the Android platform right since the birth of the HTC Dream. The open-source environment always seems to intrigue him with the plethora of options available at his fingertips. “MBA by profession, blogger by choice!”
Источник


