- Using the Network Link Conditioner Utility (how-to)
- Antoine van der Lee
- Network Link Conditioner
- Installation
- Controlling Bandwidth, Latency, and Packet Loss
- Enabling Network Link Conditioner on iOS Devices
- As We May Code
- Network Link Conditioner doesn’t work on Catalina
- Accepted Answer
- Answers
- Enabling Network Link Conditioner on iPhone and iPad
- What about Android?
Using the Network Link Conditioner Utility (how-to)
The Network Link Conditioner on iOS and macOS enables you to test your app in networking conditions like your users might have while using your app. It allows you to simulate networking conditions like 3G, Edge or High Latency DNS.
Using the Network Link Conditioner on iOS
You can find a Networking section inside the developer page of the Settings app of iOS. Besides enabling Multipath Networking you can navigate to the Network Link Conditioner, which is disabled by default. You can read more about Multipath Networking here.
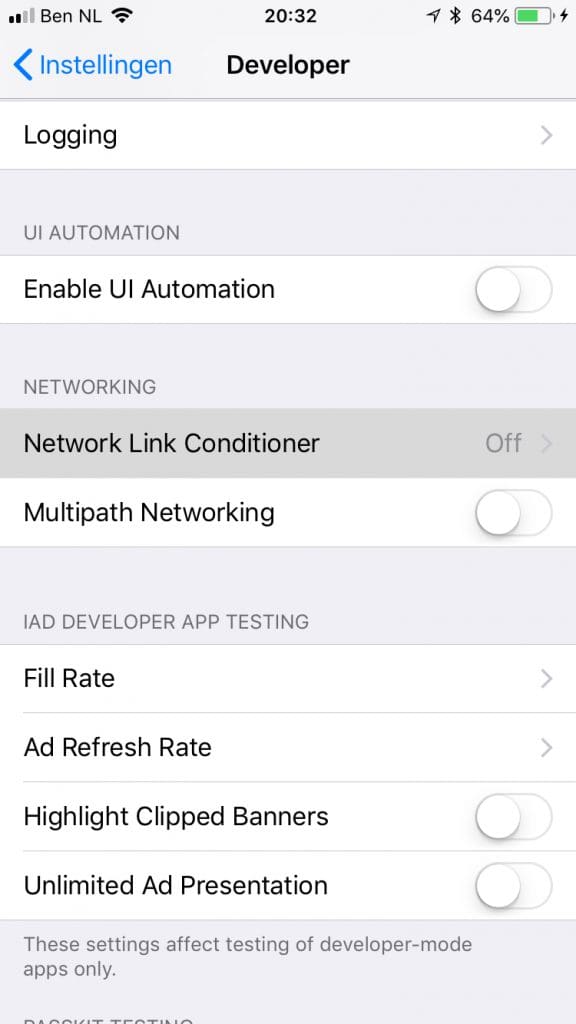
Developer Networking Section
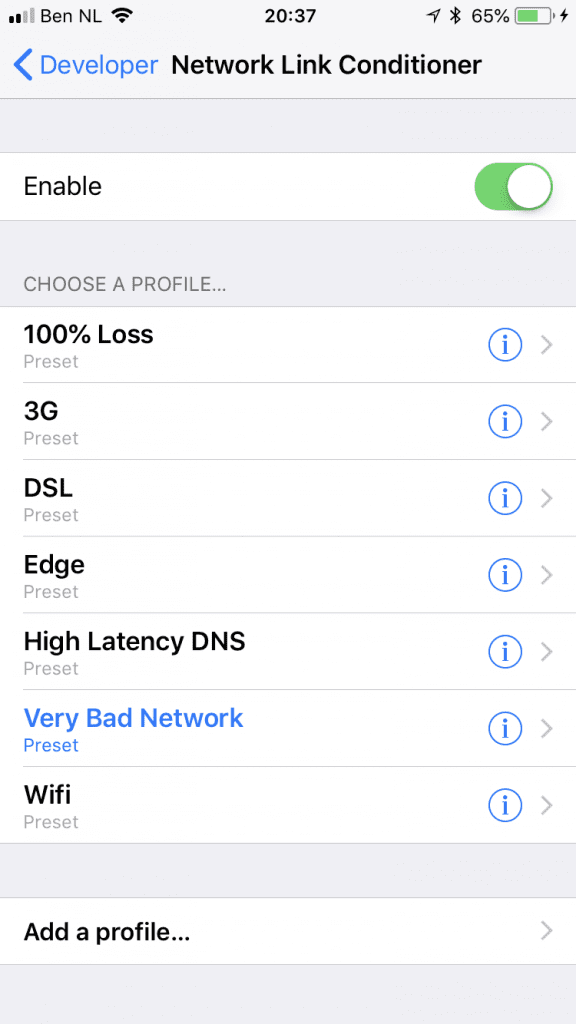
A list of default presets can be found on this page. You select a preset by tapping one of them. Enable the switch to test your app on the selected preset. A custom preset fitting your needs can be defined by navigating to the Add a profile page.
Using the developer tool on MacOS
Before you can use the utility on MacOS you need to install Additional Tools for your current Xcode version. By navigating to Xcode Main Menu > Open Developer Tool > More Developers Tools you’re able to download the tools after logging in.
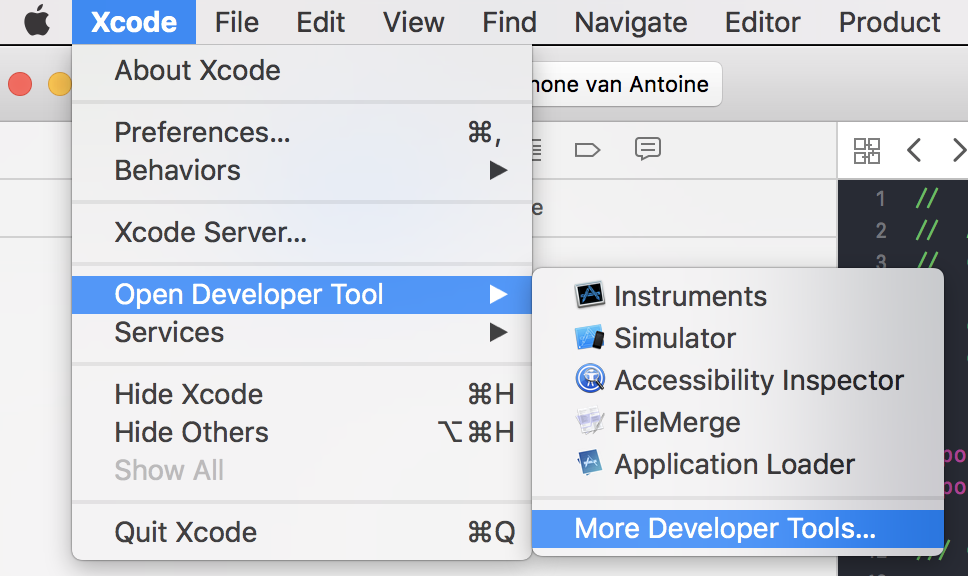
Xcode More Developer Tools
Inside the downloaded .dmg you can find lots of interesting utilities. The Network Link Conditioner can be found inside the Hardware folder. By double-clicking the app you can install the utility in your System Preferences.
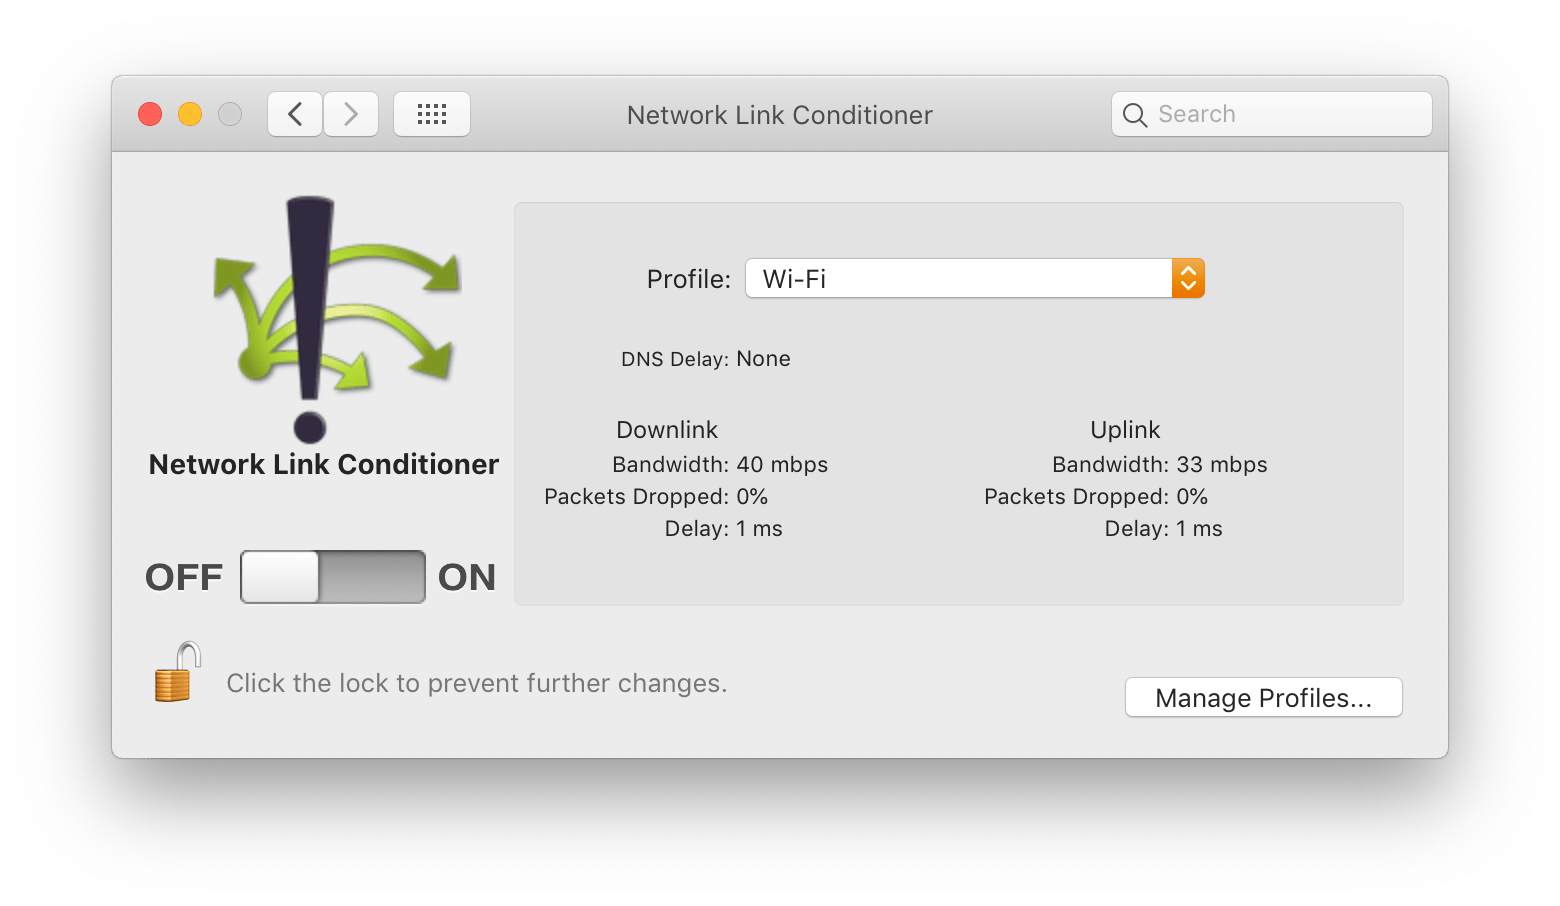
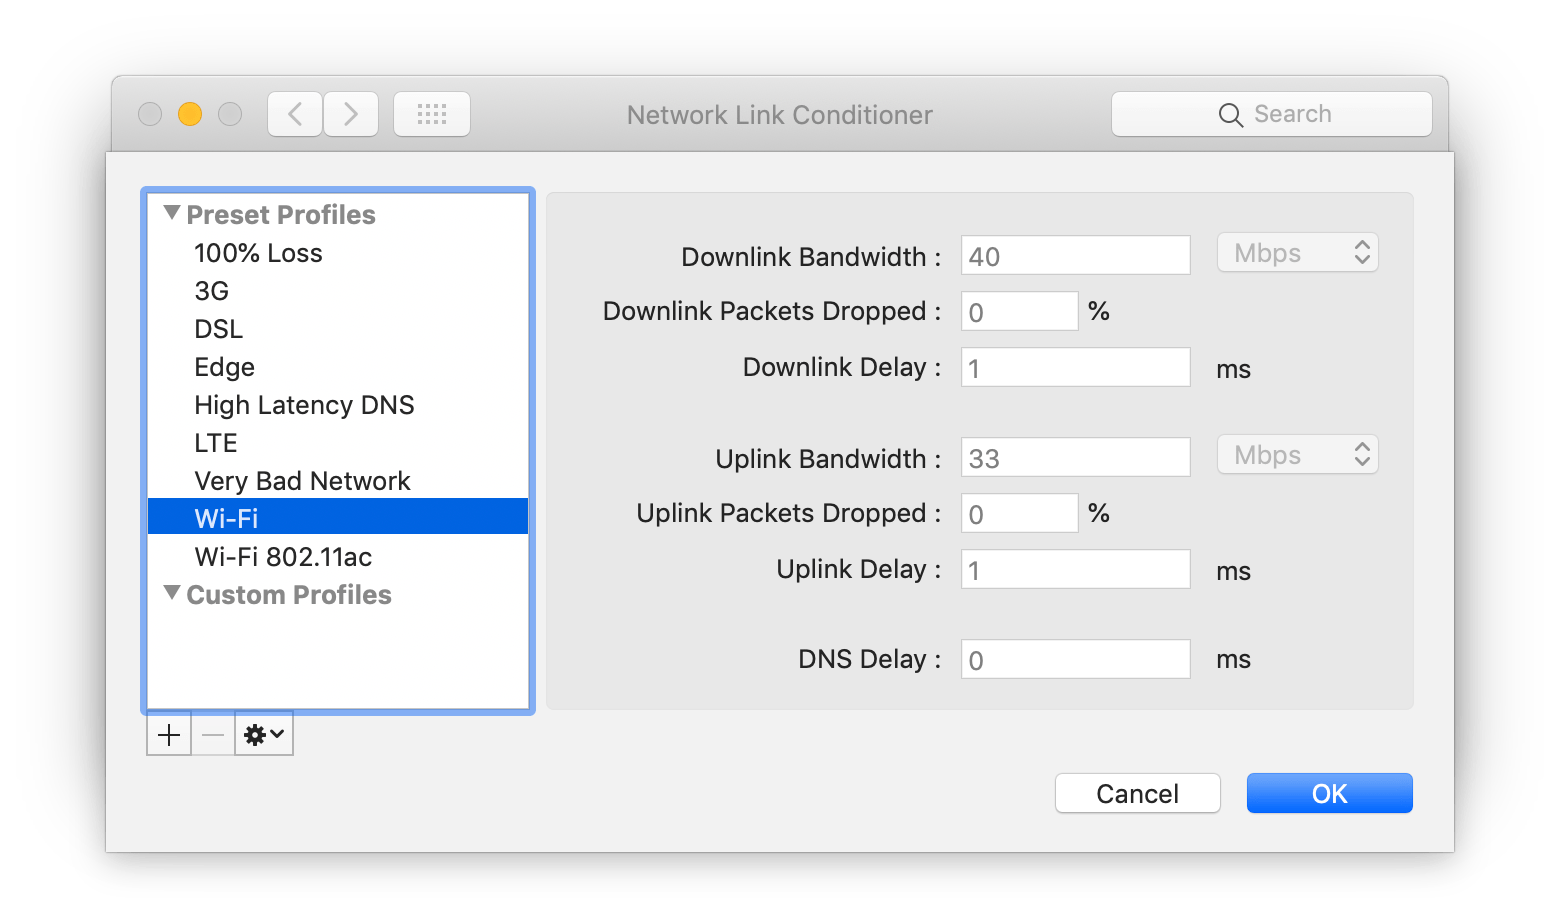
The application is quite similar to the iOS variant and also contains a list of custom presets. These can be used to simulate a range of Network conditions. Besides of that, you’re able to define your own preset in the Manage Profiles page.
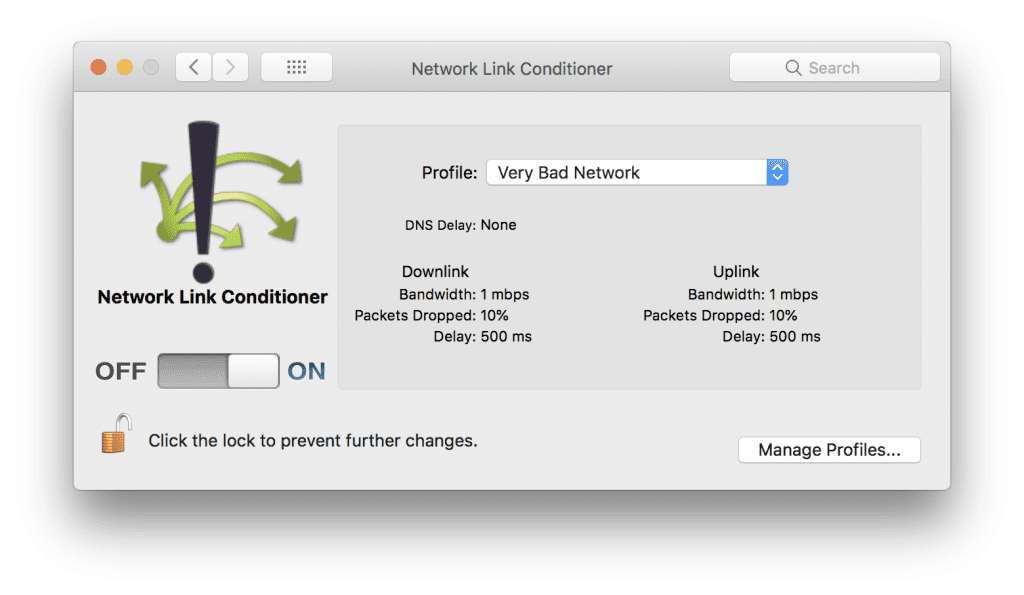
The Network Link Conditioner on MacOS
After selecting the preset and enabling the switch you can start testing your Mac OS app or your iOS app in the simulator while simulating the Networking preset. You can now start testing your apps under circumstances your end user might have as well. This is great for finding bugs you would otherwise never encounter.
![]()
Antoine van der Lee
iOS Developer since 2010. Lead developer of the Collect by WeTransfer app. Writing a new blog post every week related to Swift, iOS and Xcode. Regular speaker and workshop host.
Источник
Network Link Conditioner
Product design is about empathy. Knowing what a user wants, what they like, what they dislike, what causes them frustration, and learning to understand and embody those motivations — this is what it takes to make something insanely great.
And so we invest in reaching beyond our own operational model of the world. We tailor our experience to different locales. We consider the usability implications of screen readers or other assistive technologies. We continuously evaluate our implementation against these expectations.
There is, however, one critical factor that app developers often miss: network condition, or more specifically, the latency and bandwidth of an Internet connection.
For something so essential to user experience, it’s unfortunate that most developers take an ad-hoc approach to field-testing their apps under different conditions (if at all).
This week on NSHipster, we’ll be talking about the Network Link Conditioner, a utility that allows macOS and iOS devices to accurately and consistently simulate adverse networking environments.
Installation
Network Link Conditioner can be found in the “Additional Tools for Xcode” package. You can download this from the Downloads for Apple Developers page.
Search for “Additional Tools” and select the appropriate release of the package.
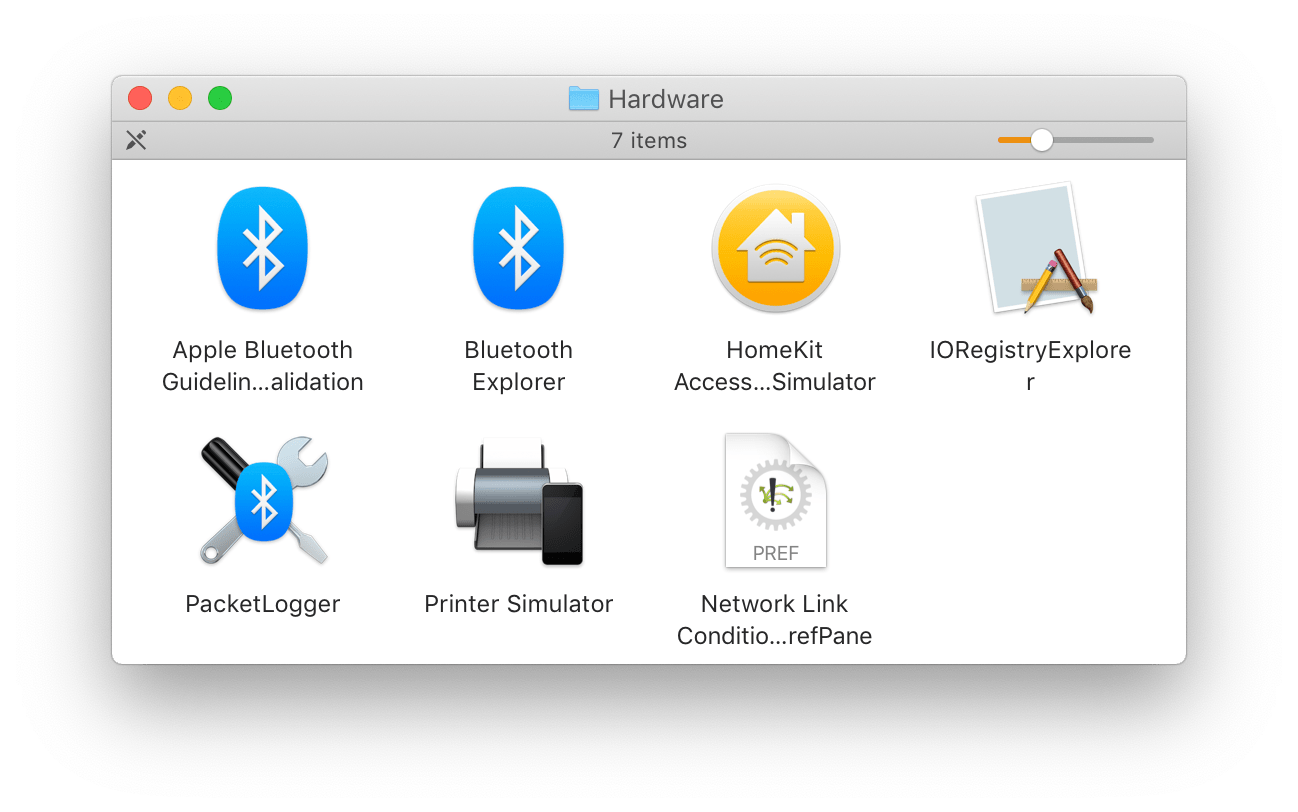
Once the download has finished, open the DMG, navigate to the “Hardware” directory, and double-click “Network Link Condition.prefPane”.
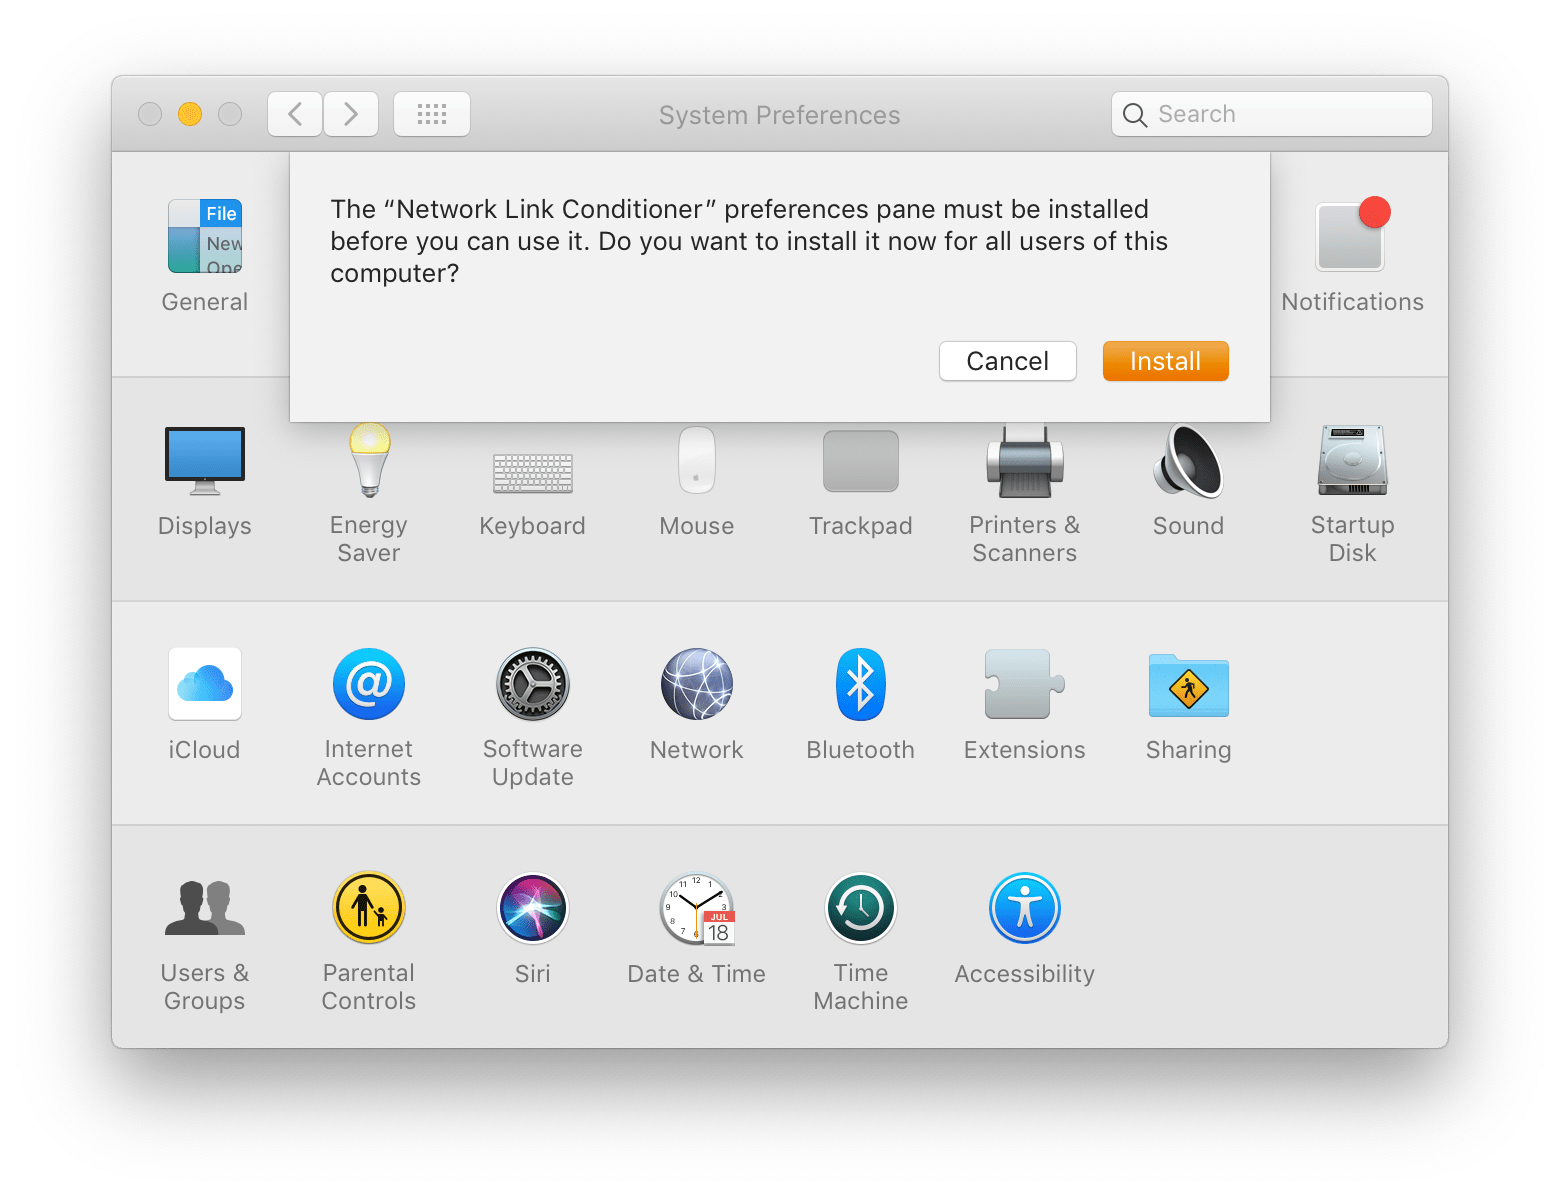
Click on the Network Link Conditioner preference pane at the bottom of System Preferences.
When you first install Network Link Conditioner on macOS 10.14, everything works as expected. But if you close and reopen System Preferences, the preference pane no longer appears, and attempting to reinstall results in the following error message:
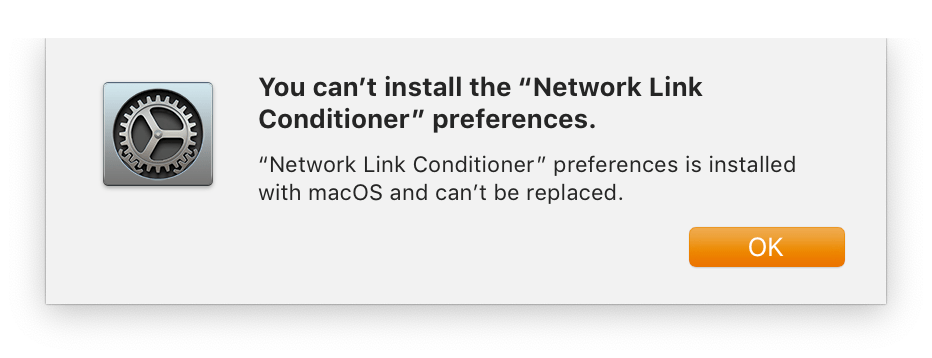
You can’t install the “Network Link Conditioner” preferences.
“Network Link Conditioner” preferences is installed with macOS and can’t be replaced.
As a workaround, you can move the preference pane from your user Preference Panes directory to the system-level directory by entering the following command in Terminal.app (you’ll be prompted for your password):
Once you’ve done this, Network Link Conditioner will appear the next time you open System Preferences.
Controlling Bandwidth, Latency, and Packet Loss
Enabling the Network Link Conditioner changes the network environment system-wide according to the selected configuration, limiting uplink or download bandwidth, latency, and rate of packet loss.
You can choose from one of the following presets:
- 100% Loss
- 3G
- DSL
- EDGE
- High Latency DNS
- LTE
- Very Bad Network
- WiFi
- WiFi 802.11ac
…or create your own according to your particular requirements.
Now try running your app with the Network Link Conditioner enabled:
How does network latency affect your app startup?
What effect does bandwidth have on table view scroll performance?
Does your app work at all with 100% packet loss?
Enabling Network Link Conditioner on iOS Devices
Although the preference pane works well for developing on the simulator, it’s also important to test on a real device. Fortunately, the Network Link Conditioner is available for iOS as well.
To use the Network Link Conditioner on iOS, set up your device for development:
- Connect your iOS device to your Mac
- In Xcode, navigate to Window > Devices & Simulators
- Select your device in the sidebar
- Click “Use for Development”
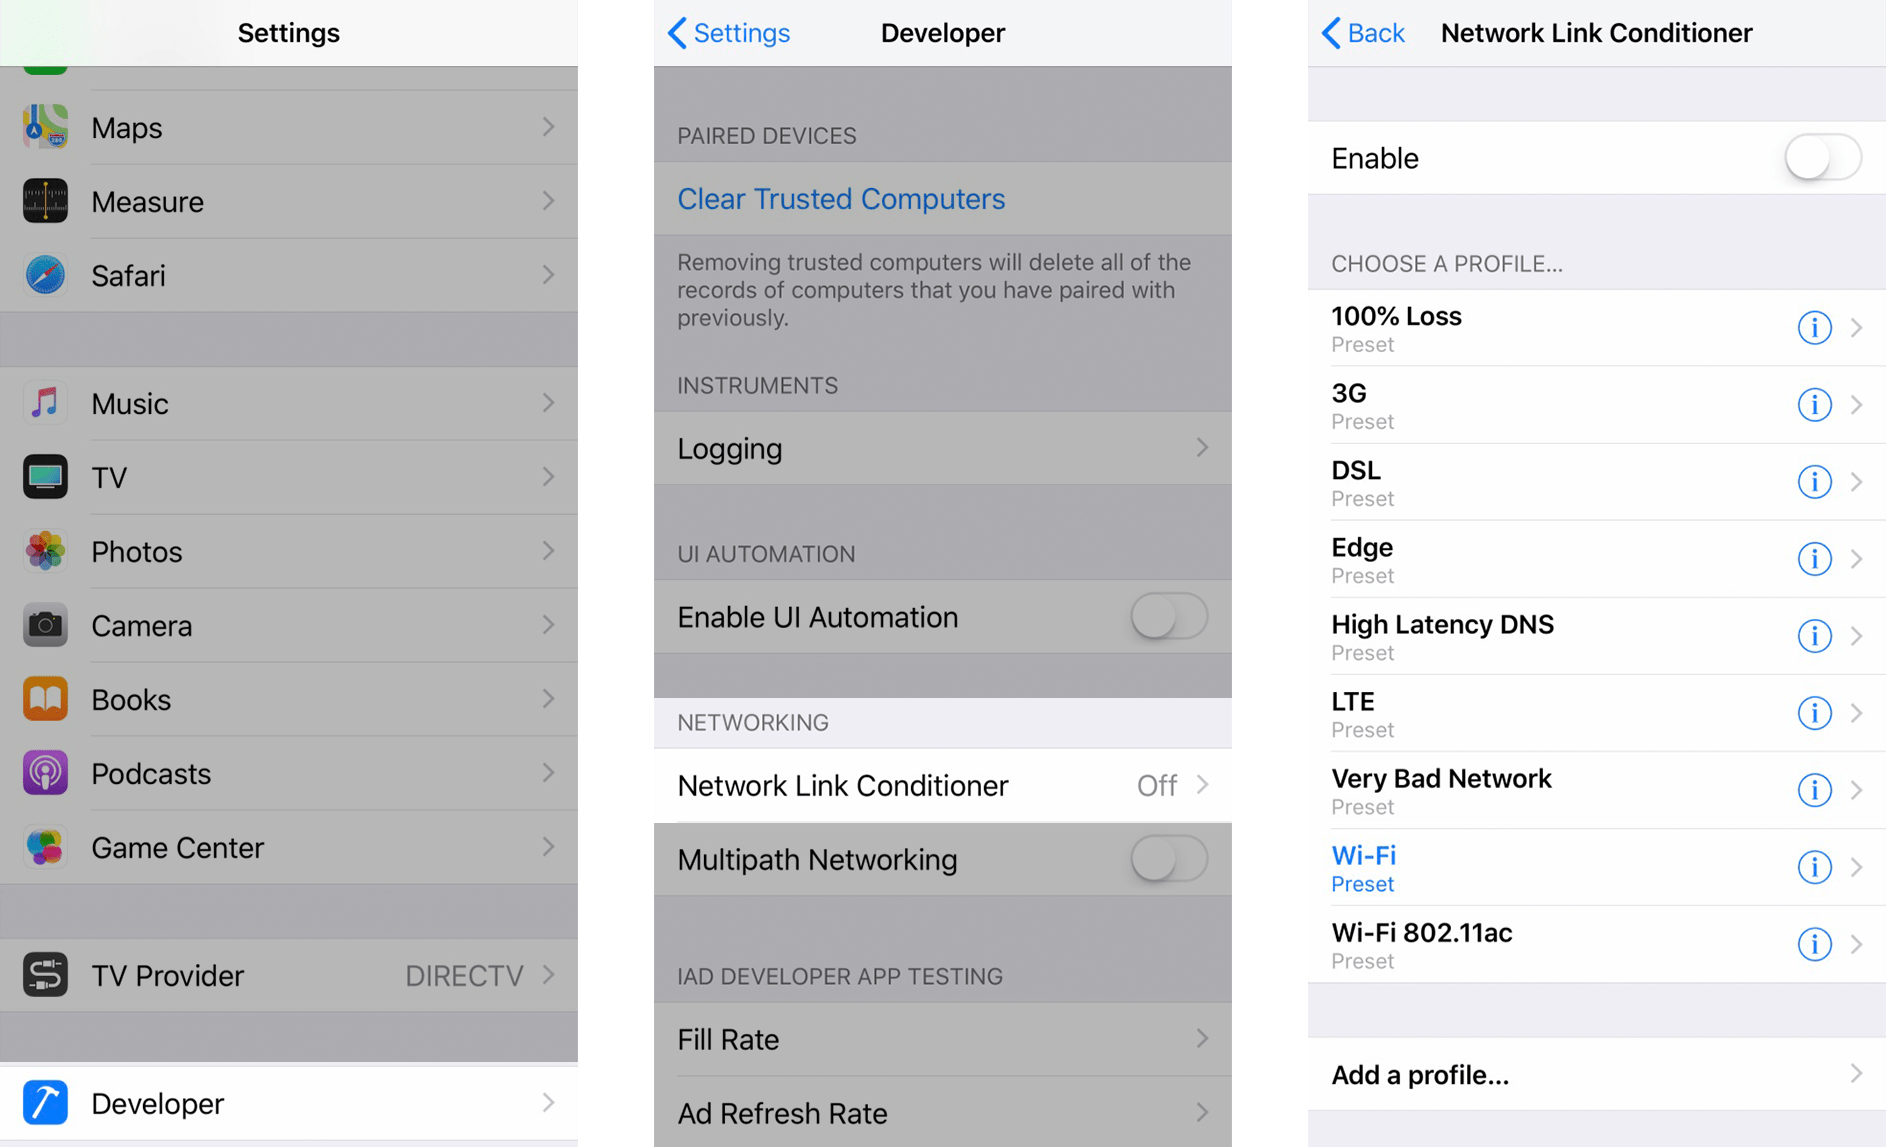
Now you’ll have access to the Developer section of the Settings app. You can enable and configure the Network Link Conditioner on your iOS device under Settings > Developer > Networking. (Just remember to turn it off after you’re done testing!).
Questions? Corrections? Issues and pull requests are always welcome.
Mattt (@mattt) is a writer and developer in Portland, Oregon.
As We May Code
What if, instead of lowering source code down for the purpose of execution, we raised it for the purpose of understanding?
Источник
Network Link Conditioner doesn’t work on Catalina
Good day,
A developper of ours accidently updated to Catalina. They need Network Link Conditioner to do some tests, however, the latest verion doesn’t seem to work. It installed but gives the error «Could not load Network Link Conditioner preference pane.»
Any ways to make it work or we’re stuck on waiting for an update or wiping and reinstalling Mojave?
Thanks
Accepted Answer
At this point, I should ask what you’ve already done to troubleshoot, but hey.
- Remove any currently installed Network Link Conditioner preference panes (right-click it in the System Preferences window for the option to remove)
- Using the Finder, check for a file named Network Link Conditioner.prefPane in either /Library/PreferencePanes/ or
Just for grins, do a ‘get info’ on that file and check it’s version. v2.0?
Answers
I recently installed NLC on Catalina no issue.
That’s what I used to install the latest version, yet, it refuses to open on both my Macbook and said developper’s Mac
In both cases, were older NLC versions already installed/present on those systems?
For the other developper, definitively
At this point, I should ask what you’ve already done to troubleshoot, but hey.
- Remove any currently installed Network Link Conditioner preference panes (right-click it in the System Preferences window for the option to remove)
- Using the Finder, check for a file named Network Link Conditioner.prefPane in either /Library/PreferencePanes/ or
Just for grins, do a ‘get info’ on that file and check it’s version. v2.0?
This actually worked it seems. I’ll try it out on the other dev’s Mac
This is weird because so far between High Sierra to Mojave, we’ve never had to do this for Network Link Conditioner, installing the newer version simply worked and it seems that removing the preference panel by simply right-clicking the doing removing is not enough either
Anyways, thanks
You’re welcome — glad you sorted it out, thanks for the followup & good luck w/your apps.
It didn’t work for my developper, however, I may have found why
In a USB key, I’ve kept multiple the multiple versions of it, renamed with which version of «additional tools for xcode» it came with, resulting in it being named something like:
Network Link Conditioner 11.prefPane
I ran it from the USB key, same issue, it refuses to work
Instead, installed from the Additonal Tools DMG, it not being renamed, it then works
I suspect it being renamed makes it not work, which is really, really strange. Either that or the steps didn’t work at first, but then managed to work the second time? That, or the name was really the issue. Oh well
Instead, installed from the Additonal Tools DMG, it not being renamed, it then works
Ah, that’s some good spelunking.
I suspect it being renamed makes it not work, which is really, really strange.
It’s not that strange. The NLC preferences pane contains more than just a preference pane; there’s a couple of other helper programs in there as well. If the NLC infrastructure were launching one of those by a fixed path, renaming it would cause trouble. This sort of thing is not uncommon on the boundary between the BSD subsystem, where full paths are a thing, and the GUI subsystem, where they are not.
If you confirm that renaming is the problem, please do file a bug about that. Renaming should either work or it should tell you that it won’t. Mysteriously failing is not helping anyone )-:
Share and Enjoy
—
Quinn “The Eskimo!”
Apple Developer Relations, Developer Technical Support, Core OS/Hardware
Источник
Enabling Network Link Conditioner on iPhone and iPad
Network Link Conditioner is an Apple tool that lets you simulate adverse network conditions on your Mac or iOS device. If you’re a designer or engineer who makes things on the internet, it should be considered an essential part of your toolkit. Without it, you can’t possibly imagine what it’s like for people to use the websites or apps you create out in the real world.
But Apple makes it kind of difficult to find. My colleague John Maeda wrote a guide that walks you through using it on your Mac. I couldn’t find a simple, up-to-date set of instructions for using it on iPhone, so here’s how you do it as of iOS 11.
- Install and run Xcode on your Mac.
- In Xcode, select the Window menu, then Devices and Simulators.

- Unlock your iOS device, then connect it to your Mac with a lightning cable. In the Devices window, a message will appear stating that your device is being prepared for development.
- When it’s done, you can disconnect your device from your Mac. (You’ll only need to do steps 1-3 once.)
- On your device, open the Settings app. You’ll find a new option just above the list of app settings called Developer. Tap it.
- Then, tap Network Link Conditioner under the Networking section.
- Finally, choose a profile or create your own, then tap the Enable toggle switch to turn it on. Just don’t forget to turn it off when you’re done. 🙂


What about Android?
Unfortunately, there’s no equivalent of Network Link Conditioner for Android. (If you learn of one, please comment below!) But if you have both an iPhone and an Android device, you can enable Network Link Conditioner on the iPhone, create a Personal Hotspot, and then connect your Android device to the hotspot. Note that this option will use cellular data. There are also options to simulate poor connections when creating an Android emulator, or to connect an Android to something like Charles Proxy which can throttle connected devices, but I’d really love to find a solution for Android that’s as easy as Network Link Conditioner.
If you’re a designer or engineer who considers the needs of the real people who use your work, Automattic is hiring.
Источник


