- Ошибка DHCP: что это такое и как ее исправить
- Как происходит ошибка DHCP
- Устранение неполадок, исправить ошибку DHCP
- Исправить настройки DHCP вручную
- Исправить ошибку DHCP с настройками маршрутизатора
- How to Fix “Obtaining IP Address” and “Failed to Obtain IP Address” Wi-Fi Errors on Android
- How Does It Look?
- What are the Causes of These Wi-Fi Errors on Android?
- 15 Ways to fix stuck “Obtaining IP address” and “Failed to obtain IP address” Wi-Fi Errors on Android
- Solution 1. Reconnect to Wi-Fi Network
- Solution 2. Reboot Both Wi-Fi Router and Android Device
- Solution 3. Rename Your Android Device
- Solution 4. Switch to WPA2-PSK with AES on the Router
- Solution 5. Turn Off Private DNS on Android
- Solution 6. Turn Off the MAC Filtering on Your Router
- Solution 7. Reduce the Distance Between the Router (or AP) and Your Android Device
- Solution 8. Change the Wireless Channel
- Solution 9. Download and Install a Wi-Fi Fix App
- Solution 10. Turn Off Network Notification
- Solution 11. Assign a Static IP Address to Your Android Device
- Solution 12. Reset Network Settings on Android
- Solution 13. Clear the Cache of Google Play Services
- Solution 14. Factory Reset Your Android Device
- Solution 15: Reset Your Wireless Router
- Wrapping Up
Ошибка DHCP: что это такое и как ее исправить
Есть две вещи, которые могут вызвать ошибку DHCP. Одна из них это конфигурация на вашем компьютере или устройстве, которая позволяет DHCP-серверу назначать ему IP-адрес. Другая – это настройка самого DHCP-сервера.
Ошибка DHCP означает, что сервер вашей сети, предоставляющий IP-адрес для устройств, не может назначить вашему устройству IP-адрес.
Как происходит ошибка DHCP
Поскольку настройка DHCP может разорвать ваше интернет-соединение, ошибка может появляться во многих формах. В конечном счете, основным симптомом является то, что вы не сможете получить доступ к Интернету.
Ошибка DHCP возникает, когда DHCP-сервер или маршрутизатор в сети не может автоматически настроить IP-адрес компьютера или устройства для подключения к сети. Обычно это приводит к ошибке сетевого подключения при попытке доступа в Интернет через веб-браузер.

Что делает ошибку DHCP настолько трудной для устранения, потому что ошибка не всегда включает упоминание о DHCP. Однако вы можете подтвердить, является ли ошибка DHCP причиной вашей проблемы с интернет-соединением , несколькими способами.
Устранение неполадок, исправить ошибку DHCP
Самый простой способ исправить проблемы с интернет-соединением – позволить Windows автоматически исправить ваши интернет-настройки. Если ваши настройки DHCP неверны, Windows попытается их исправить автоматически.
- Для этого просто щелкните правой кнопкой мыши значок сетевого подключения на панели задач Windows и выберите Устранение неполадок.

- Средство устранения неполадок в сети определит все параметры, которые могут вызывать проблемы с подключением к Интернету. Он предоставит вам возможность применить предложенные исправления. Если ваши настройки DHCP вызывают ошибку, они также будут исправлены. Выберите Применить это исправление, чтобы применить предложенные изменения.
- Если автоматические исправления сработали, вы должны увидеть, как работает ваше сетевое соединение. Откройте веб-браузер и попробуйте подключиться к Интернету. Если это все еще не работает, вам нужно будет вручную исправить настройки DHCP.


Исправить настройки DHCP вручную
Если автоматическое устранение неполадок не исправило ваши настройки DHCP, вы можете сделать это вручную.
- Выберите меню «Пуск» и выберите значок « Настройки» . Откроется окно настроек Windows. Выберите Сеть и Интернет в окне настроек Windows.
- Откроется Статус сети окно. Прокрутите вниз и выберите Изменить параметры адаптера.
- Это отобразит все сетевые адаптеры, которые настроены на вашем компьютере. Щелкните правой кнопкой мыши активный адаптер и выберите « Свойства».
- В окне «Свойства Wi-Fi» выберите « Протокол Интернета версии 4» и выберите « Свойства».
- Если параметр Получить IP-адрес автоматически не выбран, выберите его.
- Выберите OK и Закрыть, чтобы сохранить новые настройки. Перезагрузите компьютер.


Этот параметр позволяет DHCP-серверу или маршрутизатору в сети назначать компьютеру следующий доступный IP-адрес в сети.
Если вы заметили, что параметр Получить IP-адрес автоматически уже выбран, ошибка DHCP может вообще не быть вызвана сетевыми настройками вашего компьютера. Это может быть вызвано настройками вашего маршрутизатора.
Исправить ошибку DHCP с настройками маршрутизатора
В типичной корпоративной сети это DNS-сервер, который управляет IP-адресами устройств в сети. Все настройки DHCP управляются вашим ИТ-отделом, поэтому, если у вас возникают проблемы с сетевым подключением, вам следует обратиться в свою службу технической поддержки.
Однако в домашней сети настройки DHCP в вашем маршрутизаторе управляют IP-адресами устройств в сети. Если вы видите ошибки DHCP, вы должны проверить настройки маршрутизатора.
Источник
How to Fix “Obtaining IP Address” and “Failed to Obtain IP Address” Wi-Fi Errors on Android
The problem we are going to talk about in this article is the following: an Android phone or tablet gets stuck on “Obtaining IP Address” while connecting to a Wi-Fi network or says “Failed to Obtain IP Address” in the end.
Stuck Obtaining IP address is a very common Wi-Fi issue on Android devices. You can encounter it on all versions of Android OS.
The error appears when you try to connect either to already saved Wi-Fi network or after you typed a password for a new wireless network.
How Does It Look?
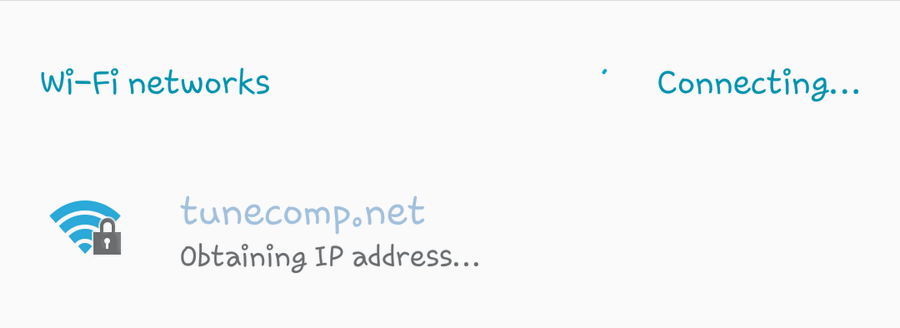
The problem looks like the following: you turn on Wi-Fi, try to connect to your router but your Android device does not connect to Wi-Fi network.
When you enter the wireless settings you can see: “Connecting…”, “Obtaining IP address” or “Obtaining IP address from” that goes on in an infinite loop.
Sometimes it says “Failed to obtain IP address”. The result of all those error is the same: you cannot connect to the Internet and consequently you are unable to use most of your apps.
It should be said, that you may encounter the stuck “Obtaining IP address” Wi-Fi issue on any version of Android from ancient 2.3.6 to Android 11.
The problem can occur on Samsung Galaxy, HTC, OnePlus and other devices. Very often CyanogenMod users are suffering the same glitch.
So you can try the guide on any Android smartphone or tablet. The steps are basically the same for all brands and models. So let us find out how to fix stuck “Obtaining IP address” and “Failed to Obtain IP Address” while connecting to Wi-Fi on Android.
What are the Causes of These Wi-Fi Errors on Android?
There are various possible reasons for endless “Obtaining IP address” loop and “Failed to Obtain IP address” error on Android.
Here are some of them:
- Weak signal.
- Wi-Fi security settings were changed on the router.
- Glitch of a router.
- Glitch of your Android smartphone (tablet).
- DNS-related problem.
- Activated wireless MAC filtering feature on router.
- Wireless interference.
15 Ways to fix stuck “Obtaining IP address” and “Failed to obtain IP address” Wi-Fi Errors on Android
Below you will find ALL possible solutions to fix this Wi-Fi-related issue: from simple to more complicated. Some of them may seem ridiculous to you but it would be better that you try all of them.
Solution 1. Reconnect to Wi-Fi Network
First of all you should try these easy actions:
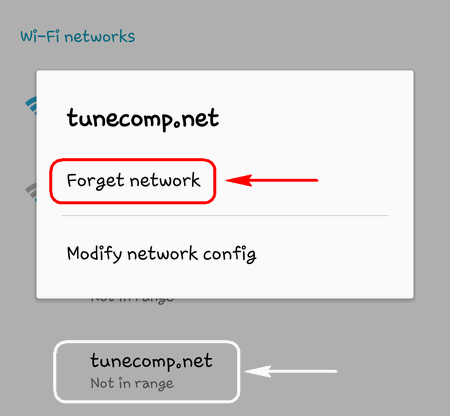
- Forget your Wi-Fi network:
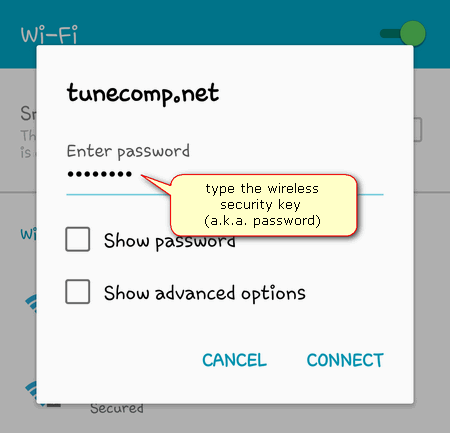
- Tap on it again, enter password and reconnect.
Solution 2. Reboot Both Wi-Fi Router and Android Device
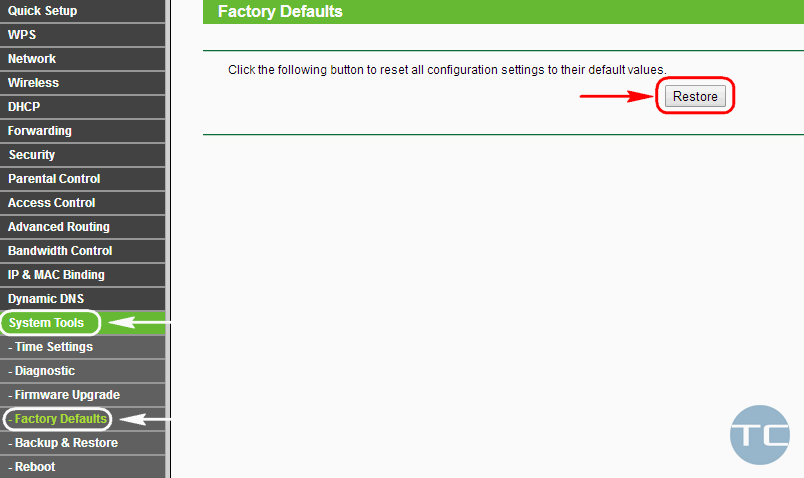
Reboot all devices to exclude the casual glitch. For example, to reboot TP-Link router you need to sign in to the router’s web interrface, then go to System Tools – Reboot and click on Reboot button:
To reboot your Samsung Galaxy device you should press and hold the Power button and then tap on Restart:
Warning! We advise you to perform a full reboot on your Android phone or tablet instead of turning Airplane mode on and off. You need to restart the operating system but not only wireless modules.
Solution 3. Rename Your Android Device
Possible reason: Rare glitch on HTC devices. Go to Wi-Fi Direct settings and rename your device. Here you should change the hostname which looks like ‘android_909892’ to any simple word in English, for example ‘HTC One’ or ‘John’.
Solution 4. Switch to WPA2-PSK with AES on the Router
- Go to the router’s web interface. If you don’t know the IP address of your router, read our article about how to find the router’s ip address on Android.
- Find the Wireless security page or something similar.
- Select WPA2-PSK as your security mode.
- Select AES as the encryption type.
- Click Save settings or Save.
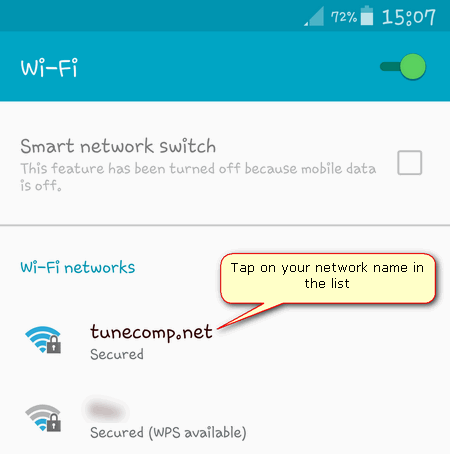
- Forget your Wi-Fi network on Android:
- Reconnect to it:
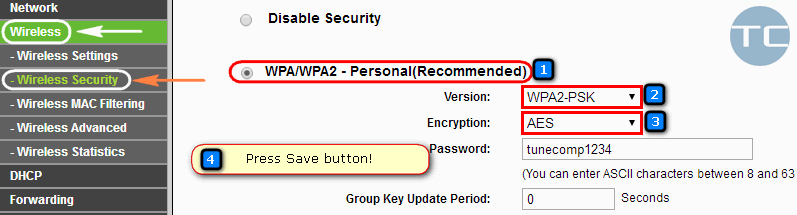
It is not recommended to use TKIP encryption as well as WEP security mode.
Solution 5. Turn Off Private DNS on Android
Private DNS can surprisingly turn out to be the culprit of network failure. Several users on the forums reported that they faced “Failed to obtain IP address” error right until they tried to disable Private DNS while troubleshooting the problem. And it suddenly worked. Such an issue was spotted on Android 10 Q and Android 9 Pie.
The reason why Private DNS provokes network conflict, which results in the error, is unclear by this time.
Solution 6. Turn Off the MAC Filtering on Your Router
The router may be rejecting your Android device by MAC address. If the MAC filter feature is enabled and your device’s MAC address is not in the white list (or is present in the black list) you will face endlessly stuck “obtaining IP address” on your Android.
To fix that, go to your router settings, find MAC filtering setting and ensure that the MAC address of your Android device is not in the black list (if Black list mode is activated) or is present in the White list (if White list mode is activated).
It would be better to temporarily turn off the MAC filter just to understand if it causes the issue of Obtaining IP Address loop when you connect to wi-fi:
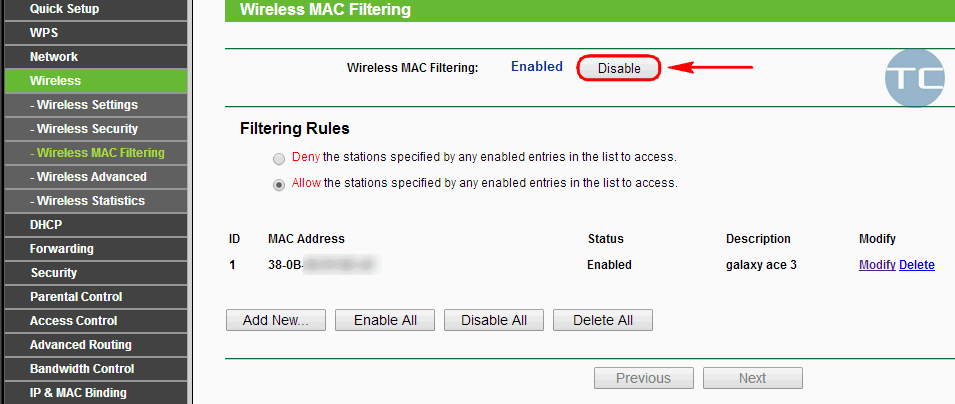
You will always be able to turn it back on and add your device to the white list (or remove from the blacklist).
Solution 7. Reduce the Distance Between the Router (or AP) and Your Android Device
Possible reason: the signal is weak.
Do not skip reading this paragraph! It is very important to understand that when the distance between your router and Android is too long you may encounter looping Obtaining IP address.
It happens because the router transmitter is more powerful than the one in an Android device. So the router’s signal reaches your smartphone or tablet but the response does not reach the router.
Thus it appears that your Android device sees the wi-fi network but cannot connect to it and successfully obtain an IP address.
Try to reduce distance between the router or AP and your Android device. If the router is yours try to place it geographically in the middle of your house or apartments.
Also take into account that walls and floors can weaken the Wi-Fi signal more than you can think. I
n some cases one wall can kill the signal so the client device cannot connect to the router even if the router is right behind that wall.
Solution 8. Change the Wireless Channel
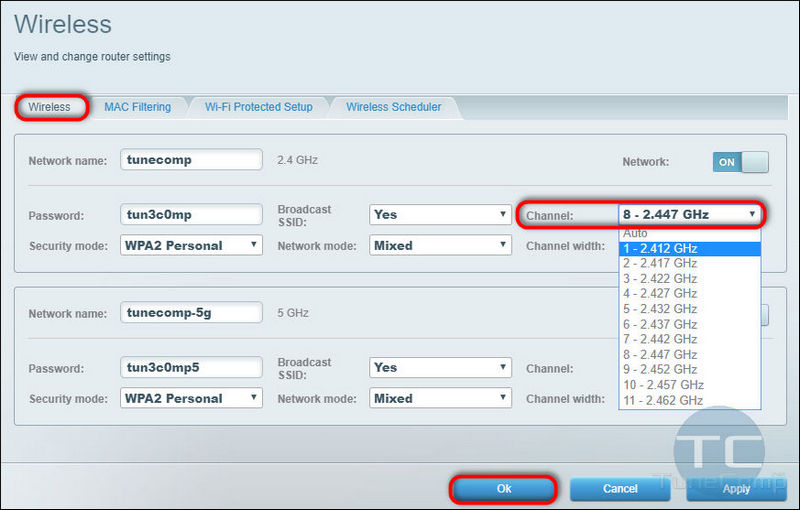
Possible reason: wireless interference. In very rare cases you will have “Failed to obtain IP address” if some neighbor network causes interference to your router’s Wi-Fi. Use WiFi Analyzer app to select the best wireless channel for your router:
Solution 9. Download and Install a Wi-Fi Fix App
Many users report the WiFi Fix app solved the issue of infinite Obtaining IP address. You can also try such apps from the Google Play Store.
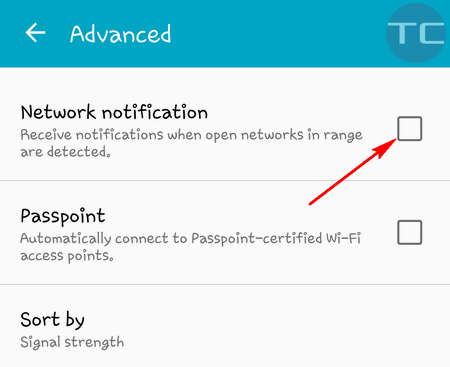
Solution 10. Turn Off Network Notification
Go to Settings → Connections → Wi-Fi → Advanced and switch off Network notification:
Solution 11. Assign a Static IP Address to Your Android Device
This is not a full solution, just a wonky workaround. But if you cannot fix the Obtaining IP Address loop or Failed to obtain IP Address error on your Android, you may apply it as a temporary solution.
Follow this guide to manually assign a static IP to your smartphone or tablet.
- Go to Settings → Connections → Wi-Fi → Turn on Wi-Fi.
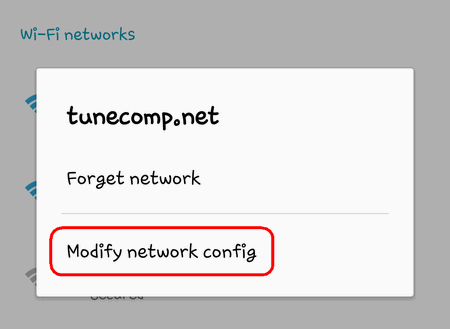
- Long press on your network name.
- Select Modify network config:
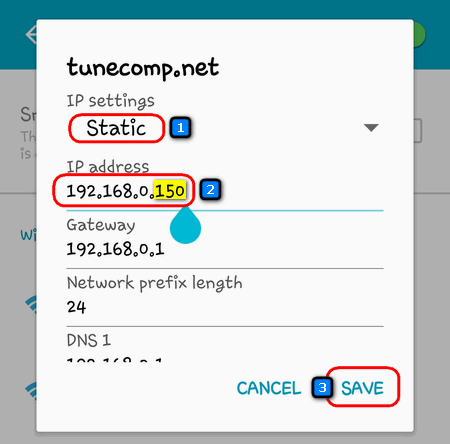
- Set the checkbox Show advanced options and scroll down:
- In IP Settings select Static.
- In IP Address field change the last octet. Specify for instance 192.168.0.150 instead of your current address.
- Tap on Save.

Note that you need to know the router’s IP address for using this solution. Here we wrote about how to find it from an Android device.
If you are unable to access the Internet after you assigned the static IP, go back to Static settings and fill in the Gateway address and DNS1. In most cases both of them should containing the IP address of your router.
Solution 12. Reset Network Settings on Android
All modern phones and tablets that run one of the latest versions of Android support resetting network settings without deleting apps and data.
So, you should try this option to try getting rid of Failed to obtain IP Address error before you opt to factory reset your device.
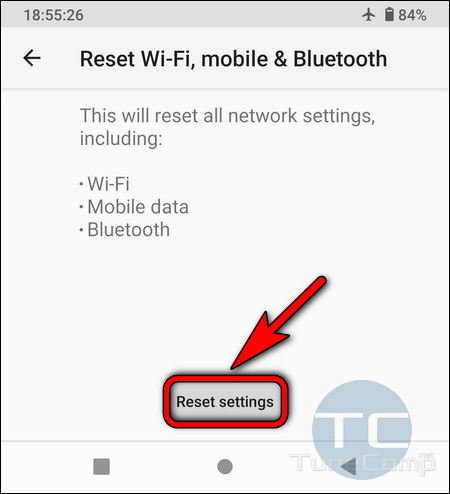
- Go to Settings – System – Reset Options,
- select Reset Wi-Fi, mobile & Bluetooth,
- tap Reset settings.
- and confirm the action by entering your pattern or another security code.
Solution 13. Clear the Cache of Google Play Services
I faced cases when glitches in Google Play Services seemed to be the reason why “Failed to Obtain IP address” error occurred on certain Android phones.
- Go to Settings – Apps (Apps& notifications);
- Tap on See all apps;
- Tap on three dots and select Show system;
- Find Google Play Services in the list and tap it;
- Select Storage & Cache;
- And finally tap Clear Cache:
Solution 14. Factory Reset Your Android Device
In some cases “Failed to obtain ip address” error emerges as a result of malware activity. A trojan or a virus can damage the system and cause unforeseen consequences.
1. Scan your Android device with Malwarebytes Anti-Malware app:

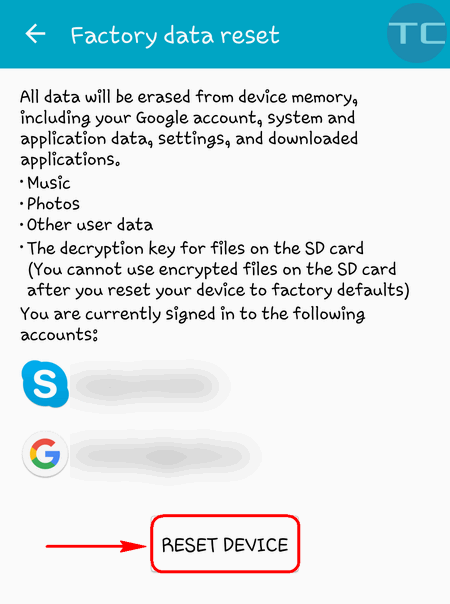
2. Try to reset your Android if nothing helps you fix the issue with Wi-Fi. Do not forget to back up all your photos, videos and music. Then go to Settings → Accounts → Backup and reset → Factory data reset and tap on RESET DEVICE:
Solution 15: Reset Your Wireless Router
First, make sure you know all credentials to get authorized at your ISP – write down or save in a text document your type of connection (PPPoE, L2TP, Dynamic IP) as well as your login, password and even the currently used MAC Address of your WAN port (in case if your ISP rejects connections from unregistered MAC addresses).
Then, restore your router to its factory defaults using its web interface or the physical Reset button on the unit.
When done factory resetting, configure your wireless router from a scratch.
Wrapping Up
As you understand, there are various reasons of the error and there are different methods to fix it respectively. We hope that our guide helped you get rid of the problem and you will never again see “Failed to obtain IP address” on your Android device.
That’s all solutions we know. You may suggest yours in the comments. Thank you and have a nice day!
The article was originally published on July 4, 2016 but is regularly updated.
Источник


