- флаттер запуска: нет подключенных устройств
- 12 ответов
- для Android (в системе mac)
- настройка Android устройства
- настройка эмулятора Android
- открыть и подключить устройство с помощью Android Studio:
- флаттер запуска: нет подключенных устройств
- 12 ответов
- для Android (в системе mac)
- настройка Android устройства
- настройка эмулятора Android
- открыть и подключить устройство с помощью Android Studio:
- Android emulator troubleshooting
- Deployment issues on Windows
- Deployment errors
- MMIO access error
- Missing Google Play Services
- Performance issues
- Hardware acceleration is not enabled
- Acceleration is enabled but the emulator runs too slowly
- Hardware acceleration issues
- Hardware acceleration not available
- Incorrect BIOS settings
- Hyper-V issues
- HAXM issues
- HAXM process is not running
- HAXM virtualization conflicts
- Incorrect BIOS settings
- Disabling Hyper-V
- Disabling Device Guard
- Additional troubleshooting tips
- Starting the emulator from the command line
- Viewing Device Manager logs
- Deployment issues on macOS
- Deployment errors
- MMIO access error
- Missing Google Play Services
- Performance issues
- Hardware acceleration is not enabled
- Acceleration is enabled but the emulator runs too slowly
- Hardware acceleration issues
- Hypervisor Framework issues
- HAXM issues
- Additional troubleshooting tips
- Starting the emulator from the command line
- Viewing Device Manager logs
флаттер запуска: нет подключенных устройств
Я пытаюсь создать образец приложения с flutter (свежая установка) android studio также установлен (свежая установка)
вот результат flutter run
выход flutter doctor
есть ли решение ?
12 ответов
Flutter поддерживает как iOS, так и Android-устройства / симуляторы.
в терминале выполнить flutter devices команда для проверки того, что Flutter распознает подключенное устройство Android.
вот справочный документ, как вы можете настроить устройство/симулятор для запуска вашего приложения.
для Android (в системе mac)
настройка Android устройства
для подготовки к запуску и Проверьте свое приложение Flutter на устройстве Android, вам понадобится устройство Android под управлением Android 4.1 (уровень API 16) или выше.
- включить параметры разработчика и отладку USB на устройстве. Подробные инструкции доступны в документации Android.
- используя USB-кабель, подключите телефон к компьютеру. При появлении запроса на устройстве авторизуйте компьютер для доступа к устройству.
- в терминале выполните команду flutter devices для проверки этот флаттер распознает ваше подключенное устройство Android.
- запустите приложение, запустив Flutter run.
по умолчанию Flutter использует версию Android SDK, на которой основан ваш инструмент adb. Если вы хотите, чтобы Flutter использовал другую установку Android SDK, вы должны установить переменную среды ANDROID_HOME в этот каталог установки.
настройка эмулятора Android
для подготовки к запуску и тестированию Flutter приложение на эмуляторе Android, выполните следующие действия:
- включить ускорение VM на вашем компьютере.
- запустите Android Studio>инструменты>Android>AVD Manager и выберите создать виртуальное устройство.
- выбрать определение устройства и нажмите кнопку Далее.
- Выберите один или несколько системных образов для версий Android, которые вы хотите эмулировать, и выберите Далее. Рекомендуется использовать образ x86 или x86_64.
- в разделе Эмулируемая производительность выберите Аппаратное обеспечение-GLES 2.0 для обеспечения аппаратного ускорения.
проверьте правильность конфигурации AVD и выберите готово.
подробные сведения о вышеуказанных шагах см. В разделе Управление AVDs.
в Диспетчере виртуальных устройств Android нажмите кнопку Выполнить на панели инструментов. Эмулятор запускается и отображает холст по умолчанию для выбранной версии ОС и устройства.
- вот еще один документ, если вы используете (Microsoft) систему Windows: начало работы: установить на Windows
открыть и подключить устройство с помощью Android Studio:
вот более простой способ открыть и подключить симуляторы / устройства.
Android Studio показывает список эмуляторов / симуляторов (установленных в вашем система) или устройства (подключенные к вашей системе). Просто выберите устройство, которое вы хотите открыть, из списка, и запустить проект.

я сталкиваюсь с той же проблемой, что и вы. Оказывается, что ваше устройство не связано с вашим компьютером.
- если вы используете XCode, если ваш компьютер и устройство используют то же самое WIFI, вам не нужно подключать устройство к компьютеру.
- для Android или iOS, работающих под командой терминала, если вы используете командную строку для запуска этого, вы должны убедиться, что они подключены через кабели. Совместное использование того же WIFI не работает. убедитесь, что устройство действительно подключено.
- убедитесь, что вы разрешена Отладка USB на вашем устройстве Android.
Если это все еще не работает, попробуйте запустить ниже команды, где вы можете получить более подробную информацию и детали:
Я запустил свой с Genymotion, вероятно, лучший для Flutter.
настройка менее болезненна и
убедитесь, что настройка ADB под

—ВАШ ANDROID SDK ПУТЬ —
должно быть хотя бы одно устройство / симулятор, подключенное к run флаттер приложения.
также убедитесь, что отладка по USB включена в настройках разработчика.
я решил проблему AVD с помощью flutter с помощью консоли Flutter.
чтобы запустить эмулятор, запустите flutter emulators —launch .
Я сталкиваюсь с той же проблемой с Flutter. Но я нашел другой способ работы, т. е.
- первый запуск эмулятора Android
- затем перейдите к консоли Flutter
запустите команду flutter doctor и проверьте, отображается ли ваш эмулятор под тегом подключенных устройств, например выход успеха команды доктора флаттера
Теперь перейдите к пути проекта Flutter через консоль Flutter, например, для меня это D:\FlutterWorkspace\flutter_demo
затем запустите команду Flutter run. например,flutter run подождите несколько минут, вы увидите, что ваше приложение работает в эмуляторе Android. приложения
один из вариантов, который я пока не видел, заключается в том, что (для моей установки) параметр разработчика «выбрать конфигурацию USB» должен быть установлен в MTP (протокол передачи мультимедиа).
для окна пользователей,
установить переменную среды Flutter SDK (. \flutter_windows_v0.2.8-бета.zip\flutter\bin)
- скачал Flutter SDK
- подключил мобильное устройство и включил опцию разработчика на мобильном телефоне и разрешил отладку USB.
и все же вы получаете «нет подключенного устройства», тогда я думаю, что вы должны установить драйвер ADB. У меня получилось!! Нажмите здесь, чтобы загрузить
я использую Linux, поэтому здесь шаг может помочь. Сначала откройте studio с правами root, (окно : щелкните правой кнопкой мыши значок программы > выберите Запуск от имени администратора, linux: sudo ./studio.sh в терминале)
создать эмулятор с оборудование-GLES 2.0 в аппаратном ускорении как уже упоминалось здесь. Откройте терминал в Android studio (Alt+F12)
выполнить команду flutter devices и посмотреть список устройств
в конце концов из терминала flutter run
и проверьте путь Flutter-sdk в вашем проекте.Настроить от этого ответа
фактический ответ не работает для меня.
но параметр ANDROID_HOME вы
/.bash_profile и выход из системы, затем войдите в систему, сделайте это работать!
это может быть проблема Android Studio, так как она не устанавливает эту переменную среды для открытых проектов.
У меня такие же проблемы, когда я отлаживал локальный движок flutter. В таком случае, если вы установили переменную среды FLUTTER_ENGINE , вы должны отключить его и перезапустить IDE.
Источник
флаттер запуска: нет подключенных устройств
Я пытаюсь создать образец приложения с flutter (свежая установка) android studio также установлен (свежая установка)
вот результат flutter run
выход flutter doctor
есть ли решение ?
12 ответов
Flutter поддерживает как iOS, так и Android-устройства / симуляторы.
в терминале выполнить flutter devices команда для проверки того, что Flutter распознает подключенное устройство Android.
вот справочный документ, как вы можете настроить устройство/симулятор для запуска вашего приложения.
для Android (в системе mac)
настройка Android устройства
для подготовки к запуску и Проверьте свое приложение Flutter на устройстве Android, вам понадобится устройство Android под управлением Android 4.1 (уровень API 16) или выше.
- включить параметры разработчика и отладку USB на устройстве. Подробные инструкции доступны в документации Android.
- используя USB-кабель, подключите телефон к компьютеру. При появлении запроса на устройстве авторизуйте компьютер для доступа к устройству.
- в терминале выполните команду flutter devices для проверки этот флаттер распознает ваше подключенное устройство Android.
- запустите приложение, запустив Flutter run.
по умолчанию Flutter использует версию Android SDK, на которой основан ваш инструмент adb. Если вы хотите, чтобы Flutter использовал другую установку Android SDK, вы должны установить переменную среды ANDROID_HOME в этот каталог установки.
настройка эмулятора Android
для подготовки к запуску и тестированию Flutter приложение на эмуляторе Android, выполните следующие действия:
- включить ускорение VM на вашем компьютере.
- запустите Android Studio>инструменты>Android>AVD Manager и выберите создать виртуальное устройство.
- выбрать определение устройства и нажмите кнопку Далее.
- Выберите один или несколько системных образов для версий Android, которые вы хотите эмулировать, и выберите Далее. Рекомендуется использовать образ x86 или x86_64.
- в разделе Эмулируемая производительность выберите Аппаратное обеспечение-GLES 2.0 для обеспечения аппаратного ускорения.
проверьте правильность конфигурации AVD и выберите готово.
подробные сведения о вышеуказанных шагах см. В разделе Управление AVDs.
в Диспетчере виртуальных устройств Android нажмите кнопку Выполнить на панели инструментов. Эмулятор запускается и отображает холст по умолчанию для выбранной версии ОС и устройства.
- вот еще один документ, если вы используете (Microsoft) систему Windows: начало работы: установить на Windows
открыть и подключить устройство с помощью Android Studio:
вот более простой способ открыть и подключить симуляторы / устройства.
Android Studio показывает список эмуляторов / симуляторов (установленных в вашем система) или устройства (подключенные к вашей системе). Просто выберите устройство, которое вы хотите открыть, из списка, и запустить проект.
я сталкиваюсь с той же проблемой, что и вы. Оказывается, что ваше устройство не связано с вашим компьютером.
- если вы используете XCode, если ваш компьютер и устройство используют то же самое WIFI, вам не нужно подключать устройство к компьютеру.
- для Android или iOS, работающих под командой терминала, если вы используете командную строку для запуска этого, вы должны убедиться, что они подключены через кабели. Совместное использование того же WIFI не работает. убедитесь, что устройство действительно подключено.
- убедитесь, что вы разрешена Отладка USB на вашем устройстве Android.
Если это все еще не работает, попробуйте запустить ниже команды, где вы можете получить более подробную информацию и детали:
Я запустил свой с Genymotion, вероятно, лучший для Flutter.
настройка менее болезненна и
убедитесь, что настройка ADB под
—ВАШ ANDROID SDK ПУТЬ —
должно быть хотя бы одно устройство / симулятор, подключенное к run флаттер приложения.
также убедитесь, что отладка по USB включена в настройках разработчика.
я решил проблему AVD с помощью flutter с помощью консоли Flutter.
чтобы запустить эмулятор, запустите flutter emulators —launch .
Я сталкиваюсь с той же проблемой с Flutter. Но я нашел другой способ работы, т. е.
- первый запуск эмулятора Android
- затем перейдите к консоли Flutter
запустите команду flutter doctor и проверьте, отображается ли ваш эмулятор под тегом подключенных устройств, например выход успеха команды доктора флаттера
Теперь перейдите к пути проекта Flutter через консоль Flutter, например, для меня это D:\FlutterWorkspace\flutter_demo
затем запустите команду Flutter run. например,flutter run подождите несколько минут, вы увидите, что ваше приложение работает в эмуляторе Android. приложения
один из вариантов, который я пока не видел, заключается в том, что (для моей установки) параметр разработчика «выбрать конфигурацию USB» должен быть установлен в MTP (протокол передачи мультимедиа).
для окна пользователей,
установить переменную среды Flutter SDK (. \flutter_windows_v0.2.8-бета.zip\flutter\bin)
- скачал Flutter SDK
- подключил мобильное устройство и включил опцию разработчика на мобильном телефоне и разрешил отладку USB.
и все же вы получаете «нет подключенного устройства», тогда я думаю, что вы должны установить драйвер ADB. У меня получилось!! Нажмите здесь, чтобы загрузить
я использую Linux, поэтому здесь шаг может помочь. Сначала откройте studio с правами root, (окно : щелкните правой кнопкой мыши значок программы > выберите Запуск от имени администратора, linux: sudo ./studio.sh в терминале)
создать эмулятор с оборудование-GLES 2.0 в аппаратном ускорении как уже упоминалось здесь. Откройте терминал в Android studio (Alt+F12)
выполнить команду flutter devices и посмотреть список устройств
в конце концов из терминала flutter run
и проверьте путь Flutter-sdk в вашем проекте.Настроить от этого ответа
фактический ответ не работает для меня.
но параметр ANDROID_HOME вы
/.bash_profile и выход из системы, затем войдите в систему, сделайте это работать!
это может быть проблема Android Studio, так как она не устанавливает эту переменную среды для открытых проектов.
У меня такие же проблемы, когда я отлаживал локальный движок flutter. В таком случае, если вы установили переменную среды FLUTTER_ENGINE , вы должны отключить его и перезапустить IDE.
Источник
Android emulator troubleshooting
This article describes the most common warning messages and issues that occur while configuring and running the Android Emulator. In addition, it describes solutions for resolving these errors as well as various troubleshooting tips to help you diagnose emulator problems.
Deployment issues on Windows
Some error messages may be displayed by the emulator when you deploy your app. The most common errors and solutions are explained here.
Deployment errors
If you see an error about a failure to install the APK on the emulator or a failure to run the Android Debug Bridge (adb), verify that the Android SDK can connect to your emulator. To verify emulator connectivity, use the following steps:
Launch the emulator from the Android Device Manager (select your virtual device and click Start).
Open a command prompt and go to the folder where adb is installed. If the Android SDK is installed at its default location, adb is located at C:\Program Files (x86)\Android\android-sdk\platform-tools\adb.exe; if not, modify this path for the location of the Android SDK on your computer.
Type the following command:
If the emulator is accessible from the Android SDK, the emulator should appear in the list of attached devices. For example:
If the emulator does not appear in this list, start the Android SDK Manager, apply all updates, then try launching the emulator again.
MMIO access error
If the message An MMIO access error has occurred is displayed, restart the emulator.
Missing Google Play Services
If the virtual device you are running in the emulator does not have Google Play Services or Google Play Store installed, this condition is often caused by creating a virtual device without including these packages. When you create a virtual device (see Managing Virtual Devices with the Android Device Manager), be sure to select one or both of the following options:
- Google APIs – includes Google Play Services in the virtual device.
- Google Play Store – includes Google Play Store in the virtual device.
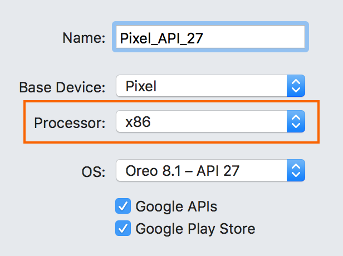
For example, this virtual device will include Google Play Services and Google Play Store:

Google Play Store images are available only for some base device types such as Pixel, Pixel 2, Nexus 5, and Nexus 5X.
Performance issues
Performance issues are typically caused by one of the following problems:
The emulator is running without hardware acceleration.
The virtual device running in the emulator is not using an x86-based system image.
The following sections cover these scenarios in more detail.
Hardware acceleration is not enabled
If hardware acceleration is not enabled, starting a virtual device from the Device Manager will produce a dialog with an error message indicating that the Windows Hypervisor Platform (WHPX) is not configured properly:
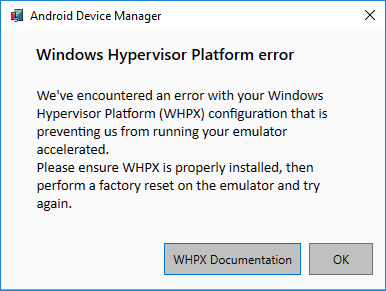
If this error message is displayed, see Hardware acceleration issues below for steps you can take to verify and enable hardware acceleration.
Acceleration is enabled but the emulator runs too slowly
A common cause for this problem is not using an x86-based image in your virtual device (AVD). When you create a virtual device (see Managing Virtual Devices with the Android Device Manager), be sure to select an x86-based system image:

Hardware acceleration issues
Whether you are using Hyper-V or HAXM for hardware acceleration, you may run into configuration problems or conflicts with other software on your computer. You can verify that hardware acceleration is enabled (and which acceleration method the emulator is using) by opening a command prompt and entering the following command:
This command assumes that the Android SDK is installed at the default location of C:\Program Files (x86)\Android\android-sdk; if not, modify the above path for the location of the Android SDK on your computer.
Hardware acceleration not available
If Hyper-V is available, a message like the following example will be returned from the emulator-check.exe accel command:
If HAXM is available, a message like the following example will be returned:
If hardware acceleration is not available, a message like the following example will be displayed (the emulator looks for HAXM if it is unable to find Hyper-V):
If hardware acceleration is not available, see Accelerating with Hyper-V to learn how to enable hardware acceleration on your computer.
Incorrect BIOS settings
If the BIOS has not been configured properly to support hardware acceleration, a message similar to the following example will be displayed when you run the emulator-check.exe accel command:
To correct this problem, reboot into your computer’s BIOS and enable the following options:
- Virtualization Technology (may have a different label depending on motherboard manufacturer).
- Hardware Enforced Data Execution Prevention.
If hardware acceleration is enabled and the BIOS is configured properly, the emulator should run successfully with hardware acceleration. However, problems may still result due to issues that are specific to Hyper-V and HAXM, as explained next.
Hyper-V issues
In some cases, enabling both Hyper-V and Windows Hypervisor Platform in the Turn Windows features on or off dialog may not properly enable Hyper-V. To verify that Hyper-V is enabled, use the following steps:
Enter powershell in the Windows search box.
Right-click Windows PowerShell in the search results and select Run as administrator.
In the PowerShell console, enter the following command:
If Hyper-V is not enabled, a message similar to the following example will be displayed to indicate that the state of Hyper-V is Disabled:
In the PowerShell console, enter the following command:
If the Hypervisor is not enabled, a message similar to the following example will be displayed to indicate that the state of HypervisorPlatform is Disabled:
If Hyper-V and/or HypervisorPlatform are not enabled, use the following PowerShell commands to enable them:
After these commands complete, reboot.
For more information about enabling Hyper-V (including techniques for enabling Hyper-V using the Deployment Image Servicing and Management tool), see Install Hyper-V.
HAXM issues
HAXM issues are often the result of conflicts with other virtualization technologies, incorrect settings, or an out-of-date HAXM driver.
HAXM process is not running
If HAXM is installed, you can verify that the HAXM process is running by opening a command prompt and entering the following command:
If the HAXM process is running, you should see output similar to the following result:
If STATE is not set to RUNNING , see How to Use the Intel Hardware Accelerated Execution Manager to resolve the problem.
HAXM virtualization conflicts
HAXM can conflict with other technologies that use virtualization, such as Hyper-V, Windows Device Guard, and some antivirus software:
Hyper-V – If you are using a version of Windows before the Windows 10 April 2018 update (build 1803) and Hyper-V is enabled, follow the steps in Disabling Hyper-V so that HAXM can be enabled.
Device Guard – Device Guard and Credential Guard can prevent Hyper-V from being disabled on Windows machines. To disable Device Guard and Credential Guard, see Disabling Device Guard.
Antivirus Software – If you are running antivirus software that uses hardware-assisted virtualization (such as Avast), disable or uninstall this software, reboot, and retry the Android emulator.
Incorrect BIOS settings
If you are using HAXM on a Windows PC, HAXM will not work unless virtualization technology (Intel VT-x) is enabled in the BIOS. If VT-x is disabled, you will get an error similar to the following when you attempt to start the Android Emulator:
This computer meets the requirements for HAXM, but Intel Virtualization Technology (VT-x) is not turned on.
To correct this error, boot the computer into the BIOS, enable both VT-x and SLAT (Second-Level Address Translation), then restart the computer back into Windows.
Disabling Hyper-V
If you are using a version of Windows before the Windows 10 April 2018 Update (build 1803) and Hyper-V is enabled, you must disable Hyper-V and reboot your computer to install and use HAXM. If you are using Windows 10 April 2018 Update (build 1803) or later, Android Emulator version 27.2.7 or later can use Hyper-V (instead of HAXM) for hardware acceleration, so it is not necessary to disable Hyper-V.
You can disable Hyper-V from the Control Panel by following these steps:
Enter windows features in the Windows search box and select Turn Windows features on or off in the search results.
Uncheck Hyper-V:
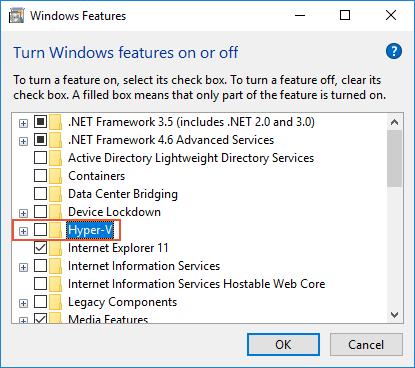
Restart the computer.
Alternately, you can use the following PowerShell command to disable the Hyper-V Hypervisor:
Disable-WindowsOptionalFeature -Online -FeatureName Microsoft-Hyper-V-Hypervisor
Intel HAXM and Microsoft Hyper-V cannot both be active at the same time. Unfortunately, there is no way to switch between Hyper-V and HAXM without restarting your computer.
In some cases, using the above steps will not succeed in disabling Hyper-V if Device Guard and Credential Guard are enabled. If you are unable to disable Hyper-V (or it seems to be disabled but HAXM installation still fails), use the steps in the next section to disable Device Guard and Credential Guard.
Disabling Device Guard
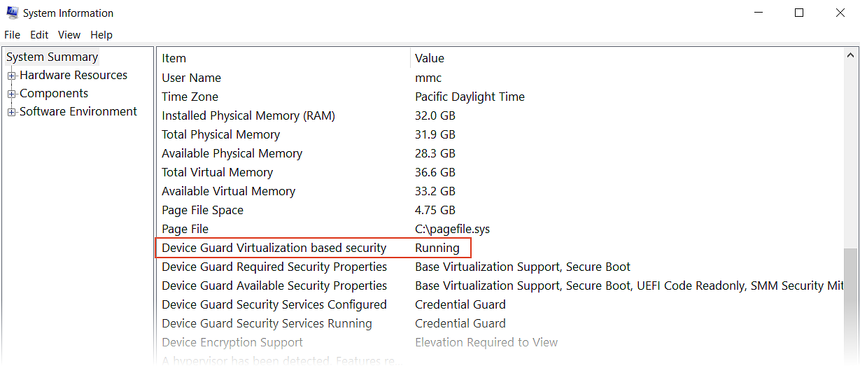
Device Guard and Credential Guard can prevent Hyper-V from being disabled on Windows machines. This situation is often a problem for domain-joined machines that are configured and controlled by an owning organization. On Windows 10, use the following steps to see if Device Guard is running:
Enter System info in the Windows search box and select System Information in the search results.
In the System Summary, look to see if Device Guard Virtualization based security is present and is in the Running state:
If Device Guard is enabled, use the following steps to disable it:
Ensure that Hyper-V is disabled (under Turn Windows Features on or off) as described in the previous section.
In the Windows Search Box, enter gpedit.msc and select the Edit group policy search result. These steps launch the Local Group Policy Editor.
In the Local Group Policy Editor, navigate to Computer Configuration > Administrative Templates > System > Device Guard:
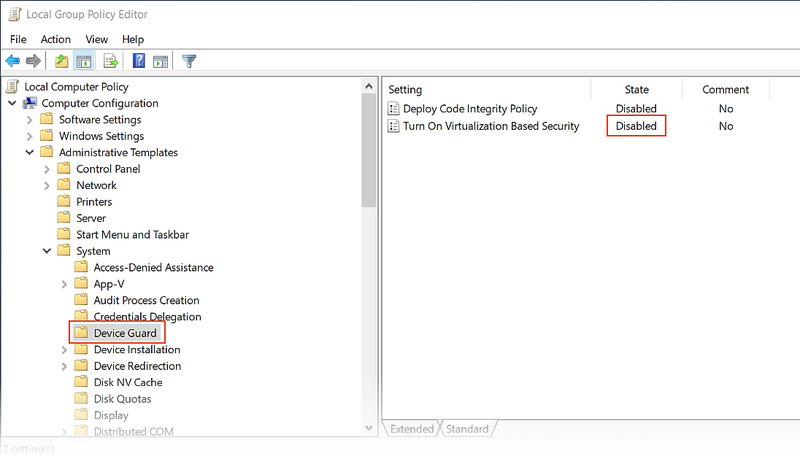
Change Turn On Virtualization Based Security to Disabled (as shown above) and exit the Local Group Policy Editor.
In the Windows Search Box, enter cmd. When Command Prompt appears in the search results, right-click Command Prompt and select Run as Administrator.
Copy and paste the following commands into the command prompt window (if drive Z: is in use, pick an unused drive letter to use instead):
Restart your computer. On the boot screen, you should see a prompt similar to the following message:
Do you want to disable Credential Guard?
Press the indicated key to disable Credential Guard as prompted.
After the computer reboots, check again to ensure that Hyper-V is disabled (as described in the previous steps).
If Hyper-V is still not disabled, the policies of your domain-joined computer may prevent you from disabling Device Guard or Credential Guard. In this case, you can request an exemption from your domain administrator to allow you to opt out of Credential Guard. Alternately, you can use a computer that is not domain-joined if you must use HAXM.
Additional troubleshooting tips
The following suggestions are often helpful in diagnosing Android emulator issues.
Starting the emulator from the command line
If the emulator is not already running, you can start it from the command line (rather than from within Visual Studio) to view its output. Typically, Android emulator AVD images are stored at the following location (replace username with your Windows user name):
C:\Users\username\.android\avd
You can launch the emulator with an AVD image from this location by passing in the folder name of the AVD. For example, this command launches an AVD named Pixel_API_27:
This example assumes that the Android SDK is installed at the default location of C:\Program Files (x86)\Android\android-sdk; if not, modify the above path for the location of the Android SDK on your computer.
When you run this command, it will produce many lines of output while the emulator starts up. In particular, lines such as the following example will be printed if hardware acceleration is enabled and working properly (in this example, HAXM is used for hardware acceleration):
Viewing Device Manager logs
Often you can diagnose emulator problems by viewing the Device Manager logs. These logs are written to the following location:
C:\Users\username\AppData\Local\Xamarin\Logs\16.0
You can view each DeviceManager.log file by using a text editor such as Notepad. The following example log entry indicates that HAXM was not found on the computer:
Deployment issues on macOS
Some error messages may be displayed by the emulator when you deploy your app. The most common errors and solutions are explained below.
Deployment errors
If you see an error about a failure to install the APK on the emulator or a failure to run the Android Debug Bridge (adb), verify that the Android SDK can connect to your emulator. To verify connectivity, use the following steps:
Launch the emulator from the Android Device Manager (select your virtual device and click Start).
Open a command prompt and go to the folder where adb is installed. If the Android SDK is installed at its default location, adb is located at
/Library/Developer/Xamarin/android-sdk-macosx/platform-tools/adb; if not, modify this path for the location of the Android SDK on your computer.
Type the following command:
If the emulator is accessible from the Android SDK, the emulator should appear in the list of attached devices. For example:
If the emulator does not appear in this list, start the Android SDK Manager, apply all updates, then try launching the emulator again.
MMIO access error
If An MMIO access error has occurred is displayed, restart the emulator.
Missing Google Play Services
If the virtual device you are running in the emulator does not have Google Play Services or Google Play Store installed, this condition is usually caused by creating a virtual device without including these packages. When you create a virtual device (see Managing Virtual Devices with the Android Device Manager), be sure to select one or both of the following:
- Google APIs – includes Google Play Services in the virtual device.
- Google Play Store – includes Google Play Store in the virtual device.
For example, this virtual device will include Google Play Services and Google Play Store:

Google Play Store images are available only for some base device types such as Pixel, Pixel 2, Nexus 5, and Nexus 5X.
Performance issues
Performance issues are typically caused by one of the following problems:
The emulator is running without hardware acceleration.
The virtual device running in the emulator is not using an x86-based system image.
The following sections cover these scenarios in more detail.
Hardware acceleration is not enabled
If hardware acceleration is not enabled, a dialog may pop up with a message such as device will run unaccelerated when you deploy your app to the Android emulator. If you are not certain whether hardware acceleration is enabled on your computer (or you would like to know which technology is providing the acceleration), see Hardware acceleration issues below for steps you can take to verify and enable hardware acceleration.
Acceleration is enabled but the emulator runs too slowly
A common cause for this problem is not using an x86-based image in your virtual device. When you create virtual device (see Managing Virtual Devices with the Android Device Manager), be sure to select an x86-based system image:
Hardware acceleration issues
Whether you are using the Hypervisor Framework or HAXM for hardware acceleration of the emulator, you may run into problems caused by installation issues or an out-of-date version of macOS. The following sections can help you resolve this issue.
Hypervisor Framework issues
If you are using macOS 10.10 or later on a newer Mac, the Android emulator will automatically use the Hypervisor Framework for hardware acceleration. However, some older Macs or Macs running a version of macOS earlier than 10.10 may not provide Hypervisor Framework support.
To determine whether or not your Mac supports the Hypervisor Framework, open a Terminal and enter the following command:
If your Mac supports the Hypervisor Framework, the above command will return the following result:
If the Hypervisor Framework is not available on your Mac, you can follow the steps in Accelerating with HAXM to use HAXM for acceleration instead.
HAXM issues
If the Android Emulator does not start properly, this problem is often caused by problems with HAXM. HAXM issues are often the result of conflicts with other virtualization technologies, incorrect settings, or an out-of-date HAXM driver. Try reinstalling the HAXM driver, using the steps detailed in Installing HAXM.
Additional troubleshooting tips
The following suggestions are often helpful in diagnosing Android emulator issues.
Starting the emulator from the command line
If the emulator is not already running, you can start it from the command line (rather than from within Visual Studio for Mac) to view its output. Typically, Android emulator AVD images are stored at the following location:
You can launch the emulator with an AVD image from this location by passing in the folder name of the AVD. For example, this command launches an AVD named Pixel_2_API_28:
If the Android SDK is installed at its default location, the emulator is located in the
/Library/Developer/Xamarin/android-sdk-macosx/emulator directory; if not, modify this path for the location of the Android SDK on your Mac.
When you run this command, it will produce many lines of output while the emulator starts up. In particular, lines such as the following example will be printed if hardware acceleration is enabled and working properly (in this example, Hypervisor Framework is used for hardware acceleration):
Viewing Device Manager logs
Often you can diagnose emulator problems by viewing the Device Manager logs. These logs are written to the following location:
Источник


