- How to fix “Android Studio doesn’t see device” in Android Studio?
- How To Solve “Android Studio doesn’t see device”
- Method 1
- Method 2
- Method 3
- Method 4
- Troubleshooting when Android Studio doesn’t recognize your device
- The Issue
- How to check whether my device is identified
- Possible Solutions
- 1) Make sure USB Debugging is enabled in your device
- 2) Make sure you have installed the android sdk
- 3) Install the Android USB drivers for your phone
- 4) Install Google USB Driver
- 5) Install a device software
- 6) Configure/Change Media Mode
- 8) Configure Knox security settings
- 9) Try Swapping USB ports and cables
- 10) Retry!
- Android Studio не видит устройство
- 30 ответов
How to fix “Android Studio doesn’t see device” in Android Studio?
In Android Studio, sometimes the list of devices and emulators doesn’t list your physical device when you try to plug it in. Or you may have faces a situation when you plugged the phone in for the first time, no dialog appeared asking if you trust the computer. But the laptop is already allowed to connect to the mobile device. However, the button Run does not allow to deploy the app to the connected device because it thinks that there is no connected device. So you may get confused about what’s wrong with the device. Before doing anything, just check the following configuration. Configuring Your System to Detect Your Android Device
- Install the USB driver for your Android device.
- Enable USB debugging on your Android device.
- If necessary, install the Android development tools (JDK/SDK/NDK).
- Add your Android SDK to the RAD Studio SDK Manager.
- Connect your Android device to your development system using the USB cable provided with your device.
Even if you have done everything that is mentioned above, if you get this error “Android Studio doesn’t see device”, then you are on the right page. This article is for such programmers. In this article, there are five methods listed below to solve this issue.
How To Solve “Android Studio doesn’t see device”
Method 1
To change what your application defaults to when you click to run or debug in Android Studio, follow these steps:
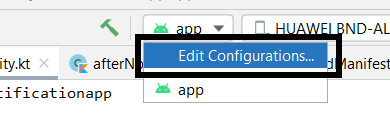
Step 1: Go to the Run (on the left corner) then click on Edit Configurations.
Or you can just click here to find the “edit configurations” tab :
Step 2: Select the project. Find the Target Device section under the General tab on the Android Application page.
That seems to be where you toggle what the project builds too. If you’re importing a project it actually defaults to Emulator, not sure why. You can also select “Open Select Deployment Target Dialog” to list both connected as well as emulated devices.
Method 2
If Android Studio doesn’t even detect your device using ‘ADB devices’. then try to switch to PTP instead of MTP on your device. To do so, just click on “File transfer via USB touch for more options” in the notification area of the device.
and then choose the PTP option.
Then you will get a popup on your device regarding access. Just try restarting Android Studio to show up there as well though.
Method 3
On your device:
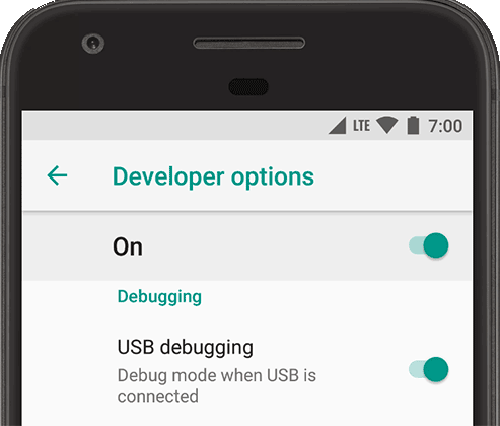
Go to settings/ developer settings / allow USB debug mode
If you might have the device currently connected to your PC, then ‘allow USB debug mode’ option is disabled. Just disconnect the device and the option should now be available. If you are using Android 4.2 and newer, the Developer options are hidden by default. To make it available, go to Settings > About phone and tap Build number seven times.
Return to the previous screen to find Developer options.
Method 4
You may need to restart ADB, from the terminal. To do so just type the below commands:
- adb kill-server
- adb start-server
or from ddms(If you are using Android Studio version My Personal Notes arrow_drop_up
Источник
Troubleshooting when Android Studio doesn’t recognize your device


Senior Software Engineer
The first step of making an android application is to install a suitable IDE for the development. Android Studio powered by intelliJ is one of the most popular choices. This article provides 10 possible solutions to troubleshoot when an android device is not detected by the Android Studio.
Note: This article was written based on Windows operating System. But some of the solutions will work with any other operating system as well.
A major step of the app development is to run your application and test it. For this, you need follow one of the two possible approaches, use your own device or run the app on an android virtual device (AVD — AKA an emulator).
In my opinion, the former option is more feasible, as running the emulator can be a tiring task. The emulator takes a lot of time to start, and also feeds on your own RAM. Thus, running the app on your own device is preferable most of the time. This article is written based on the Windows-7 operating system. But these steps would work in any other similar windows versions, 8, 8.1, or 10.
The Issue
Most of the developers face the major issue of Android studio not recognizing your device, for the first time. Presented below are some of the approaches that can be followed in order to solve this problem.
How to check whether my device is identified
Go to your SDK installed location. Usually it will be something like, C:\Users\Dodan\AppData\Local\Android\sdk
Go to platform-tools directory and start your command prompt from there,
(Shift+Right click -> Open Command window here)
then type “adb devices” and press enter.
If your device is identified, you will see a message similar to the following
List of devices attached
If you cannot see a device there, try the following possible solutions. Remember to re-do this step after trying each solution to identify whether your device was identified.
Possible Solutions
1) Make sure USB Debugging is enabled in your device
This option is usually available under settings -> developer options menu of your phone. Make sure the tick is on.
2) Make sure you have installed the android sdk
You can find the sdk from the following link. If you have not installed it, download and install it from here, http://developer.android.com/sdk/installing/index.html
Usually this takes about 3GB of space from your hard disk
3) Install the Android USB drivers for your phone
Make sure to download the installer from the original manufacturer. Most other alternatives will make your life even harder.
For example, for samsung devices, you can install the original software from the from the following link.
4) Install Google USB Driver
For this first you have to start the SDK manager from your computer. It will be installed usually in the following location.
C:\Users\ \AppData\Local\Android\sdk\SDK Manager.exe
In the “Extras” section of the SDK manager, you will find an option named, “Google USB Driver”. Select it and install it.
5) Install a device software
This is not the same as the Android USB drivers. For samsung, it is the Kies software. For HTC, it will be the HTC Sync Manager. Similarly, install the software related to your device brand.
Usually your device connects to the computer as an MTP device. Sometimes, changing it to Camera(PTP) or Mass Storage(USM) solves the issue.
6) Configure/Change Media Mode
Right click “My Computer” and click “Manage”.
From the Computer Management window, select, “Device Manager”
You will see your device under “other devices”, “Portable devices” or “Universal Serial Bus Controllers”.
Right click and select the update driver option.
8) Configure Knox security settings
If your device is a samsung s6, you should additionally enable knox configurations listed under, settings->Security
9) Try Swapping USB ports and cables
Sounds weird! But this has proven to be the problem many people had. Try plugging your device to different ports, or try using different cables. Some cables may either be incompatible or damaged.
10) Retry!
I know that sounds bad. But, if any of those options does not work, you can either try restarting your machine, or reinstalling all the software, including android studio and the sdk, well may be, a different version.
Источник
Android Studio не видит устройство
менеджер AVD в Android Studio не показывает мое устройство, но «adb devices» показывает его. Я упускаю что-то очевидное?
30 ответов
чтобы изменить настройки приложения по умолчанию при нажатии кнопки выполнить или отладить в Android Studio, выполните следующие действия:
1. на Run
2. нажать на кнопку Изменение Конфигураций
3. выберите проект
4. найти Устройство под общие на страница приложения для Android.
Это, кажется, где вы переключаете то, что строит проект. Если вы импортируете проект, по умолчанию используется эмулятор, не знаю почему. Вы также можете выбрать «открыть диалог выбора цели развертывания», чтобы отобразить как подключенные, так и эмулированные устройства.
У меня недавно были проблемы с этим, и независимо от того, что я сделал(перезапустите adb, отредактируйте adb_usb.ini, перезагрузите компьютер+устройство + обмен usb-портом, переустановите studio и т. д. так далее.) Я просто не мог заставить его работать и даже не мог обнаружить мое устройство с помощью «устройств adb». Наконец, после примерно 2 часов поиска и тестирования, кто-то предложил переключиться на PTP вместо MTP на моем устройстве. Когда я это сделал, на моем устройстве появилось всплывающее окно с просьбой разрешить доступ к mac и внезапно все работало(пришлось перезапустить студию, чтобы она там появилась).
Я мог бы наткнуться на эту тему сейчас, но это первый результат поиска google, и у меня было много проблем с поиском ответа на эту проблему, поэтому я подумал, что это должно быть добавлено в качестве решения.
на вашем устройстве:
перейдите в Настройки / настройки разработчика / разрешить режим отладки USB
Если опция «разрешить режим отладки USB» отключена. Тогда у вас может быть устройство, подключенное к вашему ПК. Отключите устройство, и теперь опция должна быть доступна
Примечание: на Android 4.2 и новее, Параметры разработчика по умолчанию скрыто. Чтобы сделать это, перейдите в Настройки > О телефоне и нажмите Создать номер семь. Вернуться к предыдущему экрану, чтобы найти параметры разработчика.
Если это все еще не помогает, вы можете google его с этим выражением:
Как включить параметры разработчика на YOUR_PHONE_TYPE
некоторые кабели не могут использоваться для режима разработчика или передачи файла. Решением было бы изменить ваш кабель и не тратить время.
Я должен killall adb потому что каким-то образом Android Studio удалось сбой и больше не хотел общаться с adb. Таким образом, мое устройство не появилось.
поэтому выход из Android Studio, завершение всех экземпляров adb в терминале и запуск Android Studio снова (следует спросить, следует ли включить отладку) работал.
Он работает для меня, выполнив следующие шаги: —
Если вы используете Windows, устройство не будет отображаться из-за проблемы с драйвером.
перейдите в Диспетчер устройств (просто найдите его, используя Start) и ищите любые устройства, показывающие ошибку. Многие андроиды будут отображаться как неизвестное USB-устройство и поставляются с восклицательным знаком. Выберите Это устройство и попробуйте обновить драйверы для него. для обновления части перейдите по ссылке:универсальный adb
но до этого у вас есть чтобы обновить диспетчер sdk и убедиться, что установлен пакет драйверов Google USB.
по завершении файлы драйверов загружаются в каталог \extras\google\usb_driver\. подсказки: Поиск «android_winusb.inf » под Windows запустите и откройте местоположение файла, чтобы получить упомянутый каталог.
Откройте Диспетчер устройств, перейдите на устройство android, щелкните его правой кнопкой мыши и выберите Обновить драйвер, затем выберите обзор драйвера. Следуйте путь к местоположению файла ранее для установки драйвера Google USB.
перезагрузите Android Studio и Параметры разработчика на android-устройстве и снова подключите USB.
мой телефон Nexus 5 не имел параметров разработчика в меню настроек. Мне пришлось сделать следующее:—1—>
на Android 4.2 и новее, Параметры разработчика по умолчанию скрыто. Чтобы сделать это, перейдите в Настройки > О телефоне и нажмите номер сборки семь раз. Вернуться к предыдущему экрану, чтобы найти параметры разработчика.
потратив некоторое время, я обнаружил, что проблема заключалась в том, чтобы включить опцию отладки USB. Просто найдите в настройках мобильного телефона — > опция разработчика — >Отладка USB. Просто включите его и он работает. Это может кому-то помочь!
в моем случае следующие шаги помогли решить проблему:
1) Убедитесь, что пакет «Google USB Driver» установлен в Android SDK Manager
2) Скачать «ADB Driver Installer 2.0» из здесь
3) запустите загруженный инструмент и подключите смартфон; в моем случае он показал, что драйвер был установлен неправильно и предложил его исправить
после этих шагов моя Android Studio мгновенно распознала устройство! И MTP, и PTP начали работать.
протестировано для Samsung (Android 4.1.2) и Xiaomi MI4W (Android 4.4.4)
в моем случае
Android studio внезапно перестает видеть мое устройство
я исправляю это изменением опция USB на устройство мультимедиа (MTP)
Как получить опцию USB из USB-накопителя подключение к компьютеру
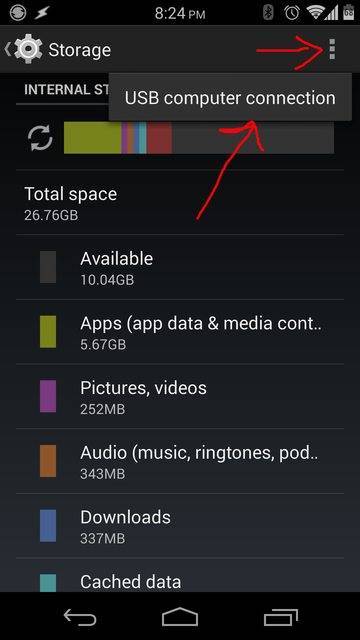
Регистрация отладка С Параметры разработчика
попробуйте повторно запустить приложение на устройстве , он должен работать
опция USB была заряжена только
ОБНОВИТЬ ОТВЕТ 26/7/2016
есть много причин, таких как не включение режима разработчика —> Отладка USB(если вы не видите опцию разработчика, нажмите 7 раз на номер сборки )
но я сталкиваюсь с другой проблемой, все было отлично работает, внезапно android studio не может видеть мое устройство
чтобы устранить эту проблему, вам необходимо перезапустить adb с терминала
в разделе Устройства — > нажмите на маленькую стрелку вниз —> перезапустить АБР
Источник


