- No client message android
- Android Notification & Data Messages From App Server Using Firebase Cloud Messaging
- Table of Contents
- Firebase Cloud Messaging Message Types
- Notification message in JSON format
- Data message in JSON format
- Notification and data message in JSON format
- Handling FCM Messages in Android
- Android Project Set up — Client of FCM
- Sending Messages from App Server to Firebase Cloud Messaging Server
- Getting access token
- Adding access token to http request header
- Creating and sending JSON message
- Android Firebase Cloud Messaging Example
- Notification message
- Data message
- Sending FCM Message from App Server Example
- AndroidManifest
- FirebaseMessagingService
- JobService
- Sending and Receiving Data with Sockets
- Простой клиент-сервер на Android (интернет-мессенджер)
- Делаем сервер
- Клиентская часть
No client message android
Android Notification & Data Messages From App Server Using Firebase Cloud Messaging
December 13, 2017
If your Android app relies on app servers for data and functionality, instead of android app contacting app server at a specified regular intervals, server can notify events or data changes to android using Firebase cloud messaging (FCM).
This way of app servers notifying client or android apps has advantages compared to client contacting app server at a regular intervals. It reduces the use of android device resources including computing power and consumption of network bandwidth as communication between server and client happens only when there is a change in data or an occurrence of an event at server.
Table of Contents
Firebase Cloud Messaging Message Types
Firebase Cloud Messaging supports two types of messages, notification message and data message. The difference between them is that with data message you can send your own data elements in the message where as with notification message you have to use predefined elements.
As names suggest, notification message type is used to send notifications which will be displayed as notifications in the notification bar. FCM automatically handles notification messages and your app can also process it and customize it. Data message type is used to send data to client. Your app has to process it and take further action. There is restriction of 4kb on the size of message that can be sent to client.
Notification message in JSON format
Data message in JSON format
Notification and data message in JSON format
Note that in the data message, only name and value pairs are allowed under data element, meaning data element can’t have hierarchical data or JSON array.
App server can send a generic message to multiple clients using Firebase topic. Client apps which listen to the topic will get the message sent by the app server. In this post, the example shows how to send messages to a topic from server app and how client apps can register to a topic and handle the messages.
Using FCM, app server can send messages to a specific client or device using firebase generated registration key. To know how to send user or device specific message, please read sending device specific message from app server to FCM server and handling the message on android.
Handling FCM Messages in Android
Notification messages are handled automatically when receiving android app is in background and notification is displayed. On taping the notification, app’s launcher activity is started.
If notification needs to be displayed when receiving app is in foreground, the app needs to provide FirebaseMessagingService service implementing its callback onMessageReceived to process notification messages.
To handle the data messages in foreground and background, app needs to provide FirebaseMessagingService service implementing its callback onMessageReceived. Data can be retrieved from RemoteMessage object passed to onMessageReceived method.
If message contains both data and notification and app is in foreground, onMessageReceived callback is called. If message contains both data and notification and app is in background, notification is displayed in notification bar and data is passed as extras in the intent to launcher activity.
Android Project Set up — Client of FCM
To make your android app as client of firebase cloud messaging server to handle and process messages, you need to follow below steps.
- Login to Firebase console.
- Add project to Firebase by clicking add project link on main screen of Firebase console.
- To install Firebase SDK, go to project overview section in Firebase console, click add-Firebase to android project and follow steps to generate google-services.json. Download the file and save it in your project under app folder.
- Add below entry to bottom of app level gradle build file.
- Add below entry to project level gradle build file in dependencies element.
- Add Firebase cloud messaging library to app level build file.
- Enable Firebase cloud messaging API in Google developers console.
- Create android service extending FirebaseMessagingService and implementing onMessageReceived, see example below to know how to handle and process messages.
- Add the service to mainfest file.
Sending Messages from App Server to Firebase Cloud Messaging Server
Firebase cloud messaging server delivers to client app the message sent from the app server. App server can send message to FCM server using various protocols. Below example app I created shows how to send messages to FCM server from app server using HTTP v1 protocol.
Authentication and authorization of the app server to use firebase service can be done using short-lived access token. In order for your app server code to get the access token, it needs private key associated with a service account which is either owner or editor.
To get private key in Firebase console, go to settings, then service accounts and click Generate New Private Key. The Json file contain key gets downloaded. You need to store it securely.

To get access token using the private key in your app server code, you need to use Google API Client library. Below are the maven and gradle dependencies which you need to add to your app server project.
Getting access token
GoogleCredential can be used to get access token using private key downloaded from firebase console.
Adding access token to http request header
You can use any http library to send message request to FCM server. Http request header should contain access token.
Creating and sending JSON message
Android Firebase Cloud Messaging Example
I’ll show the use of Firebase cloud messaging using an example app. The app displays coupons in recycler view retrieved from SQLite database using ROOM. When latest coupons are available, app server sends notification and data messages to FCM server. The android app receives and processes the messages, stores latest coupons data in SQLite database on the device and displays notifications. Since LiveData is used, as data changes in SQLite database, change will be reflected in UI.
Notification message

Data message

Sending FCM Message from App Server Example
AndroidManifest
FirebaseMessagingService
JobService
Since log running task can’t be run in FirebaseMessagingService, firebase job scheduler is used to process FCM data messages.
Источник
Sending and Receiving Data with Sockets
Network sockets are the endpoints of internet connections between devices. Basically we need two types of sockets to handle the connection — client and server. The main difference between them is that a server socket is listening for incoming connection requests. In this snippet I will try to show you a simple connection between an Android client device and a Java server app over a local network. (Warning: Using AsyncTask might not be the most modern way to do that!)
We will be using AsyncTask to make connection as a background task, Callback Interface for managing the incoming messages, Handler for updating GUI and TCPClient class representing the client. I will explain this on the Network Remote example — easy client-server app for shutting down the computer.
We are using AsyncTask to avoid StrictMode fatal error for network access ( Look in references ). The StrictMode policy is simply forbidding us to affect on UI Thread.
In this AsyncTask we are creating TCPClient object ( explained below ). In the TCPClient constructor we are passing Handler object for changing the UI, COMMAND — the String with the «shutdown -s» command for shutting down the computer, IP number — the servers ip number; Callback object — when we are getting servers response, the callback method ‘messageCallbackReceiver’ is starting ‘publishProgress’ method, which is publishing progress to ‘onProgressUpdate’ AsyncTask’s method.
After receiving proper message, we are sending command, or if we received wrong message, we are sending message «wrong» and stopping client. After this we are being transferred to the ‘onPostExecute’ method:
So step by step:
- AsyncTask is creating TCPClient object
- In TCPClient constructor we are passing Handler, Command, IP Number and Callback object
- When TCPClient begins connection, it sends message «shutdown» to the server
- When we are receiving message from server, the callback is passing it to ‘onProgressUpdate’
- If the received message ( response from server ) is equal to «shutdown», we are sending COMMAND to server
- After sending it we are stopping client, which is transferring us to ‘onPostExecute’ method.
- Meanwhile, the handler is receiving empty messages with ‘msg.what’ integers defined in MainActivity, which are responsible for updating the GUI
Example of how the widget UI is updated
This class is responsible for maintaining the connection. I will explain it step by step:
In the first step we can see the objects passed from ShutdownAsyncTask and others. Additionally we can see the sendMessage and stopClient methods.
The magic happens here — in ‘run()’ method. Here we are using ‘try-catch’ tools for handling exceptions ( server not enabled, ip not proper etc. ). As you can see below, we have infinite while() loop for listening to the incoming messages. We can simply stop it and finalize with ‘stopClient()’ method ( used in ShutdownAsyncTask’s ‘onProgressUpdate’ method)
The last thing in the client is the Callback interface. We have it in the TCPClient class in the end:
- Strict Mode Policy — Vogella’s blog post about this exception
- Sockets — Android Developers API about Sockets implementation in Android
- TurnMeOffMobile — The post was based on this app. Simple TCP Client as Android widget with connection handled by AsyncTasks + IP number finding dynamically.
Read about sockets generally on the Oracle Sockets Tutorial.
We need a way to send data to a computer from our android device. Easiest way is given the local ip address of the computer on the network to simply send data via a socket:
- http://android-er.blogspot.com/2011/01/simple-communication-using.html — Guide to sending data via a socket
- http://stackoverflow.com/a/20131985/313399 — stackoverflow snippet which connects to a host, and can send data to it via an asynctask
- http://stackoverflow.com/questions/6309201/sending-tcp-data-from-android-as-client-no-data-being-sent — stackoverflow snippet sending data to an ip address via a socket
- http://thinkandroid.wordpress.com/2010/03/27/incorporating-socket-programming-into-your-applications/ (client piece is phone, server piece needs to be on computer)
- TurnMeOffMobile — Simple TCP Client as Android widget with connection handled by AsyncTasks + IP number finding dynamically.
To send messages between an Android phone and a computer, the computer needs to be running a program that listens for messages sent on the socket coming from the phone:
Источник
Простой клиент-сервер на Android (интернет-мессенджер)
Важно. Все написанное ниже не представляет собой какой либо ценности для профессионалов, но может служит полезным примером для начинающих Android разработчиков! В коде старался все действия комментировать и логировать.
Поехали. Многие мобильные приложения (и не только) используют архитектуру клиент-сервер. Общая схема, думаю, понятна.

Уделим внимание каждому элементу и отметим:
- сервер — представляет собой некую программу, работающую на удаленном компьютере, и реализующую функционал «общения» с приложениями-клиентами (слушает запросы, распознает переданные параметры и значения, корректно отвечает на них);
- клиент — в нашем случае, программа на мобильном устройстве, которая умеет формировать понятный серверу запрос и читать полученный ответ;
- интерфейс взаимодействия — некий формат и способ передачи/получения запросов/ответов обеими сторонами.
Неважно, как реализован любой из этих элементов, все они в любом случае присутствуют. Давайте реализуем примитивный сервер и Android клиент, работающий с ним. Как пример, будем использовать любой популярный мобильный интернет-мессенджер (Viber, ICQ), а приложение условно назовем «интернет-чат».
Схема взаимодействия следующая:
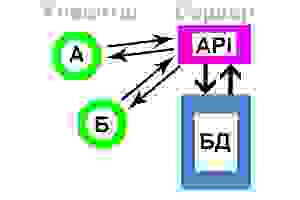
Клиент, установленный на устройстве А, посылает сообщение для клиента, установленного на устройстве Б. И наоборот. Сервер играет роль связующего звена между устройством А и Б… С, Д… и т.д. Также он играет роль «накопителя» сообщений, для их восстановления, на случай удаления на одном из клиентских устройств.
Для хранения сообщений используем SQL БД как на сервере, так и на устройствах-клиентах (в принципе, вся работа клиентов интернет-мессенджеров и сводится к постоянной синхронизации локальной и удаленной БД с сообщениями). Дополнительно, наш интернет-чат будет уметь стартовать вместе с запуском устройства и работать в фоне. Взаимодействие будет происходить путем HTTP запросов и JSON ответов.
Более логично, если синхронизация происходит через порт/сокет, это с одной стороны упрощает задачу (не нужно циклично слать HTTP запросы на проверку новых сообщений, достаточно проверять состояние прослушиваемого сокета), но с другой стороны, это усложняет создание серверной части приложения.
Делаем сервер
Для реализации «сервера», нам нужно зарегистрироваться на любом хостинге, который дает возможность работы с SQL и PHP.
Создаем пустую SQL БД, в ней создаем таблицу.
- author — автор сообщения;
- client — получатель сообщения;
- data — время и дата получения сообщения на сервере;
- text — сообщение.
В двух следующих файлах необходимо изменить переменные, содержащие данные для доступа к БД, на свои, полученные Вами при регистрации Вашего«сервера».
Структура запросов к api:
- обязательный атрибут action — может быть равен select (сервер ответит списком записей из своей БД), insert (сервер добавить новую запись в свою БД), delete (сервер очистит свою БД)
- если action=insert, нам нужно будет передать дополнительные параметры: author (кто написал сообщение), client (кому адресовано сообщение), text (сообщение)
- action=select может содержать дополнительный параметр data, в этом случае ответ сервера содержит не все сообщения из БД, а только те, у которых время создания позднее переданного
Примеры:
- chat.php?action=delete – удалит все записи на сервере
- chat.php?action=insert&author=Jon&client=Smith&text=Hello — добавит на сервере новую запись: автор Jon, получатель Smith, содержание Hello
- chat.php?action=select&data=151351333 — вернет все записи, полученные после переданного времени в long формате
Клиентская часть
Теперь структура Android приложения:
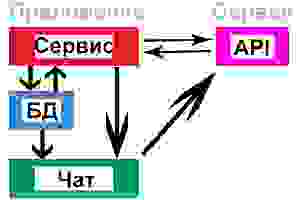
В фоне работает FoneService.java, который, в отдельном потоке, каждые 15 секунд делает запрос на сервер. Если ответ сервера содержит новые сообщения, FoneService.java записывает их в локальную БД и отправляет сообщение ChatActivity.java о необходимости обновить ListView, с сообщениями. ChatActivity.java (если она в этот момент открыта) получает сообщение и обновляет содержимое ListView из локальной БД.
Отправка нового сообщения из ChatActivity.java происходит сразу на сервер, минуя FoneService.java. При этом наше сообщение НЕ записывается в локальную БД! Там оно появится только после получения его назад в виде ответа сервера. Такую реализацию я использовал в связи с важным нюансом работы любого интернет-чата — обязательной группировкой сообщений по времени. Если не использовать группировку по времени, будет нарушена последовательность сообщений. Учитывая, что клиентские приложения просто физически не могут быть синхронизированы с точностью до миллисекунд, а возможно будут работать даже в разных часовых поясах, логичнее всего будет использовать время сервера. Так мы и делаем.
Создавая новое сообщение, мы передаем запросом на сервер: имя автора сообщения, имя получателя сообщения, текст сообщения. Получая эту запись назад, в виде ответа сервера, мы получаем то, что отправляли + четвертый параметр: время получения сообщения сервером.
Источник


