- Wi-Fi и много других аббревиатур. Как в Android приложении получить данные об узлах Wi-Fi и не опухнуть
- 1. Создаем проект
- 2. Разрешения на доступы
- 3. Создаем BroadcastReceiver и подписываемся на события обновления данных о сканировании сетевого окружения Wi-Fi
- 4. Смотрим на ScanResult и разбираемся в терминах
- 5. Разбираемся в аббревиатурах и парсим capabilities
- 6. Создаем модель и функцию парсинга
- 8. Смотрим результат
- Где хранятся пароли от Wi-Fi сетей в Android устройстве?
- Fix Android Connected To WiFi But No Internet (2021)
- Fix Android Connected To WiFi But No Internet
- 1. Check If You Are Actually Connected to the Internet
- 2. Check If Mobile Data is Turned Off
- 3. Check for Captive Portals
- 4. Check Time and Date Settings
- 5. Forget and Reconnect to WiFi Network
- 6. Check If Router is Blocking Network Traffic
- 7. Change your DNS
- 8. Change Wireless Mode on Router
- 9. Reboot or Reset WiFi Router
- 10. Reset Android Network Settings.
- 11. Factory Reset
Wi-Fi и много других аббревиатур. Как в Android приложении получить данные об узлах Wi-Fi и не опухнуть
Однажды мне понадобилось сканировать из Android приложения сети Wi-Fi и получать подробную выкладку данных о точках доступа.
Тут пришлось столкнуться с несколькими трудностями: в офф.документации Android многие описанные классы стали deprecated (API level > 26), что никак не было в ней отражено; описание некоторых вещей в документации минимально (например поле capabilities класса ScanResult на момент написания не описано почти никак, хотя содержит много важных данных). Третья сложность может заключаться в том, что при первой близости с Wi-Fi, отличной от чтения теории и настройки роутера по localhost, приходится иметь дело с рядом аббревиатур, которые кажутся понятными по отдельности. Но может быть не очевидно, как их соотнести и структурировать (суждение субъективно и зависит от предыдущего опыта).
В данной статье рассмотрено как из Android кода получить исчерпывающие данные о Wi-Fi окружении без NDK, хаков, а лишь с помощью Android API и понять, как их интерпретировать.
Не будем тянуть и начнем писать код.
1. Создаем проект
Заметка рассчитана на тех, кто больше одного раза создавал Android проект, поэтому подробности данного пункта опускаем. Код ниже будет представлен на языке Kotlin, minSdkVersion=23.
2. Разрешения на доступы
Для работы с Wi-Fi из приложения понадобится получить от пользователя несколько разрешений. В соответствии с документацией, для того, чтобы осуществить сканирование сети на устройствах с ОС версий после 8.0, помимо доступа к просмотру состояния сетевого окружения нужен либо доступ на изменение состояния модуля Wi-Fi устройства, либо доступ к координатам (примерным или точным). Начиная с версии 9.0 необходимо запросить у пользователя и то и то, и при этом явно запросить у пользователя включить службу определения местоположения. Не забываем галантно объяснять пользователю, что это прихоть компании Google, а не наше желание устроить за ним слежку 🙂
Итого, в AndroidManifest.xml добавим:
А в коде, в котором есть ссылка на текущую Activity:
3. Создаем BroadcastReceiver и подписываемся на события обновления данных о сканировании сетевого окружения Wi-Fi
Метод WiFiManager.startScan в документации помечен как depricated с версии API 28, но офф. guide предлагает использовать его.
Итого, получили список объектов ScanResult.
4. Смотрим на ScanResult и разбираемся в терминах
Посмотрим на некоторые поля этого класса и опишем, что они означают:
SSID — Service Set Identifier – это название сети
BSSID – Basic Service Set Identifier – MAC адрес сетевого адаптера (Wi-Fi точки)
level — Received Signal Strength Indicator [dBm (русское дБм) — Децибел, опорная мощность 1 мВт.] — Показатель уровня принимаемого сигнала. Принимает значение от 0 до -100, чем дальше от 0, тем больше мощности сигнала потерялось по пути от Wi-Fi точки к вашему устройству. Подробнее можно посмотреть например на Википедии. Здесь же расскажу, что с помощью Android класса WifiManager можно проградуировать уровень сигнала по шкале от отличного до ужасного с выбранным вами шагом:
frequency — частота работы точки Wi-Fi [Гц]. Помимо самой частоты вас может заинтересовать так называемый канал. У каждой точки есть своя рабочая чистота. На момент написания текста наиболее популярным диапозоном Wi-Fi точек является 2.4 GHz. Но, если быть точнее, точка передает информацию на ваш телефон на пронумерованной частоте, близкой к названной. Количество каналов и значения соответствующих частот стандартизованы. Это сделано для того, чтобы точки поблизости работали на разных частотах, тем самым не создавая помехи друг другу и взаимно не понижая скорость и качество передачи. При этом точки работают не на одной частоте, а на диапазоне частот (пареметр channelWidth), называемом шириной канала. То есть точки, работающие на соседних (и не только на соседних, а даже на 3 от себя) каналах создают друг другу помехи. Вам может пригодится этот незамысловатый код, который позволяет вычислить номер канала по значению частоты для точек с частотой 2.4 и 5 Ghz:
capabilities — наиболее интересное поле для анализа, работа с которым потребовало много времени. Тут в строку записываются «возможности» точки. При этом подробности интерпритации строки в документации можно не искать. Вот несколько примеров того, что может лежать в этой строке:
5. Разбираемся в аббревиатурах и парсим capabilities
Стоит упомянуть, что классы пакета android.net.wifi.* использует под капотом linux-утилиту wpa_supplicant и результат вывода в поле capabilities является копией поля flags при сканировании.
Будем действовать последовательно. Рассмотрим сначала вывод такого формата, при котором внутри скобок элементы отделены знаком «-«:
Первое значение описывает т.н. метод аутентификации (authentication). То есть, какую последовательность действий должны произвести устройство и точка доступа, чтобы точка доступа позволила собой пользоваться и каким образом шифровать полезную нагрузку. На момент написания поста самые частые варианты это WPA и WPA2, при котором либо каждое подключаемое устройство напрямую, либо через т.н. RADIUS-сервер (WPA-Enterprice) предоставляет пароль по зашифрованному каналу. Скорее всего у вас дома точка доступа предоставляет подключение по этой схеме. Отличие второй версии от первой в болеее стойком шифре: AES против небезопасного TKIP. Также постепенно внедряется WPA3, более сложный и продвинутый. Теоритически может встретиться вариант с enterprice-решением CCKM (Cisco Centralized Key Managment), но мне так и не встретился.
Точка доступа могла быть настроена на аутентификацию по MAC-адресу. Или, если точка доступа предоставляет данные по устаревшему алгоритму WEP, то аутентификации фактически нет (секретный ключ тут и является ключом шифрования). Такие варианты отнесем к типу OTHER.
Ещё есть полюбившийся в общественных wi-fi метод со скрытым Captive Portal Detection — запрос аутентификации через браузер. Такие точки доступа выглядят для сканера как открытые (какими с точки зраения физического подключения и являются). Поэтому отнесем их к типу OPEN.
Второе значение можно обозначить как алгоритм использования ключей (key management). Является параметром метода аутентификации, о котором написано выше. Говорит о том, как именно происходит обмен ключами шифрования. Рассмотрим возможные варианты. EAP — используется в упомянутом WPA-Enterprice, использует базу данных для сверки введеных аутентификационных данных. SAE — используется в продвинутом WPA3, более устойчива к перебору. PSK — самый частый вариант, подразумевает ввод пароля и его передачу в зашифрованном виде. IEEE8021X — по международному стандарту (отличному от поддержанным семейством WPA). OWE (Opportunistic Wireless Encryption) является расширением стандарта IEEE 802.11, для точек, которые мы отнесли к типу OPEN. OWE обеспечивает безопасность данных, передаваемых по незащищенной сети, за счет их шифрования. Также возможен варинант когда ключей доступа нет, назовем такой вариант NONE.
Третьим параметром является т.н. метод шифрования (encryption schemes) — как именно используется шифр для зашиты передаваемых данных. Перечислим варианты. WEP — использует поточный шифр RC4, секретный ключ является ключом шифрования, что в мире современной криптографии считается неприемлемым. TKIP — используется в WPA, CKIP — в WPA2. TKIP+CKIP — может быть указан в точках умеющих WPA и WPA2 для обратной совместимости.
Вместо трех элементов можно встретить одинокую пометку WEP:
Как мы обсудили выше, этого достаточно чтобы не конкретизировать алгоритм использования ключей, которого нет, и метода шифрования, которое одно по-умолчанию.
Теперь рассмотрим такую скобочку:
Это режим работы Wi-Fi или топология сетей Wi-Fi. Вам может встретиться Режим BSS (Basic Service Set) — когда есть одна точка доступа, через которую общаются подключенные устройства. Можно встретить в локальных сетях. Как правило точки доступа нужны для того, чтобы соединять устройства из разных локальных сетей, поэтому они являются частью Extended Service Sets — ESS. Тип IBSSs (Independent Basic Service Sets) говорит о том, что устройство является частью Peer-to-Peer сети.
Ещё может попасться флаг WPS:
WPS (Wi-Fi Protected Setup) — протокол полуавтоматической инициализации сети Wi-Fi. Для инициализации пользователь либо вводит 8-символьный пароль, либо зажимает кнопку на роутере. Если ваша точка доступа относится к первому типу и этот флажок высветился напротив имени вашей точки доступа, вам настоятельно рекомендуется зайти в админку и отключить доступ по WPS. Дело в том, что часто 8-значный PIN можно узнать по MAC-адресу, либо перебрать за обозримое время, чем кто-то нечистый на руку сможет воспользоваться.
6. Создаем модель и функцию парсинга
На основе того, что выяснили выше опишем data-классами то, что получилось:
Теперь напишем функцию, которая будет парсить поле capabilities:
8. Смотрим результат
Посканирую сеть и покажу, что получилось. Показаны результаты простого вывода через Log.d:
Неосвещенным остался вопрос подключения к сети из кода приложения. Скажу только, что для того, чтобы считать сохраненные пароли ОС мобильного устройства, нужны root-права и готовность порыться в файловой системе чтобы прочитать wpa_supplicant.conf. Если логика приложения предполагает ввод пароля извне, подключение можно осуществить через класс android.net.wifi.WifiManager.
Спасибо Егору Пономареву за ценные дополнения.
Если считаете, что нужно что-то добавить или исправить, пишите в комментарии 🙂
Источник
Где хранятся пароли от Wi-Fi сетей в Android устройстве?
Система Android так же как и остальные современные операционные системы, сохраняет настройки подключения Wi-Fi сетей, чтобы в последствии иметь возможность быстрого подключения к ним.
Не нарушая замыслов создателей этой системы, мы можем в своем приложении создать новое wifi соединение и подключить устройство к нему. Узнать пароли от ранее подключенных сетей мы не можем.
Таково ограничение безопасности, иначе вирусов для андроида было бы гораздо больше.
Но стоит вспомнить что внутри Android лежит ядро Linux. И хранятся пароли от беспроводных сетей в нем точно также в файле wpa_supplicant.conf. Доступ к этому файлу можно получить имея ROOT на устройстве. Обычно этот текстовый файл содержит информацию в не зашифрованном виде. Расположен на устройстве по пути :
или иногда по пути:
Первый путь встречается очень часто, но иногда производители устройств меняют месторасположение системных файлов.Имя файла останется таким же, поэтому придется просто походить по папкам в поисках.
Вот содержимое файла :
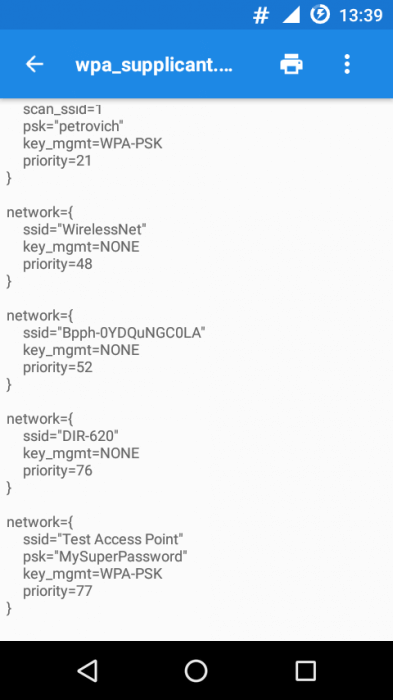 Пароль находится в поле psk. Если сеть открытая, то поле psk отсутствует.
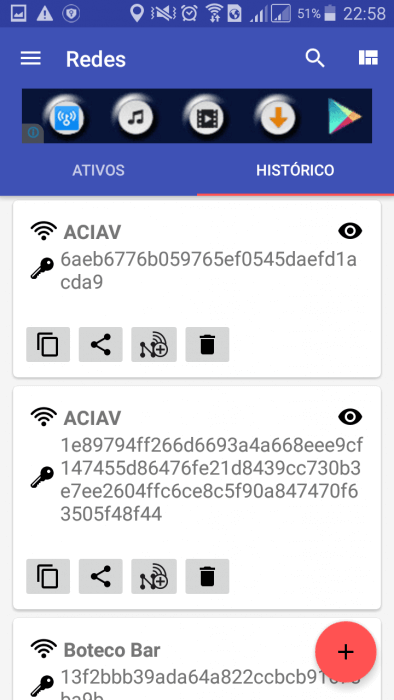
Для более быстрого доступа к этой информации я написал своё приложение «Напоминатель паролей от Wi-Fi». Оно доступно по ссылке в Google Play https://play.google.com/store/apps/details?id=com.rusdelphi.wifipassword
В нем можно сделать архив известных сетей или быстро поделиться wifi подключением с другом.
Часто пользователи жалуются на то, что поле psk содержит пароли в зашифрованном виде.
Вот пример экрана с такого устройства:
 Обычно такая ошибка появляется у пользователей Samsung устройств (например samsung galaxy s5).
Источник
Fix Android Connected To WiFi But No Internet (2021)

There are times when your Android starts behaving weirdly with the Internet. That dreaded “Connected but no Internet Access” message is just vague. There are a number of reasons that can lead up to this issue. Here are some of the things you can try to fix the problem.
In this article, we are focusing on Android only. In case you have a problem connecting your desktop to the Internet, check out our other article.
Fix Android Connected To WiFi But No Internet
Since there is no particular reason for this connectivity problem, there are a number of possible fixes. Below we have listed a few fixes which you can try to restore the Internet.
1. Check If You Are Actually Connected to the Internet
I know, this sounds stupid. But trust me, I’ve been there and done that. More often than not, you might be facing this issue because your router is not connected to the internet. So, try to connect to that router wirelessly using another device and see if you can access the internet.
If the other devices connected to your WiFi network are not also able to access the Internet, then chances are either your ISP is down (you can confirm this by calling your ISP), or someone has accidentally cut the broadband cable coming to your house (you can confirm this by asking your neighbors who share the same connection) or you have simply exhausted your monthly data plan.
Most ISP has an unlimited data plan, however, there are few internet providers that capped data usage after a certain threshold. To fix this, you simply have to recharge your internet plan. Once you’ve done that, reboot your device and try to connect to the WiFi network again.
Another scenario is that at times some websites don’t work on a particular WiFi network. For instance, in our office WiFi, all torrent websites are blocked. So, if that’s the case, try opening a bunch of different websites.
If you are able to access the Internet on all the other devices except your Android smartphone, then obviously, there’s something wrong with your Android. Moving forward we’ll try to fix your Android smartphone.
2. Check If Mobile Data is Turned Off
At times, when you have mobile data turned on and then connect to a WiFi network, you might not be able to access the internet. So, try disabling mobile data to fix the issue.
Now, you might be thinking Android is too smart for this. But occasionally, when you connect to a WiFi network, Android will prioritize WiFi over the mobile data. However, some networks require users to log in before they can access the internet. Even after logging in, Android might not see it as an active connection and still use mobile data. Under such circumstances, Android might not be able to connect to the internet on both networks.
TL;DR, try disabling mobile data and then connect to the WiFi network.
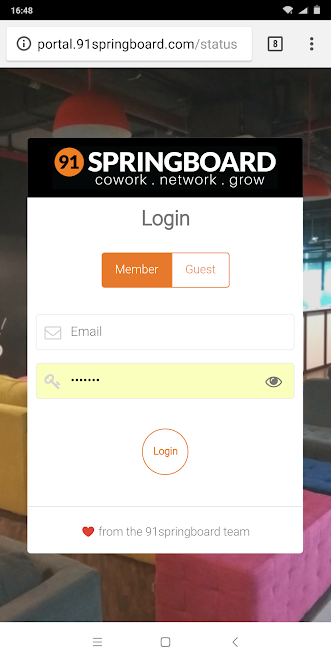
3. Check for Captive Portals
You can skip this step if you are connecting to a home WiFi network. However, some WiFi networks (especially in offices, airports, or coffee shops) have a special kind of Wi-Fi network are called “Captive Portals”.
When you connect to this type of WiFi network, even after entering the correct WiFi password – you have to complete one extra step before accessing the internet. This one extra step could be anything from sign in with your email, phone number, watch ads, or agree to the network’s terms of usage.
To find out if you are connecting to Captive Portal WiFi, you will notice your device will display a notification prompting you to sign in. If you don’t get the sign-in notification for the first time, you can disconnect and reconnect to the network. It should work. Tap the notification and follow the instructions on the web page. Complete the required task or contact the network administrator for the login credentials.
For example, our office WiFi network requires users to log in with an official username and password to access the internet. See, the screenshot below. This login session is only valid for 24 hours and then you have to repeat the process.
4. Check Time and Date Settings
This is another thing that looks silly but ill-configured time and date settings can cause a lot of problems. Generally, Android devices are configured to obtain date & time information automatically from your network operator. However, if you’ve changed those settings manually then you might have to reset the settings. Because when the date & time settings are set to manual, the clock may not be updated due to a restart.
To set up an Automatic date & time, open the “Clock” app. Tap on the three vertical dots at the top-right corner and tap on the “Settings” menu.

From the Settings menu, tap on the option “Change date and time”.

In the next screen, toggle the buttons next to “Automatic date and time” and “Automatic time zone”. In case you don’t want automatic time settings, then manually set proper time by selecting the options “Set date”, “Set time”, and “Select time zone”.

Once you’ve done that, reboot your device and try to connect to the WiFi network again.
5. Forget and Reconnect to WiFi Network
Sometimes, forgetting the problematic network and reconnecting might fix the issue. When you reconnect the WiFi network, you might be provided with a new local IP address which might actually fix the issue. To do that, open your Android Settings and navigate to “WiFi”. Next, tap on the WiFi network and select the option “Forget”.
Now, tap on the WiFi network again, enter the password and tap on the “Connect” button. That is it. If the issue is still not fixed proceed to the next solution.

6. Check If Router is Blocking Network Traffic
It is possible that the WiFi router you are trying to connect to might be blocking your Android device from connecting to the internet. For example, someone may have accidentally exploited your router’s MAC address filter and blocked your Android. If that’s the case then you won’t know it, unless you look at the WiFi router’s admin page and unblock yourself.
The router admin page differs from manufacturer to manufacturer and model to model. So, consult your router manual, go to the appropriate settings page and see if the router is blocking your device. Some routers have the IP address of the portal, username, and password written on the back of the device. We have a detailed guide here, that will help you to log in to your router.
In my case, I have a D-Link router. I can check if my device is blocked or not by navigating to the “Advanced” tab and selecting the “Traffic Control” option. For other routers, look for options such as the MAC Address Filtering menu. If your Android phone is on the list of blocked devices, click Remove or Allow to restore internet access.
7. Change your DNS
Check if you are able to access websites from their IP Address instead. If you can, then chances are there is a problem with your ISP’s domain name server. Simply switching to Google DNS (8.8.8.8; 8.8.4.4) will fix the issue.
We have a detailed guide on how to change the DNS on all your popular devices, but for Android, simply go to your WiFi setting, long-press the WiFi network whose DNS you would like to change, and then select “Modify network”. Select Static under IP options and next enter the static IP, DNS1, and DNS2 IP address. Save changes and that’s it.
Alternatively, you can use a Wi-Fi third-party app like WiFi Settings. However, if you are on Android 5.0+, then your “save changes” button may not work. Android has restricted third-party apps from making changes to the network settings prior to Android 7.
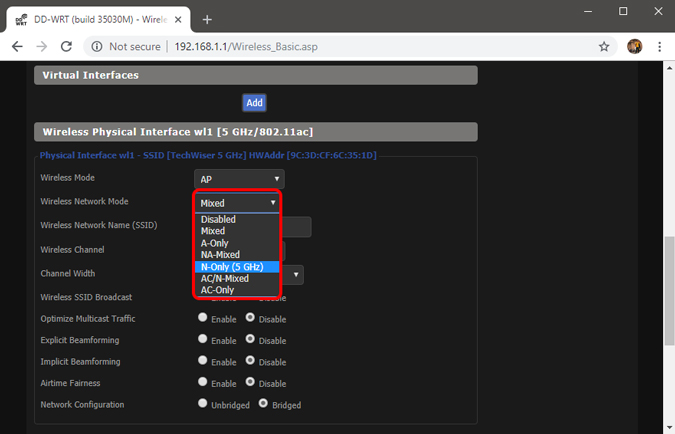
8. Change Wireless Mode on Router
This is an exceptional case and happens only if you have an old Wi-Fi card or device. If you are getting Internet access on other devices, then chances are there is a communication barrier between your Android and router.
There are several Wireless modes on a router. For instance, you might have seen something like 802.11 b or 802.11 b/g or 802.11 b/g/n, etc. These b, g, n, and ac are different Wireless standards. B is the oldest WiFi standard which covers less area and gives less speed while ac is the latest with wider coverage and better network speed. Consider them like USB 1.0, 2.0 and 3.0 standard; where the latest is fastest and backward compatible. Now usually the Wireless mode is set to 802.11 b/g/n/ and it works fine for most people. But sometimes the old devices (especially old smartphones) are not compatible with this mode and thus show network issues.
One way to fix that is — from your computer, log in to your router dashboard and look for the option that says – Wireless Mode. Usually, it’s under the Wireless settings where you set WiFi SSID and password. Next, to the Wireless mode, you’ll see a drop-down menu, click on that and select 802.11 b and save changes. Now restart the WiFi on the devices which had the WiFi issues and see if this fixes the problem. If this doesn’t work, then try 802.11 g. If you still find no luck then see the next solution.
9. Reboot or Reset WiFi Router
Once you are sure the Android device is not blocked on the router level and there is no issue with the wireless mode, try rebooting the router. It doesn’t matter if you trigger the reboot via the admin page or the physical buttons. So, pick your choice and reboot the router, it doesn’t take more than 30 seconds to complete the process.
If rebooting did not work, the next step is to reset the router. Again, depending on the router’s manufacturer, the reset option might be located either on the Maintenance page or the Advanced options page. Alternatively, you can also do a hard reset by pressing the hardware reset button located on the back of the router.
Do keep in mind that resetting the router will remove all the settings and ISP IP address configurations. So, note down the credentials and backup the necessary information beforehand so that you can configure the router once you are done with the reset.
10. Reset Android Network Settings.
If all the above tips didn’t solve the internet connectivity issue, then it is time to reset Android network settings. Open the Settings app and go to “Reset options”.

Now, tap on the “Reset Wi-Fi, mobile & Bluetooth“ option.

On the next page, tap on the “Reset Settings” button at the bottom.

After resetting, try to connect to the WiFi network and see if it fixes the issues.
11. Factory Reset
Eventually, if nothing else works then you should bring the hammer down and factory reset your Android device. To do a factory reset, open the Settings app, navigate to “Reset options”. Finally, tap on “Factory data reset”.

On the confirmation page, tap on the “Reset Phone” button to factory reset the Android device. The resetting process may take some time to complete. So, make sure that your device is fully charged or at least has over 70% battery before doing the factory reset.
That’s all the troubleshooting steps we can come up with. If you found some other workaround, do let us know in the comments below.
Источник


