- How to Fix Gmail Delayed or No Email Notifications
- How to Fix Gmail Delayed/No Email Notifications
- Check your Gmail Notification Settings
- Disable Gmail Battery Optimization
- Disable Battery Saver
- Verify Gmail Sync Settings
- Enable Unrestricted Data/Background Data
- Concluding Remarks: Fix Gmail Delayed/No Email Notifications
- About Chief Editor
- Sadique Hassan
- No email notifications android
- Уведомления о письмах в папках
- Уведомления определенного отправителя
- How to Forward Android Notifications to Email
- How to Forward Android Notifications to Email:
- My Final Verdict:
How to Fix Gmail Delayed or No Email Notifications
In this guide, we will make you aware of some workarounds that shall help you fix the delayed or no Gmail notification while receiving an email. If we create a list of some of the most important apps that have made a permanent abode on our smartphones, this email client from Google would be right there at the top. But in spite of occupying such a high position in the pecking order, it isn’t free from its fair share of issues.
What is even more infuriating is the fact that there’s just one issue that is plaguing all of us for ages, and is yet to be fixed. And it is related to receiving delayed or rather no notifications via the Gmail app. Only when we manually open the app we would get an idea that an email had actually arrived. Not replying to an email on time can have disastrous consequences, especially in the professional workspace.
Unfortunately, we are engrossed so deep into the Google ecosystem, that it’s quite difficult to bid adieu to its services, especially the Gmail app. So this is where we have to look out for workarounds that might work out in our favor. What about official fixes? Well, this is where things turn out to be all the weirder. A user recently raised this issue on the Google Support Forum and this is what the Platinum Product Expert had to say in return:
“I think you need to contact the phone seller/mobile service provider. That’s usually the throttle.”
Well, let’s not go deep into what’s wrong with this statement, otherwise, I may have to write a separate article on the same. Keeping all that aside, let’s turn our attention towards the various methods to fix the Gmail delayed or no email notification issue.
Table of Contents
How to Fix Gmail Delayed/No Email Notifications

Just keep in mind that there’s no official fix as such. So you may have to try all these below-mentioned workarounds until it spells out success in your case. Without any further ado, let’s get started.
- Were Google Servers Hacked that Day?
- Bypass New Google Restriction: Get Free Unlimited Photos Storage
- All Your Google Photos Album are Public by Default. Here’s how to fix it!
- How to Save all Inline/Embedded Images from one Email in Outlook
Check your Gmail Notification Settings
Before moving ahead, let’s start with the basics and reverify that all the Gmail account settings are in order.

- So head over to Settings on your device.
- Then go to App and Notifications > App Info.
- Scroll to the Gmail app and go to its Notifications section.
- Now make sure that All Gmail Notification toggle is enabled.
If that’s not the case, then do so right away and see if it fixes the Gmail delayed or no email notification issue
Disable Gmail Battery Optimization
Different OEMs like to give it a different name, but the underlying functionality remains the same. To optimize the battery usage for each app depending on how much battery does it need and consumes. However, when it comes to the most important apps such as Gmail, Slack, and the likes, I don’t leave it to the behest of my smartphone, rather I fine-tuned it according to my use case scenario. When it comes to Gmail, I have disabled this feature completely for this app. Here’s how you could do the same:
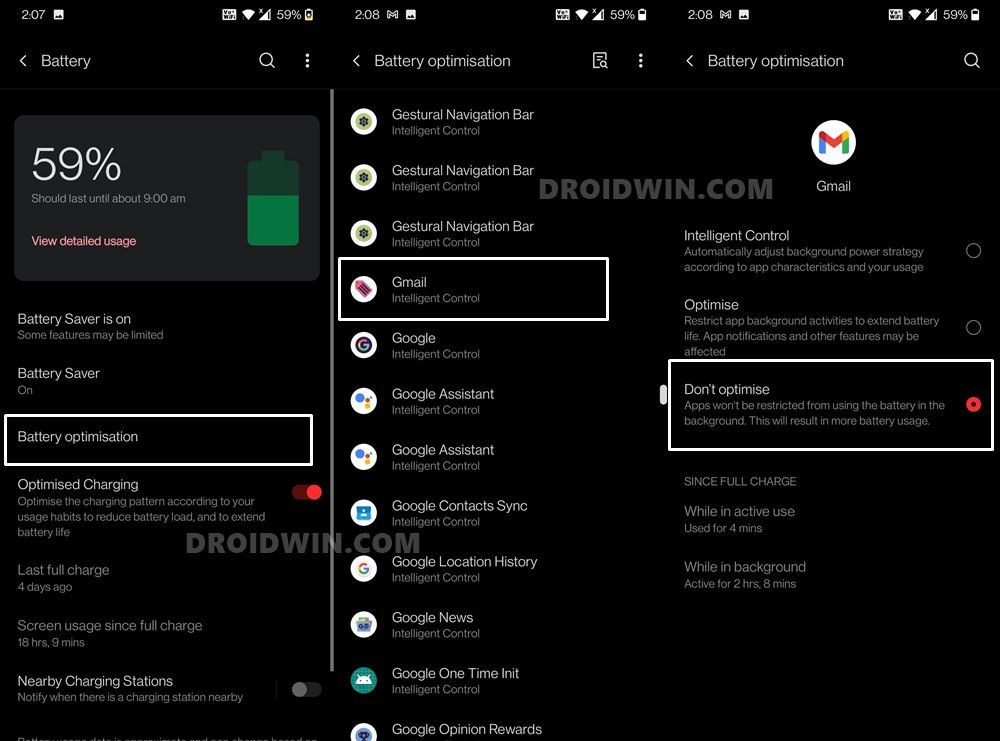
- Go to Settings followed by Battery.
- Within that, head over to the Battery optimizations option.
- Scroll to the Gmail app and select the Don’t optimize option.
- Verify if it is able to fix the Gmail delayed or no email notification.
Disable Battery Saver
As is evident from its name, Battery Saver tends to minimize and restrict most of the background activities, including sync. This in turn could definitely lead to getting delayed email prompts. So it is recommended to disable this battery saver feature, at least during office hours.
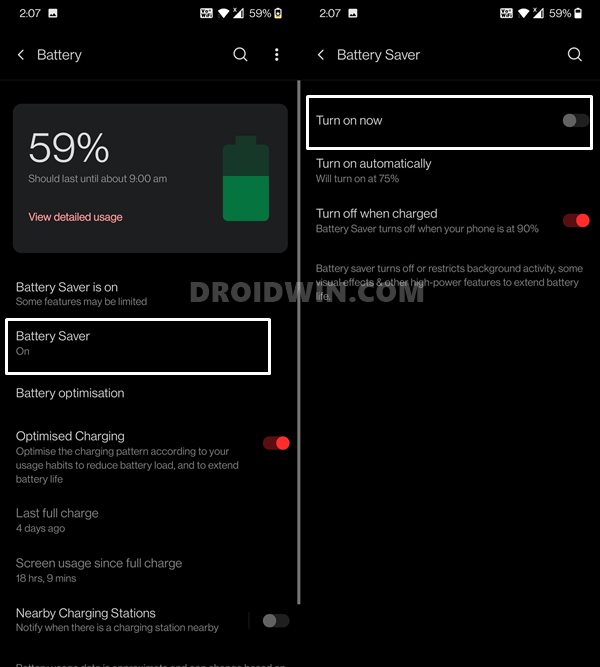
Doing so is pretty easy, just head over to Settings > Battery and make sure that the option is turned off. See if it does any good in fixing the Gmail delayed or no email notification issue.
Verify Gmail Sync Settings
You should also make sure that the Gmail sync option associated with your Google ID is enabled right from your device itself.

- To do so, go to Settings > Accounts.
- Then select your Google ID from the list, the one associated with Gmail.
- After this, select the Account Sync option.
- Finally, make sure that the Gmail toggle is turned on.
Likewise, you may also disable and re-enable the sync to refresh it and hence fix the Gmail delayed or no email notification issue.
Enable Unrestricted Data/Background Data
It is also recommended that let Gmail have access to unrestricted data. While this option sometimes might exhaust your entire data pack, but that shouldn’t be the case right now. This is because we are only enabling this option for an email app, which isn’t known to be a hefty consumer of network bandwidth. Likewise, enabling background Data will allow the Gmail app to continue using the data even when it is in a minimized state (which is usually the case).

- So on that note, go to Settings > Apps and Notifications.
- Select App Info and scroll to the Gmail app.
- Then go to Mobile Data and WiFi section.
- Enable the toggle next to Background Data.
- After this, enable the Unrestricted Data Usage.
- Check if it fixes the Gmail delayed or no email notification issue.
Concluding Remarks: Fix Gmail Delayed/No Email Notifications
So this was all from this guide on how to fix the Gmail delayed or no email notification issue. We have shared five different workarounds for the same. Do let us know in the comments which one worked out in your favor. While it may sound a little bit blown out of proportion, but in my case, I had to enable all the aforementioned tweaks and only then the issue got resolved.
It has been a week since doing so, and there hasn’t been any considerable battery drainage. Furthermore, since I am working from home, I’m connected with the WiFi network, hence the unrestricted data didn’t come to the fore in my case. Well, even if there would have been some loss of battery juice or network bandwidth, I would have readily accepted this sacrifice, in return for the benefit that I would have accrued (on-time Gmail notifications).
- How to Disable System Notifications on Android
- How to Take Screenshots in Restricted Apps on Android
- Stop Samsung Find My Device Offline Finding Notifications!
- How to Stop Random Notification Sounds on OnePlus
About Chief Editor
Sadique Hassan
A technical geek by birth, he always has a keen interest in the Android platform right since the birth of the HTC Dream. The open-source environment always seems to intrigue him with the plethora of options available at his fingertips. “MBA by profession, blogger by choice!”
Источник
No email notifications android
Перейдите  → «Работа приложения» → «Уведомления».
Передвиньте ползунок, чтобы включить уведомления.
Чтобы изменить звук, перейдите в «Настройки уведомлений» → «Мелодия» и выберите подходящий вариант. Если ни один вариант не понравился, нажмите «Выбрать с устройства».
Чтобы отключить вибрацию, перейдите в «Настройки уведомлений» и уберите галочку «Вибрация».
Чтобы временно отключить уведомления, в «Настройки уведомлений» и нажмите «Не беспокоить» и выберите, на какое время отключить звук или сами уведомления.
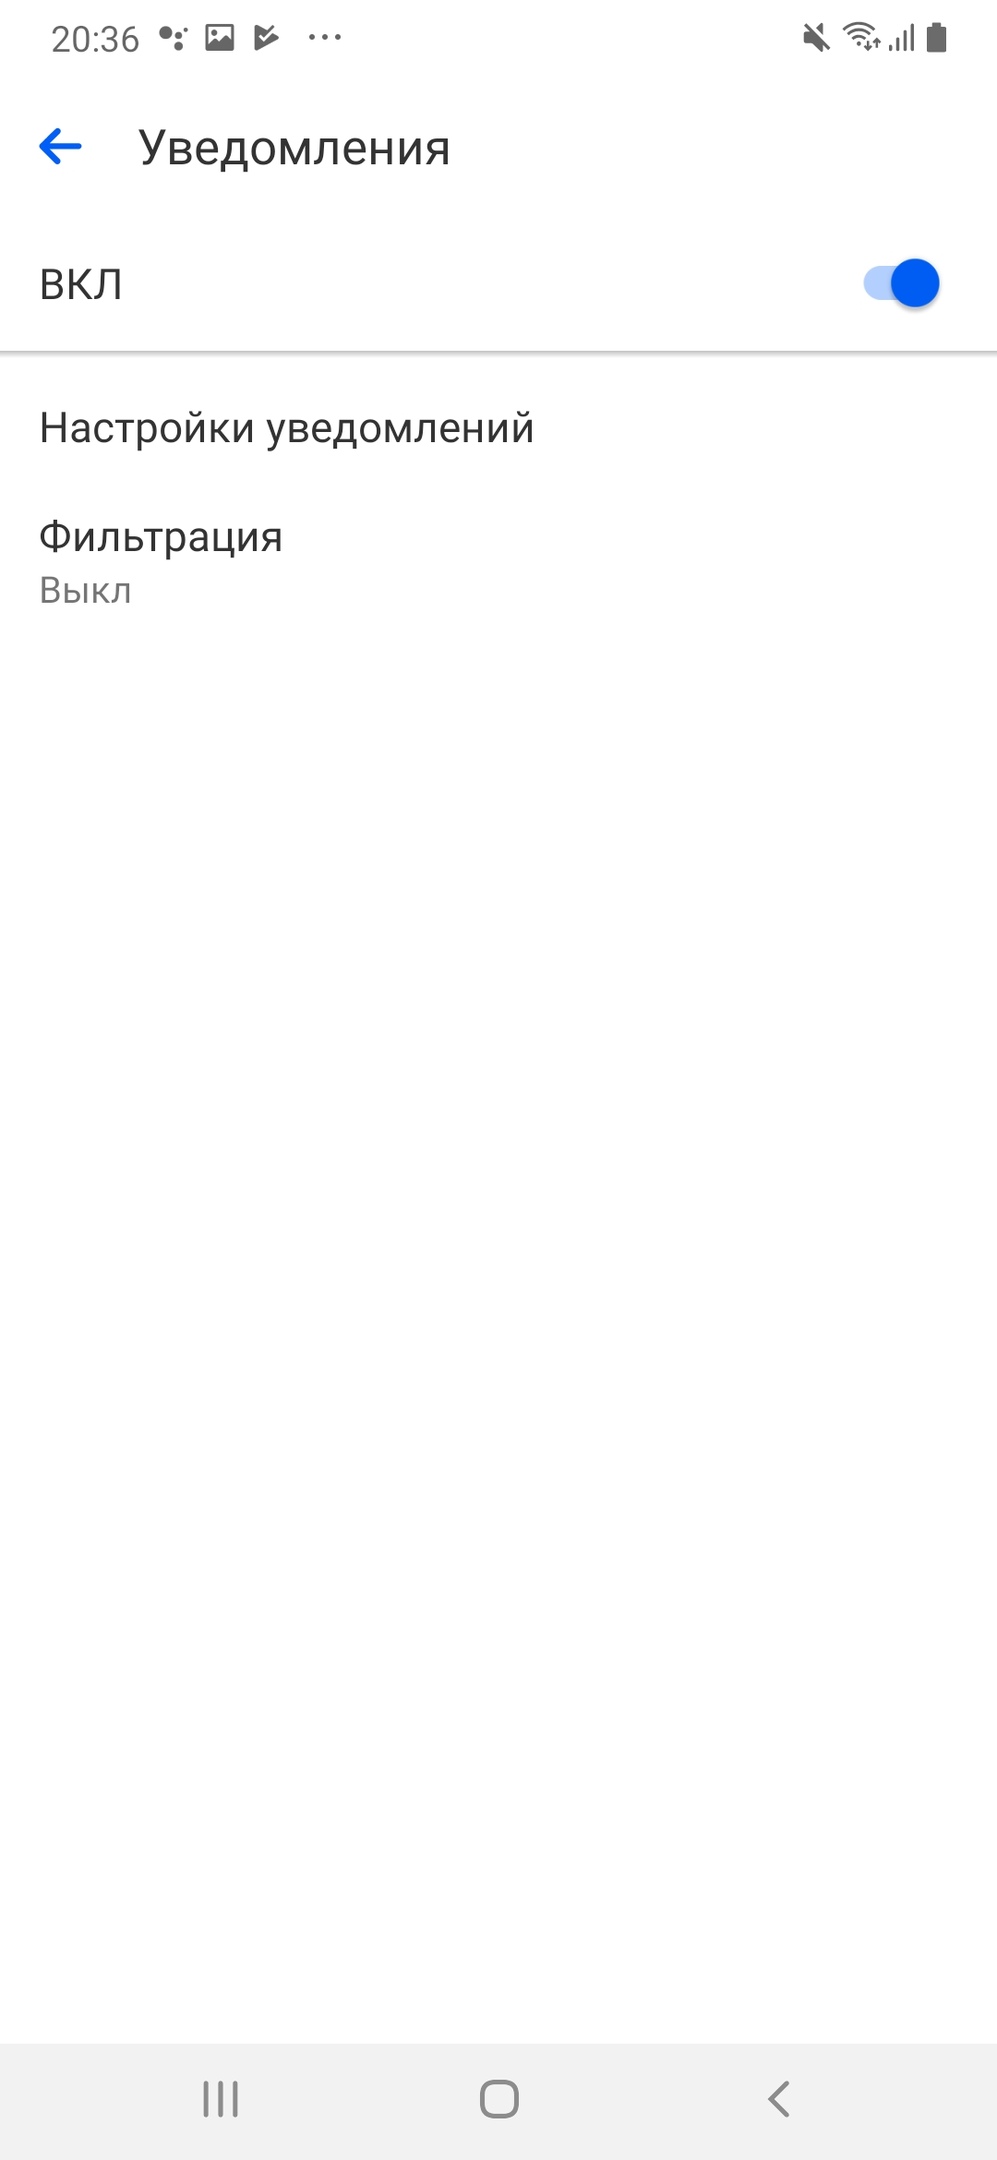
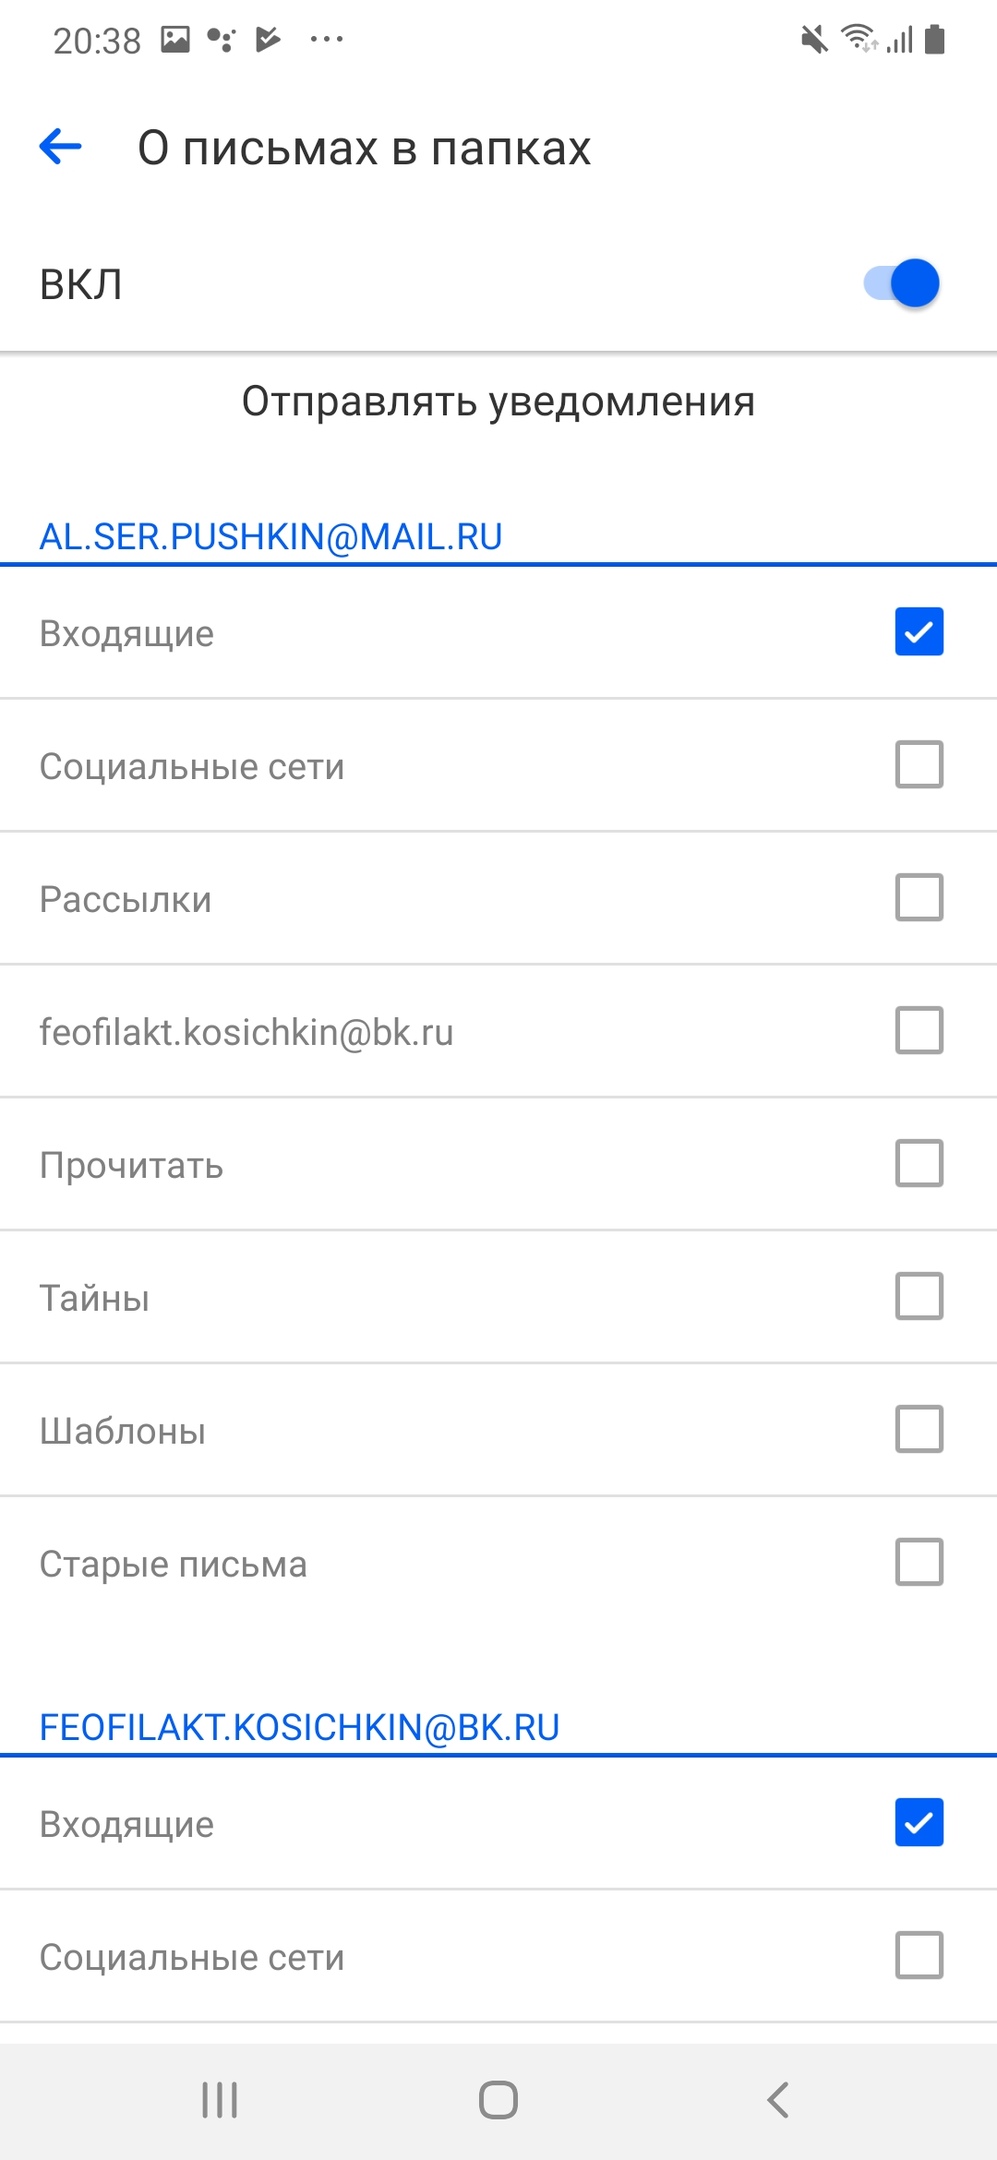
Уведомления о письмах в папках
Можно настроить только определённые уведомления. Нажмите «Фильтрация» и выберите, о чём уведомлять: о письмах в папках, о письмах социальных сетей или о рассылках.
Фильтрация уведомлений для папок: можно выбрать, о новых письмах в каких папках уведомлять
Уведомления определенного отправителя
Чтобы включить или выключить уведомления от определенного отправителя:
- Откройте письмо, которое прислал вам отправитель.
- Нажмите на его адрес.
- Установите или уберите галочку «Уведомления».
Источник
How to Forward Android Notifications to Email
This tutorial demonstrates how to forward Android notifications to email. At the end of this tutorial, you will be able forward notifications of all downloaded as well as pre-installed Android apps to your email. You can also choose the apps for which you want to forward notifications to email, and also choose to forward notifications with specific content only.
Sometimes, you might want to store notifications of any important Android app in email, then there is actually no direct option in Android which can be used to do so. But, I have found a way using which you can now forward and store your important Android notifications right on your Gmail account.

Actually, there is a free automated task app for Android which allows you to automatically forward Android notifications to email. You can use this app to forward notifications from all the apps or choose specific apps for which you want to forward the notification to email. Not only that, this app also allows you to specify notification content such that you can forward them if they contain, matches, or exclude any specific keyword.
The app which I will use in this tutorial to forward Android notifications to email is called “MacroDroid“. Similar to other device automation apps for Android, this one can also be used to perform various automated tasks and one of them is you can automatically forward Android notifications to email.
Now, let me walk you through the steps required to forward Android notifications to email.
How to Forward Android Notifications to Email:
Step 1: Simply, install and open up MacroDroid on your Android phone. After that, you would need to create an automated task or Macro (as they call it in the app) by defining a trigger and an action in response.
Step 2: To create a new Macro, simply tap on the “Add Macro” button and then it will ask you to choose a trigger and an action. On the “Triggers” tab, simply scroll down and select the “Notification” trigger. After that, a popup dialog will appear where you need to choose the “Notification Received” option.

Step 3: As soon as you do that, it will ask you to choose apps for which you want to forward the notifications. You can either choose all the apps or select specific apps. While selecting specific apps, you can either include or exclude the selected apps, as shown below.

For example, let’s say you want to forward notifications from Facebook, Instagram, and WhatsApp to email, then select these apps from the list and then tap on the “Include” option. And if you don’t want to forward notifications of these apps, then chose the “Exclude” option.
Step 4: When you’re done selecting apps, it will ask to specify the notification content before forwarding them to email. You can either choose the entire content of the notification or specify the text content as per your requirement. It lets you choose the following options for specifying the notification content:
- Any: Selecting this option will forward every Android notification (from the selected apps) to email.
- Contains: If a notification contains any specific keyword then forward to email.
- Matches: If the notification matches with any specific keyword then forward it to email.
- Excludes: If the notifications exclude a specific keyword then forward it to your email account.

Step 5: Once you’ve selected a trigger, apps, and notification content, simply go to the “Actions” tab to select an action in response to the trigger. Here, you need to find the “Send Email” action and then tap on it to proceed.

Step 6: As soon as you select the action, it will ask you to define the email content which will be forwarded to your email. You would need to enter the email id where the notifications will be forwarded, email subject, and message text. I would recommend you to put the notification title in the “Subject” field and the notification text in the “Message Text” field. You can select the same by pressing on the “Dotted” icon at the top.

When you’re all set with the email content, simply save the Macro. Now, each time a notification pops up on your Android phone from the selected apps, it will be forwarded to email.
My Final Verdict:
MacroDroid makes it very easy to forward Android notifications to email. Using this app, I was able to forward all the notifications from selected apps to my Gmail account. If you want to do the same, then I have explained all the necessary steps in this tutorial using which you can easily forward notifications from Android apps to your email.
Источник


