- How to Enable OEM Unlocking on Android [OEM Unlock]
- What is OEM Unlocking?
- Why would you need to enable OEM Unlocking?
- How to Enable OEM Unlocking on Android Devices
- Step 1: Backup your Android Device
- Step 2: Enable Developer Options on Android
- Step 3: Enable OEM Unlocking (OEM Unlock) on Android
- How to Unlock Bootloader on Android One Devices
- WARNING!
- icon-android GUIDE: ANDROID ONE BOOTLOADER UNLOCK
- Как разблокировать загрузчик на устройствах Android One
- ПРЕДУПРЕЖДЕНИЕ!
- значок-android РУКОВОДСТВО: РАЗБЛОКИРОВКА ЗАГРУЗЧИКА ДЛЯ ANDROID ONE
How to Enable OEM Unlocking on Android [OEM Unlock]
Do you want to unlock your Android device’s bootloader? Then you must first enable the OEM Unlocking option. In this post, we will talk about what OEM Unlocking is and guide you further on how to enable it on your Android device.
Android is well-known for its open-source nature and the possibilities to push it beyond the limitations set by the OEM. Talking about the boundaries, the device manufacturers often tend to limit the OS’s functionality with a software switch, to disallow any outside customizations. That is encouraged to allow day-to-day users to preserve the integrity of their Android devices. But what if a user chooses to deliberately tinker with the preinstalled software? Well, as far as the “official” word is concerned, it is not supported in most cases. Which means unlocking an Android device’s bootloader will straightforward lead to destroying the warranty. Just not in the case of OnePlus or maybe Google itself.
Now, if you’re really interested in customizing your Android phone with third-party software, you will first need to unlock the bootloader. But in order to do that, you will be required to enable the ‘OEM unlocking’ option in the phone’s settings. We shall be covering it all below.
What is OEM Unlocking?
OEM Unlocking on Android is an option in the device’s Developer Options settings that needs to be enabled in order to unlock the bootloader. It was first introduced by Google in Android 5.0 Lollipop and is also sometimes referred to as “OEM Unlock”.
Enabling this option sets the “unlock_ability” flag to “1”, thus giving the user the ability to run the “fastboot flashing unlock” command to unlock the phone’s bootloader. Once enabled, this option stays persistent across reboots and factory data resets, until disabled manually.
The option itself is generally hidden to prevent any accidental access, just like “USB debugging”. It could also serve as a recovery process to revive your device if anything goes wrong with the software.
Why would you need to enable OEM Unlocking?
Before we even get to the instructions and enable OEM unlocking on Android, let us go through the complete understanding of the benefits and drawbacks of unlocking the bootloader. We will further be adding what actually “OEM unlocking” actually is and why is it necessary.
The standard process of installing a custom ROM, kernel, or some famous mods like ViPER4Android, etc would require your device to have root permissions. Rooting itself relies on a custom recovery like TWRP in most cases. Furthermore, installing a custom recovery would require you to have access to write the device’s partitions. A locked bootloader prevents just that. It wouldn’t allow you to overwrite or modify the existing partitions. Thus, the first step towards rooting an Android device is to unlock the bootloader.
The illustration below will help you further understand the process, in case everything in the above paragraph sounded confusing.

So what is a bootloader? – It is a software program that runs from the minute your Android phone is turned ON. It is loaded with the instructions to boot the operating system kernel and OEM provides the required permission for the user to modify or access the bootloader. An unlocked bootloader will also allow flashing factory images in case of Google Nexus/Pixel, Razer and more.
An unlocked bootloader has its benefits, yes! But it also has a few disadvantages of its own. So before we head to the instructions to enable OEM unlocking on Android, take a look at a few common ones have been listed as follows:
- The foremost disadvantage is that you’d lose your official warranty or support in the majority of cases. Except in case of some OEMs like OnePlus.
- Second, your device will be wiped the instant you unlock the bootloader.
- It may prevent you from using DRM-protected features or apps like Netflix on your Android device.
How to Enable OEM Unlocking on Android Devices
Over to the thing, we are actually here for today. We have split the instructions into three steps so that you can easily understand the complete procedure.
Step 1: Backup your Android Device
It is strongly advised to backup your device completely including the apps, messages, contacts, and internal storage. While enabling OEM unlocking itself wouldn’t erase the data stored on your device. It’s likely that you’ll proceed further to unlock the bootloader, which will result in a complete data wipe. You can follow our guide on how to backup Android devices.
Step 2: Enable Developer Options on Android
As we mentioned earlier, the option/switch itself is hidden by default under the “Developer options” menu. In order to enable OEM unlocking, you will first need to reveal/enable Developer Options in the phone’s settings.
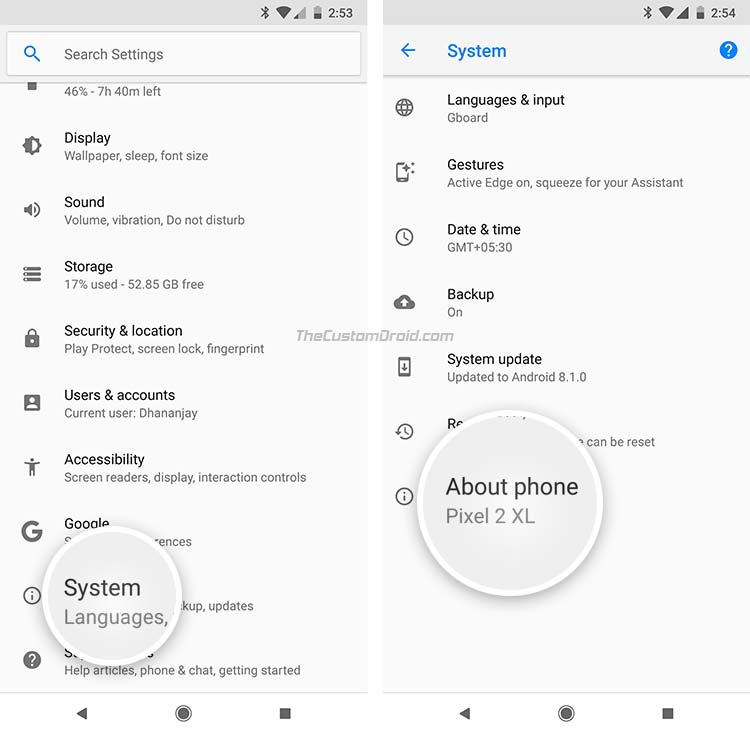
- Go to the app drawer and open “Settings”.
- Scroll down and find the “System” section. If you’re using a device with Android Nougat or below, look directly for “About phone”.
- Tap on the “About phone” section. You shall then see the device information like Android version, security patch level, etc.

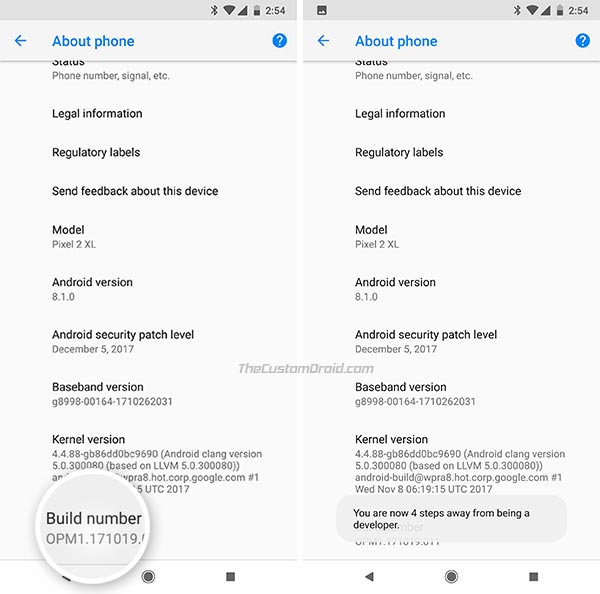
- Find “Build number”.
- Tap 7 times on “Build number” rapidly. If you have a PIN/Password set, you will be prompted to enter it.
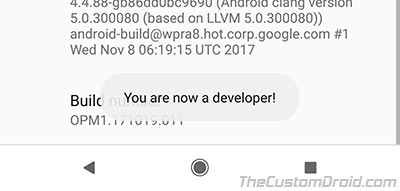
- Post that, you shall see a toast notification towards the bottom of the screen, saying – “You’re now a developer!”.
- Go back to the “System” section. On Android Nougat and below, simply go back to the main settings.
- You shall see a new section named “Developer options”.
You can now follow the instructions below to enable OEM unlocking on Android.
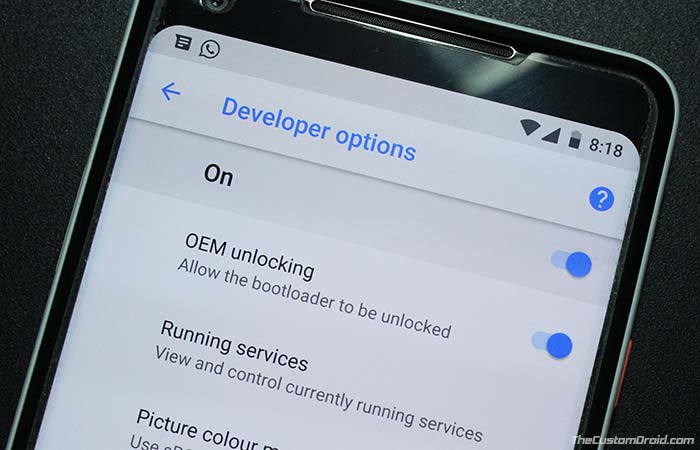
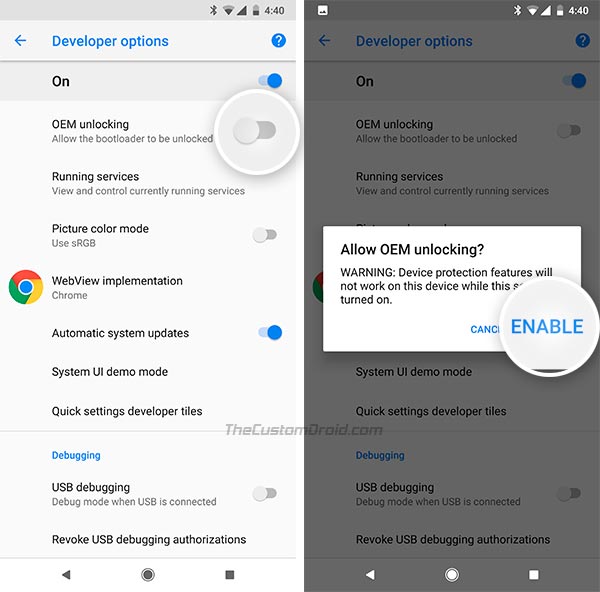
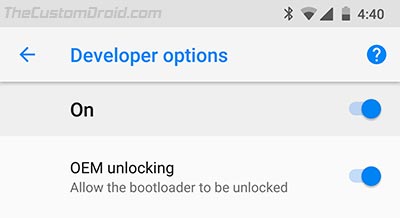
Step 3: Enable OEM Unlocking (OEM Unlock) on Android
- Go to “Settings” and tap on “System”.
- Select “Developer options”.
- Scroll down through the options and find the “OEM unlocking”.
- Simply tap on the toggle next to it. Again, if you have a password/PIN set, you will be asked to enter it.
- You shall be prompted to confirm the process, so press “ENABLE”.
So there you go, you now know what OEM Unlocking is and how to enable it on Android device. You may further go ahead and unlock the bootloader using the fastboot command. Once unlocked, you can easily install TWRP recovery and root your phone via Magisk.
That was easy now, wasn’t it? We hope the article was able to explain to you well about the whole concept. However, if you still have questions, then jump down to the comments below and ping us.
Источник
How to Unlock Bootloader on Android One Devices
Rooting, custom recoveries, custom ROMs, mods and all things fun.. it all starts with unlocking the bootloader on your Android One device. And thankfully, Google has made the bootloder unlocking process as simple as possible. It’s just a one line command and takes less than a minute to unlock the bootloader.
By unlocking the bootloader on your Android One device you’d be able to install root and custom recoveries on your device. And most important of all ─ Custom ROMs. There’s a great community of developers making custom ROMs for various Android devices and having an Android One device means you’ll have handful of great custom ROMs to flash, try and have fun with.
The process of unlocking the bootloader is similar between all Android One devices including Micromax Canvas A1, Spice Dream Uno and Karbonn Sparkle V.
WARNING!
Warranty may be void of your device if you follow the procedures given on this page!
You only are responsible for your device. We won’t be liable if any damage occurs to your device and/or its components.
icon-android GUIDE: ANDROID ONE BOOTLOADER UNLOCK
Before you begin with the instructions below, make sure your android device is adequately charged — at least 50% battery of the device.
To make sure your device is eligible with this, make sure your Android phone is part of Google’s Android One program. Do not use the procedures discussed here on a device that’s not an Android One device. You have been warned!
Back up important data and stuff before you start as unlocking the bootloader on your Android One phone would wipe/delete every single file stored on your device. You’ll lose all your apps and app-data (app settings, game progress, etc.), and all the files stored on the internal storage of the device.
For help on Backup and Restore, check out our exclusive page on that linked right below.
You must have proper and working driver installed on your windows computer to be able to successfully unlock bootloader on your Android One phone. In case you’re not sure, follow the link below for a definitive guide for installing driver for your Android One phone on your computer.
Download the One Click Bootloader Unlocking file given below and transfer it to a separate folder on your computer (just to keep things tidy, that is).
DOWNLOAD LINK | File name: Android_One_Bootloader_Unlocking_Script.zip (805 KB)
You may choose to unlock the bootloader on your Android One phone using either our one-click automated script OR manually by yourself. Both the methods are discussed below:
UNLOCK BOOTLOADER WITH ONE-CLICK SCRIPT
- Extract/Unzip Android_One_Bootloader_Unlocking_Script.zip file on your computer (using 7-zip free software, preferably)
- Turn on USB Debugging on your Android One phone
- Enable developer options: Go to your device’ Settings » select About device » Scroll to the bottom and tap on “Build number” seven times to enable developer options
- Enable USB Debugging: Open device’ Settings » select Developer options » Tick the “USB debugging” checkbox (under Debugging section)
- Connect your Android One phone to computer with a USB cable and if a pop-up screen shows up on Phone asking you to Allow USB debugging for the computer, make sure to tick the checkbox and tap Okay
- Now open the folder where you extracted the contents of Android_One_Bootloader_Unlocking_Script.zip file in Step 1
- Look for the android-one-bootloader-unlock.bat script file inside the folder and execute it by double clicking on it
└ If the script hangs on for a long time (say 2 minute) then that means you’ve a drivers or some other connectivity issue between your Android One phone and computer. To troubleshoot this, follow the drivers installation guide link provided above - Follow the instructions on the computer screen now, your phone’s bootloader will be successfully unlocked.

MANUALLY UNLOCK BOOTLOADER
If for some reason the 1-click script doesn’t work, you can also unlock the bootloader manually by following the steps below:
- Extract/Unzip Android_One_Bootloader_Unlocking_Script.zip file on your computer (using 7-zip free software, preferably)
- Now, boot your Android One phone into bootloader mode:
- Power off your device and wait 4-5 seconds after lights go off.
- Press and hold Power + Volume Up button together for a few seconds and then release the buttons as soon as you see the boot menu screen
└ In boot menu, use Volume Up scroll between options and Volume Down to confirm (OK) an option. - Press Volume Up four times to select Fastboot Mode, and then press Volume Down to confirm (OK) booting into Fastboot Mode.
└ “=> FASTBOOT mode…” will appear on screen.
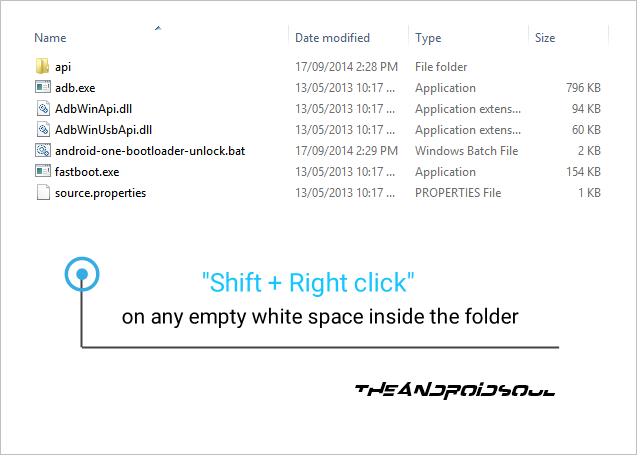
- Now open the folder where you extracted the contents of Android_One_Bootloader_Unlocking_Script.zip file
- Press Shift key + Right click on any empty space inside the folder, and select Open command window here from the context menu
- Now connect your Android One phone to your computer using a USB cable, and then type fastboot devices in the command prompt to make sure your device is recognized
└ In case if your device isn’t recognized and the fastboot devices command doesn’t list any device, then it means you don’t proper driver installed for your Android One phone on your computer. Follow the link provided above for troubleshooting driver and other connectivity issues - And now to unlock the bootloader, type this in the command prompt window and hit enter:
- You’ll see a screen asking you to accept the Bootloader unlocking request. Say Yes to it by pressing the Volume UP button
- Your phone will now show the bootloader menu again, but you’ll still be in fastboot mode
- Issue the following commands now:
- Your phone will now reboot and you’ve successfully unlocked the bootloader.
Feedback Us!
It was easy, right? Let us know what you plan to do now, with the bootloader now unlocked on your Android One phone.
Источник
Как разблокировать загрузчик на устройствах Android One
Получение root-прав, кастомных восстановлений, кастомных ПЗУ, модов и всего интересного … все начинается с разблокировки загрузчика на вашем устройстве Android One. И, к счастью, Google максимально упростил процесс разблокировки загрузчика. Это всего лишь однострочная команда, разблокировка загрузчика занимает меньше минуты.
Разблокировав загрузчик на устройстве Android One, вы сможете установить на свое устройство root-права и пользовательские восстановления. И самое главное ─ Кастомные прошивки. Существует большое сообщество разработчиков, создающих пользовательские ПЗУ для различных устройств Android, а наличие устройства Android One означает, что у вас будет несколько отличных пользовательских ПЗУ, которые можно прошить, попробовать и повеселиться.
Процесс разблокировки загрузчика одинаков для всех устройств Android One, включая Micromax Canvas A1, Spice Dream Uno и Karbonn Sparkle V.
ПРЕДУПРЕЖДЕНИЕ!
Гарантия на ваше устройство может быть аннулирована, если вы будете следовать процедурам, приведенным на этой странице!
Только вы несете ответственность за свое устройство. Мы не несем ответственности в случае повреждения вашего устройства и / или его компонентов.
значок-android РУКОВОДСТВО: РАЗБЛОКИРОВКА ЗАГРУЗЧИКА ДЛЯ ANDROID ONE
Прежде чем приступить к выполнению приведенных ниже инструкций, убедитесь, что ваше устройство Android заряжено должным образом — не менее 50% батареи устройства.
Чтобы убедиться, что ваше устройство соответствует требованиям, убедитесь, что ваш телефон Android является частью программы Google Android One. Не используйте описанные здесь процедуры на устройстве, отличном от Android One. Вы были предупреждены!
Прежде чем начать, сделайте резервную копию важных данных и прочего, поскольку разблокировка загрузчика на вашем телефоне Android One приведет к стиранию / удалению всех файлов, хранящихся на вашем устройстве. Вы потеряете все свои приложения и данные приложений (настройки приложений, ход игры и т. Д.), А также все файлы, хранящиеся во внутренней памяти устройства.
Чтобы получить помощь по резервному копированию и восстановлению, посетите нашу эксклюзивную страницу по ссылке прямо ниже.
► РУКОВОДСТВО ПО РЕЗЕРВНОМУ ВОССТАНОВЛЕНИЮ И РЕЗЕРВНОМУ ВОССТАНОВЛЕНИЮ ANDROID: ПРИЛОЖЕНИЯ И СОВЕТЫ
У вас должен быть установлен соответствующий и работающий драйвер на вашем компьютере с Windows, чтобы иметь возможность успешно разблокировать загрузчик на вашем телефоне Android One. Если вы не уверены, перейдите по ссылке ниже, чтобы получить подробное руководство по установке драйвера для телефона Android One на компьютер.
► УСТАНОВИТЕ ДРАЙВЕР ЛЮБОЕ УСТРОЙСТВО ANDROID, ИСПОЛЬЗУЯ PDANET
Загрузите файл разблокировки загрузчика в один клик, указанный ниже, и перенесите его в отдельную папку на своем компьютере (то есть, чтобы все было в порядке).
СКАЧАТЬ ССЫЛКУ | Имя файла: Android_One_Bootloader_Unlocking_Script.zip (805 КБ)
Вы можете разблокировать загрузчик на своем телефоне Android One либо с помощью нашего автоматизированного сценария в один щелчок, либо вручную самостоятельно. Оба метода обсуждаются ниже:
РАЗБЛОКИРОВАТЬ ЗАГРУЗЧИК С ПОМОЩЬЮ СКРИПТА В ОДИН ЩЕЛЧОК
- Извлечь / распаковать Android_One_Bootloader_Unlocking_Script.zip файл на вашем компьютере (используя Бесплатное программное обеспечение 7-zipжелательно)
- Включите отладку по USB на телефоне Android One
- Включить параметры разработчика: Перейдите в «Настройки» своего устройства »выберите« Об устройстве »» Прокрутите вниз и нажмите «Номер сборки» семь раз, чтобы включить параметры разработчика.
- Включить отладку по USB: Откройте настройки устройства »выберите Параметры разработчика» Установите флажок «Отладка по USB» (в разделе «Отладка»)
- Подключите свой телефон Android One к компьютеру с помощью USB-кабеля, и если на телефоне появится всплывающий экран с просьбой разрешить отладку по USB для компьютера, обязательно поставьте галочку и коснитесь ОК
- Теперь откройте папку, в которую вы извлекли содержимое Android_One_Bootloader_Unlocking_Script.zip файл на шаге 1
- Ищите android-one-bootloader-unlock.bat файл скрипта внутри папки и запустите его, дважды щелкнув по нему
└ Если сценарий зависает на в течение длительного времени (скажем, 2 минуты), это означает, что у вас есть драйверы или другая проблема с подключением между телефоном Android One и компьютером. Чтобы устранить эту проблему, перейдите по ссылке руководства по установке драйверов, указанной выше. - Следуйте инструкциям на экране компьютера, загрузчик вашего телефона будет успешно разблокирован.

РАЗБЛОКИРОВАТЬ ЗАГРУЗЧИК ВРУЧНУЮ
Если по какой-либо причине скрипт в 1 щелчок не работает, вы также можете разблокировать загрузчик вручную, выполнив следующие действия:
- Извлечь / распаковать Android_One_Bootloader_Unlocking_Script.zip файл на вашем компьютере (используя Бесплатное программное обеспечение 7-zipжелательно)
- Теперь загрузите свой телефон Android One в режиме загрузчика:
- Выключите устройство и подождите 4-5 секунд после того, как погаснет свет.
- Нажмите и удерживайте Питание + кнопка увеличения громкости вместе на несколько секунд, а затем отпустите кнопки как только вы увидите экран меню загрузки
└ В меню загрузки используйте увеличение громкости для прокрутки параметров и уменьшение громкости, чтобы подтвердить (OK) параметр. - Нажмите Увеличить громкость четыре раза, чтобы выбрать Fastboot Mode, а затем нажмите Звук тише для подтверждения (OK) загрузки в режим Fastboot.
└ «=> Режим FASTBOOT…» появится на экране.
└ Для получения дополнительной помощи посетите нашу страницу → Как загрузиться в Android One Bootloader / Fastboot Mode.
- Теперь откройте папку, в которую вы извлекли содержимое Android_One_Bootloader_Unlocking_Script.zip файл
- Нажмите Клавиша Shift + щелчок правой кнопкой мыши на любом пустом месте внутри папки и выберите Открыть командное окно здесь из контекстного меню
- Теперь подключите свой телефон Android One к компьютеру с помощью USB-кабеля и введите устройства fastboot в командной строке, чтобы убедиться, что ваше устройство распознано
└ Если ваше устройство не распознается и команда fastboot devices не перечисляет никаких устройств, это означает, что для вашего телефона Android One на вашем компьютере установлен неправильный драйвер. Перейдите по приведенной выше ссылке для устранения неполадок с драйвером и других проблем с подключением. - А теперь, чтобы разблокировать загрузчик, введите это в окне командной строки и нажмите Enter:
- Вы увидите экран с просьбой принять запрос на разблокировку загрузчика. Сказать да к нему, нажав Увеличить громкость кнопка
- Теперь ваш телефон снова покажет меню загрузчика, но вы по-прежнему будете в режиме быстрой загрузки.
- Теперь выполните следующие команды:
- Ваш телефон перезагрузится, и вы успешно разблокировали загрузчик.

Напишите нам!
Это было легко, правда? Сообщите нам, что вы планируете делать сейчас, когда на вашем телефоне Android One разблокирован загрузчик.
Источник


