- Check your Apple ID device list to see where you’re signed in
- See where you’re signed in
- Use your iPhone, iPad, iPod touch, or Apple Watch to see where you’re signed in
- Use your Mac to see where you’re signed in
- Use your PC to see where you’re signed in
- Use the web to see where you’re signed in
- Add a device to the list
- Remove a device from the list
- Use your iPhone, iPad, or iPod touch to remove a device
- Use your Mac to remove a device
- Use your PC to remove a device
- Use the web to remove a device
- Permanently remove a device from your account page
- If your iPhone, iPad, or iPod touch is lost or stolen
- Look for your device on a map
- Mark as Lost
- Report your missing device to local law enforcement
- File a Theft and Loss claim
- Remotely erase your device
- Contact your wireless carrier
- Remove your missing device from your account
- Use the Find My app to locate a missing device or item
- What features are available for your missing device or item
- iPhone, iPad, iPod touch
- Apple Watch
- AirPods Pro, AirPods Max
- AirPods, Beats products
- Third-party products
- AirTag
- iPhone Leather Wallet with MagSafe
- See it on a map
- Don’t see your device?
- Play a sound
- Mark your device as lost or turn on Lost Mode for your item
- What happens if you activate Mark As Lost for your device
- How to check the storage on your iPhone, iPad, and iPod touch
- How iOS and iPadOS optimize storage
- Use your device to check its storage
- Content categories
- Use recommendations to optimize storage
- Use the Finder or iTunes to check the storage on your iOS device
- About cached files in «Other»
- If storage on your device differs from what you see in the Finder or iTunes
- If you want to delete the cached files from your device
- Learn more
Check your Apple ID device list to see where you’re signed in
Learn which devices appear in your Apple ID device list, how to see your device’s details, and how to remove a device, if necessary.
See where you’re signed in
Use the steps below to see the devices that you’re currently signed in to with your Apple ID.
Use your iPhone, iPad, iPod touch, or Apple Watch to see where you’re signed in
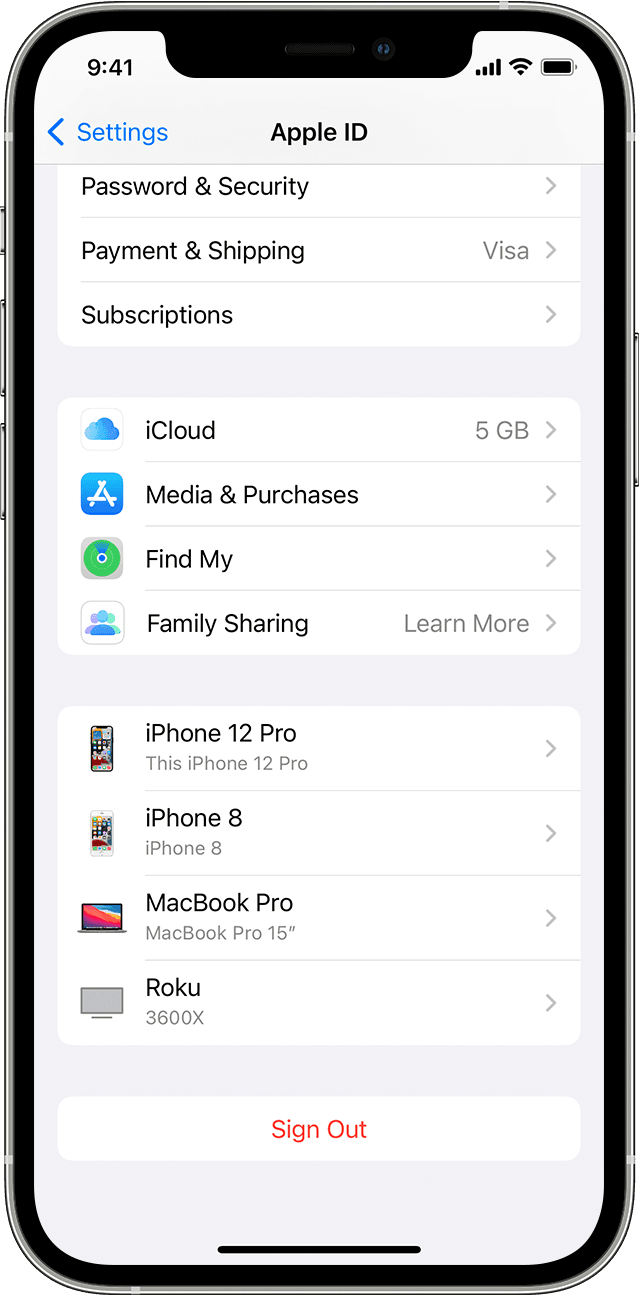
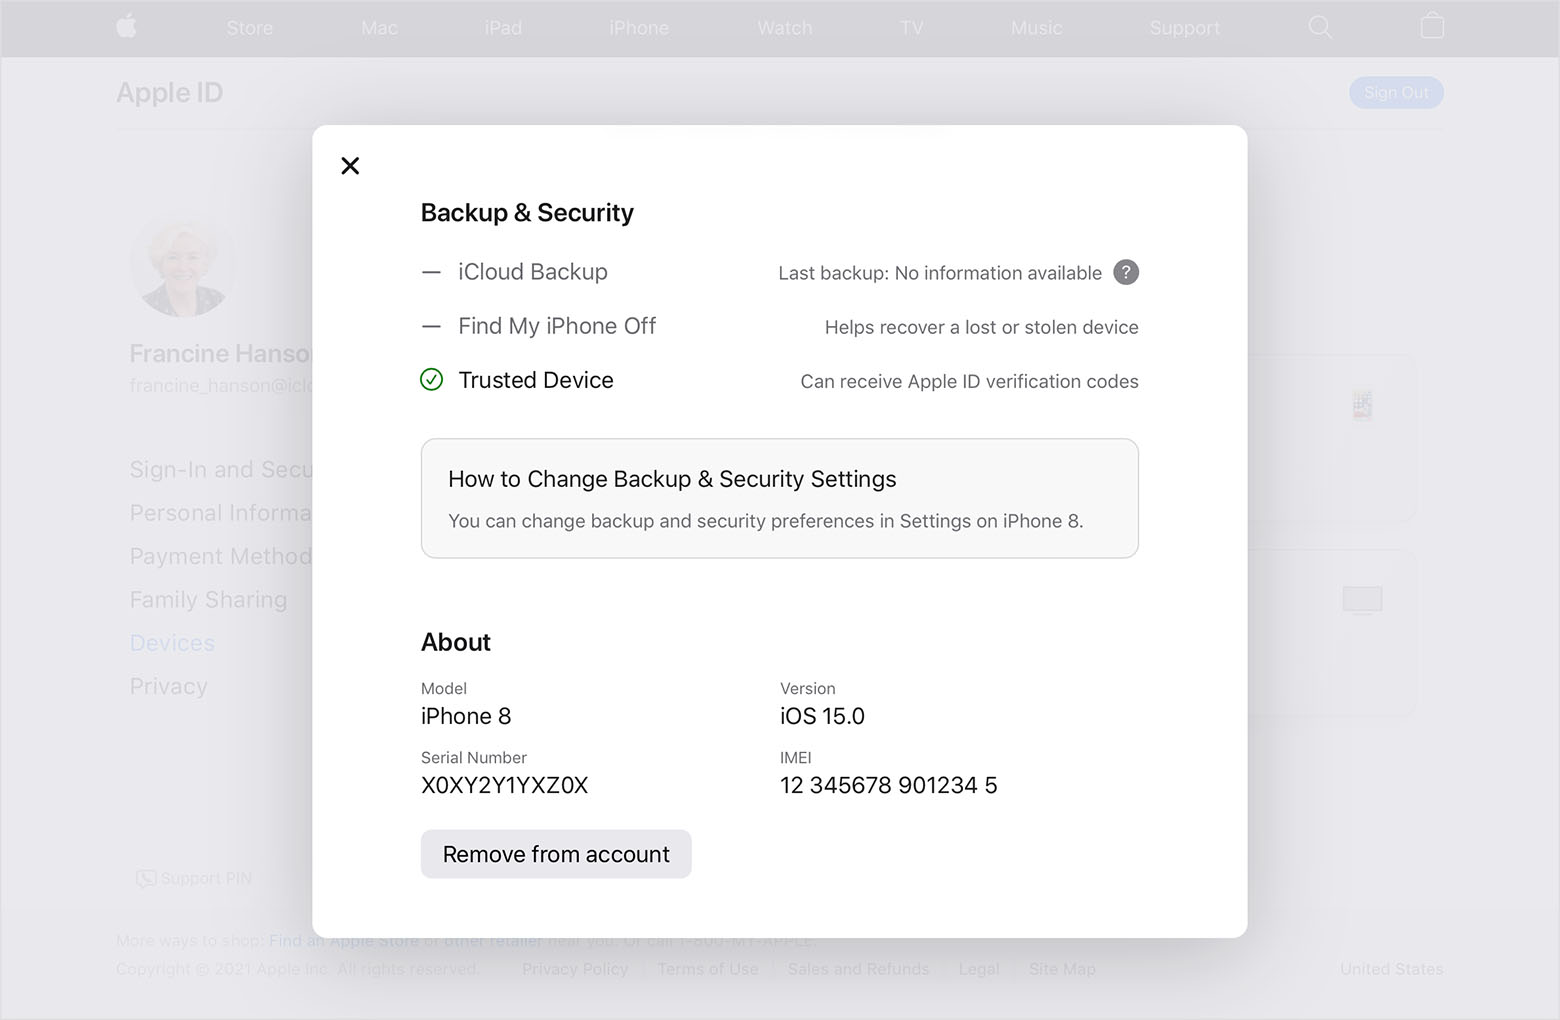
- Tap Settings > [your name], then scroll down.
- Tap any device name to view that device’s information, such as the device model, serial number, OS version, and whether the device is trusted and can be used to receive Apple ID verification codes. The information might vary depending on the device type. You might need to answer your security questions to see device details.
![]()
Use your Mac to see where you’re signed in
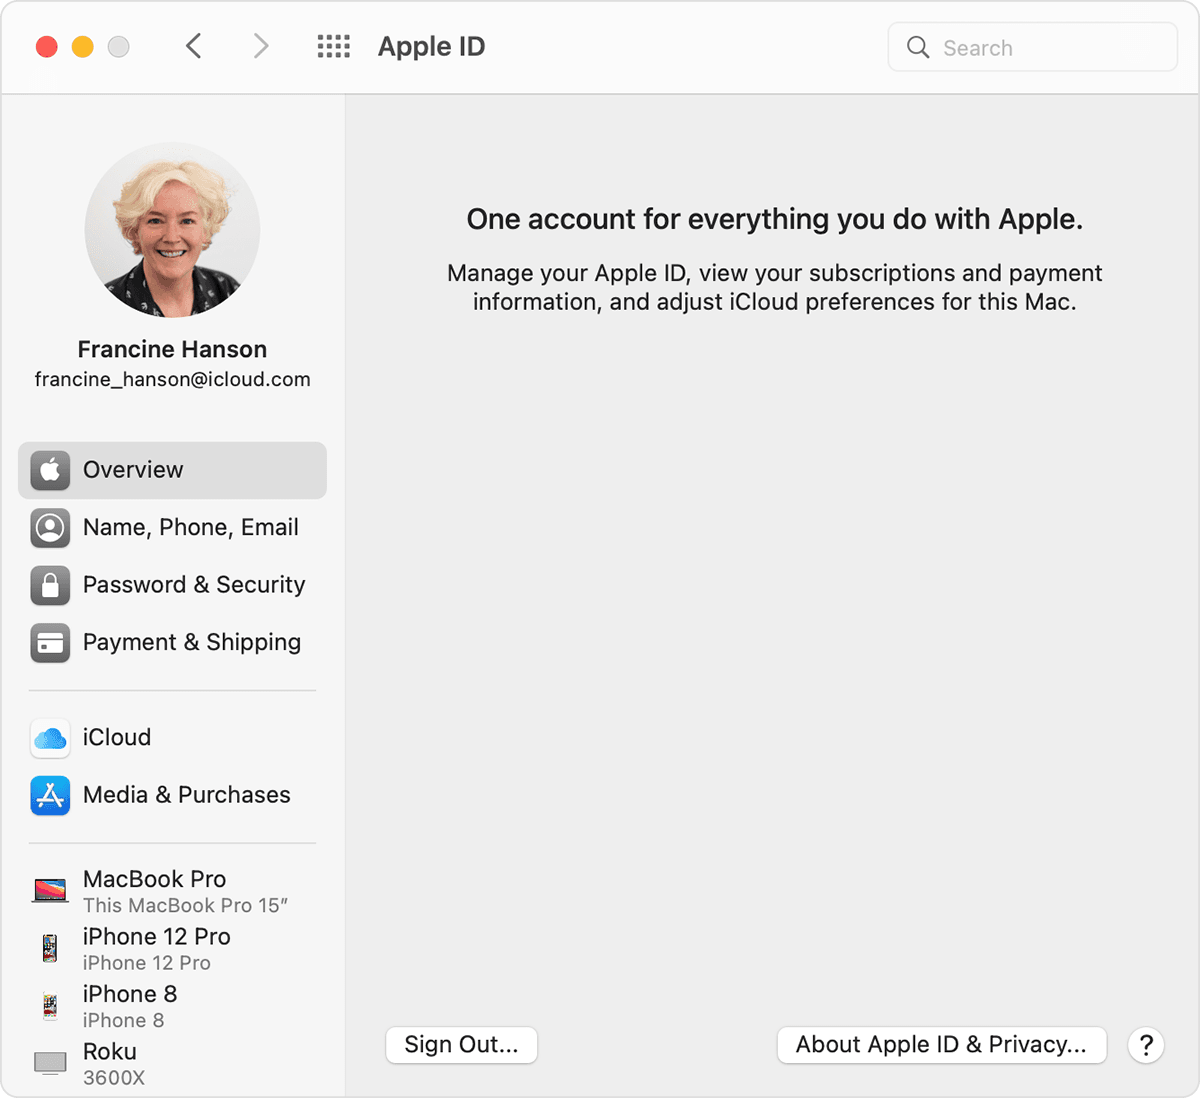
- Choose Apple menu > System Preferences.
- Click Apple ID.

- Click any device name to view that device’s information, such as the device model, serial number, and OS version. The information might vary depending on the device type. You might need to answer your security questions to see device details.
Use your PC to see where you’re signed in
- Open iCloud for Windows.
- Click Account Details, then click Manage Apple ID.
- Click any device name to view that device’s information, such as the device model, serial number, and OS version. The information might vary depending on the device type.
Use the web to see where you’re signed in
From the Devices section of your Apple ID account page, you can see all of the devices that you’re currently signed in to with your Apple ID, including Android devices, consoles, and smart TVs:
- Sign in to appleid.apple.com,* then select Devices.
- If you don’t see your devices right away, click View Details and answer your security questions.
- Click any device name to view that device’s information, such as the device model, serial number, and OS version. The information might vary depending on the device type.

* Depending on how you created your Apple ID, you might be required to provide additional information.
Add a device to the list
To add a device to the list, you need to sign in with your Apple ID. After you sign in on a device with your Apple ID, that device appears in the list. Here’s where you need to sign in:
- For iOS or iPadOS, sign in to iCloud, iMessage, FaceTime, iTunes & App Stores, or Game Center on the device. You can also see your paired Apple Watch.
- For macOS or Windows 10 and later, sign in to iCloud on the device.
- For Apple TV HD and later, sign in to the iTunes and App Store on the device.
- For Apple TV (3rd generation) and earlier, sign in to the iTunes Store on the device.
Your AirPods will appear in the Find My app, but they won’t appear in your Apple ID device list. You can remove your AirPods from your account using Find My. Devices running iOS 7 or earlier or OS X Mavericks or earlier won’t appear in your device list.
Remove a device from the list
If your device is missing, you can use Find My to find your device and take additional actions that can help you recover it and keep your data safe. If you aren’t using your device anymore, or if you don’t recognize it, you might want to remove it from the list.
If you set up two-factor authentication for your Apple ID, removing a device will ensure that it can no longer display verification codes. It also won’t have access to iCloud and other Apple services, including Find My, until you sign in again with two-factor authentication. The device won’t reappear in the list unless you sign in again.
Use your iPhone, iPad, or iPod touch to remove a device
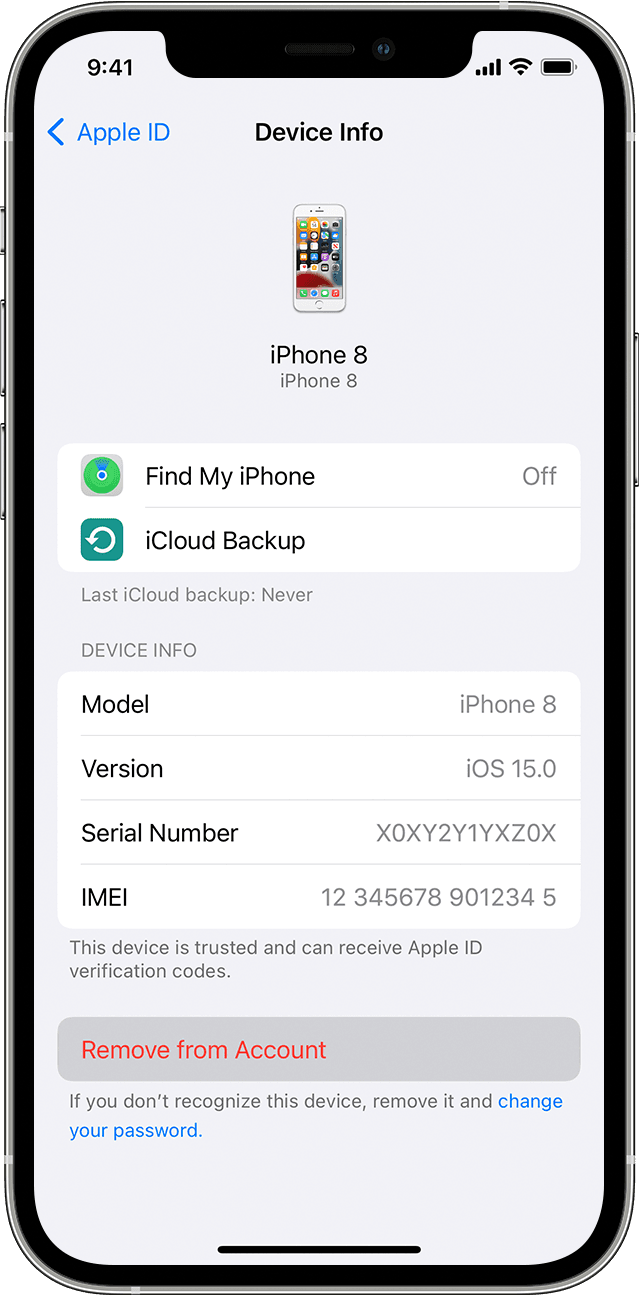
- Tap the device to see its details, then tap Remove from Account.
- Review the message that appears, then tap again to confirm that you want to remove the device.
- Want to permanently remove the device from your account page?
![]()
Use your Mac to remove a device
- Choose Apple menu > System Preferences.
- Click Apple ID.
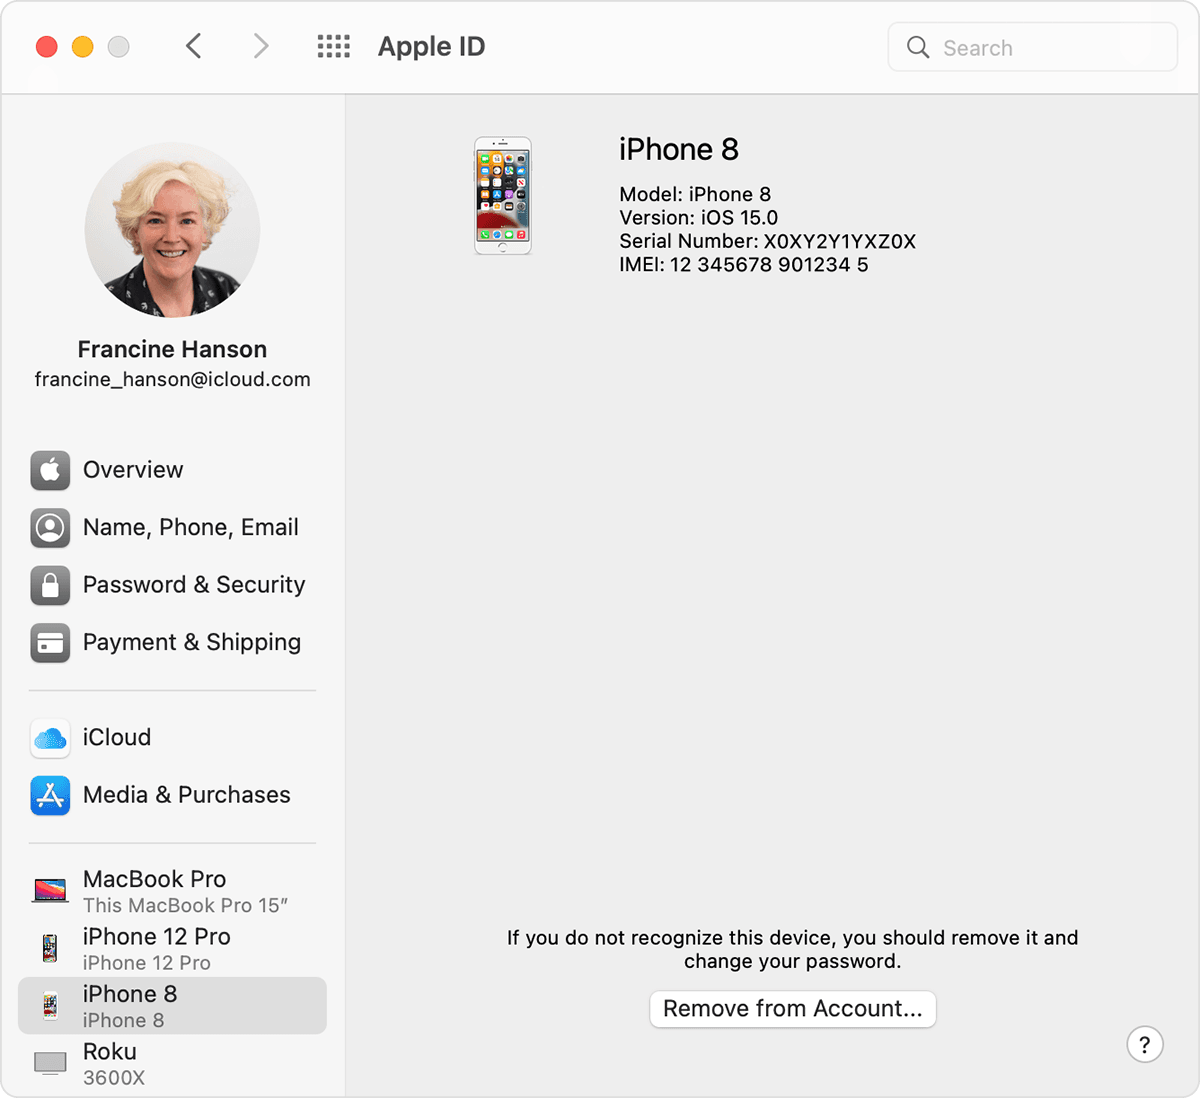
- Click the device to see its details, then click Remove from Account.
- Review the message that appears, then click again to confirm that you want to remove the device.
- Want to permanently remove the device from your account page?
Use your PC to remove a device
- Open iCloud for Windows.
- Click Account Details, then click Manage Apple ID.
- Click the device to see its details, then click Remove from Account.
- Review the message that appears, then click again to confirm that you want to remove the device.
- Want to permanently remove the device from your account page?
Use the web to remove a device
- Sign in to appleid.apple.com, then select Devices.
- Click the device to see its details, then click «Remove from account.»
- Review the message that appears.
- Click again to confirm that you want to remove the device.
- Want to permanently remove the device from your account page?
Permanently remove a device from your account page
If you’re still signed in with your Apple ID on the device, it might reappear on your account page the next time your device connects to the Internet. To permanently remove the device from your account page, sign out of iCloud, iTunes & App Stores, iMessage, FaceTime, and Game Center on that device, or erase that device.
Источник
If your iPhone, iPad, or iPod touch is lost or stolen
If you lose your iPhone, iPad, or iPod touch or think it might be stolen, use Find My and protect your data.
Look for your device on a map
To find your device, sign in to iCloud.com/find. Or use the Find My app on another Apple device that you own.
If your iPhone, iPad, or iPod touch doesn’t appear in the list of devices, Find My was not turned on. But you can still protect your account if Find My was not turned on.
Mark as Lost
When you mark your device as lost, you remotely lock it with a passcode, keeping your information secure. This also disables Apple Pay on the missing device. And you can display a custom message with your contact information on the missing device.
Report your missing device to local law enforcement
Law enforcement might request the serial number of your device.
File a Theft and Loss claim
If your missing iPhone is covered by AppleCare+ with Theft and Loss, file a claim for an iPhone replacement.
Remotely erase your device
After you erase a device, you can’t track its location, so make sure that you no longer need to search for the device. If you have AppleCare+ with Theft and Loss, do not erase your iPhone until your claim has been approved.
Contact your wireless carrier
If the missing device is an iPhone or an iPad with cellular, report your missing device to your wireless carrier. Ask the carrier to disable your account to prevent calls, texts, and data use. And if your device is covered under your wireless carrier plan, file a claim.
Remove your missing device from your account
If you have AppleCare+ with Theft and Loss, do not remove your lost iPhone from your account until your claim has been approved.
Go to appleid.apple.com to remove the missing device from your list of trusted devices.
AppleCare+ with Theft and Loss is not available in all countries and regions.
Information about products not manufactured by Apple, or independent websites not controlled or tested by Apple, is provided without recommendation or endorsement. Apple assumes no responsibility with regard to the selection, performance, or use of third-party websites or products. Apple makes no representations regarding third-party website accuracy or reliability. Contact the vendor for additional information.
Источник
Use the Find My app to locate a missing device or item
Learn the different ways you can use the Find My app to help find your missing device or personal item, like how to see its location on a map or mark it as lost.
If you’ve lost or misplaced an Apple device or personal item, just use the Find My app on an iPhone, iPad, or iPod touch with the latest version of iOS or iPadOS or a Mac with the latest version of macOS signed in with the same Apple ID. You can also use the Find Devices or Find Items apps on your Apple Watch with the latest version of watchOS.
For a misplaced iPhone, iPad, iPod touch, Apple Watch, Mac, AirPods product, or supported Beats product, you can also use the Find My app on a device owned by someone in your Family Sharing group, or sign in to iCloud.com/find on a web browser.
What features are available for your missing device or item
Find My features and availability might vary by country or region.
iPhone, iPad, iPod touch
- View Location
- Play a Sound
- Mark as Lost (Lost Mode)
- Remote Erase
- Notify When Found
- Notify When Left Behind
- View Location
- Play a Sound
- Mark as Lost (Lock your Mac)
- Remote Erase
- Notify When Found
- Notify When Left Behind*
* Feature only available on MacBooks with Apple Silicon.
Apple Watch
- View Location
- Play a Sound
- Mark as Lost (Lost Mode)
- Remote Erase
- Notify When Found
AirPods Pro, AirPods Max
- View Location
- Find Nearby
- Play a Sound
- Lost Mode (Mark as Lost)
- Notify When Found
- Notify When Left Behind
AirPods, Beats products
Third-party products
- View Location
- Lost Mode
- Other features vary by product
AirTag
- View Location
- Find Nearby
- Play a Sound
- Lost Mode (Mark as Lost)
- Notify When Found
- Notify When Left Behind
iPhone Leather Wallet with MagSafe
- View Location
- Show Phone Number
- Notify When Detached
![]()
![]()
See it on a map
- Open the Find My app.
- Choose the Devices or Items tab.
- Select the device or item to see its location on the map. If you belong to a Family Sharing group, you can see the devices in your group.
- Choose Directions to open its location in Maps.
If you turn on Find My network, you can see your device or item’s location even if it’s not connected to a Wi-Fi or cellular network. The Find My network is an encrypted anonymous network of hundreds of millions of Apple devices that can help you locate your device or item.
Don’t see your device?
You might not have Find My turned on. If your device is powered off, the battery has run out, or more than 24 hours has passed since its last location was sent to Apple, you can’t see your device’s location. Learn how you can still protect your information.
![]()
Play a sound
- Open the Find My app.
- Choose the Devices tab or the Items tab.
- Select your missing device or item, then choose Play Sound. If your device is offline, it won’t play a sound until it connects to a network. If the AirTag attached to your item is out of Bluetooth range, your AirTag won’t play a sound until it’s within range.
For 24 hours after your last use, your iPhone will also notify you if you leave your AirPods or Beats products out of Bluetooth range when you’re not in a significant location like home or work. Learn more about Notify When Left Behind.
![]()
Mark your device as lost or turn on Lost Mode for your item
- Open the Find My app and choose the Devices tab or the Items tab.
- Select your missing device or item.
- Scroll down to Mark As Lost or Lost Mode and select Activate or Enable.
- Follow the onscreen steps if you want your contact information to display on your missing device or item, or if you want to enter a custom message asking the finder of your missing device to contact you.
- Select Activate.
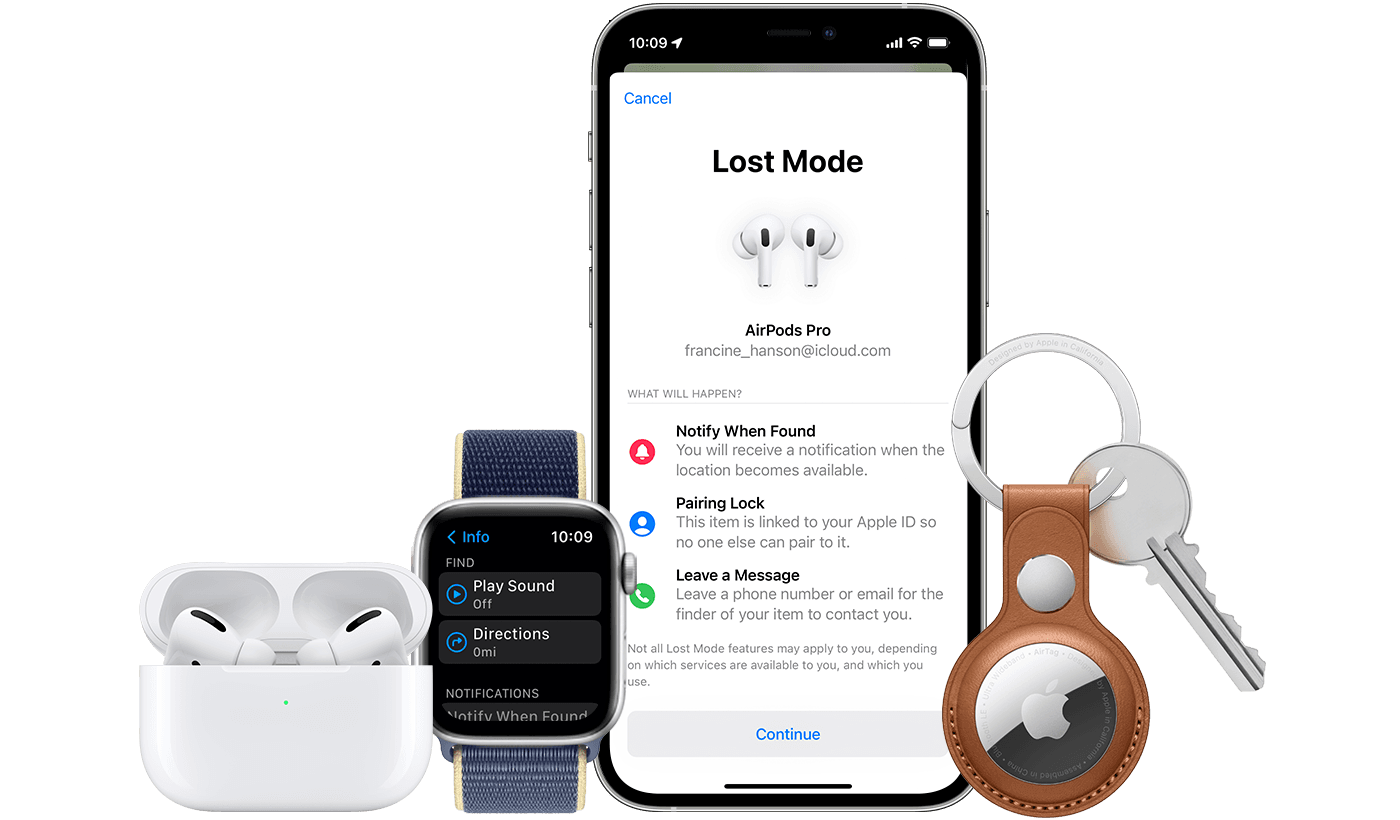
What happens if you activate Mark As Lost for your device
Mark as Lost remotely locks your missing iPhone, iPad, iPod touch, or Mac with a passcode, keeping your information secure even if your device goes missing. You can also display a custom message with your phone number on the Lock screen, and keep track of your device’s location. Learn more about how to use Mark as Lost.
Источник
How to check the storage on your iPhone, iPad, and iPod touch
iOS and iPadOS monitor the storage on your device by analyzing how much space each app uses. You can also check the storage on your device in Settings, iTunes, or the Finder on your computer.
How iOS and iPadOS optimize storage
If your device is low on storage, it automatically frees up space while installing an app, updating iOS or iPadOS, downloading music, recording videos, and more.
To make more storage available, your device can remove some of your items, like streamed music and videos, files in iCloud Drive, and parts of apps that aren’t needed. It also removes temporary files and clears the cache on your device. But your device only removes items that can be downloaded again or that aren’t needed anymore.

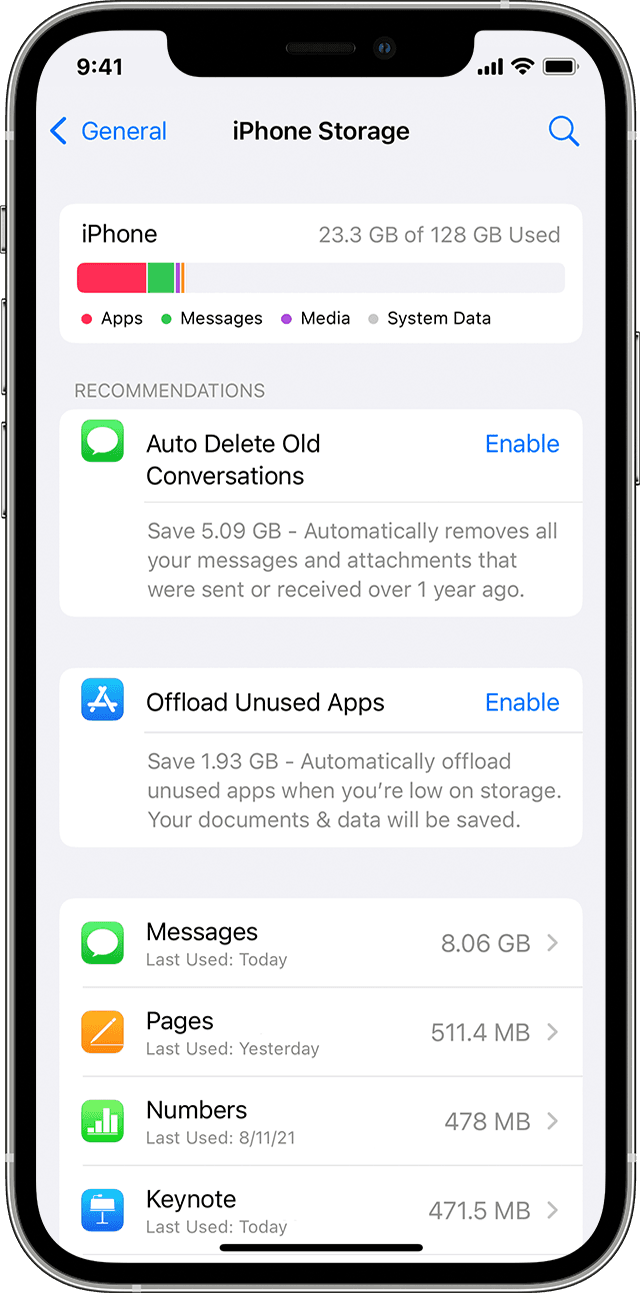
Use your device to check its storage
Go to Settings > General > [Device] Storage. You might see a list of recommendations for optimizing your device’s storage, followed by a list of installed apps and the amount of storage each one uses. Tap an app’s name for more information about its storage. Cached data and temporary data might not be counted as usage.
In the detailed view you can:
- Offload the app, which frees up storage used by the app, but keeps its documents and data.
- Delete the app, which removes the app and its related data.
- Depending on the app, you might be able to delete some of its documents and data.
If your device is almost full and can’t free up space, you might get a Storage Almost Full alert. If you see this alert, you should check the storage recommendations or you need to offload some less-used content like videos and apps.
Content categories
The used content on your device is divided in these categories:
- Apps: Installed apps and their content, and content stored in «On My iPhone/iPad/iPod touch» directory in the Files app, and Safari downloads
- Photos: Photos and videos stored in the Photos app
- Media: Music, videos, podcasts, ringtones, artwork, and Voice Memos
- Mail: Emails and their attachments
- Apple Books: Books and PDFs in the Books app
- Messages: Messages and their attachments
- iCloud Drive: iCloud Drive content that has been downloaded locally to your device. This content can’t be automatically deleted.
- Other: Non-removable mobile assets, like Siri voices, fonts, dictionaries, non-removable logs and caches, Spotlight index, and system data, such as Keychain and CloudKit Database. Cached files can’t be deleted by the system.
- System: Space taken by the operating system. This can vary based on your device and model.
Use recommendations to optimize storage
In the Storage section of Settings, your device might offer recommendations for optimizing your storage. Tap Show All to see all the recommendations for your device.
Read the description of each recommendation, then tap Enable to turn it on or tap the recommendation to review the contents you can delete.
Use the Finder or iTunes to check the storage on your iOS device
- On a Mac with macOS Catalina 10.15 or later, open the Finder. On a Mac with macOS Mojave 10.14 or earlier, or on a PC, open iTunes.
- Connect your device to your computer.
- Select your device in the Finder or in iTunes. You’ll see a bar that shows how much storage your content uses, divided by content type.
- Move your mouse over the bar to see how much storage each content type is using.
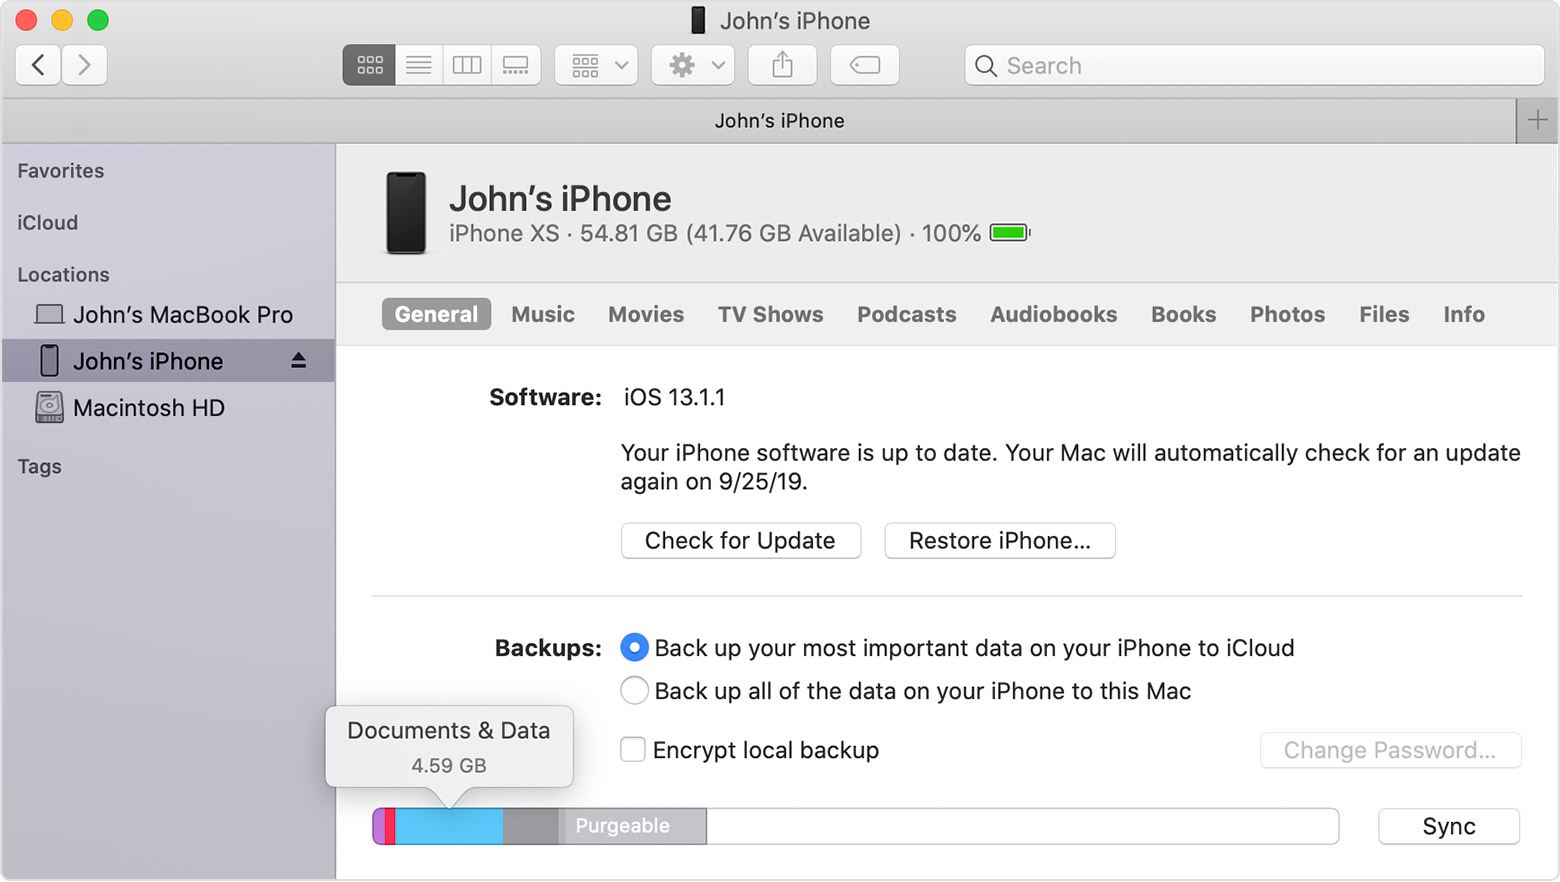
Here’s a list of the types of content on your device, and what each type includes:
- Audio: Songs, audio podcasts, audiobooks, voice memos, and ringtones.
- Video: Movies, music videos, and TV shows.
- Photos: Content in your Photo Library, Camera Roll, and Photo Stream.
- Apps: Installed apps. The content of the apps is listed under Documents & Data.
- Books: iBooks books, audio books, and PDF files.
- Documents & Data: Safari Offline Reading List, files stored within installed apps, and app content like contacts, calendars, messages, and emails (and their attachments).
- Other: Settings, Siri voices, system data, and cached files.
About cached files in «Other»
The Finder and iTunes categorize cached music, videos, and photos as Other instead of actual songs, videos, or photos. Cached files are created when you stream or view content like music, videos, and photos. When you stream music or video, that content is stored as cached files on your device so you can quickly access it again.
Your device automatically removes cached files and temporary files when your device needs more space.
If storage on your device differs from what you see in the Finder or iTunes
Since the Finder and iTunes categorize cached files as Other, reported usage for Music or Videos might differ. To view usage on your device, go to Settings > General > [Device] Storage.
If you want to delete the cached files from your device
Your device automatically deletes cached files and temporary files when it needs more space. You don’t need to delete them yourself.
Learn more
- To reduce the size of your Photo library, turn on iCloud Photo Library and optimize your device storage.
- Optimize your music and videos storage in Settings > Music > Optimize Storage.
- Learn how iOS, iPadOS, and macOS report storage capacity.
Information about products not manufactured by Apple, or independent websites not controlled or tested by Apple, is provided without recommendation or endorsement. Apple assumes no responsibility with regard to the selection, performance, or use of third-party websites or products. Apple makes no representations regarding third-party website accuracy or reliability. Contact the vendor for additional information.
Источник


