- How to uninstall pre-installed system apps from Android phones without root
- Use ADB to uninstall system apps on Android phones
- Re-install a previously removed app using ADB
- Top 9 things to do after setting up your Android phone
- Check your Do Not Disturb rules
- How to add a Do Not Disturb rule to most Android phones
- Set your default apps
- How to set your default apps
- Apply a new system theme
- Check out your new phone’s gesture shortcuts and navigation options
- Retrain Google Assistant’s Voice Match and turn on OK Google to wake/unlock
- How to retrain Google Assistant Voice Match
- Turn on automatic backups for Google Photos
- How to turn on Google Photos automatic backups
- Purge your app list
- Set up your new home screen
- Set custom ringtones and text tones for your favorite contacts
- How to set a contact-specific ringtone
- Feeling more at home in your new phone yet?
- Protect your new phone with some new accessories
- Samsung needs to bring back its iPod competitor
- VoLTE: How to use it and why you should care
- PlayStation reportedly planning service to compete with Xbox Game Pass
- The best smart locks that support Google Home and Assistant in 2021
How to uninstall pre-installed system apps from Android phones without root
Android phones from most brands come with at least some amount of bloatware or unwanted apps. These could be in the form of common apps like Google Play Movies, Netflix & Facebook, or some truly useless junk. Some brands allow users to uninstall the bundled apps while others make them system apps that cannot be removed. The final question is if we can uninstall the bundled system apps even if the brand has not given such an option.
The answer is yes, we can uninstall the apps from the current user using ADB commands. The apps will stop running in the background and they will also disappear from the launcher. However, the app’s package included in the system partition will continue to exist. That means the app package will continue to consume the storage equivalent to the size of its .apk package and you cannot free up that space.
Some brands give the option to “Disable” the system apps instead of a hard uninstall. Unfortunately, the disabled may continue to run some of their services. So, the adb method to uninstall system apps is a more reliable option. Here’s how to do it.
Use ADB to uninstall system apps on Android phones
The commands included in the following steps should be universal. So, the method will work on any Android device irrespective of the manufacturer. You can follow the steps for Samsung Galaxy, Nokia, OnePlus, Huawei, LG, OPPO, and others.
Time needed: 10 minutes.
The following steps will help you in uninstalling a system or non-system app from the current user.
- Enable Developer options on the phone
Go to Settings > About phone on your Android phone. Then tap 7 times consecutively on “Build number” to enable Developer Options.
The location of the build number may vary slightly based on the device, Android version, and Android skin. For example on Huawei phones on EMUI 9, you will need to go to Settings > System > About phone.
Enable USB Debugging
Now you need to go to Developer Options and enable “USB Debugging”. USB Debugging allows you to use ADB (Android Debug Bridge) commands.
Go to Settings > System > Advanced > Developer Options. Then enable the switch for “USB Debugging”.
Download Platform Tools
Download the platform-tools (ADB and fastboot) on your Windows PC. You can skip this part if using a Linux computer or a Mac.
Find the package name of the app to uninstall
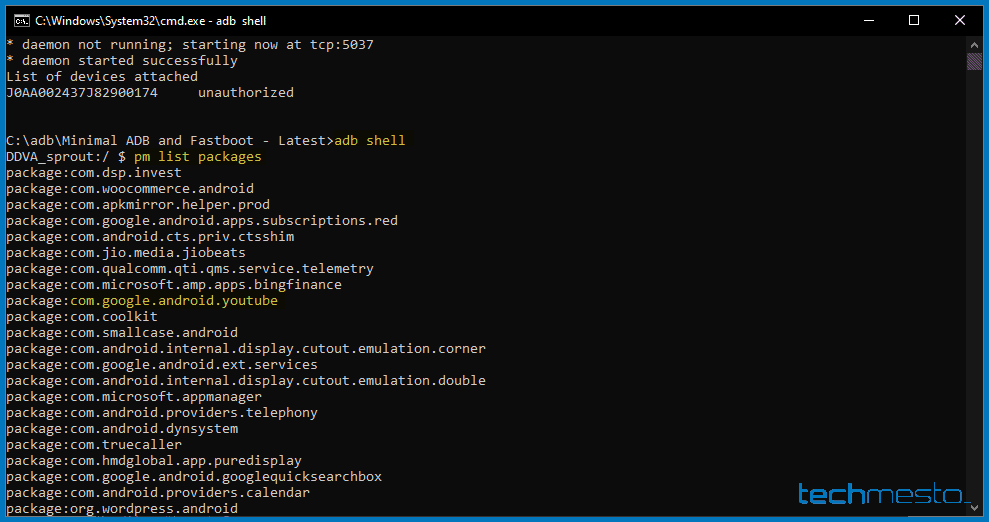
Open a command window or Terminal in your platform-tools folder. Then run the following set of commands to get a list of the package names of the apps currently installed on your phone.
adb shell – to open an ADB shell
pm list packages – to list all of the currently installed packages
Copy the package name of the app which you want to uninstall and then proceed further. If you are unable to find out the actual app name from the package name, then you can use the Android app “Package Name Viewer” on your phone to find out the package name of any installed app.
Uninstall the app(s)
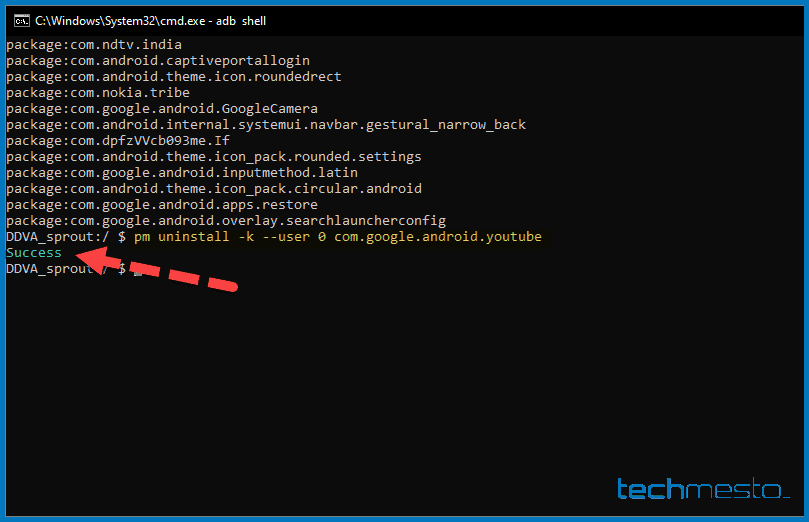
Finally, run the following command within the adb shell to uninstall the app. Remember to replace the package-name with the package name discovered by you in Step 4.
pm uninstall -k —user 0 package name
For example, if you want to remove the YouTube app (as in the above screenshot), run the following command:
pm uninstall -k —user 0 com.google.android.youtube
You will get a confirmation of a successful uninstall in the form of a “Success” response.
Re-install a previously removed app using ADB
You can re-install any of the removed application(s) easily as long as you remember the package name(s) of that application. Simply run the following command(s).
pm install-existing package-name
For example, to install the YouTube app, you just need to run:
pm install-existing com.google.android.youtube

So, that’s all you need to do to uninstall or re-install a system app. In case the app is a not a system app, then the package will be fully removed. In such a case you cannot use the install-existing command to install it since the package will no longer exist on the disk.
Источник
Top 9 things to do after setting up your Android phone
 Source: Ara Wagoner / Android Central
Setting up a new Android phone is like setting up a new apartment: there’s a lot to do and it can be easy to forget a few things along the way. Here at Android Central, we set up a lot of new phones during our device reviews — and, of course, as we play live-in tech support to our families and friends — and so we’re here to help remind you of some of the smaller tasks to do after your get all your apps downloaded and your Google account logged in on the new device. These are the top things to do with your new Android phone, but that doesn’t mean you have to do them all at once.
A new device is a chance for a new start, which makes it the best time for you to get into some better habits concerning your apps and Android use. Grab a nice soothing beverage, sit down in a comfy chair, and let’s unpack your Android experience.
Check your Do Not Disturb rules

Always forgetting to silence your phone before school or your weekly staff meetings? Or to turn the volume back up once it’s over? Do Not Disturb’s Automatic rules were made for you! DND’s automatic rules are one of Android’s hidden gems, allowing you to avoid distractions or noisy notifications during important times.
You can set more specific rules for what Do Not Disturb does and doesn’t let through in the Exceptions section. You can also set whether notification sound/vibration/icons/dots are suppressed during Do Not Disturb in the Behavior section.
How to add a Do Not Disturb rule to most Android phones
- Pull down the notification shade by swiping down from the top edge of the screen.
- Swipe down from the top edge of the screen again to open the Quick Settings.
By default, Do Not Disturb is usually placed somewhere on the first page of your Quick Settings toggles. Press and hold the Do Not Disturb toggle until the Do Not Disturb menu appears.
 Source: Android Central
Some devices can set DND rules to fire during certain events, but all can set DND rules to fire at specific times. Tap Time to create a time-based rule.
Source: Android Central
Once you have the desired days sat, tap Done.
Source: Android Central
Tap OK.
Source: Android Central
Tap the back arrow in the top left corner to exit the submenu and save the rule.
Source: Android Central
As with most system menus, the Do Not Disturb menu can look a little different depending on your exact phone and software, but the only manufacturer that made things drastically different concerning DND is Samsung. Samsung’s Do Not Disturb menu is the most sparse and the most limited, as you’re limited to one automatic rule — most phones allow several DND rules — and you cannot set a default or timed duration when toggling on DND outside the automatic rule.
Set your default apps
Source: Android Central
When you get a new Android phone, you’re going to see a lot of «Open with» app selection prompts while you’re going about tasks for the first time and settling into your various apps. These prompts are annoying, but necessary if you haven’t chosen a default app for a task yet. Of course, if you set the default apps all at once in the Settings app, you can skip all those pesky pop-ups in the weeks to come.
How to set your default apps
- Open the Settings app.
- Tap Apps or Apps & notifications (the name may vary by phone).
Tap Default apps. If you do not see the Default apps option on your screen, you may need to reveal it one of the following ways:
- (Samsung devices) Tap the three-dot menu icon in the top right corner of the screen.
(Google Pixel devices) Scroll down and tap Advanced to expand the Apps menu.
Source: Android Central
Repeat steps 4-6 as desired with the app types listed.
Source: Android Central
At the bottom of the default apps list is an Opening links submenu. This submenu can be used to clear the defaults you accidentally set the wrong app to open a certain type of link, like Samsung Browser opening YouTube links instead of YouTube. You shouldn’t need to mess with anything in here, but it’s good to know where it is in case you ever do.
Apply a new system theme
Once upon a time, Android was dark, beautiful place, a dangerous place where bugs and app crashes lurked in the shadows of a charcoal-and-blue Holo UI. Then Material Design came and replaced everything with white. Clean, clear, cruelly-blinding-at-2-AM white.
Source: Ara Wagoner / Android Central
While Google itself struggled for years to get a dark theme right before they brought it back to Android 10, manufacturers like Samsung and OnePlus have implemented their own theming systems to give users back control over the appearance of the Android system. If you own a phone with a theming system available, you should give it a once-over to see if you find a theme you like more than the bright, bland default.
System themes aren’t really standardized yet, and so they appear in different places:
- If your phone is running Android 10, you can apply the new Dark theme to automatically swap supported apps and system menus to a more soothing dark theme. It’s not on many devices yet, but hopefully it’ll be rolling out to more models before too long.
- On Samsung phones, a separate Samsung Themes app controls device themes, Always On Display faces, fonts, icon packs, and wallpapers. If you don’t see Samsung Themes in your app drawer, you can access it from the Wallpaper and themes option in the main Settings menu. A great and growing number of Samsung Themes are paid, but there are still worthwhile free themes, too.
- For OnePlus, theme sits in the Display section of the Settings app, where you can set a light/dark theme, accent color, system font and wallpaper in the Customization section.
- If all else fails, tap the search bar at the top of your phone’s Settings app and type in «theme». If there are any theme settings, they should pop up quickly.
If you’re on a device that runs a more «vanilla» take on Android, you might not have any system theme to use, you’ll never know unless you go looking for it!
Check out your new phone’s gesture shortcuts and navigation options
Source: Ara Wagoner / Android Central
Gesture shortcuts, gesture navigation, and the appearance of the navigation bar have been seeing a lot of changes this last year — and not all of them are good — but they’re something you should really look at closely after you get through the initial setup. Phones can have multiple gesture nav styles, and it’s easier to test and try them out when you can use them with your most-used apps instead of being stuck on a single screen in the initial setup menu.
Like system themes, gestures tend to hide in different places on different phones, but if you open the Settings app and type «gesture», they should appear and tell you which menus they’re hiding in. Look through all of the gesture shortcuts/features your phone has, regardless of what which ones you think you’ll use. You can disable some or all of them if you want, but see what they all do first.
 Source: Android Central
Some of these gesture shortcuts can not only be quite useful in your day-to-day life — like the double-tap to wake the screen — but some can be important settings to remember in an emergency, like the OnePlus’s hidden panic button or the Google Pixel’s quick ringer shut-off. Horror movie cliches aside, you never know when you might need to silence your phone instantly or discreetly dial 9-1-1.
Retrain Google Assistant’s Voice Match and turn on OK Google to wake/unlock
Source: Android Central
While Google Assistant is now part of the initial setup process on many new phones, I also know that people tend to skip the Voice Match section. Whether your new phone just imported your previous voice model or you skipped it because you initially set up your phone in a noisy environment — like a busy carrier store — you should find a quiet room and retrain Voice Match on your new phone.
We can also take this time to ensure that saying «OK Google» will wake up your phone if the screen’s off and unlock your phone if it’s locked, two problems that pop up from new users in Android subreddits with impressive frequency.
How to retrain Google Assistant Voice Match
- Open the main Google app, one of the pre-installed apps on your phone.
- Tap More.
- Tap Settings.
Tap Google Assistant.
Source: Android Central
Tap retrain voice model.
Source: Android Central
Tap Finish.
Source: Android Central
With the voice model saved, we can now see if the settings needed for Google Assistant to wake and unlock your phone are enabled. If either toggle is grey, tap it to turn it blue.
- Access with Voice Match is the setting that will wake your phone if you say Ok Google with the screen off.
- Unlock with Voice Match is the setting that will unlock your phone when you say OK Google. When turning this setting on, you will be required to put in your password/PIN/fingerprint and acknowledge that Voice unlocking is less secure than a PIN or password because voices can sound similar.
Turn on automatic backups for Google Photos
Google Photos automatic photo backups are amazing and help us keep treasured memories of beloved family members and pets. While they may no longer be totally free, you should still turn on automatic backups right now so you don’t forget to do it later!
How to turn on Google Photos automatic backups
- Open the Google Photos app.
- Tap Allow to allow Google Photos to see and back up your photos and videos.
- The Backup & sync enrollment window will appear. By default, it is set to upload only on Wi-Fi at high-quality resolution — which will be more than enough for the vast majority of users and save space in your Google One storage. If you want to change either of these settings, tap Change settings.
- If you want to have photos upload at original quality, tap Original.
- If you want to upload photos for backup even when you’re on mobile data, tap Use cellular data to back up.
- Tap the back arrow in the top left corner.
Tap Confirm.
Source: Android Central
If you want to come back and change these settings later, we’ve got you covered.
Purge your app list
When you set up a new phone, by default Google Play allows you to install every app your old phone had from Google Play on your new phone. It can be a major pain to try and weed through this list during initial setup, but while we’re getting this phone squared away for years of future use, now is the time to do some spring cleaning in the app drawer.
Source: Ara Wagoner / Android Central
This may take a little time, and if you still have your old phone, go ahead and pull it out so you can go through the two phones side by side and use the following guidelines to help you weed out old or unneeded apps.
- When was the last time I used this app? Google Play Store’s My apps & games section can sort the Installed tab by Last Used. Open this view on your old phone and see when the last time you used an app was. If you haven’t used the app in the last six months and it isn’t a utility app like a Barcode Scanner, you can probably uninstall it.
- Do I still need this app for anything? We pick up apps for all sorts of reasons: trying new games or downloading an app for a specific event or activity like a cross-country move or a business conference or a vacation. If you no longer use a service or need the app for last year’s iKKiCON panel guide and map, you no longer need its app cluttering your phone.
- Do I have multiple apps that do the same thing? Redundancy for the most important apps on your phone makes sense, and really, you should have at least two keyboards, text messagers, and email apps in case a catastrophic bug renders your usual app inoperable, but you don’t need five weather apps installed unless you’re a storm chaser or an app reviewer.
Once you’ve trimmed town your apps, it’s time to set the ones you’re keeping where you want them on your home screen.
Set up your new home screen
First and foremost, your phone came with a default wallpaper set on it; do yourself a favor right now and go grab a new one. It’s one small step towards turning the bland default home screen into something more personal, and it can help your phone really feel like it’s yours.
Source: Android Central
I know that one of the most stressful things about moving to a new phone is often re-learning where all your stuff moved to, so let’s put your favorite apps exactly where we want them right now so we know where everything is. Before you start dragging and dropping apps between your app drawer, dock, and home screen though, let’s answer a few questions about your home screen and the pre-installed launcher that runs it first:
- Is the grid a good size for your new phone’s screen? Phones have ballooned in size over the last seven years, and yet the home screen grid on many default launchers is still only 4×5. If your new phone is a tall drink of awesome, wouldn’t you benefit from a home screen grid with more room for apps and widgets?
- Do you like the way your app shortcuts look? Pre-installed apps can have quite different icons even between different generation devices from the same manufacturer. If you’re not a fan of the way the app shortcuts look on your new phone — maybe the icons are too small, maybe they look too similar to other apps you use, maybe the labels are hard to read — would you like to replace them with something that looks better?
- Does the app drawer arrange apps the way you want? Most Android launchers use A-Z sorting, but Samsung’s Custom sorting and several pre-made folders turn your app drawer into something of a treasure hunt. Do the app drawer’s sorting and layout make sense to you? Can you find any app in 5 seconds or less?
- Can you get this launcher set up to your liking? While launchers from manufacturers are getting more flexible, there’s still a lot of things on them you simply can’t change. If your new phone’s launcher doesn’t have a feature you’re used to, or has an unchangeable feature you don’t like, it may be time to consider alternatives.
Quickdrawer on Action Launcher (left), automatic app arrangement on Smart Launcher 5 (right) Source: Android Central
If the answer to any of these questions is heck no, consider switching to a different launcher. It’s easy to install one of the best Android launchers from Google Play that will allow you to increase the size of the app grid, change the size and labels for your app shortcuts, apply icon packs that make your apps look more familiar — or at least more consistent — and allow you to get your app drawer and launcher settings exactly the way you want them.
If hassling with all of this is something you’d prefer to avoid on your next phone, that’s just another reason to go third-party! Almost all third-party launchers have robust backup and restore functions that will make it easy to set things back up on whatever phone you buy after this one.
Getting your launcher arranged just the way you want might feel like frivolous window-dressing, but it can alleviate a great deal of tension as you figure out settings and features on your new phone, and it also helps establish a sense of ownership.
After all, this isn’t just another Android phone; this is your phone.
Set custom ringtones and text tones for your favorite contacts
Source: Android Central
The sounds that your phone make are important; they’re the aspect of your phone that everyone around you will know, laugh at, and possibly hate. If you like the ringtones and text tones that came with your phone, that’s fine, but if you’d rather get something with a little more life and personality to you, there are a multitude of ways to add custom sounds to your phone, and they’re getting easier all the time.
No matter how awesome your ringtone, having the same one go off anytime anyone calls you ever can get old faster than ever as telemarketers and spam robocalls reach new, infuriating levels. We can keep a single ringtone from wearing out its welcome and increase your ringtone’s functionality by setting contact-specific ringtones.
By giving each of your most-used contacts a special ringtone, you can tell who is calling without having to scramble across the room and grab your phone off the charger. This is useful at all times but especially during work hours, when answering personal calls can earn you a reprimand but missing a client call could lose your commission.
How to set a contact-specific ringtone
- Open Google’s Contacts app, which comes pre-installed on most Android phones. If you have two Contacts app shortcuts in your app drawer that look identical, follow the Google Play link listed in the previous sentence to the app listing.
- Tap the contact you wish to assign to a contact.
Tap the three-dot menu icon in the top right corner of the contact page.
Source: Android Central
Tap OK.
Source: Android Central
Setting a custom notification tone when your closest contacts reply to your conversation can be just as useful as contact-specific ringtones or even more so, depending on how frequently your friends text you. While custom contact/conversation text tones are finally starting to really conform to a standard method, there’s still just enough variation that you’ll want to check out our detailed how-to, which takes you through the steps on each of the major SMS apps.
Feeling more at home in your new phone yet?
Source: Ara Wagoner / Android Central
It’ll take time to settle in on your new phone, but with these basics covered, you should be able to finish unpacking the rest of your apps in short order and get back to the joys of exploring your beautiful new Android.
Protect your new phone with some new accessories
A new phone needs protecting, and as I’ve frequently said «No matter your taste, your phone needs a case!» Considering most phones these days aren’t shipping with 3.5mm jacks, now is also a great time to invest in new headphones and some extra storage for your phone.
We may earn a commission for purchases using our links. Learn more.
![]()
Samsung needs to bring back its iPod competitor
I don’t want to buy an iPod Touch. Since I want a reasonably priced PMP with acceptable audio hardware that can install a few crucial apps, I might have to.
![]()
VoLTE: How to use it and why you should care
VoLTE — or Voice over LTE — is the new standard for calling throughout the U.S., Canada, and parts of Europe. Not only does it facilitate much higher call quality between cell phones, but it allows devices to stay connected to LTE while on a call, improving data speeds for everyone.
![]()
PlayStation reportedly planning service to compete with Xbox Game Pass
Sony is planning to create a service similar to Xbox Game Pass, according to a new report. The service could launch as early as sometime in the spring of 2022, with multiple tiers.
![]()
The best smart locks that support Google Home and Assistant in 2021
Smart locks are great tools for keeping your home safe, and if you’ve got a Google Assistant speaker, these can be controlled by just using your voice.
Источник


