- Как реализовать тёмную тему в Android-приложении?
- Теперь давайте начнём
- Переходим к коду
- Проверка текущей темы системы
- Ещё немного настроек
- How to Implement Dark Mode in Android
- Introduction
- Prerequisites
- Creating the project
- Creating the attrs.xml file
- Modifying the style.xml file
- Creating the UI
- Checking state and handling click events
- Conclusion
- About the author
- Want to learn more about the EngEd Program?
- How to implement a dark theme on Android
- 1. Declare dependencies
- 2. Inherit from a DayNight theme
- 3. Use theme attributes for colors
- 4. Allow users to change the app’s theme
- 5. Run your app
- Sample
- Styles and Themes
- Themes versus Styles
- Create and apply a style
- Extend and customize a style
- Apply a style as a theme
- Style hierarchy
- TextAppearance
- Customize the default theme
- Add version-specific styles
- Customize widget styles
- Additional resources
- Blog posts
Как реализовать тёмную тему в Android-приложении?

С тех пор, как в Android Pie (9.0) появилась тёмная тема, многие популярные приложения с радостью начали использовать эту функцию. И мы тоже. Учитывая, что нам нравится пробовать новые вещи, мы решили попробовать и внедрить эту функцию в одно из наших приложений.
Я максимально просто опишу процесс реализации тёмной темы приложения с использованием библиотеки AppCompat из AndroidX.
Прежде чем мы начнём, вот вам совет: если вы работаете над какими-либо новыми проектами, то настоятельно рекомендуется использовать библиотеки из AndroidX. Кроме того, вам следует рассмотреть возможность переноса существующих проектов на AndroidX.
Теперь давайте начнём
Сначала импортируйте последнюю версию AppCompat из AndroidX:
В этой версии AppCompat будут все новые обновления и исправленные ошибки, связанные с тёмной темой.
Затем измените тему своего приложения на Theme.AppCompat.DayNight :
Переходим к коду
Измените текущую тему во время запуска приложения (рекомендуется делать это в классе Application приложения). Начиная с версии 1.1.0-aplha05 этот метод будет применять эти изменения к любой запущенной activity. Изменения также будут сохраняться при всех изменениях конфигурации, поэтому не нужно вызывать метод recreate() .
Вот четыре режима, которые мы используем в нашем приложении для выбора темы:
- MODE_NIGHT_NO — устанавливает светлую тему.
- MODE_NIGHT_YES — устанавливает тёмную тему.
- MODE_NIGHT_AUTO_BATTERY — переключается на тёмную тему, если на устройстве включена функция экономии заряда батареи. Этот режим доступен с версии 1.1.0-alpha03 .
- MODE_NIGHT_FOLLOW_SYSTEM — использует системную тему.
- MODE_NIGHT_AUTO_TIME и MODE_NIGHT_AUTO — устанавливает тему в зависимости от времени устройства. Этот режим устарел с версии 1.1.0-alpha03 , поэтому мы не используем его в нашем приложении.
Внутри приложения есть RadioGroup для переключения между различными темами:
Вот как это выглядит на устройстве:
Не забывайте, что функциональность тёмной темы поддерживается только с версии Android Pie (9.0), поэтому вам нужно предусмотреть поведение для предыдущих версий Android:
Проверка текущей темы системы
Фрагмент из нашего приложения:
Обратите внимание, что конфигурация возвращается только при наличии ночной или дневной темы (или если вообще ничего не определено), но мы не знаем, установлена ли она системой, батареей или вручную. Поэтому мы используем shared preferences, чтобы сохранить выбранную тему и установить соответствующий флажок. Вот полный код:
Когда приложение запускается в первый раз, в shared preferences будет неопределённое состояние. В этом случае мы проверим, есть ли у нас тема из конфигурации. Если нет, мы будем использовать светлую тему по умолчанию.
Ещё немного настроек
Если вы хотите использовать пользовательские цвета для тёмной/светлой темы (например, тёмно-синий для тёмной и светло-синий для светлой), то создайте папку values-night и переопределите файл цветов. Также можно переопределить styles.xml и использовать пользовательские атрибуты. Таким образом, приложение всегда будет использовать цвета из values-night , когда включена тёмная тема, и наоборот. Вы также можете подготовить альтернативные ресурсы для тёмной темы. Например, в drawable-night .
Весь исходный код ищите здесь.
Источник
How to Implement Dark Mode in Android
January 29, 2021
In the recent past, there has been a lot of excitement regarding dark mode. Users can change the entire look and feel of their application with a click of a button. Numerous developers and huge companies such as Google, Facebook, and Twitter have already implemented this feature in their applications.
Introduction
The dark mode feature does not need any significant explanation. It’s highly likely that you have already used dark mode on your phone or computer at one point. So, we can simply define dark mode as a setting that changes the overall color of your application to black. The dark mode is supported by both mobile and web applications.
Many applications on the Google Play Store are already equipped with this feature. There are even rumors that enabling dark mode helps prolong battery life. Furthermore, it improves the visual appeal of the app, especially for those users with eye problems.
To incorporate the dark mode feature into an Android Application using Kotlin.
Prerequisites
This tutorial is suitable for intermediate learners. Therefore, you must be familiar with the Kotlin programming language, as well as the file or project structure in Android studio.
When it comes to programs, you will need Android Studio installed on your computer. Having a physical Android device is also recommended. This is because we will test the application on our phones.
Creating the project
Open Android Studio and create a new project. You can give it any name. In my case, the project is called darkmode . Then, select an Empty Activity and proceed to the next screen.
In this window, ensure that you set the minimum SDK as API 21 OR Lollipop. You can then click finish and wait for the project to be set up. This usually takes a few minutes depending on your internet connection. Note: That we do not need to install any other dependencies for this tutorial.
Creating the attrs.xml file
We need to declare our color attributes in an attrs.xml file. We will later access our settings from this file rather than the default colors.xml . In the res/values folder, create a new resource file and name it attrs.xml . Add the following code in this file.
Here allows us to add the style attributes of our app. As shown in the code snippet, the app will have elements such as background_color , text_color , and button_color . Ensure that all of these attributes have the color format.
Modifying the style.xml file
We need to add our light and dark themes in the styles.xml .
When you open this file, you will realize that there is a pre-existing style named AppTheme . This will serve as our light theme. We then add the dark theme style below the AppTheme . The next step is to incorporate the elements in the attrs.xml file in both themes. This is shown below.
Kindly note that the dark theme should already have all the elements described in the light theme but with different colors.
Creating the UI
In this tutorial, our app will have a simple user interface. The UI will include a switch and a textview. To get started, open the activity_main.xml . Change the layout from ConstraintLayout to LinearLayout .
Remember to set the orientation as vertical. Next, add a Switch and TextView widgets and position them at the center of the page. Finally, include an id to the Switch widget.
Here is the full code for the activity_main.xml .
Remember to set the color of the UI components. As noted, we will access our colors via the attrs.xml file we created earlier. We, therefore, use «?attr/text_color» to set color to our widgets. Your application will not work if you ignore this crucial aspect.
Checking state and handling click events
Whenever our app starts, we need to check which theme is enabled by default. We do this by using the AppCompatDelegate class. Here is the code snippet to check the app’s theme.
Please note that you should include the code snippet above immediately after the onCreate function or before the activity_main.xml layout is initialized.
Next, we need to handle the click events for our Switch. Remember, we had assigned this component with the id of switchtheme . We, therefore, use this id to listen for changes as shown below.
The isChecked is a Boolean variable. When is isChecked is true, it means that we need to enable the dark theme. This is done using the below code snippet.
We set the default light theme as shown below.
Here is the code for the MainActivity.kt .
If you have followed the above steps properly, your app should now have a dark mode. The following gif shows the dark mode in action.
 .
.
Conclusion
Dark mode is indeed a fun thing to implement in our mobile applications. I hope that this tutorial has equipped you with the required skills and knowledge to work on dark themes. In case you haven’t understood anything, feel free to revisit the above steps.
Peer Review Contributions by: Peter Kayere
About the author
A lover of technology. An upright individual not afraid of getting out of the comfort zone and trying out new things.
Want to learn more about the EngEd Program?
Discover Section’s community-generated pool of resources from the next generation of engineers.
Источник
How to implement a dark theme on Android

Android 10 adds a system-wide dark theme, which preserves battery power for devices with OLED screens, reduces eye strain, and facilitates use in low-light environments.
These guidelines will show you how to implement a dark theme on Android, even on earlier versions of the platform.
1. Declare dependencies
Add the following dependencies to your project:
2. Inherit from a DayNight theme
The easiest way to support a dark theme is to inherit from a DayNight theme such as Theme.AppCompat.DayNight .
Basically, a DayNight theme is composed of a Light theme in the values directory and a Dark theme in the values-night directory.
For example, declare a Theme.MaterialComponents.DayNight.NoActionBar.Bridge :
And then, declare your AppTheme :
3. Use theme attributes for colors
When writing your layouts, use theme attributes or night-qualified resources instead of hard-coded colors to ensure that they display suitable colors in a Light theme and in a Dark theme.
For example, when you use a FloatingActionButton , the default backgroundTint is ?attr/colorAccent so the tint should be ?android:attr/textColorPrimaryInverse to ensure that the contrast ratio between the icon and its background is eligible:
In a Light theme, it will display a #ffffffff icon on a #ff009688 background.

In a Dark theme, it will display a #de000000 icon on a #ff80cbc4 background.

4. Allow users to change the app’s theme
Your app should let the user switch between themes, which map directly to one of the following modes:
Use AppCompatDelegate.setDefaultNightMode to switch the theme for all components in your app. Please note that it is not saved when the app is killed so you should use Settings to save the user’s choice.
For example, use the following code in your Activity to change the night mode:
And then, use the following code in your Application to restore the night mode:
5. Run your app
That’s it, you are ready to run your app and enjoy a dark theme!
Sample
For a complete example, check out my sample on GitHub.
Источник
Styles and Themes
Styles and themes on Android allow you to separate the details of your app design from the UI structure and behavior, similar to stylesheets in web design.
A style is a collection of attributes that specify the appearance for a single View . A style can specify attributes such as font color, font size, background color, and much more.
A theme is a collection of attributes that’s applied to an entire app, activity, or view hierarchy—not just an individual view. When you apply a theme, every view in the app or activity applies each of the theme’s attributes that it supports. Themes can also apply styles to non-view elements, such as the status bar and window background.
Styles and themes are declared in a style resource file in res/values/ , usually named styles.xml .

Figure 1. Two themes applied to the same activity: Theme.AppCompat (left) and Theme.AppCompat.Light (right)
Themes versus Styles
Themes and styles have many similarities, but they are used for different purposes. Themes and styles have the same basic structure—a key-value pair which maps attributes to resources.
A specifies attributes for a particular type of view. For example, one style might specify a button’s attributes. Every attribute you specify in a style is an attribute you could set in the layout file. By extracting all the attributes to a style, it’s easy to use and maintain them across multiple widgets.
A defines a collection of named resources which can be referenced by styles, layouts, widgets, and so on. Themes assign semantic names, like colorPrimary , to Android resources.
Styles and themes are meant to work together. For example, you might have a style that specifies that one part of a button should be colorPrimary , and another part should be colorSecondary . The actual definitions of those colors is provided in the theme. When the device goes into night mode, your app can switch from its «light» theme to its «dark» theme, changing the values for all those resource names. You don’t need to change the styles, since the styles are using the semantic names and not specific color definitions.
For more information about how themes and styles work together, see the blog post Android Styling: Themes vs Styles.
Create and apply a style
To create a new style or theme, open your project’s res/values/styles.xml file. For each style you want to create, follow these steps:
You can apply the style to a view as follows:
Each attribute specified in the style is applied to that view if the view accepts it. The view simply ignores any attributes that it does not accept.
Note: Only the element to which you add the style attribute receives those style attributes—any child views do not apply the styles. If you want child views to inherit styles, instead apply the style with the android:theme attribute.
However, instead of applying a style to individual views, you’ll usually apply styles as a theme for your entire app, activity, or collection of views.
Extend and customize a style
When creating your own styles, you should always extend an existing style from the framework or support library so that you maintain compatibility with platform UI styles. To extend a style, specify the style you want to extend with the parent attribute. You can then override the inherited style attributes and add new ones.
For example, you can inherit the Android platform’s default text appearance and modify it as follows:
However, you should always inherit your core app styles from the Android Support Library. The styles in the support library provide compatibility with Android 4.0 (API level 14) and higher by optimizing each style for the UI attributes available in each version. The support library styles often have a name similar to the style from the platform, but with AppCompat included.
To inherit styles from a library or your own project, declare the parent style name without the @android:style/ part shown above. For example, the following example inherits text appearance styles from the support library:
You can also inherit styles (except those from the platform) by extending a style’s name with a dot notation, instead of using the parent attribute. That is, prefix the name of your style with the name of the style you want to inherit, separated by a period. You should usually do this only when extending your own styles, not styles from other libraries. For example, the following style inherits all styles from the GreenText style above and then increases the text size:
You can continue inheriting styles like this as many times as you’d like by chaining on more names.
Note: If you use the dot notation to extend a style, and you also include the parent attribute, then the parent styles override any styles inheritted through the dot notation.
To find which attributes you can declare with an tag, refer to the «XML attributes» table in the various class references. All views support XML attributes from the base View class, and many views add their own special attributes. For example, the TextView XML attributes includes the android:inputType attribute that you can apply to a text view that receives input, such as an EditText widget.
Apply a style as a theme
You can create a theme the same way you create styles. The difference is how you apply it: instead of applying a style with the style attribute on a view, you apply a theme with the android:theme attribute on either the tag or an tag in the AndroidManifest.xml file.
For example, here’s how to apply the Android Support Library’s material design «dark» theme to the whole app:
And here’s how to apply the «light» theme to just one activity:
Now every view in the app or activity applies the styles defined in the given theme. If a view supports only some of the attributes declared in the style, then it applies only those attributes and ignores the ones it does not support.
Beginning with Android 5.0 (API level 21) and Android Support Library v22.1, you can also specify the android:theme attribute to a view in your layout file. This modifies the theme for that view and any child views, which is useful for altering theme color palettes in a specific portion of your interface.
The previous examples show how to apply a theme such as Theme.AppCompat that’s supplied by the Android Support Library. But you’ll usually want to customize the theme to fit your app’s brand. The best way to do so is to extend these styles from the support library and override some of the attributes, as described in the next section.
Style hierarchy
Android provides a variety of ways to set attributes throughout your Android app. For example, you can set attributes directly in a layout, you can apply a style to a view, you can apply a theme to a layout, and you can even set attributes programmatically.
When choosing how to style your app, be mindful of Android’s style hierarchy. In general, you should use themes and styles as much as possible for consistency. If you’ve specified the same attributes in multiple places, the list below determines which attributes are ultimately applied. The list is ordered from highest precedence to lowest:
- Applying character- or paragraph-level styling via text spans to TextView -derived classes
- Applying attributes programmatically
- Applying individual attributes directly to a View
- Applying a style to a View
- Default styling
- Applying a theme to a collection of Views, an activity, or your entire app
- Applying certain View-specific styling, such as setting a TextAppearance on a TextView
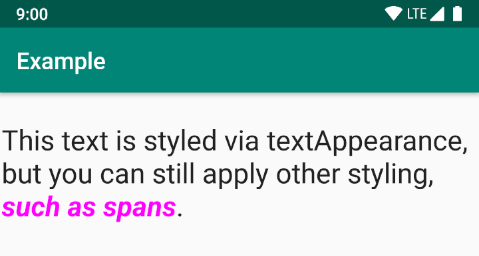
Figure 2. Styling from a span overrides styling from a textAppearance .
If you’re trying to style your app and not seeing the results you expect, it’s likely that other styling is overriding your changes. For example, if you apply a theme to your app, along with a style to an individual View , the style attributes would override any matching theme attributes for that View . Note, however, that any theme attributes that aren’t overridden by the style are still used.
TextAppearance
One limitation with styles is that you can apply only one style to a View . In a TextView , however, you can also specify a TextAppearance attribute which functions similarly to a style, as shown in the following example:
TextAppearance allows you to define text-specific styling while leaving a View ’s style available for other uses. Note, however, that if you define any text attributes directly on the View or in a style, those values would override the TextAppearance values.
TextAppearance supports a subset of styling attributes that TextView offers. For the full attribute list, see TextAppearance .
Some common TextView attributes not included are lineHeight[Multiplier|Extra] , lines , breakStrategy , and hyphenationFrequency . TextAppearance works at the character level and not the paragraph level, so attributes that affect the entire layout are not supported.
Customize the default theme
When you create a project with Android Studio, it applies a material design theme to your app by default, as defined in your project’s styles.xml file. This AppTheme style extends a theme from the support library and includes overrides for color attributes that are used by key UI elements, such as the app bar and the floating action button (if used). So you can quickly customize your app’s color design by updating the provided colors.
For example, your styles.xml file should look similar to this:
Notice that the style values are actually references to other color resources, defined in the project’s res/values/colors.xml file. So that’s the file you should edit to change the colors. But before you start changing these colors, preview your colors with the Material Color Tool. This tool helps you pick colors from the material palette and preview how they’ll look in an app.
Once you know your colors, update the values in res/values/colors.xml :
And then you can override whatever other styles you want. For example, you can change the activity background color as follows:
For a list of attributes you can use in your theme, see the table of attributes at R.styleable.Theme . And when adding styles for the views in your layout, you can also find attributes by looking at the «XML attributes» table in the view class references. For example, all views support XML attributes from the base View class.
Most attributes are applied to specific types of views, and some apply to all views. However, some theme attributes listed at R.styleable.Theme apply to the activity window, not the views in the layout. For example, windowBackground changes the window background and windowEnterTransition defines a transition animation to use when the activity starts (for details, see Start an Activity with an Animation).
The Android Support Library also provides other attributes you can use to customize your theme extended from Theme.AppCompat (such as the colorPrimary attribute shown above). These are best viewed in the library’s attrs.xml file
Note: Attribute names from the support library do not use the android: prefix. That’s used only for attributes from the Android framework.
There are also different themes available from the support library that you might want to extend instead of the ones shown above. The best place to see the available themes is the library’s themes.xml file.
Add version-specific styles
If a new version of Android adds theme attributes that you want to use, you can add them to your theme while still being compatible with old versions. All you need is another styles.xml file saved in a values directory that includes the resource version qualifier. For example:
Because the styles in the values/styles.xml file are available for all versions, your themes in values-v21/styles.xml can inherit them. As such, you can avoid duplicating styles by beginning with a «base» theme and then extending it in your version-specific styles.
For example, to declare window transitions for Android 5.0 (API level 21) and higher, you need to use some new attributes. So your base theme in res/values/styles.xml could look like this:
Now you can apply AppTheme in your manifest file and the system selects the styles available for each system version.
For more information about using alternative resources for different devices, read Providing Resources.
Customize widget styles
Every widget in the framework and support library has a default style. For example, when you style your app using a theme from the support library, an instance of Button is styled using the Widget.AppCompat.Button style. If you’d like to apply a different widget style to a button, then you can do so with the style attribute in your layout file. For example, the following applies the library’s borderless button style:
And if you want to apply this style to all buttons, you can declare it in your theme’s buttonStyle as follows:
You can also extend widget styles, just like extending any other style, and then apply your custom widget style in your layout or in your theme.
Additional resources
To learn more about themes and styles, see the following additional resources:
Blog posts
Content and code samples on this page are subject to the licenses described in the Content License. Java is a registered trademark of Oracle and/or its affiliates.
Источник


