- One response to андроид
- Какую библиотеку работы с HTTP в Android выбрать?
- Для чего это вообще?
- Немного истории
- MVVM with Kotlin Coroutines and Retrofit [Example]
- Suspend Function
- Launch and Async
- Coroutine Scope
- Coroutines in your Android Project
- Making it work with Retrofit?
- Declaring our interface.
- Building Retrofit Service
- ViewModel with Coroutines
- Coroutines and LiveData
- Exception Handling in Kotlin Coroutines
- Kotlin Coroutines With Retrofit Example
- Required Dependencies
One response to андроид
Creating Custom Response Handler for Retrofit in Android
In this article we are going to discuss about the need to handle custom responses using retrofit2 in Android, and how to do it efficiently.
Sometimes when we are integrating web APIs into our Android Application, we come across systems which provide us with responses in their own custom object form. Where a variable such as “ code” or “ status” tells us about whether the response is accurate or not.
An example of this is as follow :
As you can see the “ code” variable tells us that the response is either success, or failure. Since we are receiving response the HTTP status code would be 200. which means we can’t use Interceptors to handle our response.
For this we will implement a custom Callback Class, which will handle our response codes and use this class in place of the default retrofit callback. This will allow us to only handle the success response separately and save us a’lot of time and the unnecessary overhead of handling the onFailure() method for every Request separately.
First of all we will create a data class which will map this response:
now, we we will override the Callback class from the retrofit library and supply our data class to map the responses on, and override the onResponse() and onFailure() method.
lets also write our handling of on failure as it only needs to have one implementation in this class. Here I have simply logged whatever message we will receive as an exception, you can write any custom explanation.
lets, move on to writing the implementation of onResponse() method where we will handle our custom responses and only leave the code “0000” response to be handled by the implementing Class.
You can handle all the response codes here leaving out the code such as “0000” which will require different type of handling respective to the request call.
now, lets move on to the usage of this class and how we can use it in place of the Callback class. lets assume you have a API request that takes in some parameters and then use the en queue method to handle the response.
ApiUtils is class which creates a retrofit object which we will use to call our request named as ApiCall , which is a GET call and takes in two parameters named as params1 and params2.
as you can see this can be very advantageous to us, as we don’t need to handle the onFailure() and repeated responses again and again , but only need to handle the success response code for our API request.
now what if you want to show some sort of progress dialog on every request call, we can simply add “context” as a parameter to the object of our custom class and use it to show the progress dialog. lets make some changes to our class constructor implementation. create a method to hide the progress dialog as well, and we can use this method in both of onResponse() and onFailure() method.
Now lets combine all things together and make it work.
Источник
Какую библиотеку работы с HTTP в Android выбрать?
Представляю вашему вниманию перевод статьи «Which Android HTTP library to use?».
Для чего это вообще?
Немного истории
До Froyo HttpURLConnection имел некоторые не очень приятные баги. В частности, вызов close() у читаемого InputStream мог испортить пул соединений.
… большой размер их API мешает нам улучшать эту библиотеку без потери обратной совместимости. Команда Android не работает активно над Apache HTTP Client.
Apache HTTP client имеет мало багов на Eclair и Froyo, поэтому он является лучшим выбором для этих версий. А для Gingerbread и младше лучше подходит HttpURLConnection. Простота API и небольшой вес хорошо подходят для Android. Прозрачное сжатие и кэширование ответов помогают увеличить скорость и сохранить батарею. Новые приложения должны использовать HttpURLConnection.
Даже сегодня, если вы загляните в исходники Volley от Google (о ней я расскажу чуть попозже), вы сможете найти такое наследие:
Это классический пример фрагментации Android, которая заставляет страдать разработчиков. В 2013 году Square обратила внимание на эту проблему, когда выпускала OkHttp. OkHttp была создана для прямой работы с верхним уровнем сокетов Java, при этом не используя какие-либо дополнительные зависимости. Она поставляется в виде JAR-файла, так что разработчики могут использовать ее на любых устройствах с JVM (куда мы включаем, конечно, и Android). Для упрощения перехода на их библиотеку, Square имплементировали OkHttp используя интерфейсы HttpUrlConnection и Apache client.

OkHttp получила большое распространение и поддержку сообществом, и, в конце-концов, Google решили использовать версию 1.5 в Android 4.4 (KitKat). В июле 2015 Google официально признала AndroidHttpClient, основанный на Apache, устаревшим, вместе с выходом Android 5.1 (Lolipop).
Сегодня OkHttp поставляется со следующим огромным набором функций:
- Поддержка HTTP/2 и SPDY позволяет всем запросам, идущим к одному хосту, делиться сокетом
- Объединение запросов уменьшает время ожидания (если SPDY не доступен)
- Прозрачный GZIP позволяет уменьшить вес загружаемой информации
- Кэширование ответов позволяет избежать работу с сетью при повторных запросах.
- Поддержка как и синхронизированных блокирующих вызовов, так и асинхронных вызовов с обратным вызовом (callback)
Моя самая любимая часть OkHttp – как красиво и аккуратно можно работать с асинхронными запросами:
Это очень удобно, так как работа с сетью не должна быть в UI потоке. По-факту, начиная с Android 3.0 (Honeycomb, API 11), работа с сетью в отдельном потоке стала обязательной. Для того, чтобы воплотить что-то похожее с HtttpUrlConnection, вам потребуется построить большую (а может и монструозную) конструкцию с использованием AsyncTask или отдельного потока. Это будет еще более сложным, если вы захотите добавить отмену загрузки, объединение соединений и т.п.
Кстати, не осталась у обочины и HTTP библиотека от Google под названием Volley, которая предоставляет нам следующие бонусы:
- Автоматическое планирование сетевых запросов
- Множество параллельных сетевых соединений
- Прозрачное кэширование в памяти и на диске, в соответствии со стандартной кэш-согласованностью.
- Поддержка приоритизации запросов.
- Отмена API запросов. Вы можете отменить как один запрос, так и целый блок.
- Простота настройки, например, для повторов и отсрочек.
- Строгая очередность, которая делает легким корректное заполнение данными, полученными асинхронно из сети, интерфейса пользователя.
- Инструменты отладки и трассировки
Все, что ни есть в Volley, находится на вершине HttpUrlConnection. Если вы хотите получить JSON или изображение, то Volley имеет на это специальный абстракции, такие как ImageRequest и JsonObjectRequest, которые помогают вам в автоматическом режиме конвертировать полезную нагрузку HTTP. Так же достойно внимания то, что Volley использует жестко запрограммированный размер сетевого пула:
Когда OkHttp использует поток для каждого вызова с ThreadPoolExecutor с максимальным значением Integer.MAX_VALUE:
В результате, в большинстве случаев OkHttp будет действовать быстрее за счет использования бОльшего количества потоков. Если по каким-то причинам вы захотите использовать OkHttp вместе Volley, то есть реализация HttpStack, которая использует API запросов/ответов из OkHttp заместо HttpURLConnection.
HTTP клиенты продолжили развиваться для поддержки приложений с большим количеством картинок, особенно тех, кто поддерживает бесконечную прокрутку и трансформацию изображений. В то же время, REST API стал стандартом в индустрии, и каждый разработчик имел дело с такими типовыми задачами как сериализация в/из JSON и преобразование REST-вызовов в интерфейсы Java. Не прошло много времени, как появились библиотеки, решающие эти задачи:
- Retrofit – типобезопасный HTTP Android клиент для взаимодействия с REST-интерфейсами
- Picasso – мощная библиотека для загрузки и кэширования изображений под Android
Retrofit предоставляет некий мост между Java кодом и REST-интерфейсом. Он позволяет быстро включить в ваш проект HTTP API интерфейсы, и генерирует самодокументирующуюся реализацию.
В дополнение ко всему, Retrofit поддерживает конвертацию в JSON, XML, протокол буферов (protocol buffers).
Picasso, с другой стороны, предоставляет HTTP библиотеку, ориентированную на работу с изображениями. Например, вы можете загрузить изображение в свой View с помощью одной строчки:
Picasso и Retrofi настроены так, чтобы использовать OkHttpClient как стандартный HTTP клиент. Однако, если хотите, вы можете указать клиентом HttpURLConnection.
Glide – что-то похожее на Picasso. Он предоставляет некоторые дополнительные функции, такие как GIF-анимация, генерация миниатюрных эскизов изображения и неподвижные видео. Полное сравнение можно найти здесь.
Facebook недавно открыли общественности исходный код библиотеки Fresco, которую они используют в своем мобильном приложении. Одна из ключевых функций, которая выделяет ее, — кастомная стратегия выделения памяти для bitmap’ов, чтобы избежать работы долгого GC (сборщик мусора). Fresco выделяет память в регионе, который называется ashmem. Используются некие трюки, чтобы иметь доступ к этому региону памяти доступ как из части, написанной на C++, так и из части на Java. Чтобы уменьшить потребление CPU и данных из сети, эта библиотека использует 3 уровня кэша: 2 в ОЗУ, третий во внутреннем хранилище.
Я нашел необходимым показать отношения между библиотеками на одной схеме. Как вы можете увидеть, HTTP всегда остается внизу у высокоуровневых библиотек. Вы можете выбирать между простым HttpUrlConnection или последним OkHttpClient. Мы используем эту совместимость при разработке PacketZoom Android SDK, о котором мы поговорим в следующем посте.
Недавно мы сравнивали между собой HTTP библиотеки по производительности, но эта тема заслужила отдельного рассмотрения. Мы надеемся, что этот обзор дал вам основные идеи о плюсах и минусах каждой библиотеки, и мы помогли вам сделать правильный выбор. Следите за выходом более интересных постов о сетевой работе в Android от нас.
Источник
MVVM with Kotlin Coroutines and Retrofit [Example]


Coroutines are a neat new feature of the Kotlin language that allow us to write asynchronous code in a more idiomatic way. — This also means you can write asynchronous code the same way you would normally write synchronous code in your project.
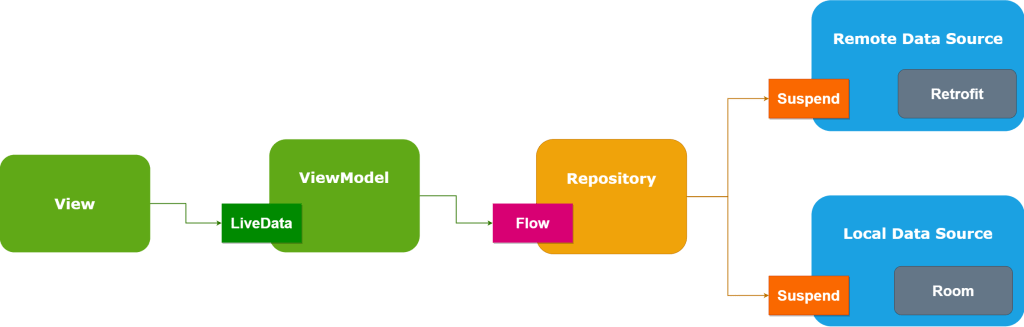
Already, I have explained about MVVM in detail in my another post. Please check that for better understanding of MVVM. in this post, I am focusing on coroutines and retrofit working together.
The flow diagram for the coroutines with retrofit in viewModel.
Coroutines are helpful in two main problems,
- A long-running task that can block the main thread
- Main safety allows you to ensure that any suspend function can be called from the main thread
According to the Kotlin docs it is stated that coroutines are a lightweight alternative to threads.
“Coroutines provide a way to avoid blocking a thread and replace it with a cheaper and more controllable operation”
Before we begin I would like to briefly address the concept and the commonly used functions in Coroutine.
Coroutines build upon regular functions by adding two new operations. In addition to invoke (or call) and return, coroutines add suspend and resume.
- suspend — pause the execution of the current coroutine, saving all local variables
- resume — continue a suspended coroutine from the place it was paused
Suspend Function
A suspending function is just a regular Kotlin function with an additional suspend modifier which indicates that the function can suspend the execution of a coroutine.
You can only call suspend functions from other suspend functions, or by using a coroutine builder like launch to start a new coroutine.
We use call back functions when we get response from our Async task. Suspend and resume work together to replace callbacks.
To understand suspend functions, we should also know about provided dispatchers by Kotlin.
To specify where the coroutines should run, Kotlin provides three dispatchers that you can use:
- Dispatchers.Main — Use this dispatcher to run a coroutine on the main Android thread. This should be used only for interacting with the UI and performing quick work. Examples include calling suspend functions, running Android UI framework operations, and updating LiveData objects.
- Dispatchers.IO — This dispatcher is optimized to perform disk or network I/O outside of the main thread. Examples include using the Room component, reading from or writing to files, and running any network operations.
- Dispatchers.Default — This dispatcher is optimized to perform CPU-intensive work outside of the main thread. Example use cases include sorting a list and parsing JSON.
Lets, see this with an example -> We are calling our api through coroutines. So, we use Dispatchers.IO.
When we call getAllMovies() suspend method, then it suspends our coroutine. The coroutine on the main thread will be resumed with the result as soon as the withContext block is complete.
Note: Using suspend doesn’t tell Kotlin to run a function on a background thread. It’s normal for suspend functions to operate on the main thread.
Launch and Async
launch and async are the most commonly used Coroutine builder.
launch – Launches new coroutine without blocking current thread and returns a reference to the coroutine as a Job . The coroutine is canceled when the resulting job is cancelled .
async – Creates new coroutine and returns its future result as an implementation of Deferred . The running coroutine is canceled when the resulting object is cancelled .
Take a look at this piece of code as an example.
From the example, the difference between launch and async is that async can return the future result which has a type of Deferred , and we can call await() function to the Deferred variable to get the result of the Coroutine while launch only executes the code in the block without returning the result.
Coroutine Scope
Coroutine Scope defines a scope for coroutines. Every coroutine builder (like launch, async, etc) is an extension on CoroutineScope. When the scope dies, the Coroutines inside will be out of the picture too. Fortunately, the Android lifecycle-viewmodel-ktx provides a really easy way to get a Coroutine Scope in the ViewModel. I will show you how to do so later.
Coroutines in your Android Project
To begin add the following library to your build.gradle file dependencies:
Note : You’ll also need to be on kotlin version 1.3 or better.
Making it work with Retrofit?
Retrofit is a type-safe HTTP client for Android and Java.
Starting from Retrofit 2.6.0 you no longer require the Call Adapter as Retrofit now includes built-in support for Kotlin suspend modifier on functions.
In order to begin, let’s add the retrofit dependencies into our app level build.gradle file:
Declaring our interface.
For this example I am using https://howtodoandroid.com/movielist.json api to get list of movies.
Observe the below snippet for our interface:
You may notice that instead of Call , we now have a function with the suspend modifier defined in our interface function.
According to Retrofit documentation this function will, behind the scenes behave as a normal Call.enqueue operation.
Also we wrap our response in a Response object to get metadata about our request response e.g. information like response code.
We no longer have to await() anymore as this is handled automatically! As with all networking on Android its done on the background. And this is a very clean way of doing so!
Building Retrofit Service
Our Retrofit instance will look like the following code snippet:
ViewModel with Coroutines
A CoroutineScope keeps track of all coroutines it creates. Therefore, if you cancel a scope, you cancel all coroutines it created. This is particularly important if you’re running coroutines in a ViewModel.
If your ViewModel is getting destroyed, all the asynchronous work that it might be doing must be stopped. Otherwise, you’ll waste resources and potentially leaking memory. If you consider that certain asynchronous work should persist after ViewModel destruction, it is because it should be done in a lower layer of your app’s architecture.
Add a CoroutineScope to your ViewModel by creating a new scope with a SupervisorJob that you cancel in onCleared() method. The coroutines created with that scope will live as long as the ViewModel is being used.
Coroutines and LiveData
LiveData is an observable value holder for UI and we are expected to be able to access the value from the main thread. With the release of livedata-2.1.0-alpha1, google provided the interoperability between LiveData and Coroutines.
Exception Handling in Kotlin Coroutines
If you consider the above example, you can see we are wrapping our code inside a try-catch exception. But, when we are working with coroutines we can handle an exception using a global coroutine exception handler called CoroutineExceptionHandler.
To use it, first, we create an exception handler in our ViewModel,
and then we attach the handler to the ViewModelScope.
So, our code looks like,
Kotlin Coroutines With Retrofit Example
Now, lets see the example of list movies using kotlin coroutines and retrofit.
Required Dependencies
Here are the things you need to add to your build.gradle
First, setup the retrofit service.
Next step is to setup the repository.
Setup the ViewModel,
Finally, in our MainActivity setup the viewmodel and call the getAllMovies() method of the viewModel.

Thanks for reading. checkout this example in GITHUB.
Источник


