- Три относительно честных способа создания Flutter проекта
- Теперь за дело. Сейчас мы сделаем следующее
- Устанавливаем Flutter и создаём проект из командной строки
- Устанавливаем JDK , Android Studio (вместе с Android SDK) и необходимые плагины
- И наконец, устанавливаем VS Code, расширения, и создаём третий Flutter проект
- Android Studio completely blocked when Android module is opened using Flutter -> Open Android module in Android Studio #5051
- Comments
- neokree commented Nov 16, 2020
- Steps to Reproduce
- Version info
- stevemessick commented Nov 16, 2020
- neokree commented Nov 19, 2020
- stevemessick commented Dec 8, 2020
- Open android module in android studio flutter нет
- How To Install Flutter In Android Studio In Windows : Flutter Android Studio Set Up Tutorial
- How To Download Flutter SDK In Windows
- How To Update Path Variable With Flutter SDK Path In Windows
- How To Install Flutter Plugin In Android Studio
- How To Create Flutter Project In Android Studio
- How To Change Flutter SDK Path In Android Studio
- How To Run Flutter Project In Android Studio
- How To Open Existing Flutter Project In Android Studio
- Method I – Drag And Drop Flutter Project To Android Studio
- Method II – Using Open An Existing Android Studio Project
Три относительно честных способа создания Flutter проекта

Итак, с презентацией Google первой стабильной версии Flutter, которая случилась 4 декабря 2018 г. начался процесс изменения ландшафта на полях мобильного программирования. Появился новый игрок, способный изменить правила самой игры. Теперь из одной базы кода можно создавать сразу два нативных (т.е. «родных» для среды выполнения) приложения — для iOS и Android. В отличие от т.н. гибридных приложений, которые под капотом используют JavaScript, приложения созданные на Flutter работают быстро и плавно, поскольку код написанный на языке программирования Dart (для тех кто знаком с Java или C# с этим языком будет комфортно) затем компилируется (AoT , т.е. предварительно) в машинный код: отдельно для Android, и отдельно для iOS.
Поэтому, если вы изучите Dart и Flutter, вы сможете писать нативные приложения для двух самых популярных мобильных операционных систем, т.е. быть одновременно Android и iOS разработчиком. И это, вероятно, ещё не предел, поскольку было объявлено, что Google ведёт работу по расширению Flutter на предмет возможности создания с его помощью приложений для Windows, Mac и Web (проект Flutter для Web носит название Hummingbird — Колибри). В итоге может получиться так, что зная Dart и Flutter вы сможете писать всё очень многое. Поэтому многие IT эксперты назвали 2018 год — годом Flutter.
Теперь за дело. Сейчас мы сделаем следующее
Устанавливаем Flutter и создаём проект из командной строки
Переходим на страницу установки Flutter, выбираем свою операционную систему — Windows, Mac или Linux (здесь будет описано для Windows 10, как наиболее популярной ОС), и скачиваем zip файл, содержащий Flutter SDK . Затем распаковываем zip, например, в папку текущего пользователя, как показано на скриншоте:

Сейчас пропишем путь к flutter\bin в переменную Path среды пользователя Windows (Этот компьютер -> Свойства -> Дополнительные параметры системы -> Переменные среды):
Можно создавать проект из командной строки Windows:
Готово! Файлы проекта можно редактировать любым текстовым редактором, хоть в блокноте. Но это хорошо разве что для мелких правок. Поэтому мы…
Устанавливаем JDK , Android Studio (вместе с Android SDK) и необходимые плагины
Теперь скачиваем Android Studio. Запускаем процесс установки, следуя за мастером установки, и обращаем внимание на путь, куда будет установлен Android SDK . Создаём системную переменную среды ANDROID_SDK_TOOLS с указанием пути к папке \tools в Android SDK, примерно так:
Когда всё готово — запускаем Android Studio, и устанавливаем плагины Flutter и Dart. Для этого в начальном экране Android Studio справа внизу жмём на значок шестерёнки и выбираем Plugins:
В открывшемся окне внизу нажимаем кнопку Browse repositories.
В поисковую строку вводим flutter, выбираем и устанавливаем (у меня уже установлен, поэтому не видно соответствующей кнопки):
Android Studio предложит также установить плагин Dart от которого зависит работа плагина Flutter. Соглашаемся. В итоге у вас должно быть установлено как минимум два плагина:
Перезапускаем Android Studio, и теперь давайте убедимся, что всё идёт хорошо. Для этого в командной строке выполним команду:
Сканирование займёт десяток секунд, и затем вы можете увидите примерно такой результат:
Вот мы и готовы создать Flutter проект в Android Studio. После установки плагинов Flutter и Dart в начальном экране Android Studio должна появится опция Start a new Flutter project. Выбираем её:
Далее соглашаемся с выбранной по умолчанию опцией Flutter Application и нажимаем кнопку Next:
Наконец, указываем доменное имя (которое в реверсивном порядке будит использовано как ID Android приложения), а также опционально — поддержку языков Kotlin и Swift (если не указать — по умолчанию будут поддерживаться только Java и Objective-C). Нажимаем кнопку Finish.
В зависимости от производительности компьютера, ждём несколько минут пока проект будет создан… Готово! Он должен выглядеть примерно так:
Обратите внимание на стрелку, указывающую на вкладку Flutter Inspector. В этом инспекторе имеется функционал, позволяющий делать ряд очень полезных во время разработки вещей, в т.ч. просмотр приложения на девайсе Android в режиме представления на iOS!
И наконец, устанавливаем VS Code, расширения, и создаём третий Flutter проект
Скачиваем последнюю версию Visual Studio Code для своей операционной системы, устанавливаем на свой компьютер, следуя за мастером установки, и запускаем VS Code. Затем на боковой панеле нажимаем на кнопку Extensions (показана стрелкой) или на клавиатуре — Ctrl+Shift+X:
С помощью поиска ищем расширение Flutter.
VS Code, как и в случае с Android Studio, предложит установить необходимое дополнительное расширение Dart. Устанавливаем и его. В итоге должны иметь два (или более) активированных расширения:
А теперь создаём Flutter проект. Нажимаем на значок шестерёнки в левом нижнем углу, и выбираем Command Pallete. (или на клавиатуре — Ctr+Shift+P). В командной строке Command Pallete начинаем печатать flutter, и из появившегося списка выбираем Flutter: New Project:
Даём проекту название и нажимаем клавишу Enter:
Появится диалоговое окно, предлагающее выбрать папку, в которой необходимо создать Flutter проект. Выбираем и нажимаем кнопку с длинным названием Select a folder to create the project in:
Источник
Android Studio completely blocked when Android module is opened using Flutter -> Open Android module in Android Studio #5051
Comments
neokree commented Nov 16, 2020
Steps to Reproduce
Open a plugin project.
Right click on the android folder in the root of the project
Select Flutter -> Open Android module in Android Studio
When the «Open project» modal appears, choose «This Window».
The new project will open without any files opened and showing «Loading», but the project will never load.
Any menu buttons will not work either, and using «Close» will not close the project.
The only way is to force close it
Version info
Tested on a MacBook Pro 2018, running Mac Catalina 10.15.7
Android Studio version
The text was updated successfully, but these errors were encountered:
stevemessick commented Nov 16, 2020
I cannot reproduce this problem. I think it’s due to a change in Android Studio last summer. When the project tool window is set to «Android» it won’t display any files for Flutter projects. Switch to any other project type and it works. I usually use «Project».
However, my menus work as expected. And the latest test showed that the «Android» view displayed files for the Flutter «android» directory. Lately, it has just showed «Loading. «. It seems to be a timing issue with Android Studio 4.1.
Using Android Studio 4.2, files are displayed after the Gradle build finishes. It shows «Loading. » for a while, then displays the files.
We recommend using another window until 4.2 is stable. Another possibility is to enable the experimental option in Flutter preferences named «Enable code completion, navigation, etc. for Java / Kotlin». It if works for you then you won’t have to open another window.
neokree commented Nov 19, 2020
@stevemessick Thank you for your response.
I just started opening projects using «File -> Open», which works as expected.
Probably it doesn’t work in my case because I have added, for my Project Module (under Project Structure) multiple «Content Root», in order to see all my linked projects from the same Android Studio Project.
To explain my situation, I have a repo that is similar to the flutter/plugins repo, and my primary project is dependent on project in the same packages folder. In order to look at the code without opening/closing projects every time I added them as «Content Root»s.
stevemessick commented Dec 8, 2020
Missed this earlier, sorry.
Unfortunately, due to some ancient assumptions in the Flutter code, your configuration is not fully supported by the Flutter plugin. It assumes (in some places) that the top-level directory is the project root. We’re working to relax that assumption but aren’t quite there yet.
You can’t perform that action at this time.
You signed in with another tab or window. Reload to refresh your session. You signed out in another tab or window. Reload to refresh your session.
Источник
Open android module in android studio flutter нет
Для разработки под Flutter нередко выбирается такая среда разработки как Android Studio . Хотя мы можем набирать код и в простейшем текстовом редакторе и компилировать его в консоли, но среда разработки существенно позволяет упостить процесс написания и построения приложения. Причем Android Studio позволяет создать приложения на Flutter не только собственно под Android, но и под другие поддерживаемые платформы.
Для работы с Android Studio ее естественно вначале надо установить. Инсталлятор можно загрузить по ссылке https://developer.android.com/studio.
По умолчанию Android Studio не поддерживает Flutter, поэтому нам надо установить соответствующий плагин. Для этого в Android Studio на стартовом экране выберем пункт Plugins (либо в открытой студии перейдем в меню File -> Settings и далее в открывшемся окне также выберем пункт Plugins ). И в панели плагинов найдем плагин Flutter :
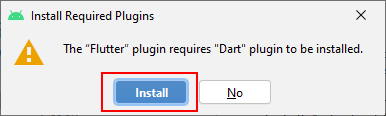
Для упрощения поиска нужного плагина мы можем ввести в поисковую стоку слово «Flutter», и первый результат будет как раз тем, который надо установить. При установке плагина также отобразится окно с предложением установить плагин для Dart. Также нажмем на ОК для его установки:
После установки плагина необходимо будет перезагузить Android Studio.
После перезагрузки на стартовом экране в Android Strudio мы можем увидеть кнопку New Flutter Project :
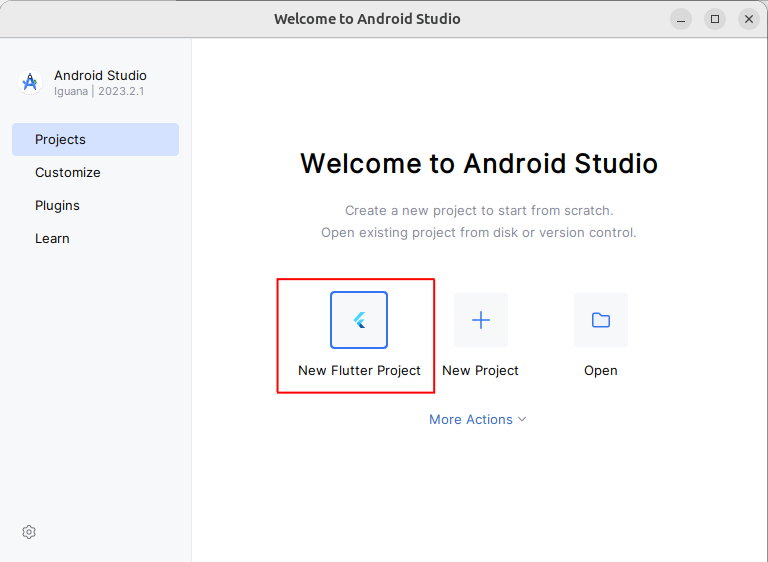
Нажмем на эту кнопку для создания проекта под Flutter.
В качестве альтернативы для создания проекта в студии можно перейти в меню к пункту File -> New -> New Flutter Project :

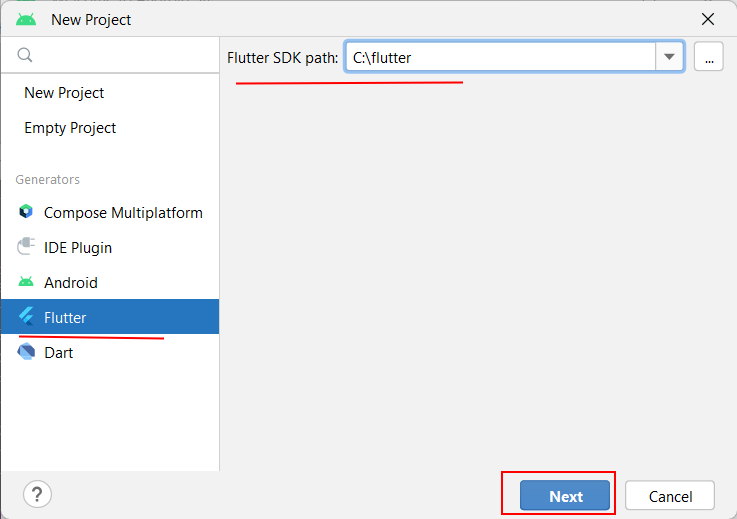
Далее нам откроется окно создания нового проекта. В левой части выберем пункт Flutter , а в центре в поле Flutter SDK path укажем путь к Flutter SDK:
На следующем окне укажем ряд настроек проекта:
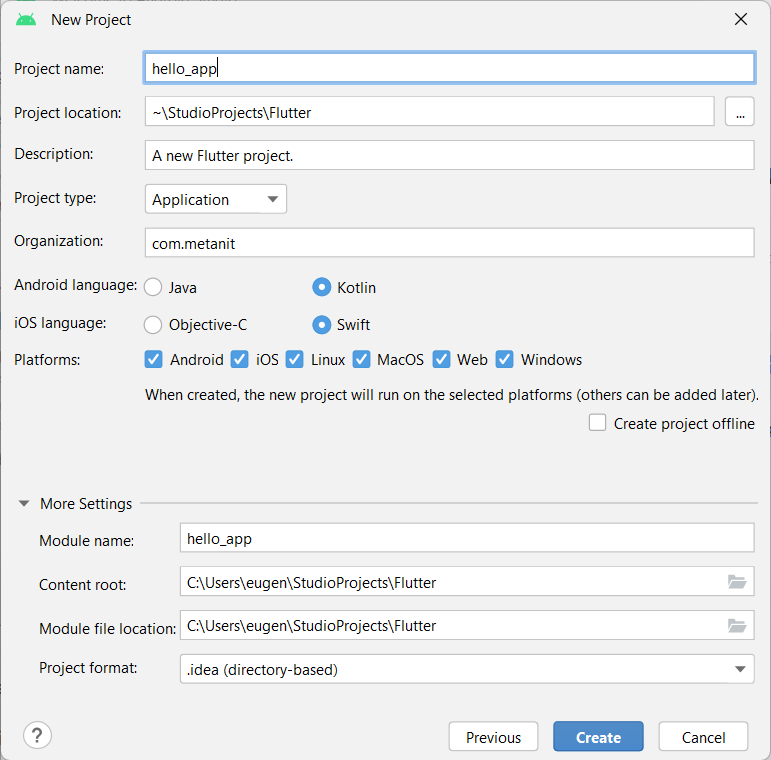
В поле Project name дадим проекту какое-либо имя. Так, в моем случае он называется hello_app .
В поле Project location можно изменить расположение проекта, если предложенное расположение по умолчанию не устраивает.
В поле Description можно указать описание проекта
В поле Project type указывается тип проекта. По умолчанию он имеет значение Application (то есть проект предназначен для создания приложения). Оставим это значение по умолчанию.
В поле Organization можно задать название для пакета приложения. Можно оставить по умолчанию, а можно и изменить. Например, в моем случае это com.metanit .
В поле Android language указывается язык для Android. Можно оставить значение по умолчанию — Kotlin .
В поле iOS language указывается язык для платфомы iOS. Можно оставить значение по умолчанию — Swift .
В поле Organization можно задать название для пакета приложения. Можно оставить по умолчанию, а можно и изменить. Например, в моем случае это com.metanit .
В поле Platforms можно указать платформы, под которые будет создаваться проект. По умолчанию отмечены пункты Android и iOS, но можно выбрать и другие доступные платформы. Так, как видно выше на скриншоте, я также выбрал пункт «Web» для создания проекта под веб.
И затем после установки всех настроек нажмем на кнопку «Finish» для непосредственного создания проекта. Сразу после создания Android Studio откроет созданный проект:
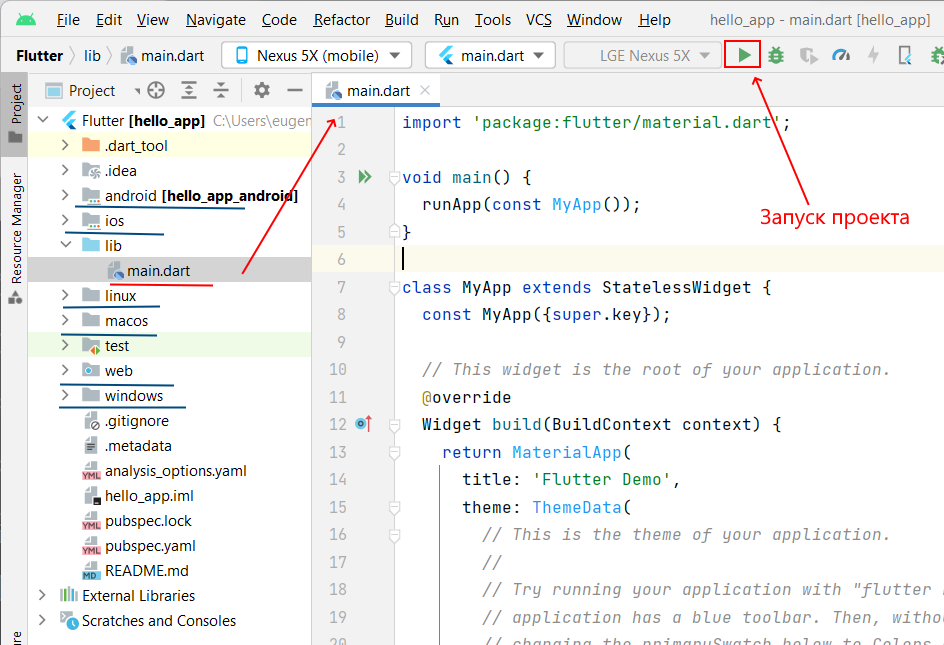
Созданный проект будет иметь ту же самую структуру, что был создан в прошлой теме в консоли с помощью команды flutter create . В центре студии будет открыт файл main.dart , который содержит собственно код приложения.
Подключим к компьютеру устройство Android (или воспользуемся эмуляторами) и в панели Android Studio нажмем на зеленую стрелочку для запуска приложения.
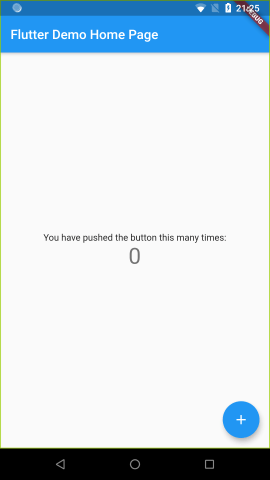
Подобным образом в Android Studio можно запускать проект и под другие «устройства», например, под web. Для этого лишь нужно выбрать соответствующее устройство в панели инструментов:
Источник
How To Install Flutter In Android Studio In Windows : Flutter Android Studio Set Up Tutorial

Welcome to our first Flutter Android Studio tutorial.
Let’s start by talking about Flutter.
Google has introduced its software development kit Flutter in 2017. Using Flutter, you can develop applications for Android, ios, Mac, Windows, Linux, and More.
So in this post, you will learn,
and know, how to create an android project, emulator also.
How To Download Flutter SDK In Windows
- Go to this URL – Flutter SDK – Windows, Linux, and macOs or You can go to flutter.dev and click on Get started,
- Click on Windows.
- While scrolling down, you will see a blue button with flutter latest SDK version in a zip file, just click on it.
- Download begins…
- After the download, Extract the zip file
- Just cut and paste the extracted file in C drive, just like above. You can choose your suitable location except for Program Files in C drive.
- Just click on the extracted directory.
- This is Flutter software development kit. Here you can click on flutter console and check flutter commands.
- This is flutter console window.
- click on bin folder.
- We need to update the PATH variable with “…/flutter/bin”, then only we can run flutter commands from any command prompt.
- So copy the path with “flutter/bin” like shown above.
How To Update Path Variable With Flutter SDK Path In Windows
- Search “env” on the search bar and click on “Edit environment variables for your account”.
- Click on the path field ->Edit -> New -> Paste it in the empty field. Just like above.
- Click Ok.
If the Path variable doesn’t exist, you need to create one. By clicking New->Providing values in each field (name and value) and click OK (just like shown above).
- Open the command prompt, and run the “flutter doctor” command.
- If there is any problem you will see the red cross mark.
- Here I got errors because flutter and dart plugin are unavailable, let’s clear it now.
How To Install Flutter Plugin In Android Studio
- Open Android Studio
- If you don’t get a window like the above image.
You may not close your last opened project. So just close your project, File -> Close Project. - Click on “Configure“.
- Next click on the “plugins” items from the drop-down menu.
- Next, we have to find the flutter plugin from the marketplace. Make sure you are on the marketplace tab.
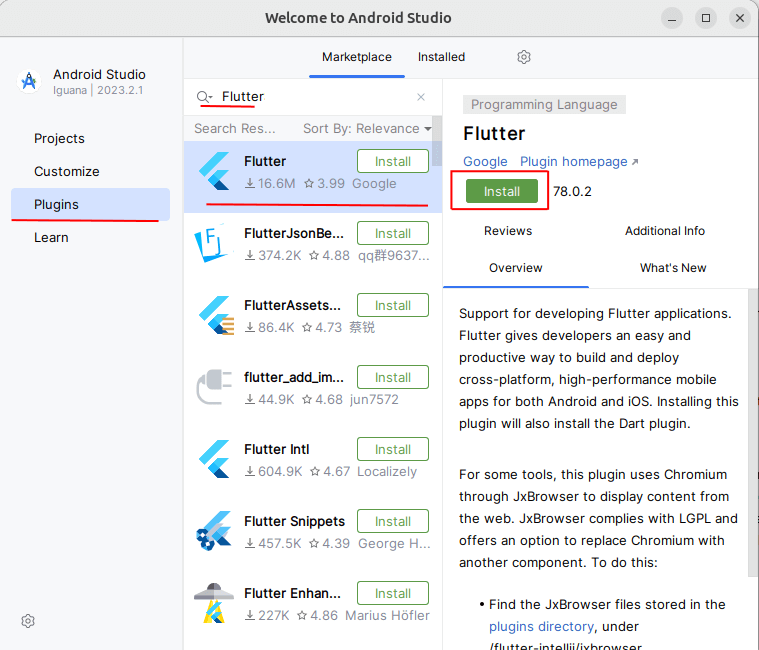
- Then search “ Flutter ” in the search box and press Enter.
- Click on the install button to install the flutter plugin.
- Dart plugin is also needed to make flutter applications. You don’t need to install separately. Just click on ‘Install‘ on the dialog box.
- It will automatically download both.
- Now click on the Restart IDE button to restart the Android Studio.
- In the next alert dialog box, “Restart Android Studio to activate changes in plugins?“. Click on Restart.
- After the restart, now you can see “Start a new flutter project” item in the window.
- That means you have successfully installed a flutter plugin in Android Studio.
- But check again to confirm our system is ready to create flutter applicaions using flutter doctor command.
How To Create Flutter Project In Android Studio
- Click on “Start a new Flutter project”.
- Select “Flutter Application” and click “Next”.
How To Change Flutter SDK Path In Android Studio
- I just let the project name as ‘flutter_app’. After that, one of the important step is to change the Flutter SDK path.
- Click on Flutter SDK path …(3 dot) button.
- Now you have to select the flutter SDK location, for me, it’s in C drive. Expand drives by clicking on it.
- After selecting flutter folder just click OK.
- Flutter SDK path is set now, then click Next.
- Change package name if you want.
- I have changed to “com.androidride” , leave others, and click Finish.
How To Run Flutter Project In Android Studio
- After the build, the project will shown up just like above.
- Like Android Project, Select your emulator and click on Run button.
- The flutter application is ready now.
How To Open Existing Flutter Project In Android Studio
Method I – Drag And Drop Flutter Project To Android Studio
- Before drag and drop your project, make sure you have installed the flutter plugin in Android Studio.
Method II – Using Open An Existing Android Studio Project
- Click on “Open an Existing Android Studio project “.
- Now you have to find the location of your flutter project. Here, my fluter project is located at desktop.
- After selecting your project, just click OK.
- The project is ready now.
I believe that this post will help you start your flutter journey. If you like this post, please share it with your family and friends. Thank you.
Источник


