- Как установить Android Studio на Ubuntu 18.04
- Подготовка
- Установка Java OpenJDK
- Установка Android Studio
- Запуск Android Studio
- Выводы
- Android Platform Implementation Details
- Build Requirements
- Build machine
- Android NDK & SDK
- Generating standalone toolchains for the builds
- libffi (required for ARM builds only)
- libfreetype
- Building the JDK
- Downloading the sources
- Build command for x86
- Build command for arm
- Running your built Java 9 binaries on Android
- Known Issues
- Дистрибутив OpenJDK от Майкрософт для разработки мобильных приложений
- Обзор
- Скачать
- Устранение неполадок
- Известные проблемы
- Не удалось установить пакет «OpenJDKV1.RegKey,version=1.8.0.25,chip=x64».
- Сводка
- Microsoft’s Mobile OpenJDK Distribution
- Overview
- Download
- Troubleshooting
- Known Issues
- Package ‘OpenJDKV1.RegKey,version=1.8.0.25,chip=x64’ failed to install
- Summary
- Build Your First Android App in Java
- 1. Welcome!
- What you must know already
- What you’ll learn
- Use Android Studio and Java to write Android apps
- Note: This version of the codelab requires Android Studio 3.6 or higher.
- 2. Install Android Studio
- Note: This version of the codelab requires Android Studio 3.6 or higher.
- 3. Task: Create your first project
- What you’ll learn
- Step 1: Create a new project
- Step 2: Get your screen set up
- Step 3: Explore the project structure and layout
- Step 4: Create a virtual device (emulator)
- Step 5: Run your app on your new emulator
Как установить Android Studio на Ubuntu 18.04
Android Studio — это полнофункциональная кроссплатформенная среда IDE, которая помогает создавать приложения на всех типах устройств Android. Он основан на IntelliJ IDEA JetBrains и включает все необходимое для разработки под Android.
Система сборки Android Studio работает на Gradle, что позволяет создавать несколько вариантов сборки для разных устройств из одного проекта.
В этом руководстве объясняется, как установить Android Studio на Ubuntu 18.04. Те же инструкции применимы для Ubuntu 16.04 и любого дистрибутива на основе Ubuntu, включая Kubuntu, Linux Mint и Elementary OS.
Подготовка
Вам нужно будет войти в систему как пользователь с доступом sudo, чтобы иметь возможность устанавливать пакеты в вашей системе Ubuntu.
Установка Java OpenJDK
Android Studio требует, чтобы в вашей системе был установлен OpenJDK версии 8 или выше.
Мы установим OpenJDK 8 . Установка довольно проста, начните с обновления индекса пакета:
Установите пакет OpenJDK 8, набрав:
Проверьте установку, введя следующую команду, которая распечатает версию Java :
Результат должен выглядеть примерно так:
Установка Android Studio
На момент написания этой статьи последней стабильной версией Android Studio была версия 3.3.1.0. Самый простой способ — установить Android Studio на Ubuntu 18.04 — использовать систему быстрой упаковки.
Чтобы загрузить и установить пакет оснастки Android Studio, откройте терминал с помощью Ctrl+Alt+T и введите:
После завершения установки вы увидите следующий вывод:
Вот и все. Android Studio установлена на вашем рабочем столе Ubuntu.
Запуск Android Studio
Вы можете запустить Android Studio, набрав android-studio в своем терминале или щелкнув значок Android Studio ( Activities -> Android Studio ).
Когда вы запускаете Android Studio в первый раз, появится следующее окно с просьбой импортировать настройки Android Studio из предыдущей установки:

После того, как вы нажмете кнопку « OK , появится окно мастера установки. Нажмите кнопку Next , чтобы начать начальную настройку и шаги после установки.
Затем вам будет предложено выбрать тип установки для Android Studio. Скорее всего, вы захотите выбрать вариант «Стандартный».

На следующем шаге вы можете выбрать тему пользовательского интерфейса, и мастер установки загрузит и установит необходимые компоненты SDK. Этот процесс может занять некоторое время в зависимости от скорости вашего подключения.
После загрузки Android Studio IDE вам будет представлена страница приветствия:

Выводы
Вы узнали, как установить Android Studio на рабочий стол Ubuntu 18.04. Теперь вы можете изучить свою новую среду IDE и начать работу над проектами Android.
Чтобы получить дополнительную информацию о том, как разрабатывать приложения с помощью Android Studio, посетите страницу документации Android Studio .
Если у вас есть вопросы, оставьте комментарий ниже.
Источник
Android Platform Implementation Details
The JDK 9 Android port supports both x86 and arm execution on Android emulators or devices. The x86 implementation uses the standard Hotspot JIT but the ARM 32-bit implementation is restricted to the Zero interpreter.
Build Requirements
Build machine
The Android JDK 9 build requires a 64-bit Linux System capable of running the Android NDK and SDK binaries.
Android NDK & SDK
Our JDK 9 Mobile project requires the Android NDK and SDK which can be downloaded from Android developer site. When downloading the SDK, select the Linux package from the «SDK Tools Only» section. The sources can currently be built using NDK version r10e and compiling for API level 19.
Follow the instructions here for installing the Linux 64-bit (x86) Android NDK.
Generating standalone toolchains for the builds
The dependent libraries and JDK build require a traditional standalone gnu toolchain to be available rather than the default layout of the Android NDK distribution. In addition, the JDK requires the toolchain to be in the form of a devkit. This amounts to having a devkit.info at the top directory of each required toolchain. Follow these instructions for this setup.
libffi (required for ARM builds only)
The Zero interpreter used in our Android arm port requires a third party library for calling native functions. This library is libffi (Foreign Function Interface Library). We are currently working with version 3.2.1 of this library.
The libffi 3.2.1 sources can be downloaded from here:
Download the bundle and untar it to a working directory, «cd» into that directory and then execute the following commands:
The «make install» will build the library and populate the include and lib directories in build_android-arm with the built libffi library artifacts needed to build the JDK.
libfreetype
The FreeType 2.6.2 sources can be downloaded from here:
To build an Android x86 distribution, download the sources, cd to the top directory and run these commands:
The output of the build will be stored in the build_android-i686 directory
To build an Android arm distribution, run these commands:
The output of the build will be stored in the build_android-arm directory
Building the JDK
Once you have the required tools and libraries built, download the mobile/dev sources, customize the build commands below to match your build system setup and run the build script.
Downloading the sources
Build command for x86
Build command for arm
Running your built Java 9 binaries on Android
Make sure you have the Android SDK tools and platform-tools directory on your path.
Known Issues
1. If you get a message that the binary can’t be run due to PIE issues, the JDK build needs to have some additional CFLAGS (-fPIE -pie) added to produce compatible binaries. This issue appears to only impact the «java» executable and does not impact shared libraries. Also, this issue only impacts newer Android running API level 21 or newer.
Источник
Дистрибутив OpenJDK от Майкрософт для разработки мобильных приложений
В этом руководстве описываются шаги по переходу на внутренний дистрибутив OpenJDK. Этот дистрибутив предназначен для разработки мобильных приложений.
Обзор
Начиная с версий Visual Studio 15.9 и Visual Studio для Mac 7.7 решение «Инструменты Visual Studio для Xamarin» более не использует пакет JDK от Oracle и перешло на облегченную версию OpenJDK, предназначенную исключительно для разработки на Android. Это обязательная миграция, так как Oracle прекращает поддержку коммерческих дистрибутивов JDK 8 в 2019 г., а JDK 8 является обязательной зависимостью для разработки приложений Android.
Такой переход предлагает следующие преимущества:
У вас всегда будет версия OpenJDK, которая подходит для разработки приложений Android.
Скачивание JDK 9 или более поздней версии от Oracle не повлияет на интерфейс разработки.
Уменьшены размер скачиваемого файла и объем занимаемой памяти.
Отсутствие потенциальных проблем со сторонними серверами и установщиками.
Если вы хотите быстрее перейти на обновленную версию, доступны сборки OpenJDK от Майкрософт для разработки мобильных приложений, которые вы можете опробовать на Windows и Mac. Процесс установки описан ниже. Вернуться на JDK от Oracle можно в любое время.
Скачать
Дистрибутив OpenJDK для мобильных приложений установится автоматически, если вы выберете пакеты SDK для Android в Visual Studio Installer в Windows.
На Mac пакет OpenJDK для мобильных приложений будет установлен в рамках рабочей нагрузки Android для новых установок. Существующие пользователи Visual Studio для Mac получат приглашение установить его в составе обновления. Среда IDE предложит вам перейти на новый пакет JDK и станет использовать его после перезапуска.
Устранение неполадок
Если возникли проблемы с установкой на Mac или Windows, вы можете выполнить установку вручную.
Для этого проверьте, установлен ли пакет OpenJDK на компьютере в правильном расположении:
- Mac — $Home/либрари/девелопер/ксамарин/ЖДК/microsoft_dist_openjdk_1.8.0. x
- Windows – C:\Program филес\андроид\ждк\ microsoft_dist_openjdk_1.8.0. x
Укажите в IDE новый пакет JDK:
- Mac — щелкните инструменты Диспетчер пакетов SDK Расположение и измените расположение пакета SDK Java (JDK) на полный путь к установке OpenJDK. В следующем примере этот путь имеет значение $Home/либрари/девелопер/ксамарин/ждк/microsoft_dist_openjdk_1.8.0.9 , но ваша версия может быть более новой.

- Windows — щелкните сервис параметры Xamarin > Android Параметры и измените > на полный путь к установке OpenJDK. В следующем примере для этого пути задано значение C:\Program филес\андроид\ждк\ microsoft_dist_openjdk_1.8.0.9, но ваша версия может быть более новой:

Известные проблемы
Не удалось установить пакет «OpenJDKV1.RegKey,version=1.8.0.25,chip=x64».
Возможно, возникла проблема в некоторых корпоративных средах. Пакет OpenJDK уже установлен на компьютере. Следуйте шагам по устранению неполадок выше, чтобы указать в IDE правильное расположение. Следить за состоянием проблем можно здесь.
Сводка
В этой статье вы узнали, как настроить в IDE использование дистрибутива OpenJDK от Майкрософт для разработки мобильных приложений и как устранять неполадки.
Источник
Microsoft’s Mobile OpenJDK Distribution
This guide describes the steps for switching to an internal distribution of OpenJDK. This distribution is intended for mobile development.
Overview
Beginning with Visual Studio 15.9 and Visual Studio for Mac 7.7, Visual Studio Tools for Xamarin has moved from Oracle’s JDK to a lightweight version of the OpenJDK that is intended solely for Android development. This is a required migration as Oracle is ending support for commercial distribution of JDK 8 in 2019, and JDK 8 is a required dependency for all Android development.
The benefits of this move are:
You will always have an OpenJDK version that works for Android development.
Downloading Oracle’s JDK 9 or greater won’t affect the development experience.
Reduced download size and footprint.
No more issues with 3rd party servers and installers.
If you’d like to move to the improved experience sooner, builds of the Microsoft Mobile OpenJDK distribution are available for you to test on both Windows and Mac. The setup process is described below, and you can revert back to the Oracle JDK at any time.
Download
The mobile OpenJDK distribution is automatically installed for you if you select the Android SDK packages in the Visual Studio installer on Windows.
On Mac, the mobile OpenJDK will be installed for you as part of the Android workload for new installs. For existing Visual Studio for Mac users, you will be prompted to install it as part of your update. The IDE will prompt you to move to the new JDK, and will switch to using it at the next restart.
Troubleshooting
If you encounter issues with the setup on Mac or Windows, you can take the following steps for manual setup:
Check if OpenJDK is installed on the machine in the correct location:
- Mac – $HOME/Library/Developer/Xamarin/jdk/microsoft_dist_openjdk_1.8.0.x
- Windows – C:\Program Files\Android\jdk\microsoft_dist_openjdk_1.8.0.x
Point the IDE to the new JDK:
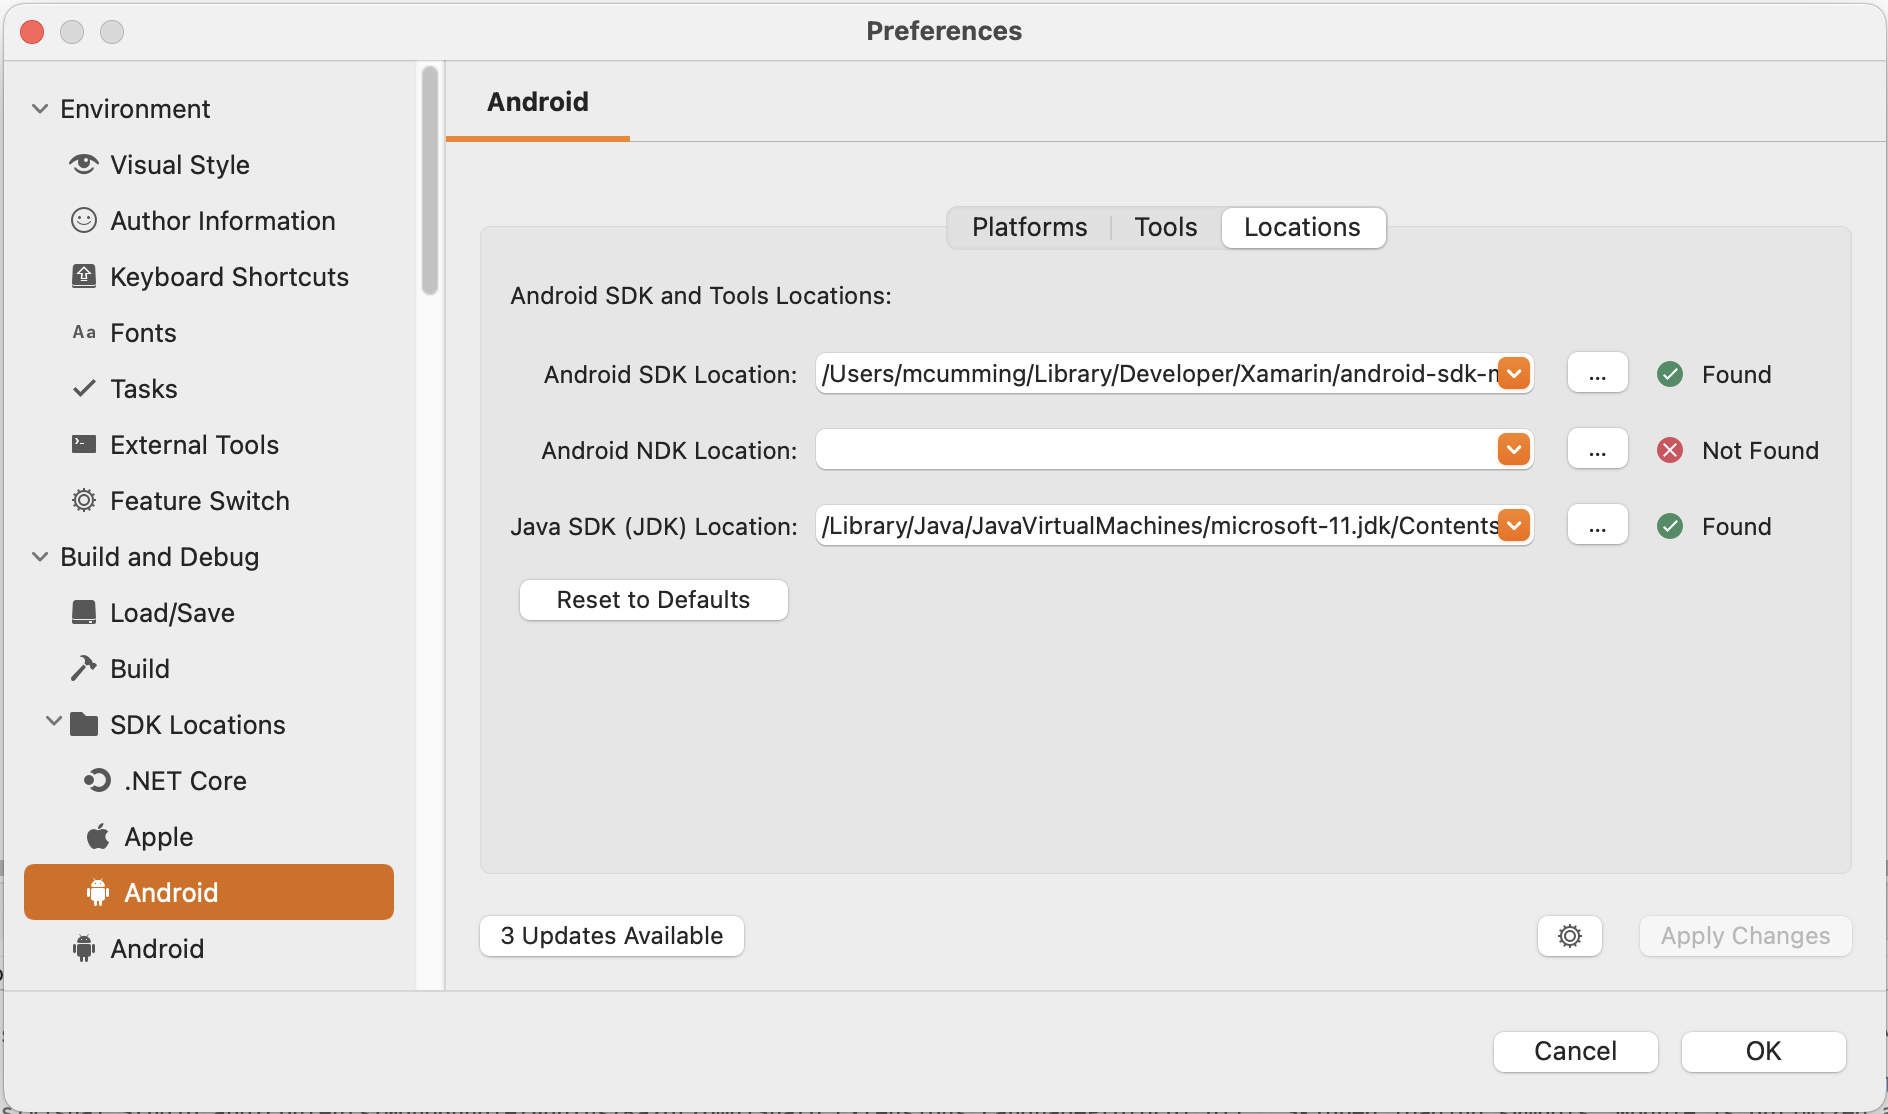
- Mac – Click Tools > SDK Manager > Locations and change the Java SDK (JDK) Location to the full path of the OpenJDK installation. In the following example, this path is set to $HOME/Library/Developer/Xamarin/jdk/microsoft_dist_openjdk_1.8.0.9 but your version may be newer.
- Windows – Click Tools > Options > Xamarin > Android Settings and change the Java Development Kit Location to the full path of the OpenJDK installation. In the following example, this path is set to C:\Program Files\Android\jdk\microsoft_dist_openjdk_1.8.0.9, but your version may be newer:

Known Issues
Package ‘OpenJDKV1.RegKey,version=1.8.0.25,chip=x64’ failed to install
This may be an issue in some corporate environments. OpenJDK is already on the machine — follow the troubleshooting steps above to point your IDE to the correct location. You can follow the status of the issues here.
Summary
In this article, you learned how to configure your IDE to use Microsoft’s Mobile OpenJDK distribution, and how to troubleshoot should you encounter issues.
Источник
Build Your First Android App in Java
1. Welcome!
In this codelab, you’ll learn how to build and run your first Android app in the Java programming language. (If you’re looking for the Kotlin version of this codelab, you can go here.)
What you must know already
This codelab is written for programmers and assumes that you know either the Java or Kotlin programming language. If you are an experienced programmer and adept at reading code, you will likely be able to follow this codelab, even if you don’t have much experience with Java.
What you’ll learn
- How to use Android Studio to build your app.
- How to run your app on a device or in the emulator.
- How to add interactive buttons.
- How to display a second screen when a button is pressed.
Use Android Studio and Java to write Android apps
You write Android apps in the Java programming language using an IDE called Android Studio. Based on JetBrains’ IntelliJ IDEA software, Android Studio is an IDE designed specifically for Android development.
Note: This version of the codelab requires Android Studio 3.6 or higher.
To work through this codelab, you will need a computer that can run Android Studio 3.6 or higher (or already has Android Studio 3.6 or higher installed).
2. Install Android Studio
Note: This version of the codelab requires Android Studio 3.6 or higher.
You can download Android Studio 3.6 from the Android Studio page.
Android Studio provides a complete IDE, including an advanced code editor and app templates. It also contains tools for development, debugging, testing, and performance that make it faster and easier to develop apps. You can use Android Studio to test your apps with a large range of preconfigured emulators, or on your own mobile device. You can also build production apps and publish apps on the Google Play store.
Note: Android Studio is continually being improved. For the latest information on system requirements and installation instructions, see the Android Studio download page.
Android Studio is available for computers running Windows or Linux, and for Macs running macOS. The OpenJDK (Java Development Kit) is bundled with Android Studio.
The installation is similar for all platforms. Any differences are noted below.
- Navigate to the Android Studio download page and follow the instructions to download and install Android Studio.
- Accept the default configurations for all steps, and ensure that all components are selected for installation.
- After the install is complete, the setup wizard downloads and installs additional components, including the Android SDK. Be patient, because this process might take some time, depending on your internet speed.
- When the installation completes, Android Studio starts, and you are ready to create your first project.
Troubleshooting: If you run into problems with your installation, see the Android Studio release notes or Troubleshoot Android Studio.
3. Task: Create your first project
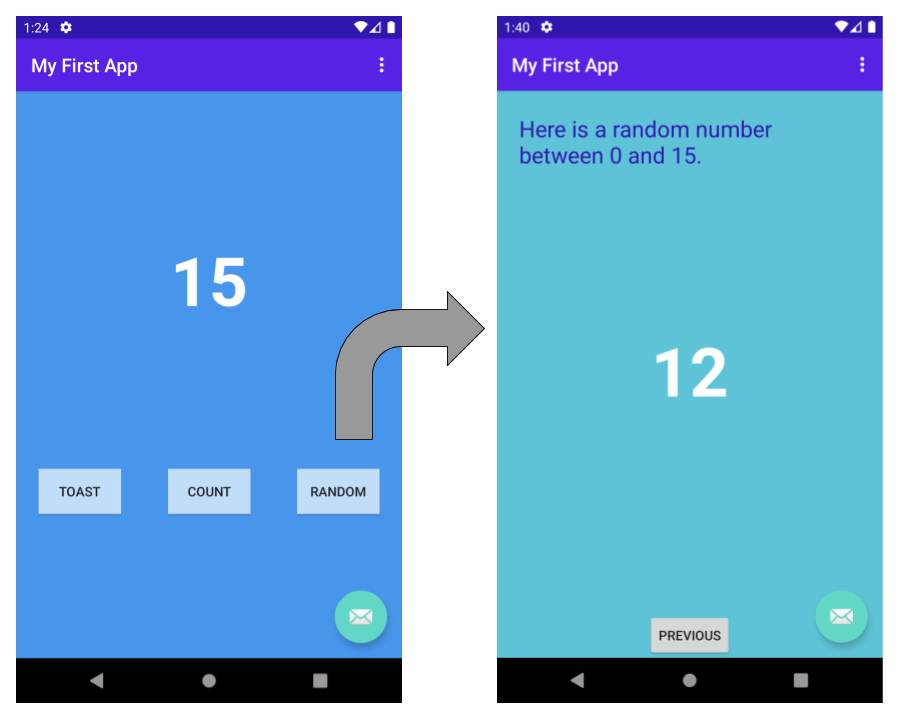
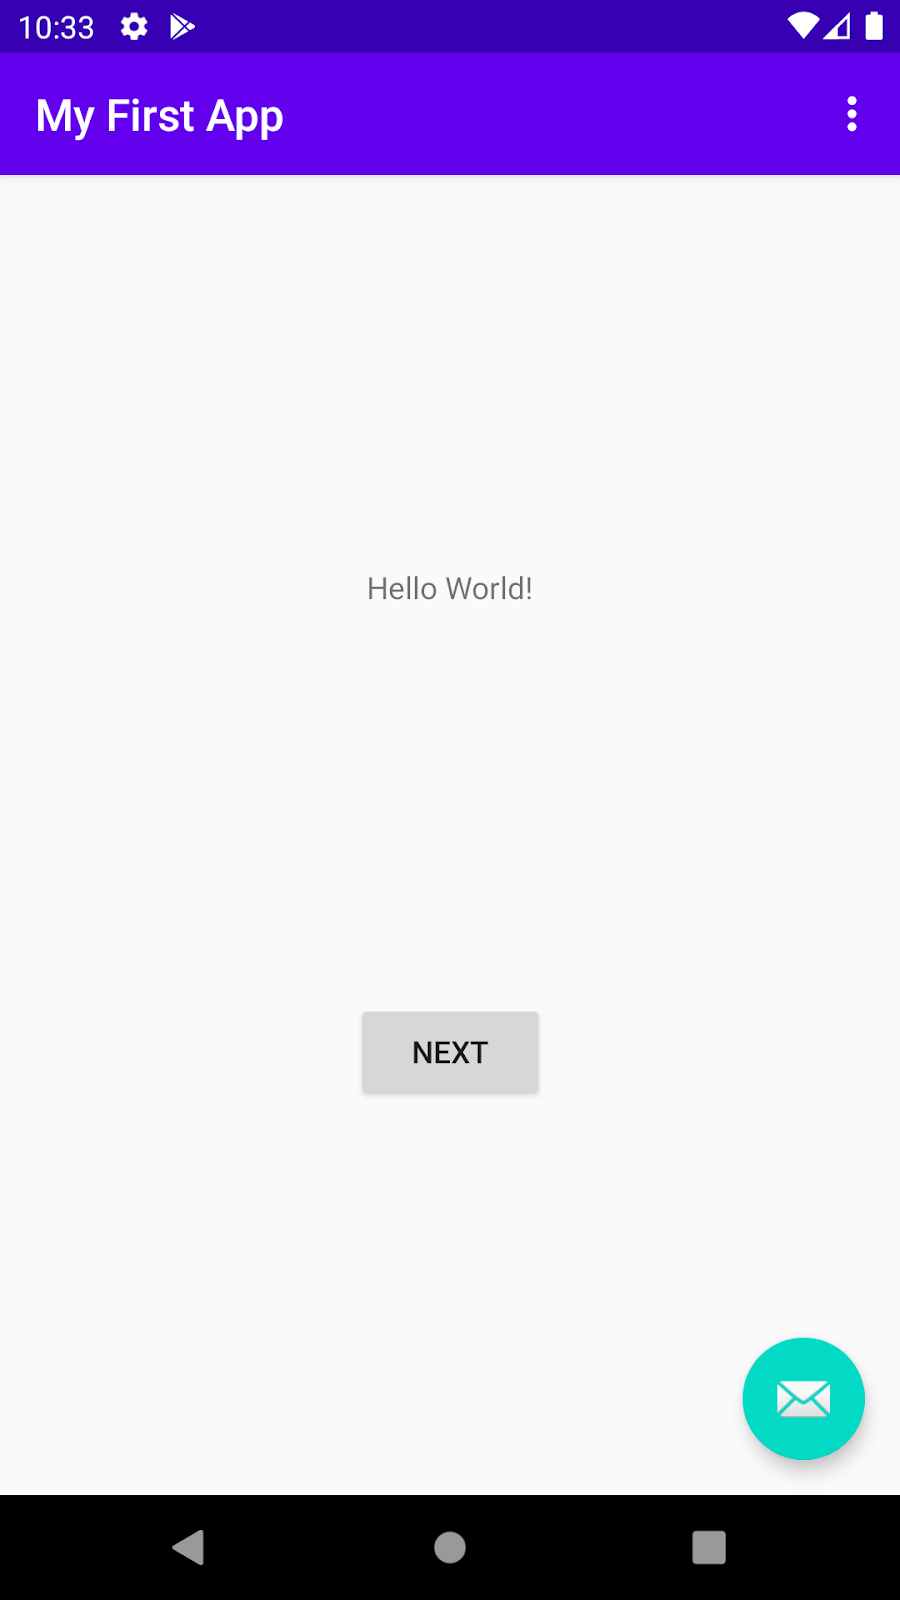
In this step, you will create a new Android project for your first app. This simple app displays the string «Hello World» on the screen of an Android virtual or physical device.
Here’s what the finished app will look like:
What you’ll learn
- How to create a project in Android Studio.
- How to create an emulated Android device.
- How to run your app on the emulator.
- How to run your app on your own physical device, if you have one.
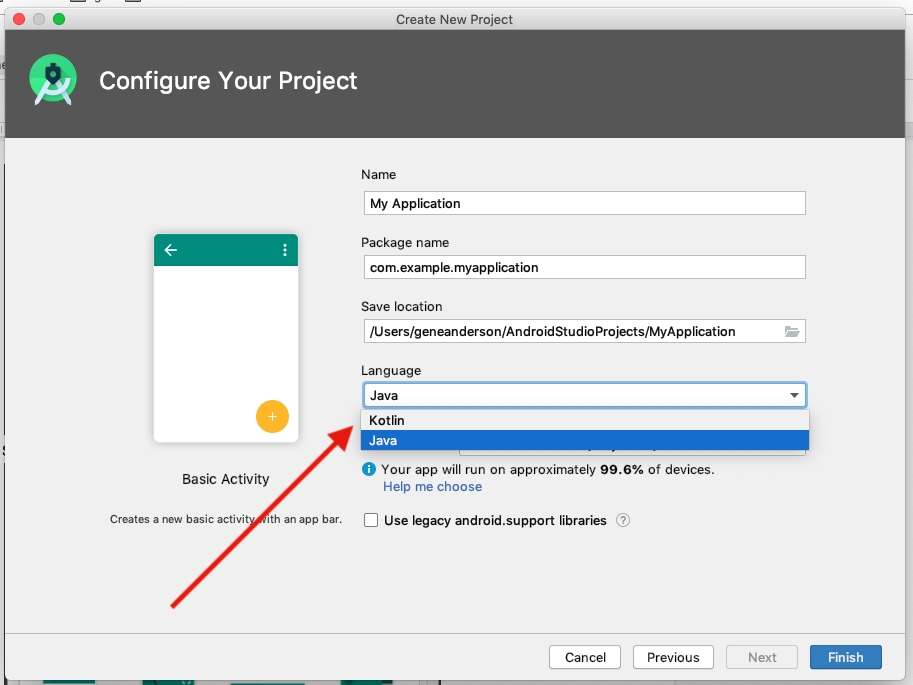
Step 1: Create a new project
- Open Android Studio.
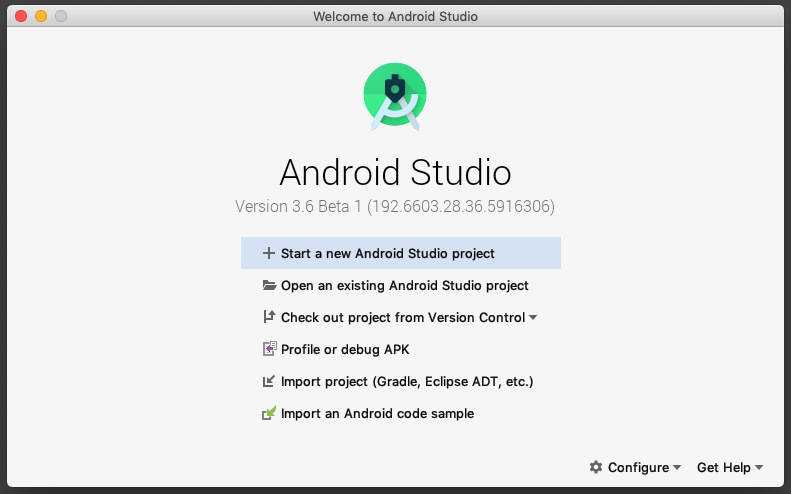
- In the Welcome to Android Studio dialog, click Start a new Android Studio project.

- Select Basic Activity (not the default). Click Next.
- Give your application a name such as My First App.
- Make sure the Language is set to Java.
- Leave the defaults for the other fields.
- Click Finish.

After these steps, Android Studio:
- Creates a folder for your Android Studio project called MyFirstApp. This is usually in a folder called AndroidStudioProjects below your home directory.
- Builds your project (this may take a few moments). Android Studio uses Gradle as its build system. You can follow the build progress at the bottom of the Android Studio window.
- Opens the code editor showing your project.
Step 2: Get your screen set up
When your project first opens in Android Studio, there may be a lot of windows and panes open. To make it easier to get to know Android Studio, here are some suggestions on how to customize the layout.
- If there’s a Gradle window open on the right side, click on the minimize button (—) in the upper right corner to hide it.
- Depending on the size of your screen, consider resizing the pane on the left showing the project folders to take up less space.
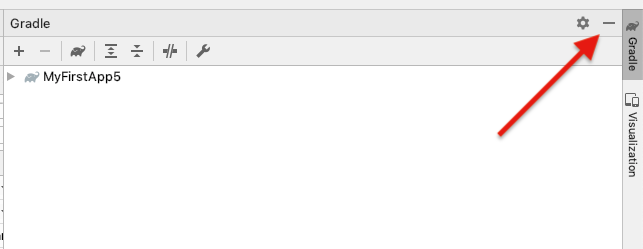
At this point, your screen should look a bit less cluttered, similar to the screenshot shown below.

Step 3: Explore the project structure and layout
The upper left of the Android Studio window should look similar to the following diagram: 
Based on you selecting the Basic Activity template for your project, Android Studio has set up a number of files for you. You can look at the hierarchy of the files for your app in multiple ways, one is in Project view. Project view shows your files and folders structured in a way that is convenient for working with an Android project. (This does not always match the file hierarchy! To see the file hierarchy, choose the Project files view by clicking (3).)
- Double-click the app (1) folder to expand the hierarchy of app files. (See (1) in the screenshot.)
- If you click Project (2), you can hide or show the Project view. You might need to select View > Tool Windows to see this option.
- The current Project view selection (3) is Project > Android.
In the Project > Android view you see three or four top-level folders below your app folder: manifests, java, java (generated) and res. You may not see java (generated) right away.
- Expand the manifests folder.
This folder contains AndroidManifest.xml . This file describes all the components of your Android app and is read by the Android runtime system when your app is executed. 2. Expand the java folder. All your Java language files are organized here. The java folder contains three subfolders:
com.example.myfirstapp: This folder contains the Java source code files for your app.
com.example.myfirstapp (androidTest): This folder is where you would put your instrumented tests, which are tests that run on an Android device. It starts out with a skeleton test file.
com.example.myfirstapp (test): This folder is where you would put your unit tests. Unit tests don’t need an Android device to run. It starts out with a skeleton unit test file. 3. Expand the res folder. This folder contains all the resources for your app, including images, layout files, strings, icons, and styling. It includes these subfolders:
drawable: All your app’s images will be stored in this folder.
layout: This folder contains the UI layout files for your activities. Currently, your app has one activity that has a layout file called activity_main.xml . It also contains content_main.xml , fragment_first.xml , and fragment_second.xml .
menu: This folder contains XML files describing any menus in your app.
mipmap: This folder contains the launcher icons for your app.
navigation: This folder contains the navigation graph, which tells Android Studio how to navigate between different parts of your application.
values: This folder contains resources, such as strings and colors, used in your app.
Step 4: Create a virtual device (emulator)
In this task, you will use the Android Virtual Device (AVD) manager to create a virtual device (or emulator) that simulates the configuration for a particular type of Android device.
The first step is to create a configuration that describes the virtual device.
- In Android Studio, select Tools >AVD Manager, or click the AVD Manager icon in the toolbar.
- Click +Create Virtual Device. (If you have created a virtual device before, the window shows all of your existing devices and the +Create Virtual Device button is at the bottom.) The Select Hardware window shows a list of pre-configured hardware device definitions.
- Choose a device definition, such as Pixel 2, and click Next. (For this codelab, it really doesn’t matter which device definition you pick).
- In the System Image dialog, from the Recommended tab, choose the latest release. (This does matter.)
- If a Download link is visible next to a latest release, it is not installed yet, and you need to download it first. If necessary, click the link to start the download, and click Next when it’s done. This may take a while depending on your connection speed.

Note: System images can take up a large amount of disk space, so just download what you need.
- In the next dialog box, accept the defaults, and click Finish.
The AVD Manager now shows the virtual device you added.
- If the Your Virtual Devices AVD Manager window is still open, go ahead and close it.
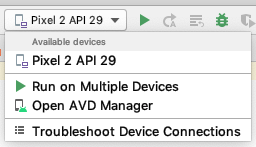
Step 5: Run your app on your new emulator
- In Android Studio, select Run > Run ‘app’ or click the Run icon in the toolbar. The icon will change when your app is already running.
 The icon will change when your app is already running.
If you get a dialog box stating «Instant Run requires that the platform corresponding to your target device (Android N. ) is installed» go ahead and click Install and continue.
- In Run > Select Device, under Available devices, select the virtual device that you just configured. This menu also appears in the toolbar.
The emulator starts and boots just like a physical device. Depending on the speed of your computer, this may take a while. You can look in the small horizontal status bar at the very bottom of Android Studio for messages to see the progress.
Messages that might appear briefly in the status bar
Gradle build running

Waiting for target device to come on line
Источник


