- How to Clean up Your Android Device and «Other» Storage?
- Part 1: Clean up your Android device and «other» storage.
- Part 2: Other tips and tricks.
- Part 3: Recommendation tool: Comprehensive phone manager.
- Правильная работа с файлами в Android
- Saving Files
- This lesson teaches you to
- You should also read
- Choose Internal or External Storage
- Obtain Permissions for External Storage
- Save a File on Internal Storage
- Save a File on External Storage
- Query Free Space
- Delete a File
How to Clean up Your Android Device and «Other» Storage?
Have you ever run into this situation on your Android devices, when you were trying to download some Apps or videos to your phone, an «insufficient storage» message on your phone’s notification bar and, there are large amount of data usage in your internal memory which displayed as «other». If you are reading this article, I guess it’s probably because that you’ve run into this trouble on your device or it was performing even worse.
So how to clean up your Android device, how to clear the «other» storage to release more space? Before looking for a third-party app, why not trying with the Android system itself? Sometimes, the easiest way may be the best way. Check the steps below. Also please kindly note that the follow tips are based on my own Huawei Android 6.0 Marshmallow, as we know, Android devices’ feature are different from each other resulted from various version and brand, so the operation below will be a little differences with yours.
Part 1: Clean up your Android device and «other» storage.
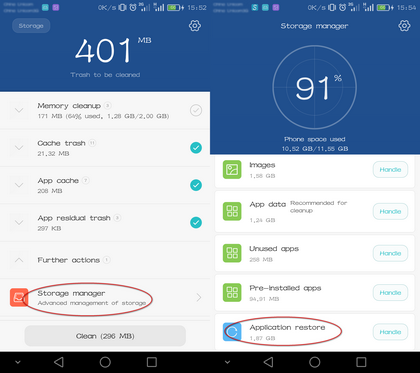
Step 1 Manually clean the app’s cache.
Cache is basically a storage area where data or frequently used processes are saved for quicker access in the future. Many apps on our device are prone to download many images, text, flash, videos etc automatically, if don’t clean them regularly, before long, they will take up large space on your device. So by doing a cleaning of app’s cache you can save much memory of your device and this won’t do any harm or loss to your phone.
![]()
If you’re running Android 6.0 Marshmallow on your device, like my Huawei Android 6.0, simply click on Files and then Clean up. This only can clear your app’s cache, your app residual trash, unused app packages will also be detected and, on the advanced management of storage, you can check all your data usage exhaustively, and select certain contents to clean up.
Step 2 Application restore.
Basically, some gaming apps and messaging apps like WhatsApp may save much gaming data or chat record which takes up large space, and that’s what we usually see the «Other» storage when analyzing the storage. To clean up these data, of course, first you should make sure you no longer need them or already backed up them, then do the cleaning. Some Android version and device version supports restore applications, which could restore the apps to its origin without uninstalling them:
Note: the process of restore will clean up all the app data, so before restoring the apps, you must need to make sure that you no longer need the data or already backed up them.
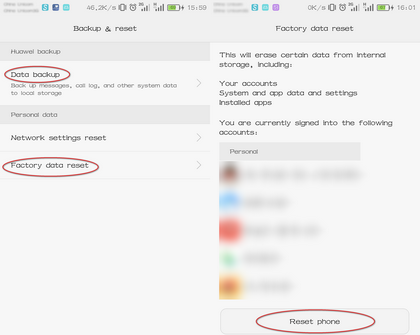
Step 3 Factory reset your device.
If the above steps still could not release your space, the ultimate method, restoring your phone to factory settings like how they were the day it came out of the box. All your data such as contacts, call logs, photos, apps, phone settings won’t be there anymore. I recommend that if your phone has been used over one year and works very slowly, this option could basically give your phone a new life. Of course, do not forget to backup your phone before doing this.
Part 2: Other tips and tricks.
Backing up your data to cloud or use an external memory device such as a microSD card if your device supports also could help. Besides, remember to uninstall the apps you don’t really need, sometimes it may release large space than you expected. You can re-install it when you need it.
Of course, using a third-party app to put your phone in control is a good option as well. In this article, DiskUsage and CCleaner are my two recommendations. DiskUsage could help you identify which files are using up the most space on your phone visually after scanning your phone, of course it will also let you select which ones to delete to release the space. The other one is CCleaner, you may know this App as it is also the most popular application on the computer. It supports to scan all types of data saved on your device and list all the apps with the memory taken up, on the simple user interface, and then recommend what should be deleted after the analysis. Both Apps could be found in Google store.
Please kindly note that clean up your phone just a way to release the space, but doesn’t mean a performance enhance of your phone, including the factory resetting, it may enhance your Android phone’s performance temporarily, before long, it freezes again since the performance of most Android phone are related to their hardware, so don’t mistakenly believe some third-apps claim that they could give your device a better performance. If your phone is too old to perform well, it’s just the time to switch your phone.
Part 3: Recommendation tool: Comprehensive phone manager.
Syncios Mobile Manager
Syncios Mobile Manager is an easy-to-use and powerful iOS & Android Mobile manager, which is well-designed for users who want to manage device contents on PC. It allows you to export contacts, apps, photos, music, ringtone, videos, SMS messages, eBooks and more.
- Sync contacts, messages, call history, audio, photos, videos and other contents to computer.
- Import photos, videos, audios and more media files from computer to iOS/Android devices.
- Help to organize every iOS devices/Android’s file.
- Handy tools: One-Click Backup/Restore, HEIC Converter, Photo Compression, Ringtone Maker.
Syncios iOS & Android manager, an all-in-one management tool for all smartphones, supports transfer data between phone and computer easily and efficiently. Besides, it enables you manage, create, edit, delete device contents straightforward and one-click backup& resotre your phone, so if you want to backup your data before cleaning up your phone, it can be a great alternative. There are more features on its toolbox, like making ringtone, converting HEIC to JPG, compressing photos and etc. Truly a trick. Simply install it on your computer, worth a try.
Источник
Правильная работа с файлами в Android
Сегодня я бы хотел рассказать вам о правильной работе с файлами в ОС Android. Итак, чаще всего у новичков возникают ситуации, когда обычные Java функции не могут корректно создать тот или иной файл в системе Android.
Во-первых, вам нужно обратить внимание на интересную особенность ОС:
когда вы устанавливаете apk приложение в эмулятор или телефон, система Linux (на которой базируется ядро Android) выделяет ему специальный User-ID, который является неким ключом доступа к (sandbox). То есть другие приложения в телефоне не смогут получить доступ к чтению файлов вашего приложения просто так. Кончено, всё это сделано в целях безопасности.
В общем, если вы запустите следующий код:
FileWriter f = new FileWriter(«impossible.txt»);
То этот код вызовет исключение: ‘java.io.FileNotFoundException: /impossible.txt ‘
Тогда как должен в случае отсутствия файла создать его.
Далее стоит отметить, что данное ограничение не распространяется на файлы, записываемые на SDCard. Туда можно писать любые файлы без всяких проблем, правда предварительно нужно добавить в AndroidManifest разрешение на запись:
Код файла на карту:
File fileName = null;
String sdState = android.os.Environment.getExternalStorageState();
if (sdState.equals(android.os.Environment.MEDIA_MOUNTED)) <
File sdDir = android.os.Environment.getExternalStorageDirectory();
fileName = new File(sdDir, «cache/primer.txt»);
> else <
fileName = context.getCacheDir();
>
if (!fileName.exists())
fileName.mkdirs();
try <
FileWriter f = new FileWriter(fileName);
f.write(«hello world»);
f.flush();
f.close();
> catch (Exception e) <
>
Как уже ранее было сказано мною, android приложение находится в некой песочнице, изолированной от воздействия со стороны других приложений по умолчанию. Для того, чтобы создать файл внутри этой песочницы, следует использовать функцию openFileOutput(). Хочу отметить 2 аргумента:
1. имя файла
2. режим доступа к нему со стороны чужих приложений
С первым аргументом все ясно, что касается второго, то режимов существует два: MODE_WORLD_READABLE и/или MODE_WORLD_WRITEABLE.
И ещё, чтобы записать файл можно использовать следующий код:
final String TESTSTRING = new String(«Hello Android»);
FileOutputStream fOut = openFileOutput(«samplefile.txt», MODE_WORLD_READABLE);
OutputStreamWriter osw = new OutputStreamWriter(fOut);
// записываем строку в файл
osw.write(TESTSTRING);
/* проверяем, что все действительно записалось и закрываем файл */
osw.flush();
osw.close();
Для чтения файлов используется метод openFileInput():
FileInputStream fIn = openFileInput(«samplefile.txt»);
InputStreamReader isr = new InputStreamReader(fIn);
char[] inputBuffer = new char[TESTSTRING.length()];
isr.read(inputBuffer);
String readString = new String(inputBuffer);
Для удаления используется метод deleteFile() в контексте приложения/активити. На этом я бы хотел закончить полезный пост, спасибо за внимание!
Источник
Saving Files
This lesson teaches you to
You should also read
Android uses a file system that’s similar to disk-based file systems on other platforms. This lesson describes how to work with the Android file system to read and write files with the File APIs.
A File object is suited to reading or writing large amounts of data in start-to-finish order without skipping around. For example, it’s good for image files or anything exchanged over a network.
This lesson shows how to perform basic file-related tasks in your app. The lesson assumes that you are familiar with the basics of the Linux file system and the standard file input/output APIs in java.io .
Choose Internal or External Storage
All Android devices have two file storage areas: «internal» and «external» storage. These names come from the early days of Android, when most devices offered built-in non-volatile memory (internal storage), plus a removable storage medium such as a micro SD card (external storage). Some devices divide the permanent storage space into «internal» and «external» partitions, so even without a removable storage medium, there are always two storage spaces and the API behavior is the same whether the external storage is removable or not. The following lists summarize the facts about each storage space.
- It’s always available.
- Files saved here are accessible by only your app by default.
- When the user uninstalls your app, the system removes all your app’s files from internal storage.
Internal storage is best when you want to be sure that neither the user nor other apps can access your files.
- It’s not always available, because the user can mount the external storage as USB storage and in some cases remove it from the device.
- It’s world-readable, so files saved here may be read outside of your control.
- When the user uninstalls your app, the system removes your app’s files from here only if you save them in the directory from getExternalFilesDir() .
External storage is the best place for files that don’t require access restrictions and for files that you want to share with other apps or allow the user to access with a computer.
Tip: Although apps are installed onto the internal storage by default, you can specify the android:installLocation attribute in your manifest so your app may be installed on external storage. Users appreciate this option when the APK size is very large and they have an external storage space that’s larger than the internal storage. For more information, see App Install Location.
Obtain Permissions for External Storage
To write to the external storage, you must request the WRITE_EXTERNAL_STORAGE permission in your manifest file:
Caution: Currently, all apps have the ability to read the external storage without a special permission. However, this will change in a future release. If your app needs to read the external storage (but not write to it), then you will need to declare the READ_EXTERNAL_STORAGE permission. To ensure that your app continues to work as expected, you should declare this permission now, before the change takes effect.
However, if your app uses the WRITE_EXTERNAL_STORAGE permission, then it implicitly has permission to read the external storage as well.
You don’t need any permissions to save files on the internal storage. Your application always has permission to read and write files in its internal storage directory.
Save a File on Internal Storage
When saving a file to internal storage, you can acquire the appropriate directory as a File by calling one of two methods:
getFilesDir() Returns a File representing an internal directory for your app. getCacheDir() Returns a File representing an internal directory for your app’s temporary cache files. Be sure to delete each file once it is no longer needed and implement a reasonable size limit for the amount of memory you use at any given time, such as 1MB. If the system begins running low on storage, it may delete your cache files without warning.
To create a new file in one of these directories, you can use the File() constructor, passing the File provided by one of the above methods that specifies your internal storage directory. For example:
Alternatively, you can call openFileOutput() to get a FileOutputStream that writes to a file in your internal directory. For example, here’s how to write some text to a file:
Or, if you need to cache some files, you should instead use createTempFile() . For example, the following method extracts the file name from a URL and creates a file with that name in your app’s internal cache directory:
Note: Your app’s internal storage directory is specified by your app’s package name in a special location of the Android file system. Technically, another app can read your internal files if you set the file mode to be readable. However, the other app would also need to know your app package name and file names. Other apps cannot browse your internal directories and do not have read or write access unless you explicitly set the files to be readable or writable. So as long as you use MODE_PRIVATE for your files on the internal storage, they are never accessible to other apps.
Save a File on External Storage
Because the external storage may be unavailable—such as when the user has mounted the storage to a PC or has removed the SD card that provides the external storage—you should always verify that the volume is available before accessing it. You can query the external storage state by calling getExternalStorageState() . If the returned state is equal to MEDIA_MOUNTED , then you can read and write your files. For example, the following methods are useful to determine the storage availability:
Although the external storage is modifiable by the user and other apps, there are two categories of files you might save here:
Public files Files that should be freely available to other apps and to the user. When the user uninstalls your app, these files should remain available to the user.
For example, photos captured by your app or other downloaded files.
Private files Files that rightfully belong to your app and should be deleted when the user uninstalls your app. Although these files are technically accessible by the user and other apps because they are on the external storage, they are files that realistically don’t provide value to the user outside your app. When the user uninstalls your app, the system deletes all files in your app’s external private directory.
For example, additional resources downloaded by your app or temporary media files.
If you want to save public files on the external storage, use the getExternalStoragePublicDirectory() method to get a File representing the appropriate directory on the external storage. The method takes an argument specifying the type of file you want to save so that they can be logically organized with other public files, such as DIRECTORY_MUSIC or DIRECTORY_PICTURES . For example:
If you want to save files that are private to your app, you can acquire the appropriate directory by calling getExternalFilesDir() and passing it a name indicating the type of directory you’d like. Each directory created this way is added to a parent directory that encapsulates all your app’s external storage files, which the system deletes when the user uninstalls your app.
For example, here’s a method you can use to create a directory for an individual photo album:
If none of the pre-defined sub-directory names suit your files, you can instead call getExternalFilesDir() and pass null . This returns the root directory for your app’s private directory on the external storage.
Remember that getExternalFilesDir() creates a directory inside a directory that is deleted when the user uninstalls your app. If the files you’re saving should remain available after the user uninstalls your app—such as when your app is a camera and the user will want to keep the photos—you should instead use getExternalStoragePublicDirectory() .
Regardless of whether you use getExternalStoragePublicDirectory() for files that are shared or getExternalFilesDir() for files that are private to your app, it’s important that you use directory names provided by API constants like DIRECTORY_PICTURES . These directory names ensure that the files are treated properly by the system. For instance, files saved in DIRECTORY_RINGTONES are categorized by the system media scanner as ringtones instead of music.
Query Free Space
If you know ahead of time how much data you’re saving, you can find out whether sufficient space is available without causing an IOException by calling getFreeSpace() or getTotalSpace() . These methods provide the current available space and the total space in the storage volume, respectively. This information is also useful to avoid filling the storage volume above a certain threshold.
However, the system does not guarantee that you can write as many bytes as are indicated by getFreeSpace() . If the number returned is a few MB more than the size of the data you want to save, or if the file system is less than 90% full, then it’s probably safe to proceed. Otherwise, you probably shouldn’t write to storage.
Note: You aren’t required to check the amount of available space before you save your file. You can instead try writing the file right away, then catch an IOException if one occurs. You may need to do this if you don’t know exactly how much space you need. For example, if you change the file’s encoding before you save it by converting a PNG image to JPEG, you won’t know the file’s size beforehand.
Delete a File
You should always delete files that you no longer need. The most straightforward way to delete a file is to have the opened file reference call delete() on itself.
If the file is saved on internal storage, you can also ask the Context to locate and delete a file by calling deleteFile() :
Note: When the user uninstalls your app, the Android system deletes the following:
- All files you saved on internal storage
- All files you saved on external storage using getExternalFilesDir() .
However, you should manually delete all cached files created with getCacheDir() on a regular basis and also regularly delete other files you no longer need.
Источник


