- Other phones using android
- Informationen zum Datenschutz auf dieser Website
- From Beginner to Professional: All Things About How to Clone Android Phone
- Backup & Restore Data
- Part 1: What Does Clone Phone Refer To?
- dr.fone — Phone Manager: How to Clone A Phone with 1 Click?
- Part 3: 4 Other Ways to Clone Your Phone
- 1. SHAREit
- 2. CLONEit
- 3. Google Drive
- 4. Phone Clone
- Part 4: How to Find Out if Your Phone is Cloned or Not?
- 1. Low battery capacity
- 2. Check the specification of the phone using third-party app
- 3. Unable to make or receive calls
- Some other signs that your phone is cloned:
- Part 5: How to Protect Your Mobile Phone from Cloning without Permission?
Other phones using android
To connect an Android-Device with the MyPhoneExplorer , there are three different options:
— WIFI
— Bluetooth
— USB-Cable
Video-Tutorial with Motorola Droid
To successfully make a connection, please follow this guide:
1. Download the newest Version of MyPhoneExplorer from www.fjsoft.at: Download
2. Install the software on your Desktop Computer.
Now it depends on which connection you want to use, so pick an option and follow the guidelines:
— Connecting via WIFI:
3.Connect your Android Device with your WIFI Router.
Notice: Your cell phone is supposed to be connected with the same WIFI-Router as your Desktop PC!
5. Open the MyPhoneExplorer Client on your Android-Device.
6. Start the MyPhoneExplorer on your Computer.
7. Go to File -> Settings .
8. In the Connection-Tab under Phone Typ choose Phone with Google Android-OS and in Connect via. choose the option Autodetect .
9. Confirm your choice with the OK button.
10. Connect with your phone using F1 or File->Connect .
Notice: If your android device doesnt use the same Subnetwork as your PC (or the IP-adress of your cell phone can’t be determined due to some other reasons), there is also the possibility to enter your cell’s IP manually into the MPE (the cell phone’s IP is show in the client on the cell phone).
— Connecting via Bluetooth:
Notice: Bluetooth is currently not working on all phones. This is related to the different ways Bluetooth is implented. So if you cant get your phone connected via Bluetooth, try Wifi or USB.
3. Install the latest Version (at least 1.0.7) from the market!
4. Open MyPhoneExplorer Client on your cell.
5. Enable Bluetooth on your cell, switch your bluetooth mode to «Discoverable» and pair your cell phone with your computer.
6. Start MyPhoneExplorer on your computer.
7. Choose «File» -> «Settings».
8. Choose «Phone with Google-OS», select «Connect via Bluetooth» and Pick the right Bluetooth Port»
10. Connect with the «F1»-button or via «File->Connect».
— Connecting via USB-Cable:
3. Download ADB Driver (look up the Linklist below for further instructions).
4. Enable USB-Debugging on your cell phone. This option is hidden in
Settings -> Application -> Development
or
Settings -> Apps -> Development
or
Settings -> Developer options
ATTENTION: On Android 4.2.2 and newer the USB-Debugging option is hidden, here is a tutorial how to unlock USB-Debugging for this devices: http://www.droidviews.com/how-to-enable-developer-optionsusb-debugging-mode-on-devices-with-android-4-2-jelly-bean/
With this devices there is also a security prompt on the phone when you want to connect the first time with MyPhoneExplorer — this has to be commited.
5. Connect your cell phone and install the ADB Drivers.
If there are different options coming up after you plug in your cable, choose Charge Phone , Charge Phone only or something similar!. If you choose «Connect your phone» or something similar, your content on the SD Card is only listed to Windows and cant be accessed on your android phone nor in the MyPhoneExplorer.
During the whole process keep an eye on the phones screen. You may get a message like this:
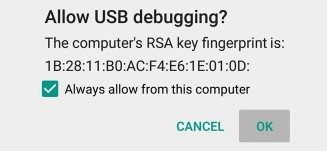
Please select «Always allow from this computer» and confirm with «OK»
If you connect the cell phone via usb-cable with MyPhoneExplorer, the MyPhoneExplorer tries to install its Client on the phone. But you can also do this manually (if you prefer to do so).
6. Start the MyPhoneExplorer on your Computer
7. Select File -> Settings .
8. In the Connection-Tab under Phone Typ choose Phone with Google Android-OS and in Connect via. choose the option Autodetect .
9. Confirm your choice with OK
10. Connect with the «F1»-button or via «File->Connect».
Now your Device should be connected to the MyPhoneExplorer.
A Selection of ADB-Drivers can be found here:
Manufacturer-dependent driver
Notice: The Drivers are device-specific and should only be applied to the given model!
Please send me a message if you’ve found ADB-drivers to an unlisted device.
HTC:
To get the most up to date drivers for HTC suggest downloading HTC Sync and part installing it. The first steps are to unpack and install the drivers. Once you’ve done that you can abandon the rest of the Sync install.
There are also extra packages for the HTC-Driver, but some of them are directly installed side-by-side with the the Android-SDK .
FAQ — Frequently Asked Questions
Troubleshooting:
How can you solve problems on your own?
— Connection can’t be established or continues to fail:
At all time you should use the newest version of the Software and the Client. If you have problems, please try to download the newest version from the website respectively the market!
Wifi: On some devices there are issues concerning the standby mode of android. To enable a workaround, look up the «settings» of the client (on your phone!) and choose «Avoid Standby-Mode !
USB:
Did you install the ADB Drivers correctly?
Did you enable USB Debugging?
Did you choose «Charge only» at the moment you plugged in the usb cable? If you did, maybe give another option a try
If the problem cant be solved using this troubleshoots, please open a new thread in the forum containing your Debug-Log .
— How to create a Debug-Log?
This can be found in the MyPhoneExplorer in «File->Settings» click on «Show Log file»
or (if the MyPhoneExplorer crashed (note: reopen MPE deletes old Debug.log)):
Windows -> Start -> Run (or on Vista/Win 7 just type into the field):
%appdata%
Go to the folder «MyPhoneExplorer», open the file Debug.txt and post the content into your thread!
(It might be a good idea to modify your IMEI with the String «IMEI» or something you prefer before you post the log ).
— Is my phone supported by MyPhoneExplorer?
An up-to-date list can be consulted here:
http://www.fjsoft.at/de/supportedphones.php
This list doesnt give any guarantee! It only gives an idea on which phones should be supported. There might be some functions which wont work with your model.
— I only want to sync one specific calendar, but how?
I the clientsoftware on your android phone, you can choose which calendars to sync in the settings.
— I want to sync my outlook/thunderbird contacts, but a lot of them are missing. What did I do wrong?
Open File->Settings->Sync
Here you should have choosen Outlook/Thunderbird in the contact field. Now open ‘Advanced->Exceptions’.
All you have to do now is to disable the checkbox for ‘Add new contacts from Outlook/Thunderbird only if they contain at least one phone number’.
Now it should work.
— What are the 3 different ways to install the MPE App on my phone:
1) install the app from the market (like any other software!) . this should not be a problem! Search for MyPhoneExplorer and install it!
2) download MPE Software for computer -> install it, set up the usb connection (see the FAQ). The app should be installed by MPE as a default procedure during the first connection (when you try to connect MPE to your phone via USB!)! After the app is install you can (if you want to!) disconnect and reconnect via Bluetooth or Wifi (after making some changes to the settings -> FAQ)! The installation of the App is only made via USB! Keep that in mind.
3) download the app from the web (e.g. beta apk or from whereever you’ve got it), enable the checkbox for «untrusted applications» in android phone -> settings -> application and install it via some file manager!
Warning: Disable the checkbox after the installation for safety reasons!
I recommend version 1 or 2. You should not go for version 3 unless you really need to.
  | FJ Software Foren-Ьbersicht » FAQ |
| Nдchstes Thema anzeigen Vorheriges Thema anzeigen Du kannst keine Beitrдge in dieses Forum schreiben. Du kannst auf Beitrдge in diesem Forum nicht antworten. Du kannst deine Beitrдge in diesem Forum nicht bearbeiten. Du kannst deine Beitrдge in diesem Forum nicht lцschen. Du kannst an Umfragen in diesem Forum nicht mitmachen. |
Informationen zum Datenschutz auf dieser Website
Die Webseite kann Cookies verwenden, um Ihre Anmeldeinformationen zu speichern und die Website-Funktionalitдt fьr Ihre Verwendung zu optimieren. Weitere Informationen sind auf folgenden Seiten verfьgbar Datenschutz und Cookies
Источник
From Beginner to Professional: All Things About How to Clone Android Phone
Here is a definitive guide to show you how to clone Android phone in 5 different ways. If you’re frustrated with Android phone cloning, here we provide solutions.
Backup & Restore Data
• Filed to: Backup Android • Proven solutions
Everyone loves to have a new Smartphone in their hand. The main problem that all new phone buyers face is how to get available data on their old device to the new phone.
If you are moving from a low version of the Android phone to the Android phone’s upgraded version, then there are tools on offer online that you can use to easily transfer all the contents from your old Android phone to the new Android device. This type of transfer of all files from one Android device to another is commonly referred to as clone Android phone.
Part 1: What Does Clone Phone Refer To?
The clone phone is nothing but to make a copy of the entire data from one phone to the other phone. The reasons to clone the Android phones might differ from person to person:
- You might want to keep track of the activities of the phones of your teenage kids or employees or your partner;
- Another reason to clone Android phone would be that you are going to change from an old Android phone to a new Android device and you do not want to miss all the important data and files on your phone. There is a chance for the data in the Android phone to get lost in seconds.
This is why it is very important to find a cloning tool that also offers the option of clone Android phone back up so that no data is lost during the transfer. In this post, you can learn 5 different ways to clone Android phone to PC or other security places. You can check these methods one by one as followings:
dr.fone — Phone Manager: How to Clone A Phone with 1 Click?
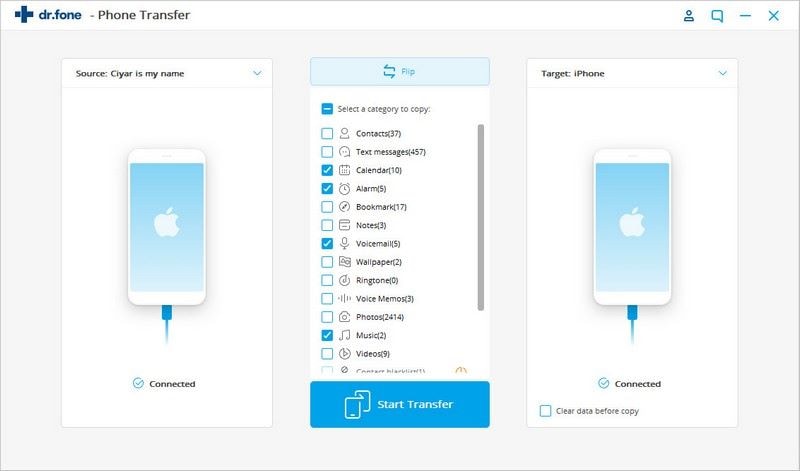
dr.fone — Phone Transfer is the best software you can use to carry out phone to phone transfer. It will easily and quickly transfer your apps, messages, videos, photos, music, messages, etc., from your old Android phone to the latest Android phone or iPhone you have purchased. This tool also offers the ability to clone Android phone to PC in just one click. There will be no loss of any file or data that you back up from the phone to the PC. The files will also not get lost when you carry out the transfer from the PC to the new Android phone using the software.
Below is the step by step guide to use dr.fone — Phone Transfer to clone Android phones:
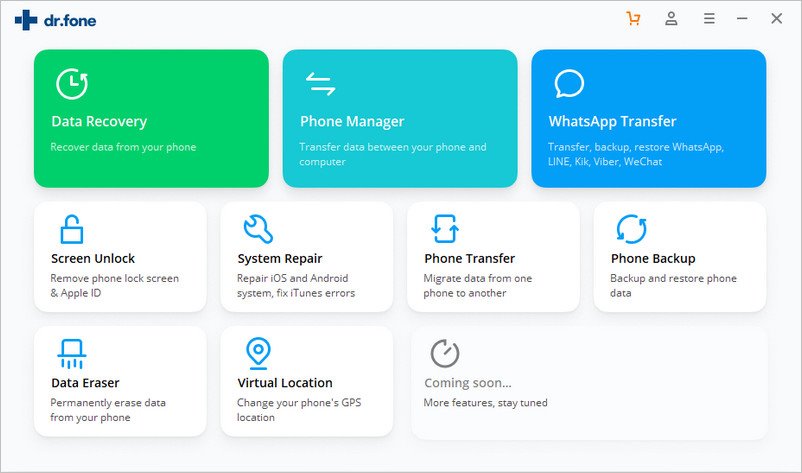
Step 1: Download, install and launch this phone cloner on your Windows or Mac computer. Then, choose the «Phone Manager» option and click on it.
Step 2: Connect both the old and the new Android phones to the PC or the laptop. You should be using a computer or laptop that has more than two USB connectors to connect both the handsets at the same time. (If you need to clone Android to iPhone, just connect the target iPhone to the USB cable and continue the following steps.)
Step 3: When the devices are recognized by the program, you’ll see both the phones along with the source phone information. There will be a box shown in between the two phones where you can choose the data that you would like to transfer from the source to the destination device. As you are looking to clone Android phone in full, you need to choose all options.
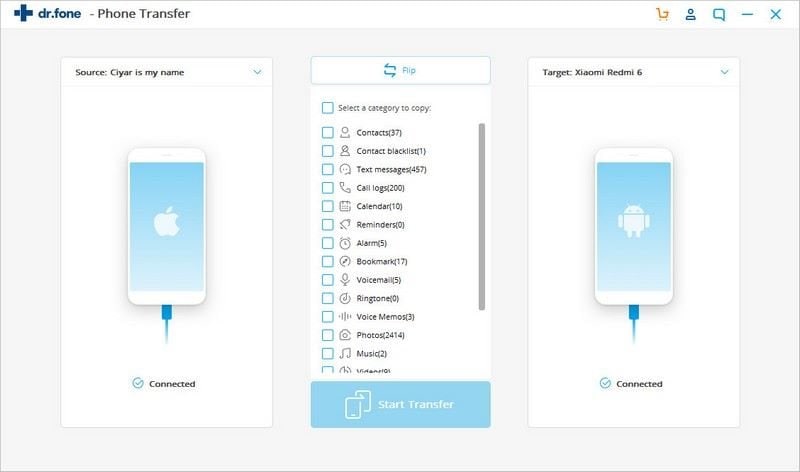
Step 4: After this, you just need to click on the «Start Transfer» button to initiate the transfer of data from the old phone to the new one. Once the transfer is complete, you can remove the phones from the PC.
That’s the way to clone your phone integrated. I hope it can help you.
Read Also:
Part 3: 4 Other Ways to Clone Your Phone
Here we also provide 4 other solutions to help you switch data and clone your new phone. Let’s check them out!
1. SHAREit
SHAREit is a very popular app used on Android devices that help in the very quick transfer of files and photos from one phone to the other. It has over 700 million users and offers wireless transfer of data at lightning speed. With it, there is no need to use the Bluetooth option to transfer files from one device to the other if you have SHAREit installed on both the devices. You can download this app for free from the Google Play Store.
Now, let’s check the detailed steps as follows:
[Update] If SHAREit is not available on both the devices, then it has to be first downloaded and installed on both the devices.
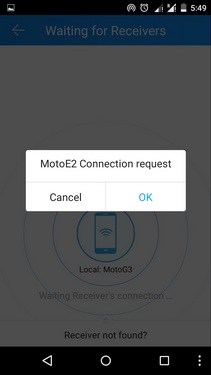
Step 1: Open the app on the old Android or the source Android device and then tap on the «Send» option. You will be asked to choose the files that you would like to transfer. Choose the necessary files and then tap on the Next option.
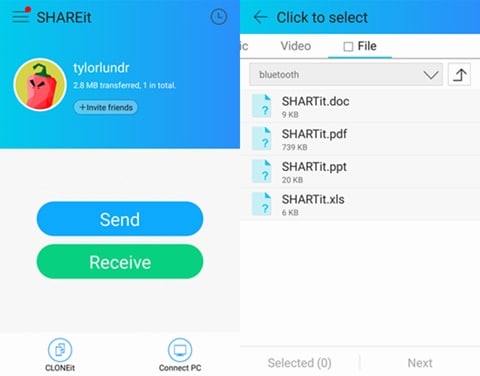
Step 2: It is important to open the SHAREit app on the receiver’s device as well. The target Android device should be brought closer to the source device. Once you spot the availability of the receiver’s device on your source device, you need to mark the receiving device.
Step 3: Now, the files from the source phone will be transferred to the receiver phone.
Note: It is important that both the phones are securely connected to the Wi-Fi option or hotspot to send and receive the files.
2. CLONEit
CLONEit is another popular app that you can use to clone Android phone easily. There will be no loss of the quality of the items that you transfer between the phones using the CLONEit app. There is no need to depend on any cables and wait for a long time to transfer the contents of your old Android phone to a new Android phone. This app will start a private hotspot to send and receive data between the phones. CLONEit can create Android phone backup and transfer the content from one device to another in 12 different types of mobile data.
Here are some tips for using CLONEit to migrate data from Android to another device:
- This app need be downloaded and installed on both the source and the destination device.
- The source Android phone must be chosen as the «Sender» device and the destination Android phone should be chosen as the «Receiver» device.
Then, you can follow the onscreen instructions to clone Android phone to other devices easily.
3. Google Drive
Google Drive is an app that allows you to store data in the cloud. It can be used as the clone Android phone backup to create a backup of all the data you have in your old Android phone. You can use the Google drive to transfer data from old Android phone to a new one.
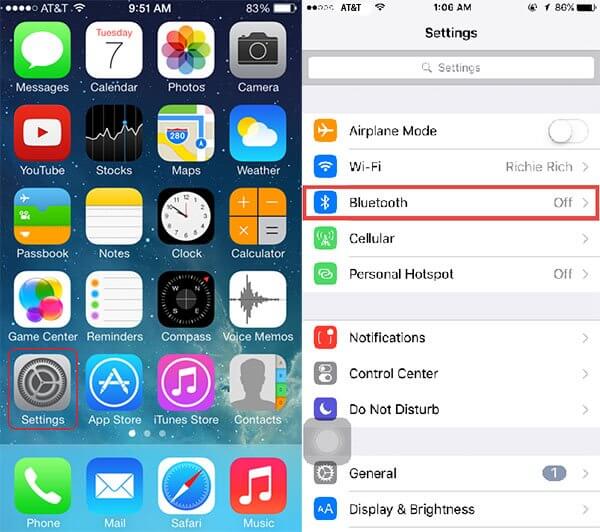
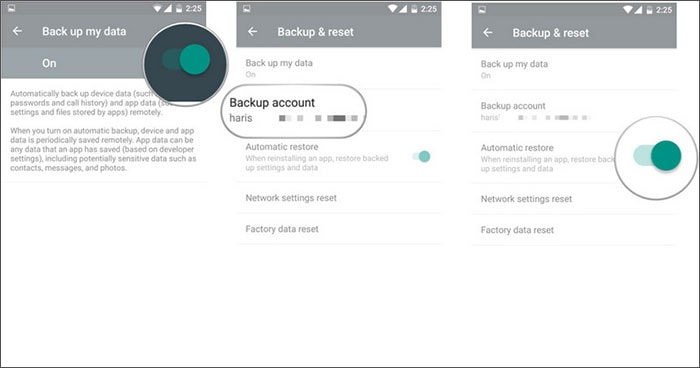
Step 1: Open your old Android phone and visit the Settings option. Scroll to choose the Backup and Reset option. Turn this option ON to create a backup of your data.
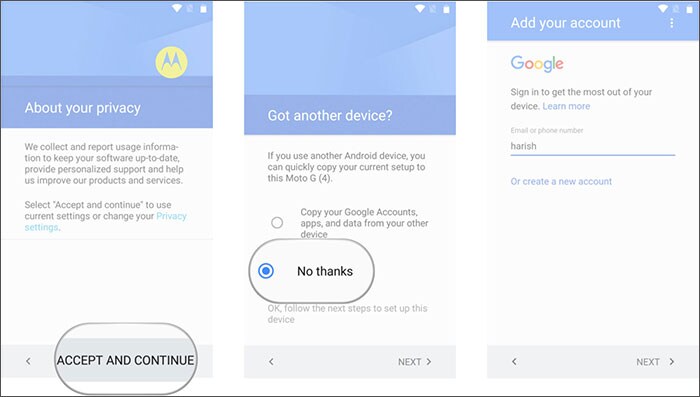
Step 2: After the backup data is fully stored in the Google Drive, you should switch on the new Android phone to carry out the setup.
Step 3: Log in to the Google account on the phone using the credentials. Be sure that the Google account is linked to the same old account you used in your old Android phone.
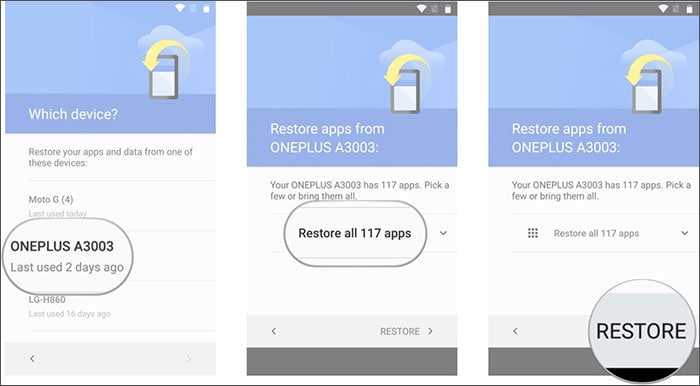
Step 4: The device will automatically sync to the Google account once your sign in is successful and the backup files will be seen on the new device. Choose the latest backup file and tap on the restored option to clone Android phonees to the new device.
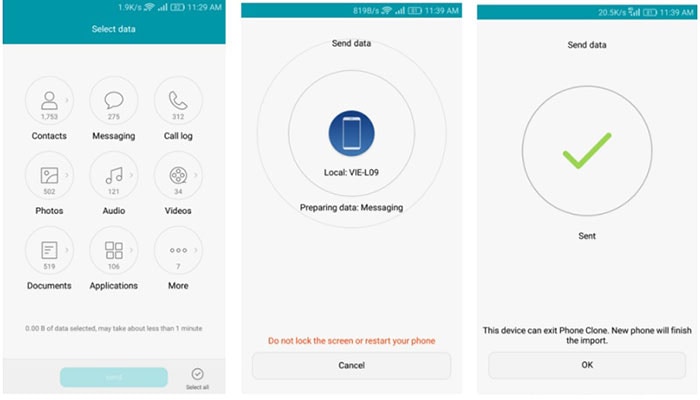
4. Phone Clone
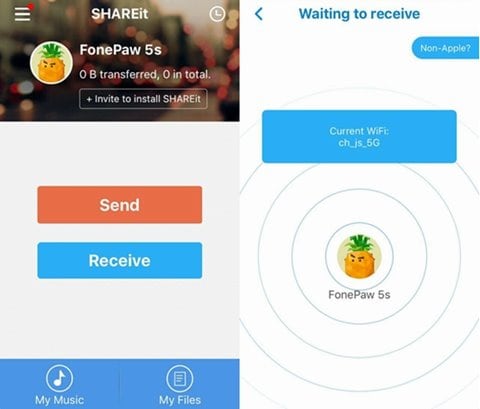
This is a new app that is designed to help transfer data from one Android phone to the other wirelessly. There is no need to set up multiple Google accounts in the new phone to transfer old files. This app offers a user-friendly interface and the transfer of data takes place instantly.
Step 1: Download and install Phone Clone on the old and new Android phones and open the app on both the phones.
Step 2: Choose the old phone as the sender and the new phone should be marked as the receiver. Now, your phone will turn into a Wi-Fi hotspot.
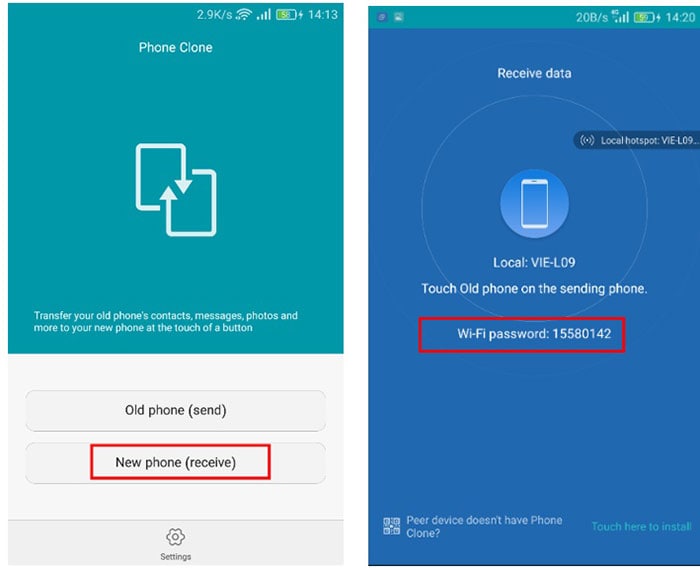
Step 3: The sender device will be looking for Wi-Fi networks and establish a connection with the sender phone by choosing the newly created Wi-Fi hotspot on the sender device.
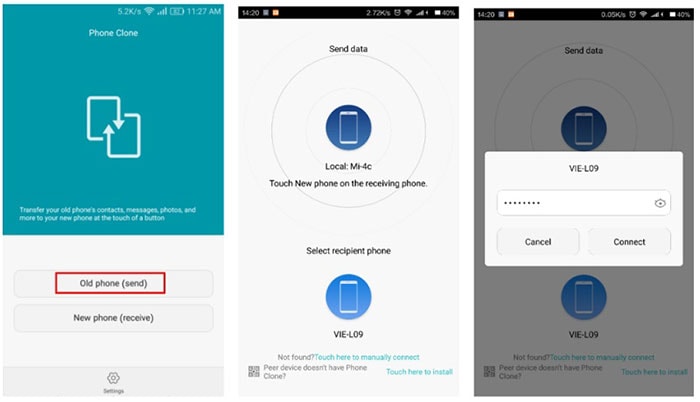
Step 4: Once the secure connection between the two devices is established, you get to the clone Android phone by choosing the data on the source device. Then choose the «Send» option to transfer the data from the old phone to the new phone.
Part 4: How to Find Out if Your Phone is Cloned or Not?
The security of your mobile phone is always with the threat. There is always a possibility that your phone is cloned. This way all the important data and information you have on your phone can be accessed by fraudsters. The following are some of the ways to know if your Android device is cloned or not.
1. Low battery capacity
If you experience battery draining on the phone to be quicker than normal, then your phone might be bugged. If your phone is cloned, then the activities of your phone are getting recorded and sent to a third party. This will result in excess battery usage and it drains off quickly.
2. Check the specification of the phone using third-party app
Go to the Google Play Store on your phone and then look for the Antutu Benchmark App. Download and install this app on your phone. This software will be able to test the speed of the handset and also show the specifications of your phone and its name. If the manufacturer’s name displayed on the screen is different from what you are holding, then your device is cloned.
3. Unable to make or receive calls
It is important to take note of the times when you are not able to make or receive calls on your Android phone. If the Android phone is cloning at the same time, then you might get a message stating that the mobile number is already in use. This is a sign that your Android phone is cloned.
Some other signs that your phone is cloned:
- If there are clicking sounds or distant voices or static voices that you hear on your phone when making conversations, and then you should be worried that your phone is cloned.
- If the phone shows unusual behavior like screen lighting up when not in use or you see an automatic reboot, then it is possible that your phone is under cloning.
- If you have pressed the shutdown button and your phone takes a longer time to shut off than normal, then it might be a victim of cloning.
Part 5: How to Protect Your Mobile Phone from Cloning without Permission?
If you suspect that your Android phone is being hacked or if there is some unfair play, then you can check it by following a simple procedure. Here, you should make use of the Google «Find My Phone» feature to find out the location of the phone. If Google is not showing the same location where you are and are showing some other location, then you can be sure that your phone is hacked.
The following are some of the tips you can follow to prevent your Android phone from getting cloned and to prevent anyone from accessing the phone without permission.
- Keeping the phone with you and not allowing any other person to have access your phone is a way to prevent it from getting cloned.
- Securing the phone with a special PIN that cannot be easily traced or with a biometric lock is one way to not worry about clone Android phone backup.
- It is very important not install any of the unauthorized apps on your phone as it can easily make way for the clone Android phone.
- Using a security app can prevent the phone from hacking.
- It is important that you clear the cookies, cache and the browsing history of your phone every week or regularly so that no one can gain access to what you do online and where all you visit.
- Turning off the Wi-Fi when you are not accessing the internet and also keeping the Bluetooth off when not in use will prevent easy third-party access to your phone.
Источник


