- Playing with elevation in Android
- What is that shadow all about
- Elevation tweaks in action
- One last thing before you go
- TextInputLayout Styling
- Hint color
- Label, Helper and Error
- Fonts
- Spaces
- Bottom line color
- Box background-color
- Cursor and Selection
- Palette
- Наложение двух компонентов
- Идентификаторы
- Tooltip (Подсказка)
- v.3.4-3.1
Playing with elevation in Android
Everyone knows that Material Design has shadows. Most know that you can control the virtual Z coordinate of Material elements in Android by using the elevation property, to control the shadow. Very few know that there’s so much more you can do to tweak the shadows your UI elements cast!
Update 6th Nov 2018: I just published a follow-up to this article with new APIs added in P, and a bunch of other goodies. Do check it out!

What is that shadow all about
In Material Design, the elevation is a manifestation of the virtual Z coordinate of a material plane relative to the screen’s “base” plane. For example:
 Image shamelessly ripped from the Material Design guidelines.
In the Material Design system, there are two light sources. One is a key light that sits above the top of the screen, and an ambient light that sits directly above the centre of the screen:
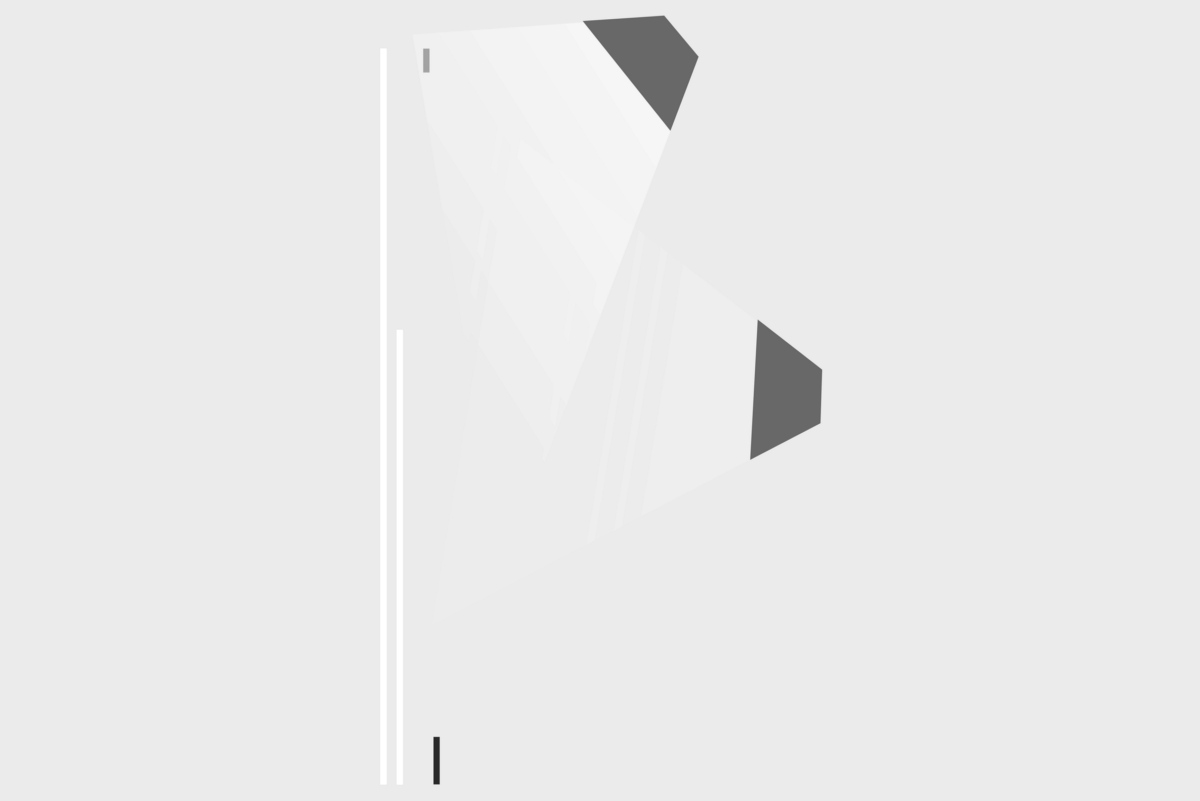 Image shamelessly ripped from the Touchlab blog.
These two lights cast each their own shadow, one which is mostly affecting the bottom edge of a material sheet (key light), and the other which is affecting all edges (ambient light):
 Image derived from the Material Design guidelines.
The elevation property directly controls the shape of the resulting shadow; you can see this clearly with buttons, which change their elevation based on their state:
 Image from Vadim Gromov’s Dribbble.
You may think that the elevation property is the only way to control how shadows look, but that’s not true.
In Android, there is a very little known API called Outline that is providing the required information for a Material sheet to project a shadow. The default behaviour for View s is to delegate the outline definition to their background drawable. ShapeDrawable s for example provide outlines that match their shapes, while ColorDrawable s, BitmapDrawable s, etc. provide a rectangle matching their bounds. But nothing says we cannot change that, and tell a view to use a different ViewOutlineProvider , using the setOutlineProvider() method:
If we control the ViewOutlineProvider , we can tweak the resulting Outline , tricking the OS into drawing whatever shadow we want:
You can use elevation and Outline to do all sorts of tweaks to the shape and position of an elevation shadow:
 Believe it or not, I have actually captured this one myself on my phone.
You will notice how the shadow here does not just adapt to different elevation values, but is also translated around and gets a larger or smaller size than the view itself.
Another thing you can do is to assign a shape that is different from the actual outline of the view itself — I cannot think of any situation in which this would make sense, but you could. The only limitation is that the shape must be convex. There are convenience methods on Outline to have ellipses, rectangles and rounded rectangles, but you could also use any arbitrary Path , as long as it’s convex.
Unfortunately it’s not possible to exaggerate some effects too much, since as you can see there are some shortcuts the system takes when rendering the shadows which will create some rather annoying artefacts when you hit them.
In case you are curious how shadows are rendered in Android, the relevant code is in the hwui package in AOSP — you can start looking at AmbientShadow.cpp (note: starting with Android 10, hwui is not really used anymore, and everything is rendered by Skia instead).
Another limitation is that we cannot tint the elevation shadow, we’re stuck with the default grey, but to be honest I don’t believe that’s a bad thing 😉
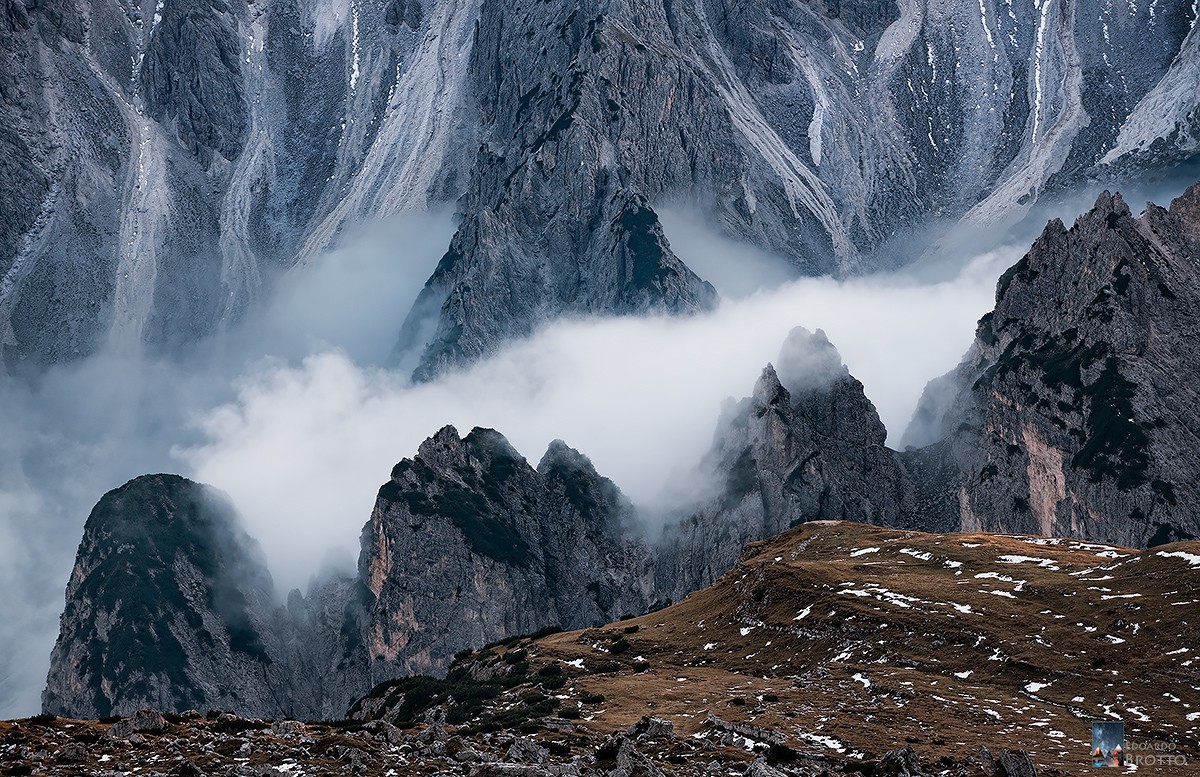
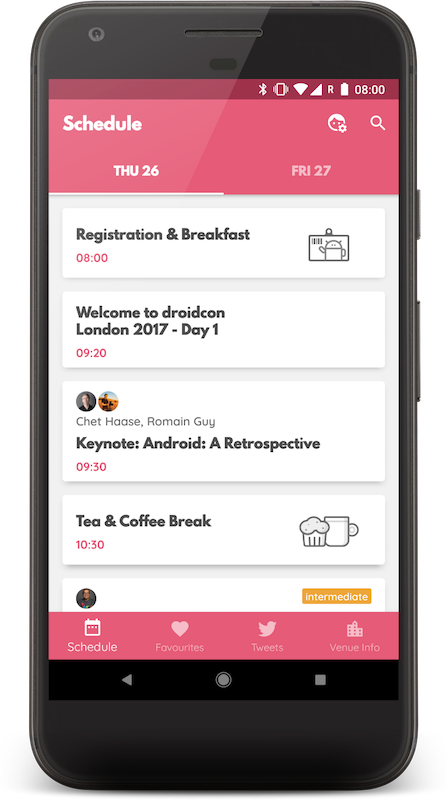
Elevation tweaks in action
I’ve used this technique to come up with a peculiar elevation appearance for the cards in Squanchy, an open source conference app I’ve been working on in the last year:
As you can see, the cards have a shadow that looks way more diffuse than the regular elevation shadows. This is obtained by having an Outline that is 4dp smaller than the card, and an elevation of 4dp :
The cards have an android:stateListAnimator that also tweaks their elevation and translationZ based on their pressed state, like Material buttons do. You can see how the cardInset* attributes are then used in the CardLayout code to shrink the Outline that we provide to the system.
When you scroll the schedule in Squanchy, you might notice that the shadow tends to change size as a card scrolls along the Y axis:
If the effect is too subtle in a gif for you to see, this image makes it crystal clear:
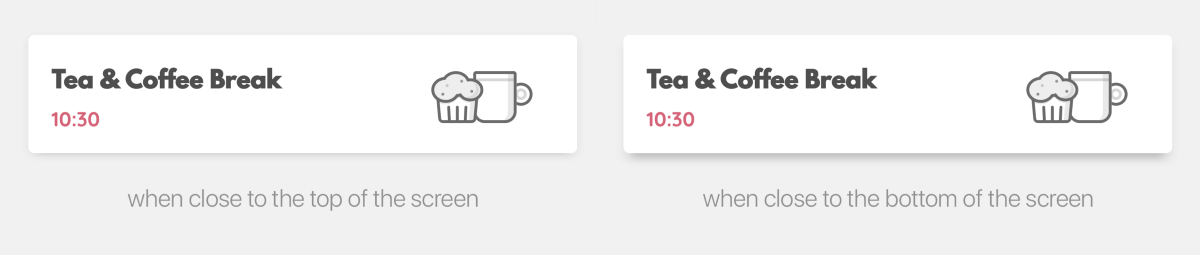
How is that possible? We definitely don’t change the elevation and outline based on the y-position of an item (we could, but it’s really not a good idea as it requires recalculating outlines on each scroll event).
You’ll remember I mentioned earlier how there are two shadows in the Material Design environment, one which sits above the top of the screen, and one that sits directly above the centre. Well, the top light — that is the key light — is casting a longer shadow when an item gets farther away from it. This is actually something that is always true in Android, you just don’t notice it as much in normal circumstances. The Squanchy style makes it more obvious though, and you can even exaggerate it further by using a higher elevation value:

One last thing before you go
Lastly, remember that Outlines aren’t just used for shadows, but by default they define the clipping of the view too! If you have a weird outline and don’t want it to influence the drawing of your actual view, you’ll want to call setClipToOutline(false) on it to avoid nasty surprises.
This is only important when the Outline you provide has canClip() returning true , which is the case when the outline is a rectangle, a rounded rectangle, or a circle. Non-round ovals, and arbitrary paths, are not able to provide clipping, so setClipToOutline() has no effect in those cases.
Fun fact: rectangles and circles are all internally represented as special cases of rounded rectangles. A rectangle is a rounded rectangle with a corner radius of zero, and a circle is a rounded rectangle whose corner radius is equal to half the circle height/width.
If you want to read some more on the topic, the Android Developers website has a page on Defining shadows and clipping views, that goes through the same topics with code examples, and links to some more javadocs.
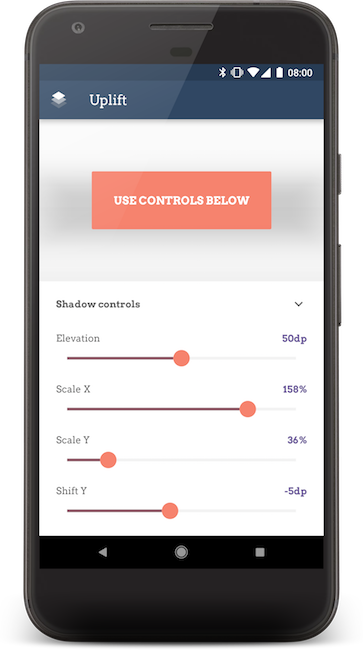
To play around with elevations on your own Android device, I have cooked up a simple playground app:

The code for the playground app is open source on GitHub.
Источник
TextInputLayout Styling

Today, with the material components, we have at least 3 out of box implementations of input layout: Default, FilledBox, and OutlinedBox. And we want to briefly walk through their styling:
If you are looking for a brief solution you can use this table. Below you can find the description of each of these parameters in detail.

Hint color
Hint color could be set via “android:textColorHint” parameter of TextInputLayout. This parameter also changes the label default color (label focused color could also be changed in other ways). Let’s set a purple color (#673AB7) as an example.
Label, Helper and Error

Such parameters as “app:hintTextAppearance”, “app:helperTextTextAppearance” and “app:errorTextAppearance” together with all the necessary text parameters of styles.xml should be used to customize labels, helpers and errors in TextInputLayout. The parent of the text appearance style should be TextAppearance.AppCompat or some of its children.
Also, please keep in mind the following:
- “ app:hintTextAppearance” affects the focused label color and label size in any state;
- when an error is shown, the bottom/border line will have the color indicated in the “android:textColor” parameter of errorTextAppearance. This color will be changed to the default once the error is removed.
Here is the TextAppearances for error and helper that was used in the above shown TextInputLayouts:
Fonts

Fonts of all elements except inputted text (label, hint, error, and helper) could be easily changed in the program via the typeface parameter of TextInputLayout. We have done it in the following way:
Spaces

Label’s, Helper’s and Error’s spaces are connected to the EditText in the TextInputLayout. So, to increase or decrease spaces between the error/helper messages and bottom line/border you should use “android:layout_marginBottom” parameter, between the label and the top of the text, or add some space on the start of the error, helper and the label, and you should set positive or negative padding to the EditText. But you should understand that this will affect the text inside the InputLayout so, it would be better if horizontal spaces were symmetric from both sides.
As an example, let’s increase space above the errors for Default and OutlinedBox input layouts and decrease for FilledBox input layout. Also, let’s add some extra space at the start of the input layouts.
Bottom line color
Bottom line color could be changed with “app:backgroundTint” attribute of EditText view. Pay attention to the prefix, “app:” that makes this parameter back-compatible and useful even for Android API 16.
As for the OutlinedBox, it does not have the bottom line but has an outline instead. To change its color we should use “app:boxStrokeColor” parameter, but this parameter changes stroke color in the focused state only. Changing the default state of the stroke is a bit tricky. We should override mtrl_textinput_default_box_stroke_color color. The line below should be added to the color.xml file:
Let’s make the bottom line and the outline stroke color purple (#673AB7) as well.
Box background-color
This element is present in Filled and Outlined input layouts and can be changed via “app:boxBackgroundColor” parameter. Let’s change this parameter to the transparent purple (#26673AB7) only for FilledBox input layout.
Cursor and Selection
Finally, we get to the most interesting part — how to change the cursor and the selection handles. Most of you have already tried to use “app:textSelectHandle” parameters, that allow changing the drawable of the cursor handle and selection left and right handles. But how to change the color without drawing custom drawables and without changing the main application colors? It is not the secret that the cursor and handles color, as well as label color in focus mode, take their color from the AppTheme “colorAccent”. Of course, we can change it for the whole project but it is not obligatory. We can just use ThemeOverlay and change the “colorAccent” for a single view. We should inherit our style from ThemeOverlay.AppCompat and set it as the “android:theme” parameter of the view and that is all. As for the selection highlight, you can change it via android:textColorHighlight of the EditText.
In the example above was used android:color/holo_blue_light:
So, my final layout looked like this:
colors.xml includes the following colors:
styles.xml includes the following styles:
Tap the 👏 button if you found this article useful!
About the Author
Dmytro is Android Developer at OmiSoft, whose inner perfectionist does not allow to be content with mediocre results but forces him to move forward to excellence.
Need an Android mobile app with clean & maintainable code? Click here to get an estimate! Or find us on Facebook and Twitter.
Источник
Palette
На панели Palette находятся компоненты пользовательского интерфейса: View, Layouts, ViewGroup.
Виджет — это объект View, который служит интерфейсом для взаимодействия с пользователем. Если сказать предыдущую умную фразу простым языком, понятным даже коту, то виджеты — это обычные элементы управления: кнопочки, текстовые поля, флажки, переключатели, списки.
В сети можно встретить разные способы наименования на русском — контрол, вьюха, представление и т.д. Мы с вами будем использовать термин компонент. А знаете почему? Берём крайние буквы слова, отсчитываем по три следующих символа и выкидываем их на свалку. Что остаётся? Ну вы поняли — к омп о нен т. Красиво спрятались.
Кстати, в последних версиях Android Studio в режиме Design появилась панель Component Tree, хотя раньше в Eclipse аналогичная вкладка называлась Outline. Видимо, разработчики из Гугла читали эту статью и внесли поправки.
Стандартные элементы имеют привычные свойства: ширина, высота, цвет и т.п.
Другие настройки могут сбить с толку других программистов, поэтому не изощряйтесь в остроумии.
Выравнивание (gravity) — это ориентация в контейнере (alignment). Например, вы хотите выровнять текст надписи по правому краю, тогда свойство gravity будет иметь значение right. Набор значений для gravity достаточно ограничен: left, center, right, top, bottom, center_vertiсаl, сliр_horizontal и еще некоторые.
Обратите внимание, что в Android есть два сходных атрибута выравнивания: android: gravity и android: layout_gravity. Разница заключается в том, что android: gravity — это настройка, используемая компонентом, а android: layout_gravity применяется контейнером. Например, можно установить для android: gravity значение center, чтобы текст в EditText был выровнен по центру. Аналогичным образом можно выровнять EditText по правому краю LinearLayout (который является контейнером), установив android: layout_gravity=»right».
У компонентов также есть атрибут android:tag, который можно использовать для хранения каких-то промежуточных данных. Также можно устанавливать теги программно. Напишем надуманный пример:
Наложение двух компонентов
Вы можете использовать не только положительные, но и отрицательные значения для атрибута layout_marginBottom или родственных ему. При этом можно наблюдать эффект, когда следующий компонент будет «наезжать» на ваш компонент.
Идентификаторы
Те компоненты, к которым вы будете обращаться в коде, нужно обязательно присваивать идентификаторы. Кроме того, они помогут сохранить состояние при поворотах: текст в текстовых полях, статус переключателей и т.д.
Tooltip (Подсказка)
В Android 8.0 (API 26) у View появилась возможность присвоить компоненту подсказку, которая появляется при долгом нажатии или при прохождении курсора мыши (бывает и такое).
Подсказку можно установить через XML-атрибут.
Можно установить подсказку программно, а также получить текст.
v.3.4-3.1
В версии 3.2 добавили ChipGroup, Chip, BottomAppBar. В версии 4.1 появился новый раздел Helpers. В версии 4.2 список компонентов снова изменился.
Источник


