- Synchronize Outlook and Apple iPhone or iPod touch contacts
- Export your Outlook data
- How to Import Outlook Contacts to iPhone
- Part 1. How to Import Outlook Contacts to iPhone via iTunes
- Part 2. How to Export Outlook Contacts to iPhone via iCloud
- Part 3. How to Transfer OutlookВ Contacts toВ iPhone in a Simple Way
- Part 4. How to AddВ Outlook Contacts to iPhone through Exchange
- The Bottom Line
Synchronize Outlook and Apple iPhone or iPod touch contacts
Synchronization of contacts between your Outlook account and your Apple iPhone or iPod touch requires Apple iTunes. You can configure which items are synchronized during a one-time set up process.
After the initial setup, each time that you connect your iPhone or iPod touch to your computer, the changes made on your computer or device are synchronized.
Note: As a best practice, make sure that software on your computer and your Apple device is current. Also, be prudent and back up both your Outlook account and your Apple device before you begin.
Export your Outlook data
On the File tab, choose Open & Export > Import/Export.
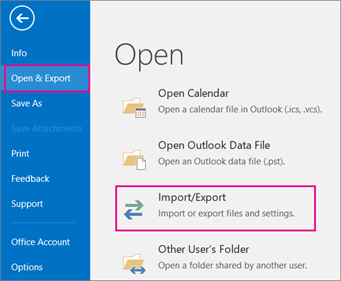
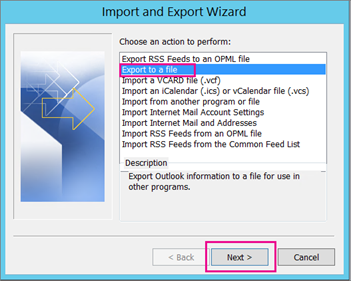
In the Import and Export Wizard, choose Export to a file > Next.
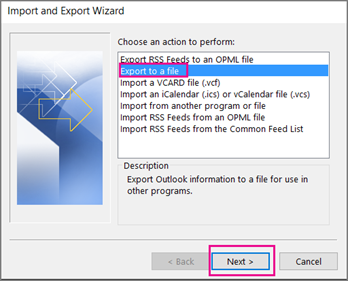
Under Create a file of type, choose Outlook Data File (.pst) > Next.
Under Select the folder to export from, choose the folder to export and only information in that folder is exported.
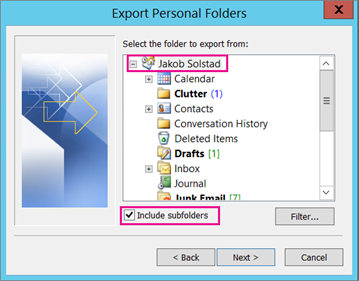
Select the Include subfolders check box to make sure everything—Calendar, Contacts, and Inbox—in the account will be exported, and then choose Next.
Under Save exported file as, click Browse to select where to save the Outlook Data File (.pst), type a file name, and then click OK to continue.
Note: If you’ve used export before, the previous folder location and file name appear. Type a different file name, and then click OK.
If you are exporting to an existing Outlook Data File (.pst), under Options, specify what to do when exporting items that already exist in the file.
Outlook begins the export immediately unless a new Outlook Data File (.pst) is created or a password-protected file is used.
If you’re creating an Outlook Data File (.pst), an optional password can help protect the file. When the Create Outlook Data File dialog box appears, type the password in the Password and Verify Password boxes, and then click OK. In the Outlook Data File Password dialog box, type the password, and then click OK.
If you’re exporting to an existing Outlook Data File (.pst) that is password protected, in the Outlook Data File Password dialog box, type the password, and then click OK.
Now that your Outlook data is in a .pst file, it’s portable. You can save the .pst file to OneDrive or to a USB storage device, for example, and then download it to another computer or another device of your choice. See import your email, contacts, and calendar to Outlook to learn more.
On the File tab, choose Options > Advanced.
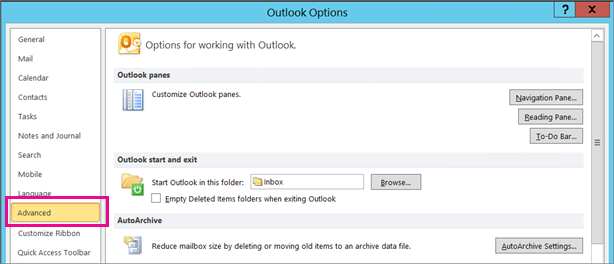
Under the Export section, choose Export.

Click Export to a file > Next.
Click Outlook Data File (.pst) > Next.
Under Select the folder to export from, choose the folder to export and only information in that folder is exported.
Select the Include subfolders check box to make sure everything—Calendar, Contacts, and Inbox—in the account will be exported, and then choose Next.
Click Browse to select where you want to save the Outlook Data File (.pst) and to enter a file name, and then click OK to continue.
Note: If you have previously used the export feature, the previous folder location and file name appear. Make sure that you change the file name if you want to create a new file instead of using the existing file.
If you’re exporting to an existing Outlook Data File (.pst), under Options, specify what to do when exporting items that already exist in the file.
The export begins immediately unless a new Outlook Data File (.pst) is created or the export is to an existing file that is password protected.
If you are creating a new Outlook Data File (.pst), an optional password can help protect the file. When the Create Outlook Data File dialog box appears, enter the password in the Password and Verify Password boxes, and then click OK. In the Outlook Data File Password dialog box, enter the password, and then click OK.
If you are exporting to an existing Outlook Data File (.pst) that is password protected, in the Outlook Data File Password dialog box, enter the password, and then click OK.
Now that your Outlook data is in a .pst file, it’s portable. You can save the .pst file to OneDrive or to a USB storage device, for example, and then download it to another computer or another device of your choice. See import your email, contacts, and calendar to Outlook to learn more.
On the File tab, choose Import and Export.
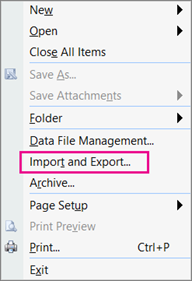
Under Choose an action to perform, choose Export to a file > Next.
Click Personal File Folder (.pst) > Next.
Choose the folder to export and only information in that folder is exported.
Select the Include subfolders check box to make sure everything—Calendar, Contacts, and Inbox—in the account will be exported, and then choose Next.
Click Browse to select where you want to save the Outlook Data File (.pst) and to enter a file name. Click OK to continue.
Note: If you have previously used the export feature, the previous folder location and file name appear. Make sure that you change the file name if you want to create a new file instead of using the existing file.
If you’re exporting to an existing Outlook Data File (.pst), under Options, specify what to do when exporting items that already exist in the file.
The export begins immediately unless you’re creating a new Outlook Data File (.pst) or you’re exporting is to an existing .pst file that is password protected. In those cases, you’ll get this dialog box:

Choose OK if you don’t want to password protect your file. Otherwise:
If you want to password protect your .pst file: enter the password in the Password and Verify Password boxes, and then click OK. In the Outlook Data File Password dialog box, enter the password, and then click OK.
If you are exporting to an existing Personal File Folder (.pst) that is password protected, in the Outlook Data File Password dialog box, enter the password, and then click OK.
Connect your iPhone or iPod touch to your computer using the cable provided with your device or by placing the iPhone or iPod touch in the Apple Universal Dock.
iTunes opens automatically when connected to your computer.
In iTunes, in the source list, under Devices, click the entry for your iPhone or iPod touch.
Click the Info tab.
Under Contacts, click Sync contacts from, and then click Outlook.
Do one of the following:
To synchronize all contacts, click All contacts.
To limit the contacts that are synchronized, click Selected groups, and then click the groups you want to synchronize.
Note: To select multiple groups, press Ctrl as you click each group name.
Note: If you are using a Microsoft Exchange Server account and have more than 500 contacts, all contacts might not synchronize unless you use Cached Exchange Mode. To turn on Cached Exchange Mode, see Turn on or off Cached Exchange Mode.
Outlook synchronization support for iPhone, iPod touch, and iTunes is provided by Apple support.
Источник
How to Import Outlook Contacts to iPhone
Sometimes, you may need to import Outlook contacts to iPhone or iPad for convenient use or syncВ Outlook contacts with iPhone to keep your contacts updatedВ across different devices. Regardless of your motivations, here areВ several ways to transfer Outlook contacts to iPhone.
Part 1. How to Import Outlook Contacts to iPhone via iTunes
iTunes is your first option to sync Outlook contacts. Once you activate the «Sync contacts with Outlook» option in iTunes, your Outlook contacts will be automatically synced to your iPhone the next time you connectВ it to iTunes. To use this method, you’ll need to make sure your iCloud is disabled on your device. Then, follow these steps to export Outlook contacts to iPhone.
Step 1. Open the latest version of iTunes on your computer and connect your device to the computer.
Step 2. iTunes will automatically detect your iPhone. If not, just fix it as soon as possible.
Step 3. From the left panel of iTunes, click on your device icon.
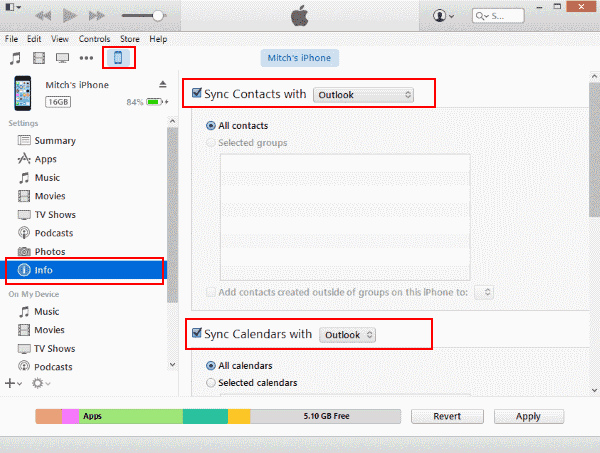
Step 4. Under the Settings section, click on «Info.»
Step 5. From the right panel, check the «Sync Contacts With» and choose «Outlook» from the options.
Step 6. Then, click on the «Apply.»
Tips: You can configure which items are synchronized during a one-time setup process. Once it gets set, each time when you connect your iDevice to your computer, the changes you made on your computer or device are synchronized.В
Part 2. How to Export Outlook Contacts to iPhone via iCloud
Likewise, this approach will sync everything, including calendar events, email messages, etc to your iPhone. If you don’t mind that, followВ these steps to do it.
Step 2. Run it and log in with your Apple ID and password.
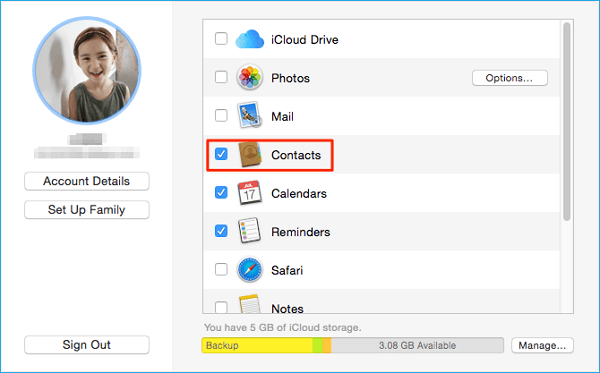
Step 3. From itsВ main screen, tick the box next to the «Mail, Contacts, Calendar, and Tasks.»
Step 4.В Then, all of the information stored in your mail account, including Outlook, will be synced to your iPhone.
If you need, you can alsoВ import Google contacts to the iPhoneВ using a similar way.
Part 3. How to Transfer OutlookВ Contacts toВ iPhone in a Simple Way
Whether to use iTunes or iCloud, you’ll have to sync everything to your device. Most people would likely mind this. If you’re one of these groups, just try another indirect solutionВ — export contacts from Outlook in CSV format, and then import these contacts to your iPhone with thisВ iOS data transfer tool — EaseUS MobiMover. As a versatile iPhone data transfer tool, it allows you to import VCF/CSV files to the iPhone with ease.
First of all, you’ll need to export contacts from Outlook in CSV format:
- Sign in to your Outlook account on the computer.
- Click the people icon in the bottom left corner.
- Click on «Management» in the top right-hand corner,В clickВ «Export Contacts,» then clickВ «Export.»
- Then, the selected contacts will be saved on your computer in CSV format.
Then, you can use EaseUS MobiMover to transfer these contacts to your iPhone directly.
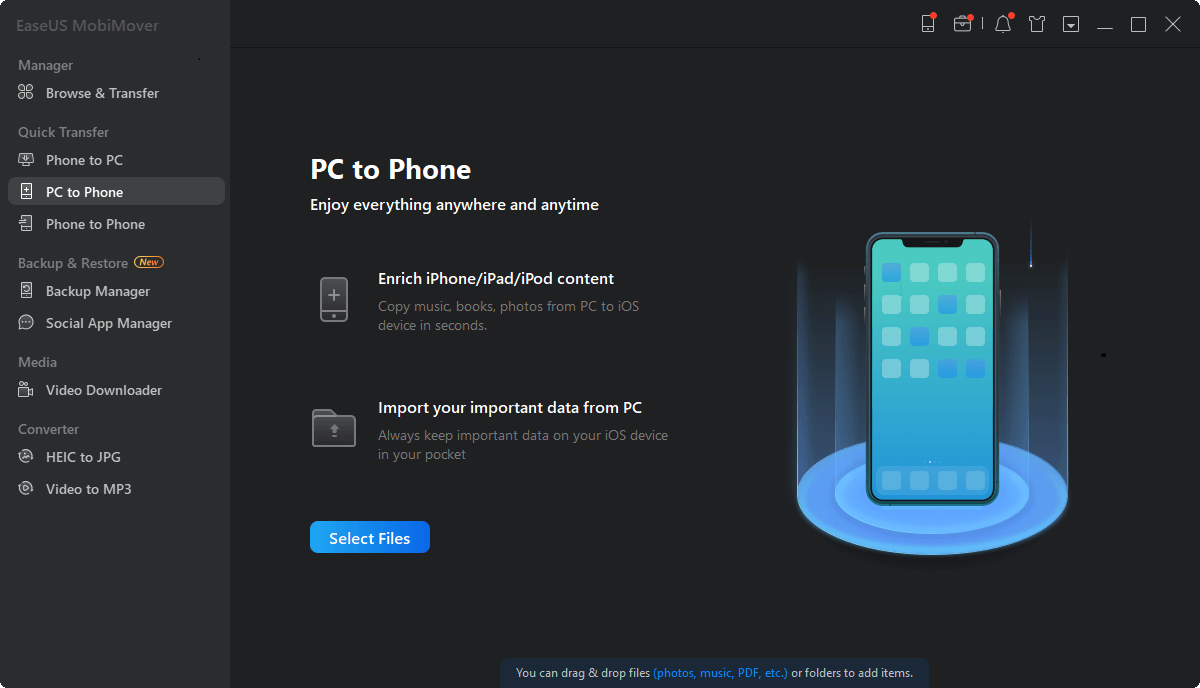
Step 1.В Connect your iPhone toВ your PC with a USB cable and startВ EaseUS MobiMover. Unlock your iOS device and click «Trust». Then go to «PC to Phone» > «Select Files».
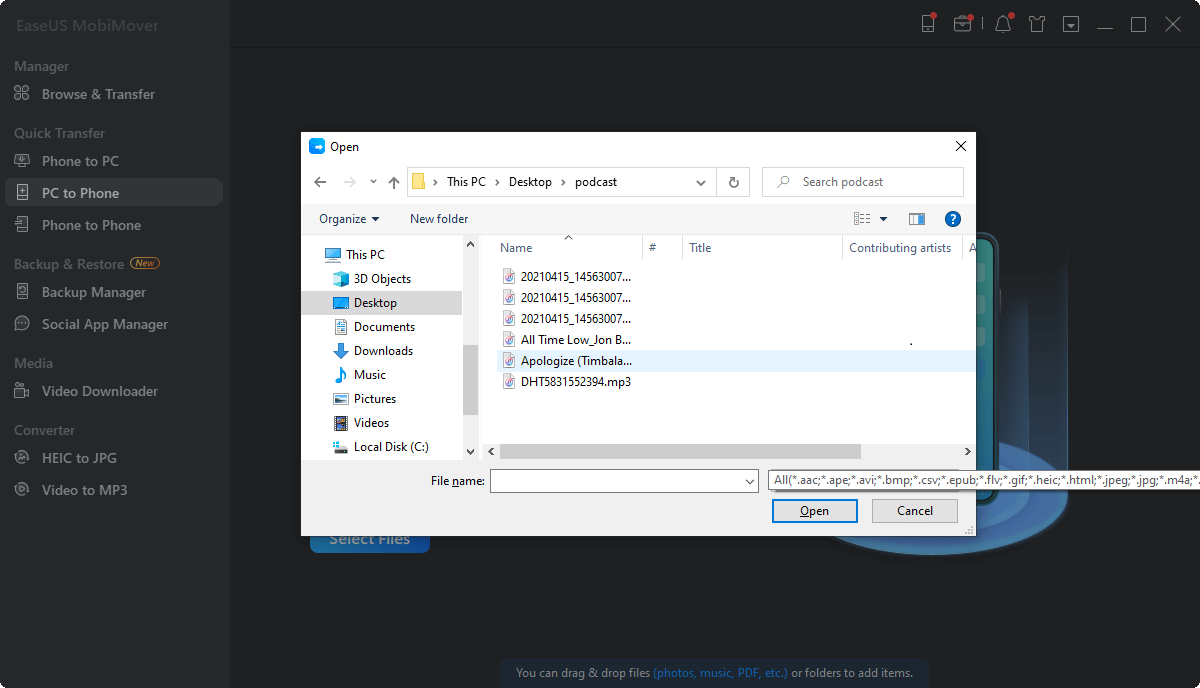
Step 2.В Select the contacts (.vcf, .csv, or .html)В you want to transfer and click «Open».
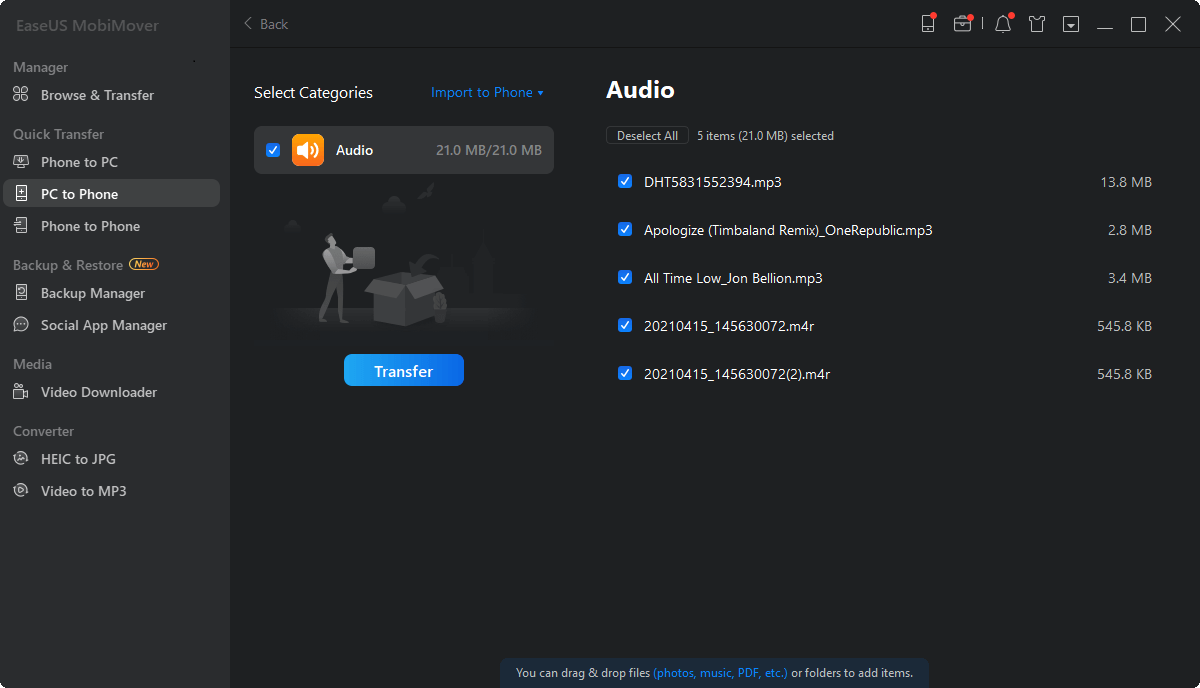
Step 3. Click «Transfer» to start transferring contacts from your PC to your iPhone.
Part 4. How to AddВ Outlook Contacts to iPhone through Exchange
This method can be used only when your iPhone is connected toВ an internal corporate network.
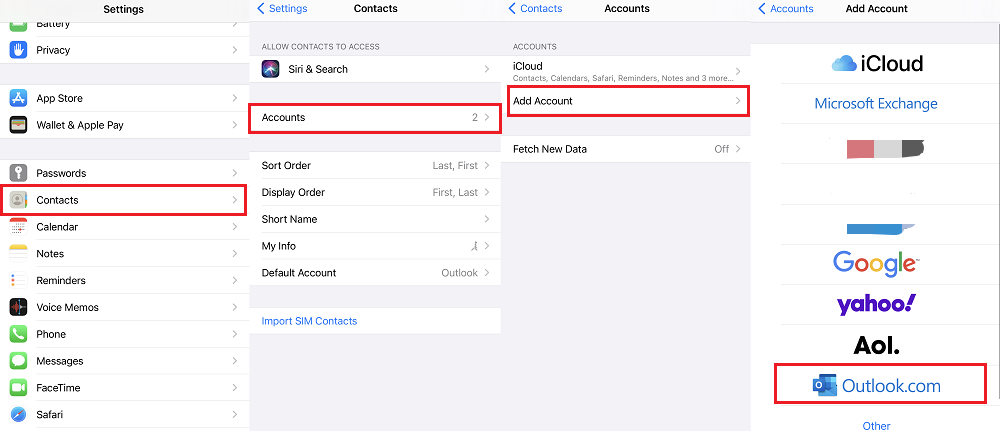
Step 1. Open the Settings app on your iPhone or iPad.
Step 2. Tap «Contacts,» and then tap «Accounts.»
Step 3. Tap «Add Account.» From where choose «Outlook.com.» If you have had an Outlook account here, just tap it and enable «Contacts.»В
Step 4. Log in with your Outlook account name and password.
Step 5. Wipe over the Contents to the «On» position. Tap the «Save» icon.
Or you can also go to the Settings app > Account & Password > Add Account > Outlook.com > Sign in > Toggle the «Contacts» to ON > Save.
The Bottom Line
That’s all about our guide on how to import Outlook contacts to iPhone or iPad. As you can see, there are three ways for you to do it. Besides, we also give you a bonus tip to transfer other files between iPhones or iPads, or between an iOS device and a computer. If you’re interested in data management, don’t miss EaseUS MobiMover.
о™љо™љо™љо™љо™љ
4.5 out of 5 stars, based on 10 votes
EaseUS MobiMover allows you to easily transfer all data from your iPhone to your PC. The app is available for both Windows and Macs so irrespective of which platform you use, you are covered.

EaseUs MobiMover solves this problem as it allows you to transfer data from an iPhone to a Mac, Mac to an iPhone, or from one iPhone to another iPhone fast.

EaseUS MobiMover is a program that allows you to share files between your iOS device and your PC in an easy manner. This is very useful, since both operative systems are not compatible.

EaseUS MobiMover for Mac and PC is a powerful tool for transferring data from your Apple mobile device to your computer, managing the variety of files that you create, and moving those huge videos quickly.

Related Articles — ALSO ON EaseUS SOFTWARE
Источник


