- Блог ЛТБЦЦ-20.
- среда, 28 октября 2015 г.
- Включаем аппаратное ускорение в Яндекс.Браузере (Chromium)
- Как заставить рендеринг GPU на Android —
- Что такое рендеринг на GPU?
- Когда форсировать рендеринг на GPU
- Аппаратное ускорение в браузере Google Chrome – как отключить или включить
- Что такое «аппаратное ускорение» в браузере Google Chrome
- Как в Google Chrome отключить аппаратное ускорение
- Как включить аппаратное ускорение в Гугл Хром
- Как использовать аппаратное ускорение при наличии Chrome
- Configure hardware acceleration for the Android Emulator
- Configure graphics acceleration
- Requirements
- Configure graphics acceleration in the AVD Manager
- Configure graphics acceleration from the command line
- Enable Skia rendering for Android UI
- Configuring VM acceleration
- General requirements
- Development environment requirements
- Virtualization extension requirements
- Restrictions
- About hypervisors
- Check if a hypervisor is installed
- Configure VM acceleration on Windows
- Choose a hypervisor on Windows
- Double-check when disabling Hyper-V
- Configure VM acceleration using Intel HAXM on Windows
- Configure VM acceleration using Android Emulator Hypervisor Driver for AMD Processors on Windows
- Configure VM acceleration using Windows Hypervisor Platform
- Configure VM acceleration on macOS
- Configure VM acceleration on Linux
- Requirements
- Check whether KVM is currently installed on Linux
- Install KVM on Linux
Блог ЛТБЦЦ-20.
Заметки с информацией на разрозненные темы.
среда, 28 октября 2015 г.
Включаем аппаратное ускорение в Яндекс.Браузере (Chromium)
Попытаемся включить аппаратное ускорение в Яндекс.Браузере и в любом другом Chromium-based браузере, а так же попробуем его немного ускорить. Инструкция подходит как для Linux так и для Windows.
1. Проверяем для чего у нас включено аппаратное ускорение (Hardware accelerated), вводим в строке Яндекс.Браузера:
browser://gpu/
для любых других Chromium-based браузеров:
chrome://gpu
Если для Opera страница выше не открывается, то прописываем:
opera://gpu
В пункте «Graphics Feature Status» в идеале все значения должны быть зеленого цвета с подписью Hardware accelerated, это означает что абсолютно все элементы страницы рендерятся при помощи видеокарты. Если же там будут желтые или красные строки, то значит обработка объектов происходит на стороне процессора, это во-первых медленно, во-вторых энергонеэффективно, так что попытаемся исправить положение.
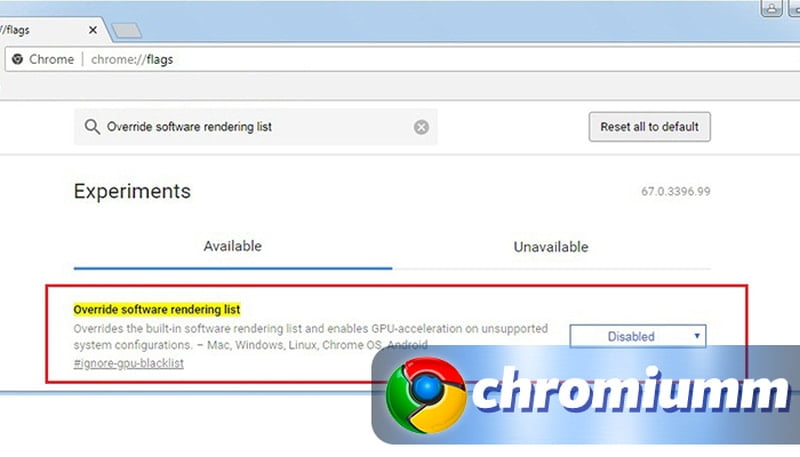
2. Открываем экспериментальные функции браузера:
browser://flags/
для других браузеров основанных на Хромиуме это будет:
chrome://flags
для Opera (на этом браузере некоторых настроек может не быть):
opera://flags
(ВНИМАНИЕ! Я настоятельно не рекомендую там менять что либо еще во избежание неправильной работы браузера)
Меняем настройки:
- Ищем там строку «Переопределение списка программного рендеринга» (она же — Override software rendering list, #ignore-gpu-blacklist) и нажимаем «Включить» (Enable).
- Так же находим и включаем «Поддержка экспериментальных функций canvas» (#enable-experimental-canvas-features).
- Для строки «Включить аппаратную растеризацию» (#enable-gpu-rasterization) выставляем значение «Принудительное включение для всех слоев».
- Ищем строку «Число потоков растрового изображения» (#num-raster-threads), рекомендую выставить значение исходя из количества ядер вашего процессора, если 2 ядра, то и значение выставляем 2. Если у вас есть поддержка Hyper-threading и например процессор имеет 2 ядра и 4 потока, то выставляем значение 4.
Так же можно включить данные параметры (они никак не влияют на аппаратное ускорение):
- «Сохранить страницу в формате MHTML» (#save-page-as-mhtml). Если вы часто сохраняете страницы, то довольно полезная функция позволяющая сохранять интернет-страницы одним файлом, а не вида файл + папка с изображениями. Кстати для Яндекс.Браузера можно не включать, т.к. он умеет сохранять в PDF по-умолчанию.
- «Экспериментальный протокол QUIC» (#enable-quic). Что такое QUIC можно поискать в инете, если вкратце — это экспериментальный протокол позволяющий увеличить скорость соединения.
- «Включить функцию возобновления загрузки» (#enable-download-resumption).
3. Перезапускаем браузер и вновь открываем данную страницу:
browser://gpu
Вот что получилось у меня:

В сообщении ниже на этой странице указано почему не удалось включить некоторые пункты:
Accelerated 2d canvas is unstable in Linux at the moment
Accelerated video decode is unavailable on Linux
Возможно в более новой версии Chromium будет добавлена поддержка. Думаю на аналогичном моему железе, но в ОС Windows будут светится зеленым все пункты благодаря чему браузер будет максимально быстро работать.
Источник
Как заставить рендеринг GPU на Android —
когда Рендеринг с помощью графического процессора добрался до Android, это было ненадежно, если не сказать больше. Официальная цель — повысить производительность приложений, но тогда многие графические пользовательские интерфейсы не знали, как работать с рендерингом на GPU. В некоторых случаях это было даже медленнее, чем программный рендеринг.
Со временем, особенно после появления Android 4.0, графический процессор стал более надежным и постепенно стал стандартным для большинства приложений. В настоящее время большинство обновленных приложений имеют встроенный графический рендеринг.
Но прежде чем мы перейдем к тому, как и когда включить эту опцию, давайте разберемся, как она работает.
Что такое рендеринг на GPU?
GPU является Графический процессор. По своей сути он очень похож на ЦП, но вместо выполнения вычислений и выполнения задач, связанных с операционной системой и оборудованием, графический процессор обрабатывает графическую информацию. Другими словами, это помещает материал на экран, чтобы ваши глаза могли видеть.
Хотя процессор прекрасно способен обрабатывать графические инструкции, это отнимет уйму времени на выполнение других важных для системы вещей, что может привести к задержке. Более того, конструкция ЦП делает их совершенно неэффективными при обработке графических данных по сравнению с графическими процессорами, которые запрограммированы на обработку графической информации.
Это где Графический процессор приходит — он отнимает часть графической обработки от процессора, освобождая его для более важных дел. Поскольку графический процессор намного лучше с графическими данными, конечный результат — лучшая производительность как для процессора, так и для графического процессора.
Когда форсировать рендеринг на GPU
Включение этого параметра приведет к разгрузке таких компонентов окна, как текст, кнопки и расчеты 2D-графики, в графический процессор. Это позволит вашему устройству лучше отображать анимацию пользовательского интерфейса и чувствовать себя менее запаздывающим. Хотя вы, безусловно, достигнете более плавного восприятия и лучшей частоты кадров в 2-мерных приложениях, ваше устройство может в итоге использовать больше батареи. Известно, что графические процессоры потребляют больше энергии, чем процессоры, поэтому ожидайте, что время автономной работы уменьшится на 10-15%, если оставить его включенным постоянно.
Принудительное рендеринг с помощью графического процессора определенно имеет смысл на устройствах с более слабым процессором. Если ваше устройство является чем-то меньшим, чем четырехъядерный процессор, я бы рекомендовал вам всегда оставлять его включенным.
Но имейте в виду, что рендеринг с помощью графического процессора эффективен только для двумерных приложений. Большие игры с использованием 3D-графики могут иметь худшую частоту кадров при Force GPU Rendering включен. Хорошо то, что большинство версий Android не будут мешать 3D-приложениям и будут вызывать рендеринг с помощью графического процессора только в тех приложениях, которые не используют его по умолчанию.
Поскольку в большинстве новых приложений эта опция уже включена в коде, вы можете заметить только значительные различия при просмотре меню вашего телефона. Ваше устройство будет работать быстрее и отображать информацию на экране быстрее, чем раньше. Конечно, некоторые старые или плохо сделанные приложения будут достигать более высокой частоты кадров при форсировании рендеринга на GPU, но такие случаи редки.
Суть в том, что вам решать, хотите ли вы обменять срок службы батареи на повышенную текучесть и некоторые дополнительные частоты кадров. Имея это в виду, вот как включить Force GPU Rendering.
Источник
Аппаратное ускорение в браузере Google Chrome – как отключить или включить
В этом обзоре мы расскажем и о том, как отключить аппаратное ускорение в Google Chrome, и как запустить его снова. И даже объясним, что это такое, и зачем нужно оптимизировать работу опции.

Что такое «аппаратное ускорение» в браузере Google Chrome
Прежде чем отключить аппаратное ускорение Chrome, необходимо разобраться с тем, что это такое. Ведь не все даже знают о существовании опции.
Аппаратное ускорение Гугл Хром — это функция, обеспечивающая браузеру доступ к графическим утилитам, инсталлированным на устройстве. Опция необходима для повышения скорости обработки визуальной информации (картинок, гифок, видео), размещенной на интернет-страницах. Чем быстрее подгружается визуальный контент, тем удобнее пользователю, тем меньше времени занимает вывод вновь открываемых сайтов.
Аппаратное ускорение Гугл Хром априори создавалось для стабилизации функционирования утилиты. Алгоритм предполагал повышенную нагрузку на видеокарту. На нее переключали дополнительные задачи. Повышенную нагрузку получала и оперативная память.
Но в результате замедлялась скорость работы Windows и, как следствие такого перераспределения, подтормаживал обозреватель Google. Подобные симптомы типичны для слабых машин. Потому наиболее разумным решением будет отключить лишних потребителей ресурсов, включая аппаратное ускорение Chrome.
Также в отдельных случаях аппаратное ускорение Гугл Хром приводит к некорректному выводу графики и видео. Проблема проявляется в том, что отдельные части страниц выводятся с ошибками (видео выводится с зелеными вставками, картинки могут закрывать часть текста). Тогда и начинают выяснять, как отключить, хотя бы временно, аппаратное ускорение в браузере Google Chrome.
Как в Google Chrome отключить аппаратное ускорение
Как отключить самостоятельно аппаратное ускорение в Google Chrome:
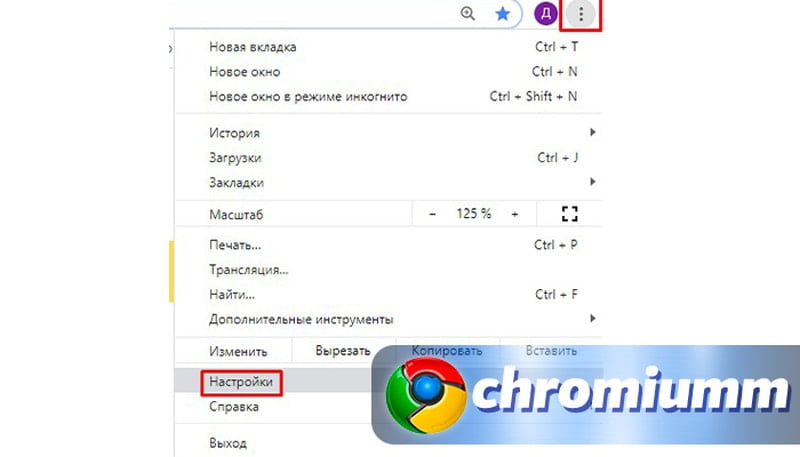
- открыть браузер;
- перейти в «Настройки». Меню активируется после нажатия на кнопку, на которой изображены 3 точки. Она расположена справа, после адресной строки;
- нужно прожать строку «Настройки»;

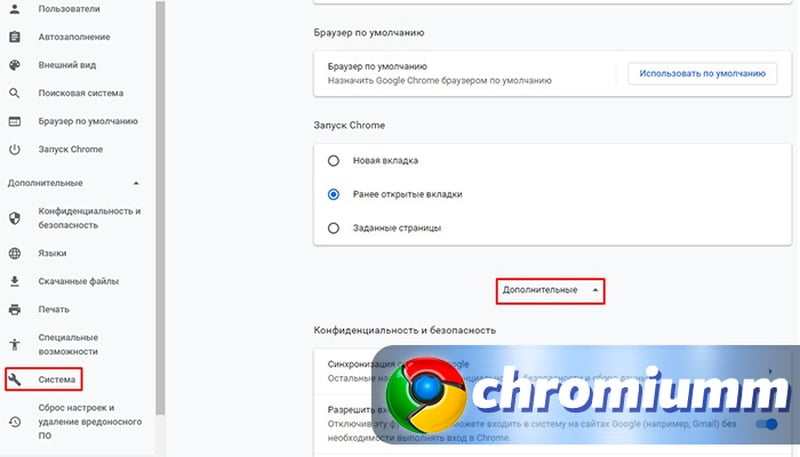
- далее выбирают категорию «Дополнительные». Она находится внизу страницы;
- раздел нужно раскрыть, нажав на соответствующую ссылку;
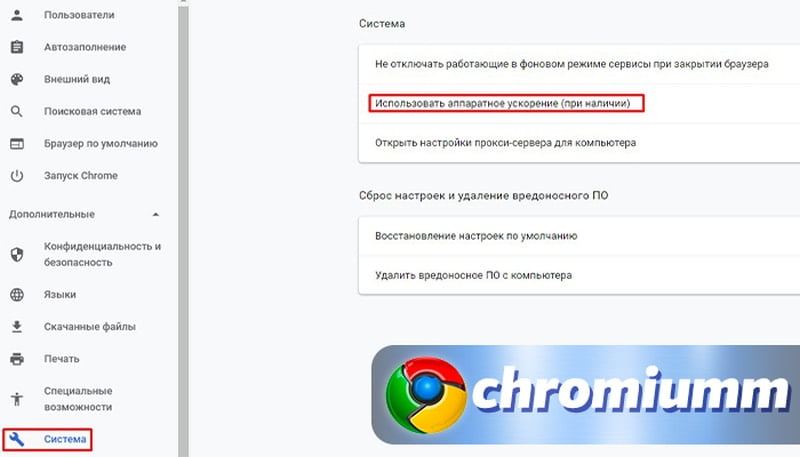
- справа следует дотронуться до надписи «Система»;
- в строке «Использовать аппаратное ускорение» переводят бегунок в положение выключено;
- чтобы изменения активизировались, необходимо закрыть браузер и заново включить его (перезагрузить).
Также можно отключить аппаратное ускорение Chrome, если:
- запустить программу;
- в адресной строке набрать и активировать переход на адрес chrome://flags/;
- дать согласие на корректировку. Эти действия может быть чреваты лишением лицензии на текущую копию утилиты;
- когда откроется новая страница, в поисковой строке ввести #disable-accelerated-video-decode;
- после того как будет найден заданный параметр, указать его новое значение Disabled;
- перезагрузить программу, прожав Relaunch Now.
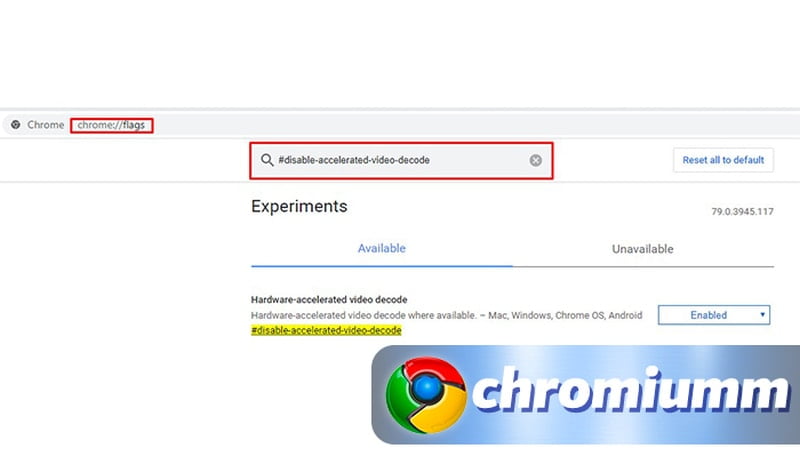
Если указанный пункт на странице отсутствует, можно отыскать надпись Override software rendering list и выключить уже ее. При работе в этой части браузера следует быть аккуратным. Если деактивировать другую опцию, это может негативно отразиться на работе программы.
Как включить аппаратное ускорение в Гугл Хром
Чтобы заново активизировать функцию, следует пройти тот же путь, как для того, чтобы отключить в «Настройках» аппаратное ускорение в Google Chrome. Но бегунок переключают в режим включено.
Чтобы произведенные изменения заработали, программу вновь перезагружают.
Как использовать аппаратное ускорение при наличии Chrome
Когда стоит выключить аппаратное ускорение Гугл Хром:
Если у Вас остались вопросы или есть жалобы — сообщите нам
Источник
Configure hardware acceleration for the Android Emulator
The Android Emulator can use hardware acceleration features to improve performance, sometimes drastically. This page describes how you can configure graphics and virtual machine (VM) acceleration to get higher performance from the emulator.
Configure graphics acceleration
Graphics acceleration uses your computer’s hardware (typically the GPU) to make screen rendering faster. Android devices use OpenGL for Embedded Systems (OpenGL ES or GLES) for rendering both 2D and 3D graphics on the screen.
When you create an Android Virtual Device (AVD) in the AVD Manager, you can specify whether the emulator should use hardware or software to emulate the GPU of the AVD. Hardware acceleration is recommended and is typically faster. However, you might need to use software acceleration if your computer uses graphics drivers that aren’t compatible with the emulator.
By default, the emulator decides whether to use hardware or software graphics acceleration based on your computer setup. If your GPU hardware and drivers are compatible, the emulator uses the GPU. Otherwise, the emulator uses software acceleration (using your computer’s CPU) to simulate GPU processing.
If you start the emulator from the command line, you can also override the graphics acceleration setting in the AVD for that virtual device instance.
Requirements
To use graphics acceleration, your development environment must meet the following requirements:
- SDK Tools: Latest release recommended (version 17 minimum)
- SDK Platform: Latest release recommended (Android 4.0.3, Revision 3, minimum)
Configure graphics acceleration in the AVD Manager
To configure graphics acceleration for an AVD, follow these steps:
- Open the AVD Manager.
- Create a new AVD or edit an existing AVD.
- On the Verify Configuration page, find the Emulated Performance section.
- Select a value for the Graphics: option.
- Click Finish.
Configure graphics acceleration from the command line
To specify a graphics acceleration type when you run an AVD from the command line, include the -gpu option, as shown in the following example:
The value of mode can be set to one of the following options:
- auto : Let the emulator choose between hardware or software graphics acceleration based on your computer setup.
- host : Use the GPU on your computer for hardware acceleration. This option typically provides the highest graphics quality and performance for the emulator. However, if your graphics drivers have issues rendering OpenGL, you might need to use the swiftshader_indirect or angle_indirect options.
- swiftshader_indirect : Use a Quick Boot-compatible variant of SwiftShader to render graphics using software acceleration. This option is a good alternative to host mode if your computer can’t use hardware acceleration.
- angle_indirect : (Windows only) Use a Quick Boot-compatible variant of ANGLE Direct3D to render graphics using software acceleration. This option is a good alternative to host mode if your computer can’t use hardware acceleration. In most cases, ANGLE performance should be similar to using host mode because ANGLE uses Microsoft DirectX instead of OpenGL. On Windows, Microsoft DirectX drivers typically have fewer issues than OpenGL drivers. This option uses Direct3D 11 and requires Windows 10, Windows 8.1, or Windows 7 SP1 with the Windows 7 Platform Update.
- guest : Use guest-side software rendering. This option provides the lowest graphics quality and performance for the emulator.
Note: If you enable a graphics acceleration option that your computer doesn’t support, you are likely to see incorrect images displayed during emulation.
The following mode options are deprecated:
- swiftshader : Deprecated in version 27.0.2 Use swiftshader_indirect instead.
- angle : Deprecated in version 27.0.2. Use angle_indirect instead (Windows only).
- mesa : Deprecated in version 25.3. Use swiftshader_indirect instead.
Enable Skia rendering for Android UI
When using images for API level 27 or higher, the emulator can render the Android UI with Skia. Skia helps the emulator render graphics more smoothly and efficiently.
To enable Skia rendering, use the following commands in adb shell:
Configuring VM acceleration
VM acceleration uses your computer’s processor to significantly improve the execution speed of the emulator. A tool called a hypervisor manages this interaction using virtualization extensions that your computer’s processor provides. This section outlines the requirements for using VM acceleration and describes how to set up VM acceleration on each operating system.
General requirements
To use VM acceleration with the emulator, your computer must meet the general requirements in this section. Your computer also needs to meet other requirements that are specific to your operating system.
Development environment requirements
To use VM acceleration, your development environment must meet the following requirements:
Virtualization extension requirements
In addition to the development environment requirements, your computer’s processor must support one of the following virtualization extensions technologies:
- Intel Virtualization Technology (VT, VT-x, vmx) extensions
- AMD Virtualization (AMD-V, SVM) extensions
Most modern processors support these virtualization extensions. If you’re not sure whether your processor supports these extensions, check the specifications for your processor on the manufacturer’s site. If your processor doesn’t support one of these extensions, then you can’t use VM acceleration.
Restrictions
VM acceleration has the following restrictions:
- You can’t run a VM-accelerated emulator inside another VM, such as a VM hosted by VirtualBox, VMWare, or Docker. You must run a VM-accelerated emulator directly on your host computer.
- Depending on your operating system and hypervisor, you can’t run software that uses another virtualization technology at the same time that you run a VM-accelerated emulator. For example, VirtualBox, VMWare, and Docker currently use a different virtualization technology, so you can’t run them at the same time as the accelerated emulator.
About hypervisors
VM acceleration requires a hypervisor.
Without a hypervisor and VM acceleration, the emulator must translate the machine code from the VM block by block to conform to the architecture of the host computer. This process can be quite slow. With a hypervisor, the VM and the architecture of the host computer match, so the emulator can run code directly on the host processor using the hypervisor. This improvement drastically increases both the speed and performance of the emulator.
The hypervisor that will work best for you depends on your computer’s operating system and configuration. For more information, see one of the following sections:
Check if a hypervisor is installed
You can use the emulator -accel-check command-line option to check if a hypervisor is currently installed on your computer.
The following examples show how to use the emulator accel-check option. In each example, Sdk is the location of the Android SDK:
Configure VM acceleration on Windows
VM acceleration on Windows can use one of three hypervisors: the Intel Hardware Accelerated Execution Manager (HAXM), the Android Emulator Hypervisor Driver for AMD Processors or the Windows Hypervisor Platform (WHPX).
Choose a hypervisor on Windows
Use the following criteria to determine which hypervisor you should use:
| Criteria | Hypervisor |
|---|---|
| You have an Intel processor and do not need to run Hyper-V at the same time as the Android Emulator. | Use Intel HAXM. |
| You have an Intel processor and do need to run Hyper-V at the same time as the Android Emulator. | Use WHPX. |
| You have an AMD processor and do not need to run Hyper-V at the same time as the Android Emulator. | Use Android Emulator Hypervisor Driver for AMD Processors. |
| You have an AMD processor and do need to run Hyper-V at the same time as the Android Emulator. | Use WHPX. |
Double-check when disabling Hyper-V
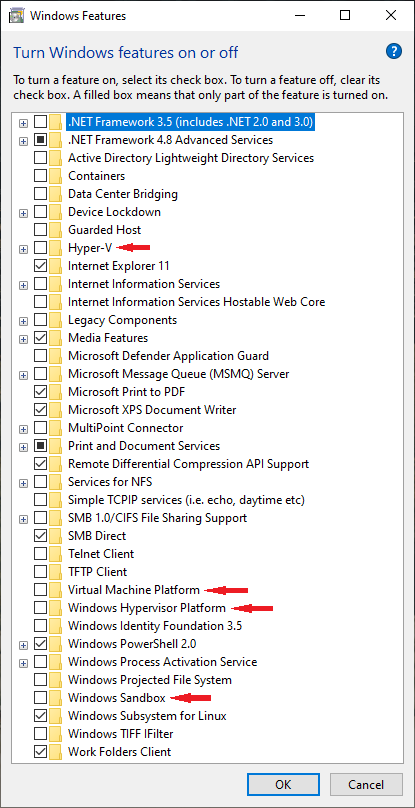
Hyper-V must be disabled to use Intel HAXM or the Android Emulator Hypervisor Driver for AMD Processors. However, unchecking «Hyper-V» in Windows Features Dialog might not guarantee that Hyper-V is disabled. Quite a few features in Windows 10 will enable Hyper-V implicitly. Users may not even know Hyper-V is activated when they enable one of these features.
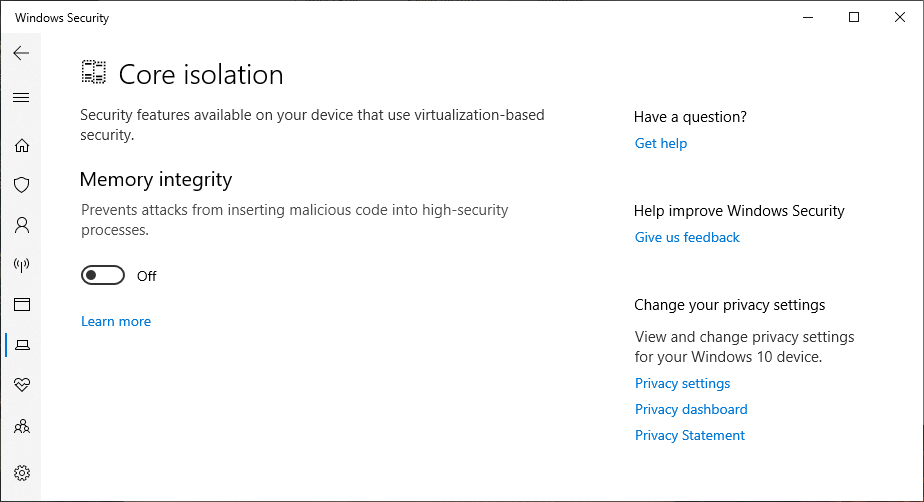
To our best knowledge, these includes Virtual Machine Platform, Windows Hypervisor Platform, Windows Sandbox, Core Isolation, Credential Guard. Additionally, Windows Subsystem for Linux version 2 requires Virtual Machine Platform, meaning that it implicitly requires Hyper-V. This list is not exhaustive, please notify us on our bug tracker if you find an item that should be included here.
Double-check that the features listed above are also disabled when disabling Hyper-V. Reference Microsoft documentation and the examples below to find out how each individual feature can be disabled.
Some platforms fail to immediately disable Hyper-V when it is switched off. When this occurs, there is no error returned by the Windows OS and Hyper-V appears disabled in the Windows Features Dialog. Please file a bug on Microsoft’s issue tracker when this occurs.
Configure VM acceleration using Intel HAXM on Windows
Before you can install and use Intel HAXM, your computer must meet the following requirements:
- Intel processor with Virtualization Technology (VT-x), Intel EM64T (Intel 64) features, and Execute Disable (XD) Bit functionality enabled
- 64-bit Windows 10, Windows 8, or Windows 7 (or 32-bit version of the operating system on a 64-bit processor)
- To use Intel HAXM on Windows 10 or 8, you must turn off Hyper-V in the Windows Features Dialog.
Note: Installing certain software might turn Hyper-V back on. Refer to Disabling Hyper-V for more details.
To install the Intel HAXM driver, follow these steps:
- Open the SDK Manager.
- Click the SDK Update Sites tab and then select Intel HAXM.
- Click OK.
- After the download finishes, run the installer. Typically, you can find the installer in the following location: sdk \extras\intel\Hardware_Accelerated_Execution_Manager\intelhaxm-android.exe
- Use the wizard to complete the installation.
After installing Intel HAXM, confirm that the virtualization driver is operating correctly by entering the following command in a Command Prompt window:
You should see a status message that includes the following information:
You can adjust the amount of memory available to the Intel HAXM kernel extension by running the installer again.
You can uninstall Intel HAXM using either the installer or the Windows Control Panel. Before you uninstall Intel HAXM, shut down any x86 emulators that are currently running.
Configure VM acceleration using Android Emulator Hypervisor Driver for AMD Processors on Windows
Before you can install and use the Android Emulator Hypervisor Driver for AMD Processors, your computer must meet the following requirements:
- AMD processor with Secure Virtual Machine (SVM) Technology
- 64-bit Windows 10, Windows 8, or Windows 7 (32-bit Windows is not supported)
- To use Android Emulator Hypervisor Driver for AMD Processors on Windows 10 or 8, you must turn off Hyper-V in the Windows Feaures Dialog.
Note: Installing certain software might turn Hyper-V back on. Refer to Disabling Hyper-V for more details.
The Android Emulator Hypervisor Driver for AMD Processors can be installed via the SDK Manager in Android Studio 4.0 Canary 5 or later, or from Github (see below). To install from the SDK Manager, follow these steps:
- Open Tools->SDK Manager.
- Click the SDK Tools tab and then select Android Emulator Hypervisor Driver for AMD Processors.
- Click OK to download and install the Android Emulator Hypervisor Driver for AMD processors.
After installation, confirm that the driver is operating correctly by entering the following command in a Command Prompt window:
You should see a status message that includes the following information:
The following error message means either that SVM is not enabled in your BIOS or that Hyper-V is not disabled (Refer to Disable Hyper-V).
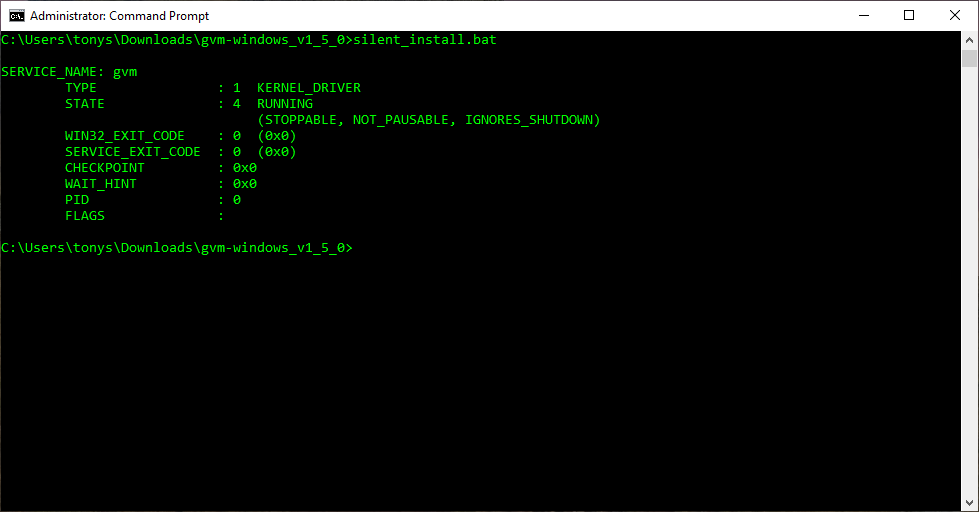
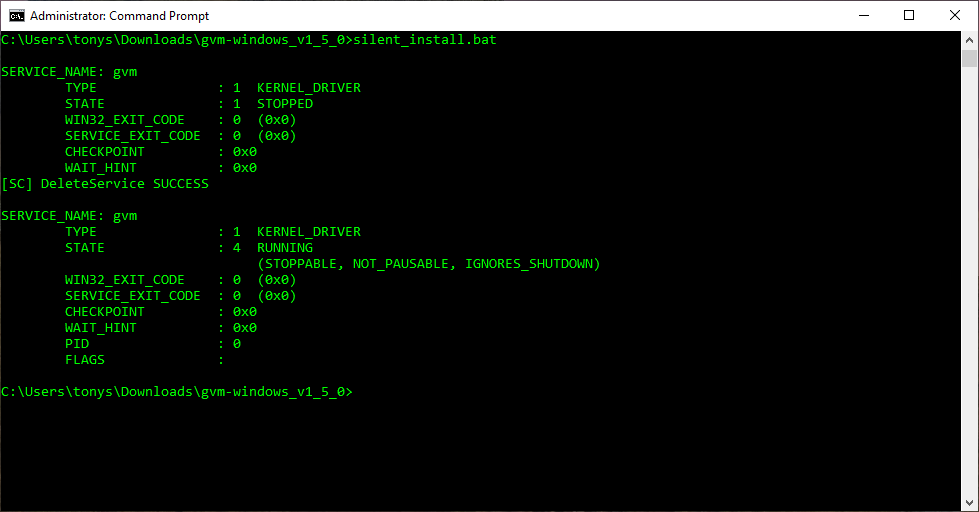
The Android Emulator Hypervisor Driver for AMD Processors can also be downloaded and installed from github. After unpacking the driver package, run «silent_install.bat» in a Command Prompt with Administrator privileges. Successfully completing a new installation would have the following output:
Upgrading an installation would result in the following output, which includes messages regarding the old driver’s uninstallation:
You can uninstall Android Emulator Hypervisor Driver for AMD Processors using the following commands in a Command Prompt with Administrator privileges.
Note: Shut down any x86 emulators before uninstalling the Android Emulator Hypervisor Driver for AMD Processors.
Configure VM acceleration using Windows Hypervisor Platform
Before you can enable WHPX, your computer must meet the following requirements:
- Intel processors: Support for Virtualization Technology (VT-x), Extended Page Tables (EPT), and Unrestricted Guest (UG) features. VT-x must be enabled in your computer’s BIOS settings.
- AMD processors: AMD Ryzen processor recommended. Virtualization or SVM must be enabled in your computer’s BIOS settings.
- Android Studio 3.2 Beta 1 or higher (download from developer.android.com)
- Android Emulator version 27.3.8 or higher (download using the SDK Manager)
- Windows 10 with April 2018 Update or higher
To install WHPX on Windows, follow these steps:
- From the Windows desktop, right-click the Windows icon and select Apps and features.
- Under Related settings, click Programs and Features.
- Click Turns Windows Features on or off.
Select Windows Hypervisor Platform
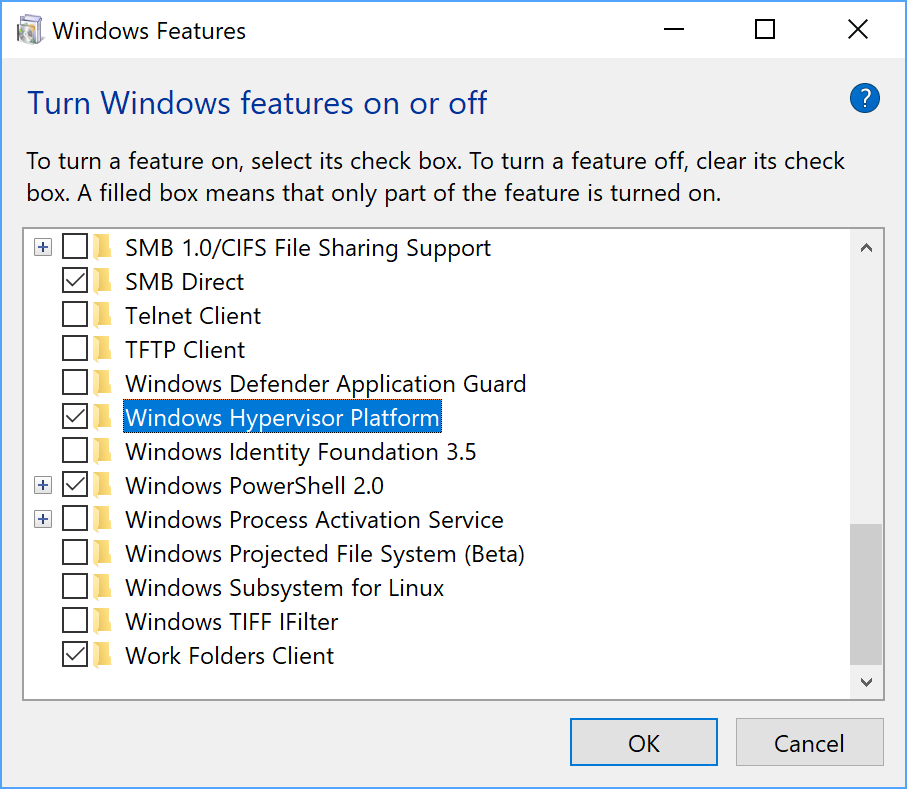
Click OK.
Once the installation has finished, restart your computer.
Configure VM acceleration on macOS
On Mac OS X v10.10 Yosemite and higher, the Android Emulator uses the built-in Hypervisor.Framework by default, and falls back to using Intel HAXM if Hypervisor.Framework fails to initialize.
To use VM acceleration on macOS when the Hypervisor.Framework is not available, you must install the Intel HAXM kernel extension.
To install the Intel HAXM kernel extension, follow these steps:
- Open the SDK Manager.
- Click the SDK Update Sites tab and then select Intel HAXM.
- Click OK.
- After the download finishes, run the installer. Typically, you can find the installer in the following location: sdk /extras/intel/Hardware_Accelerated_ExecutionManager/IntelHAXM version .dmg
- Follow the on-screen instructions to complete the installation.
After installation finishes, confirm that the new kernel extension is operating correctly by opening a terminal window and running the following command:
You should see a status message containing the following extension name, indicating that the kernel extension is loaded:
You can adjust the amount of memory available to the Intel HAXM kernel extension by running the installer again.
You can stop using the Intel HAXM kernel extension by uninstalling it. Before you uninstall it, shut down any x86 emulators that are currently running, then run the following command in a terminal window:
Configure VM acceleration on Linux
Linux-based systems support VM acceleration through the KVM software package. Follow the instructions for installing KVM on your Linux system, and verify that KVM is enabled. For Ubuntu systems, see Ubuntu KVM Installation.
Requirements
Running KVM requires specific user permissions. Make sure that you have sufficient permissions as specified in the KVM installation instructions.
To use VM acceleration on Linux, your computer must also meet these requirements:
- For Intel processors: Support for Virtualization Technology (VT-x), Intel EM64T (Intel 64) features, and Execute Disable (XD) Bit functionality enabled.
- For AMD processors: Support for AMD Virtualization (AMD-V).
Check whether KVM is currently installed on Linux
You can use the emulator -accel-check command-line option to check whether you have KVM installed. Alternatively, you can install the cpu-checker package containing the kvm-ok command.
The following example shows how to use the kvm-ok command.
Install the cpu-checker package:
An output of 1 or greater means that virtualization is supported. An output of 0 means that your CPU doesn’t support hardware virtualization.
Run the kvm-ok command:
Expected output: INFO: /dev/kvm exists KVM acceleration can be used
If you get the following error, it means that you can still run virtual machines. Your virtual machine will be slower without the KVM extensions. INFO: Your CPU does not support KVM extensions KVM acceleration can NOT be used
Install KVM on Linux
Use the following command to install KVM:
Cosmic (18.10) or later
Lucid (10.04) or later
Karmic (9.10) or earlier
Content and code samples on this page are subject to the licenses described in the Content License. Java is a registered trademark of Oracle and/or its affiliates.
Источник


