- About your Apple ID email addresses
- Email addresses you use with your Apple ID
- Apple ID email address
- Change your Apple ID email address
- Reset your Apple ID password
- Get a verification code
- Additional email addresses
- Add an additional email address
- Delete an additional email address
- Rescue email address
- Add or edit a rescue email address
- Delete a rescue email address
- Reset your security questions
- Learn more
- If you forgot your Apple ID password
- Use your own device to reset your password
- On your iPhone, iPad, iPod touch, or Apple Watch with watchOS 8 or later
- On your Mac with macOS Catalina or later
- Use a trusted phone number, trusted email, recovery key, or account recovery contact
- Use someone else’s device to reset your password
- Use the Apple Support app
- Use the Find My iPhone app
- If you can’t change or reset your password
- If you can’t reset your Mac login password
- Before you begin
- Start up from macOS Recovery
- If you’re asked to select an admin user
- If you’re asked for your Apple ID information
- If you’re asked for your recovery key
- Use the Reset Password assistant
- If you still can’t reset your password, erase your Mac
About your Apple ID email addresses
Learn how to add, change, or delete the different types of email addresses that you can use with your Apple ID account.
Email addresses you use with your Apple ID
Your Apple ID uses email addresses to sign you in to your account with Apple. With your Apple ID, you can access services like the App Store, Apple Music, iCloud, iMessage, FaceTime, and more. We use your email addresses to send you information about your account, and to help friends and family communicate and share with you.
Apple ID email address
In most cases, your Apple ID is also the primary email address of your Apple ID account.
Additional email addresses
Add extra email addresses to your account to help people find you on Apple services like FaceTime, iMessage, and Find My.
Rescue email address
Most people have a notification email address instead of a rescue email address. Apple uses this to send you important account and security related information. If you don’t use two-factor authentication or two-step verification (learn how to check what security method you use), you have the option to add a rescue email address to your account for more security. You can see it when you sign in to your Apple ID account page.
Before you can use a new or updated Apple ID, we’ll send you a verification email to make sure that the email address belongs to you.

Apple ID email address
When you create an Apple ID, you enter an email address. This email address is your Apple ID and the username that you use to sign in to Apple services like Apple Music and iCloud. It’s also the contact email address for your account. Be sure to check your email address regularly. We’ll send you email notifications to help you manage your account and make the most of your Apple ID.
Change your Apple ID email address
Reset your Apple ID password
If you know your current Apple ID password and want to change it, follow these steps on your iPhone, iPad, iPod touch, or Mac. If you’ve forgotten your Apple ID password and need to reset it, follow these steps.*
Get a verification code
With two-factor authentication, you’ll need a verification code to sign in with your Apple ID on a new device or browser. Learn how to get and use the code on a trusted device, or get a text or phone call.
* If you use two-factor authentication, in some cases you might be able to speed up the account recovery process or reset your password immediately by verifying a six-digit code sent to your primary email address.
Additional email addresses
Many of us have more than one email address that friends and family use to reach us. Add an email address that you commonly use to your Apple ID account, so people can easily find and communicate with you on Apple services like FaceTime, iMessage, Shared Albums, iWork collaboration, and Find My.
Add an additional email address
- Sign in to your Apple ID account page.
- Click Edit in the Account section.
- Under Reachable at, select Add More.
- Enter your additional email address. Make sure you’re not already using it as an Apple ID.
- We’ll send a verification to that address. Didn’t get the email?
- Enter the verification code and click Verify.
Delete an additional email address
- Sign in to your Apple ID account page.
- Click Edit in the Account section.
- To delete one of your additional email addresses, click next to the address.
Rescue email address
Having a rescue email address is optional but recommended if you do not have two-factor authentication or two-step verification. If you ever forget your security questions, you can use your rescue email address to reset them. We also send any account security-related notifications to your rescue email address. If you have two-factor authentication or two-step verification, you have a notification email address instead of a rescue email address and won’t need to remember security questions.
Add or edit a rescue email address
- Sign in to your Apple ID account page.
- Click Edit in the Security section. You might be asked to answer one or more security questions before you continue.
- To add a rescue email address:
- Under Rescue Email, click Add an Email Address, then enter your rescue email address. We send a verification to that address. Didn’t get the email?
- Enter the verification code and click Verify.
- To edit a rescue email address:
- Select Change Email Address under the address you want to edit, then enter the new address. We send a verification to that address. Didn’t get the email?
- Enter the verification code and click Verify.
If you had a rescue email address on file when you upgraded to two-factor authentication or two-step verification, you can also use these steps to edit your notification email address. If you remove the notification email, you won’t be able to add a new one.
Delete a rescue email address
- Sign in to your Apple ID account page.
- Click Edit in the Security section. You might be asked to answer one or more security questions before you continue.
- To delete a rescue email address, click next to the address.
Reset your security questions
If you’ve forgotten the answers to your security questions, follow these steps to verify your identity and reset your security questions. If you set up two-factor authentication or two-step verification, you won’t need to remember any security questions.
Learn more
If you receive suspicious email, learn how to identify fraudulent email.
FaceTime is not available in all countries or regions.
Источник
If you forgot your Apple ID password
If you have issues when you try to sign in with your Apple ID password, use these steps to reset it and regain access to your account.
Use your own device to reset your password
Use the steps below to reset your password from any trusted iPhone, iPad, iPod touch, Apple Watch, or Mac.
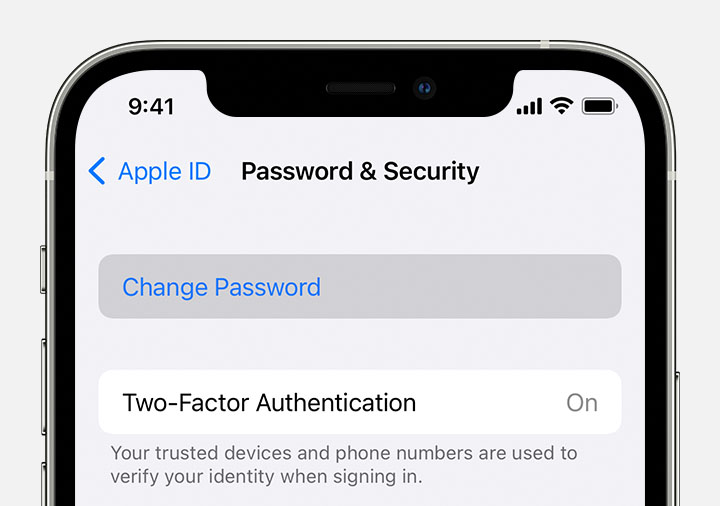
On your iPhone, iPad, iPod touch, or Apple Watch with watchOS 8 or later
- Go to Settings.
- Tap [your name] > Password & Security > Change Password.

- If you’re signed into iCloud and have a passcode enabled, you’ll be prompted to enter the passcode for your device.
- Follow the onscreen steps to update your password.
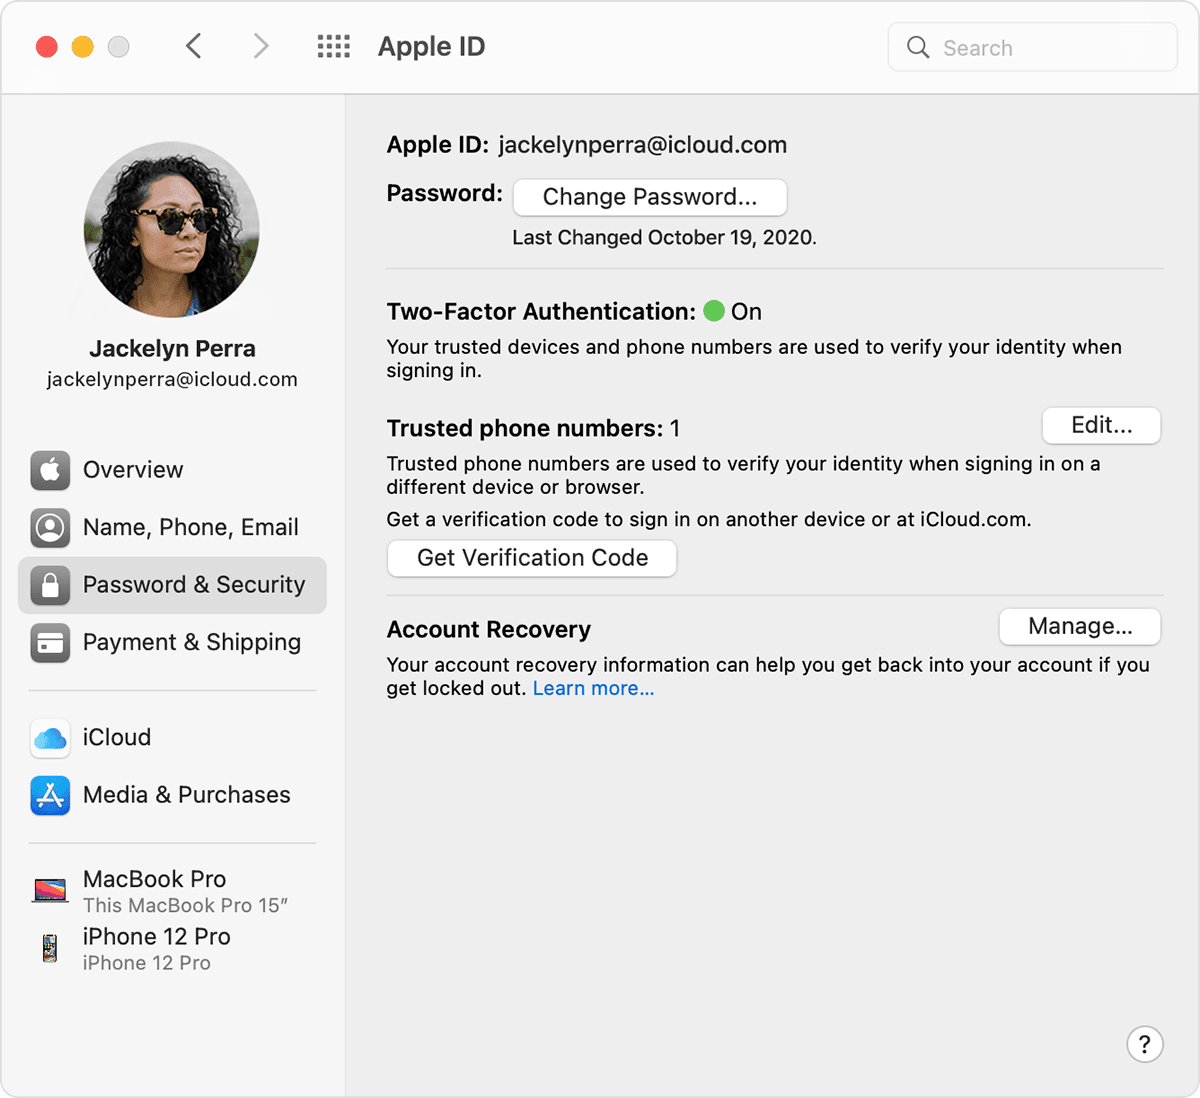
On your Mac with macOS Catalina or later
- Choose Apple menu > System Preferences, then click Apple ID.
- Click Password & Security. If you’re asked to enter your Apple ID password, click «Forgot Apple ID or password» and follow the onscreen instructions. You can skip the final step below.
- Click Change Password, then enter the password you use to unlock your Mac.
Use a trusted phone number, trusted email, recovery key, or account recovery contact
- In some cases, you might be able to reset your password using a trusted phone number and trusted email.
- If you use a recovery key for account security, you can use it to help reset your password on your iPhone, iPad, or iPod touch. Learn more about using a recovery key.
- If you already set up an account recovery contact, your account recovery contact can help you reset your password on your iPhone, iPad, or iPod touch. Learn more about using an account recovery contact.
Use someone else’s device to reset your password
You can reset your Apple ID password on a friend or family member’s iPhone, iPad, or iPod touch using the Apple Support app or the Find My iPhone app. You can also visit an Apple Store and ask to use a device on site.
Use the Apple Support app
Ask your friend or family member to open the App Store and download the Apple Support app on their iPhone, iPad, or iPod touch. Can’t download the Apple Support app?
Then open the Apple Support app and follow these steps:
- Under Topics, tap Passwords & Security.
- Tap Reset Apple ID password.
- Tap Get Started, then tap «A different Apple ID.»
- Enter the Apple ID that you need to reset the password for.
- Tap Next, then follow the steps on your screen until you receive confirmation that your Apple ID password is changed.
Any information that you enter will not be stored on the device.
Use the Find My iPhone app
If your friend or family member uses iOS 9 through 12 and they can’t download the Apple Support app, use the Find My iPhone app instead.
- Open the Find My iPhone app.
- When a Sign In screen appears, make sure the Apple ID field is empty. If you see someone else’s user name, erase it.
- Tap Forgot Apple ID or Password, then follow the onscreen steps.
Don’t see a Sign In screen? Tap Sign Out. After you sign out, make sure the Apple ID field is empty. Then tap Forgot Apple ID or Password, and follow the onscreen steps.
If you tried the previous steps or live in a country or region where Support App is not available, you can still reset your password and regain access to your account with account recovery. In some cases, you might have the option to speed up the account recovery process or reset your password immediately by verifying a six-digit code sent to your primary email address. Learn more about account recovery .
If you can’t change or reset your password
If you tried the previous steps and were unable to change or reset your password, try these steps instead.
- Go to iforgot.apple.com.
- Enter your Apple ID. Did you forget your Apple ID?
- Select the option to reset your password, then choose Continue.
- Choose to answer your security questions, get an email, or enter your Recovery Key.* Learn what to do if you don’t receive your verification or reset email.
- Follow the onscreen steps to reset your password.
After you reset your password, you’ll be asked to sign in again with your new password. You also might need to update your password in Settings on your devices.
* If you permanently lost your Recovery Key or access to your trusted device, you can’t change your password.
Источник
If you can’t reset your Mac login password
If the standard steps to reset the password of your Mac user account don’t succeed, try these additional steps.
Before you begin
Start up from macOS Recovery
Determine whether you’re using a Mac with Apple silicon, then follow the appropriate steps to start up from macOS Recovery:
- Apple silicon: Turn on your Mac and continue to press and hold the power button until you see the startup options window. Select the gear icon labeled Options, then click Continue.
- Intel processor: Turn on your Mac and immediately press and hold Command (⌘)-R until you see an Apple logo or other image.
If you’re asked to select an admin user
If you’re asked to select an admin user you know the password for, click “Forgot all passwords?” and proceed as described below.
If you’re asked for your Apple ID information
Enter your Apple ID information. You might also be asked to enter the verification code sent to your other devices.
If you see an Activation Lock window, click Exit to Recovery Utilities. Then continue as described in the next section, “Use the Reset Password assistant.”
If you’re asked to select a user that you want to reset the password for:
- Select the user, then enter your new password information and click Next.
- When authentication has succeeded, click Exit.
- Choose Apple menu > Restart. Password reset is now complete, so you don’t need to take additional steps.
If you’re asked for your recovery key
- Enter your FileVault recovery key. You received it when you turned on FileVault and chose to create a recovery key instead of allowing your iCloud account (Apple ID) to unlock your disk.
- When prompted to reset your password, click Reset Password.
- Select a user to reset the password for.
- After successfully authenticating, click Exit.
- Choose Apple menu > Restart. Password reset is now complete, so you don’t need to take additional steps.
Use the Reset Password assistant
You should now see the utilities window, which shows options such as restoring from Time Machine, reinstalling macOS, and using Disk Utility.
- From the Utilities menu in the menu bar, choose Terminal.
- In the Terminal window, type resetpassword , then press Return to open the Reset Password assistant.
- If you’re asked to select an admin user you know the password for, click “Forgot all passwords?”.
- At the Reset Password window, click Deactivate Mac, then click Deactivate to confirm.
- If you see an Activation Lock window, enter your Apple ID email and password, then click Next.
- At the Reset Password window, enter your new password information, then click Next.
If this window shows multiple user accounts, click the Set Password button next to each account name, then enter the new password information for each account. - When the password reset is completed, click Exit.
- Choose Apple menu > Restart, then log in with your new password.
If you still can’t reset your password, erase your Mac
If no other solution is successful, you have the option to reset your password by erasing your Mac.
- Shut down your Mac, then start up from macOS recovery as described previously.
- When you’re asked to select an admin user you know the password for, choose Erase Mac from the Recovery Assistant menu in the menu bar.
- From the Erase Mac window, click Erase Mac, then click Erase Mac to confirm.
- If your Mac restarts to a flashing question mark, press and hold the power button for a few seconds until your Mac turns off.
- Start up from macOS Recovery again, then reinstall macOS. For details, see How to reinstall macOS.
If you can’t reinstall macOS because the installer doesn’t see a hard disk on which to install, you might need to change the format of the disk:
- Press Command (⌘)-Q to quit the installer.
- When you see the utilities window, select Disk Utility, then click Continue.
- Select the first item listed in the sidebar of the Disk Utility window. This is your built-in hard disk.
- Click the Erase button or tab on the right side of the window, then enter these details:
- Name: Macintosh HD
- Format: Mac OS Extended (Journaled)
- Scheme (if shown): GUID Partition Map
- Click Erase, then click Erase to confirm.
- When the erase is complete, press Command-Q to quit Disk Utility and return to the utilities window. You should now be able to reinstall macOS successfully.
If you still need help, please contact Apple Support.
Источник


