- Make purchases using Apple Pay
- How to pay using Apple Pay in stores and other places
- Pay with your iPhone
- Pay with your Apple Watch
- How to pay using Apple Pay online or within apps
- Send and receive money with Apple Cash
- How to send money in the Messages app using Apple Pay
- On your iPhone or iPad
- Respond to a request for money
- On your Apple Watch
- Respond to a request for money
- Ask Siri
- How to accept a payment
- Choose your payment method
- Use your debit card
- How to send a request for payment
- On your iPhone
- On your Apple Watch
- Automatically or manually accept payments
- On your iPad
- On your Apple Watch
- How to cancel or dispute a payment
- What you need
- Set up Apple Pay
- How to add a card for Apple Pay on your iPhone
- Add a new card on your iPhone
- Add a previous card on your iPhone
- How to add a card for Apple Pay on your Apple Watch
- Add a card for Apple Pay on your Apple Watch
- Add a card for Apple Pay with the Apple Watch app on your iPhone
- How to add a card for Apple Pay on your Mac or iPad
Make purchases using Apple Pay
You can pay using Apple Pay in stores, within apps and on the web, and more.
How to pay using Apple Pay in stores and other places
With your iPhone or Apple Watch, you can use Apple Pay in stores, restaurants, gas stations, taxis, or wherever else you see one of these symbols 1 .
Pay with your iPhone
- To use your default payment card:
- If your iPhone has Face ID, double-click the side button. Authenticate with Face ID or enter your passcode.
- If your iPhone has Touch ID, rest your finger on the Touch ID sensor.
- To use a different card, tap your default card to see your other cards. Tap a new card and authenticate.
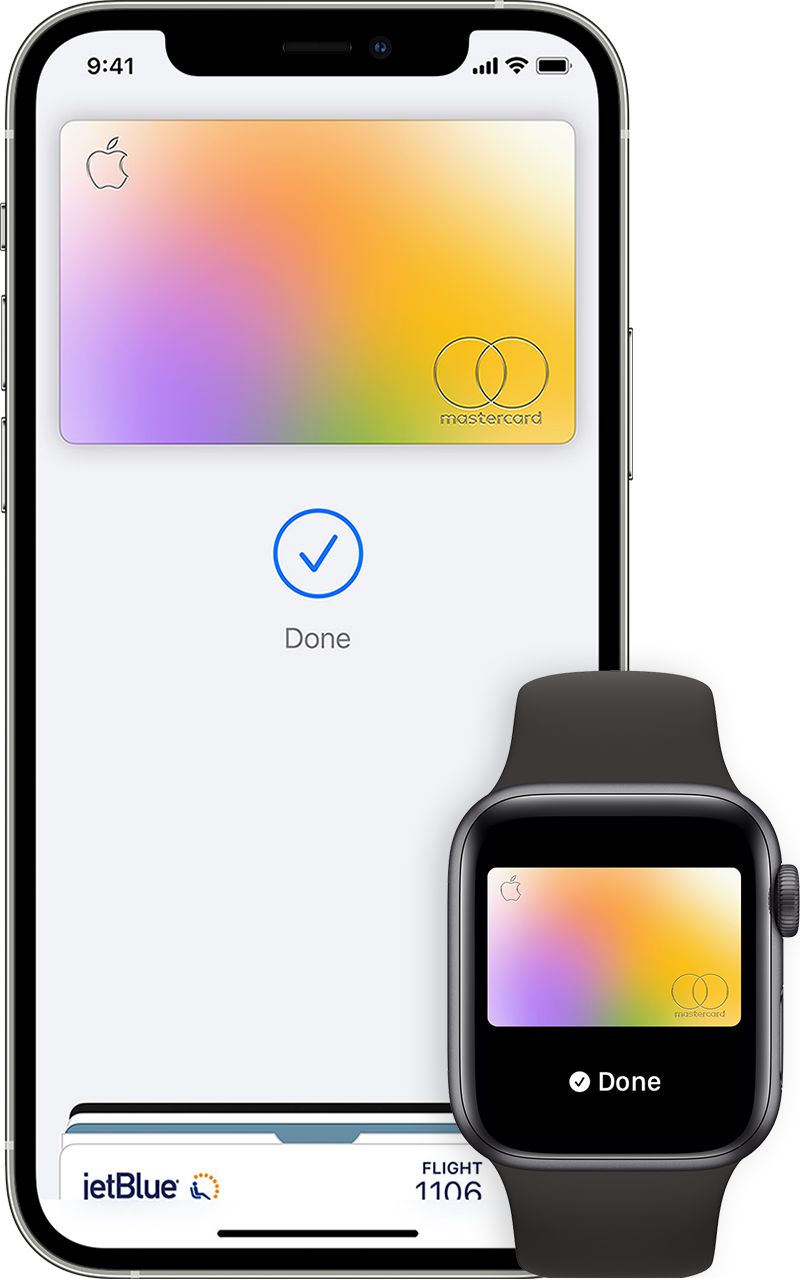
- Hold the top of your iPhone near the contactless reader until you see Done and a checkmark on the display.
Pay with your Apple Watch
- Double-click the side button.
- Your default card opens automatically. Scroll down to choose another card.
- Hold the display of your Apple Watch near the contactless reader until you feel a gentle tap and hear a beep.
Want to see your recent purchases? Learn how to check your Apple Pay transaction history.
How to pay using Apple Pay online or within apps
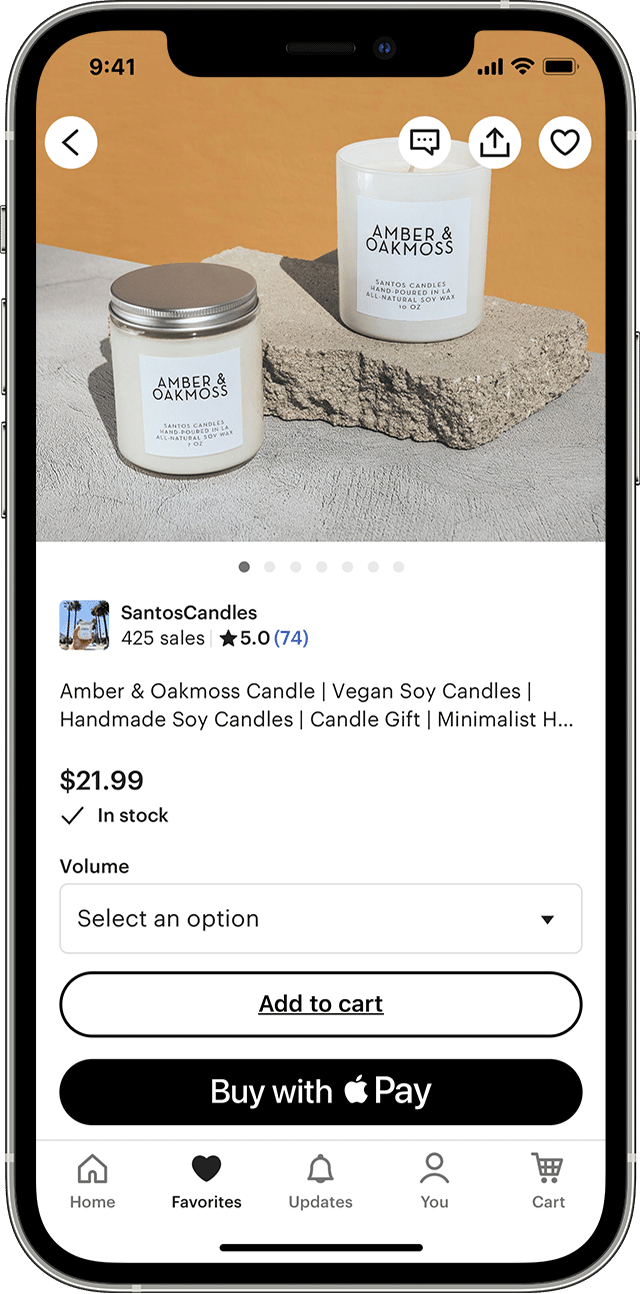
You can use Apple Pay to pay online in Safari 2,3 or within apps when you see Apple Pay as a payment option.
- Tap the Apple Pay button or choose Apple Pay as your payment method.
- To pay with a different card, tap the Next button
or the Expand Menu button
next to your default card.
- If necessary, enter your billing, shipping, and contact information. Apple Pay stores that information, so you won’t need to enter it again.
- Confirm the payment.
- iPhone or iPad with Face ID: Double-click the side button, then use Face ID or your passcode.
- iPhone or iPad without Face ID: Use Touch ID or your passcode.
- Apple Watch: Double-click the side button.
- Mac with Touch ID: Follow the prompts on the Touch Bar and place your finger on Touch ID. If Touch ID is off, tap the Apple Pay icon on the Touch Bar and follow the prompts on the screen.
- Mac without Touch ID: Confirm the payment on your Bluetooth-connected iPhone or Apple Watch. Make sure that you’re signed in with the same Apple ID on all devices.
- When your payment is successful, you’ll see Done and a checkmark on the screen.
- In addition to accepting Apple Pay, the merchant must accept your payment card and payment network.
- In China mainland, you can use Apple Pay on the web in Safari only on a compatible iPhone and iPad with the latest version of iOS or iPadOS.
- In Italy, you can use your iPhone and Apple Watch to make Apple Pay purchases in stores with your Maestro card. Maestro cards can’t be used within apps and on the web. In the Netherlands, you can add Maestro cards to all compatible devices except Mac.
Information about products not manufactured by Apple, or independent websites not controlled or tested by Apple, is provided without recommendation or endorsement. Apple assumes no responsibility with regard to the selection, performance, or use of third-party websites or products. Apple makes no representations regarding third-party website accuracy or reliability. Contact the vendor for additional information.
Источник
Send and receive money with Apple Cash
Use Apple Cash or a debit card in the Wallet app to send and receive money in the Messages app.
If this is your first time using Apple Pay to send, receive, or request money in Messages, see what you need to get started.
How to send money in the Messages app using Apple Pay
When you send money in the Messages app using Apple Pay, your Apple Cash card is used to pay first by default. If you want to use a debit card instead, you can send money directly from your debit card.
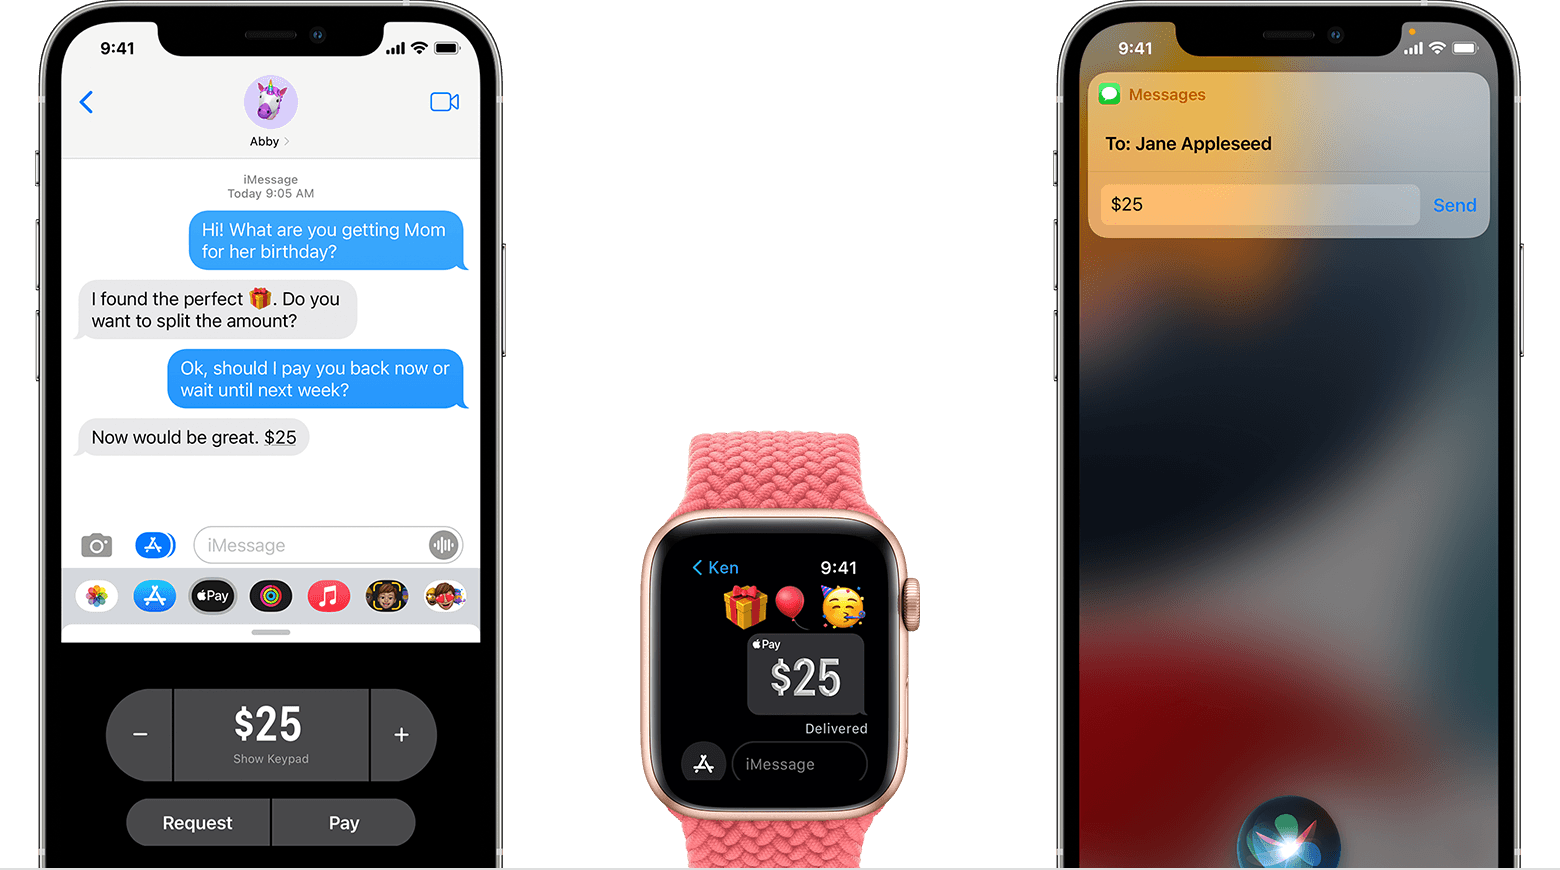
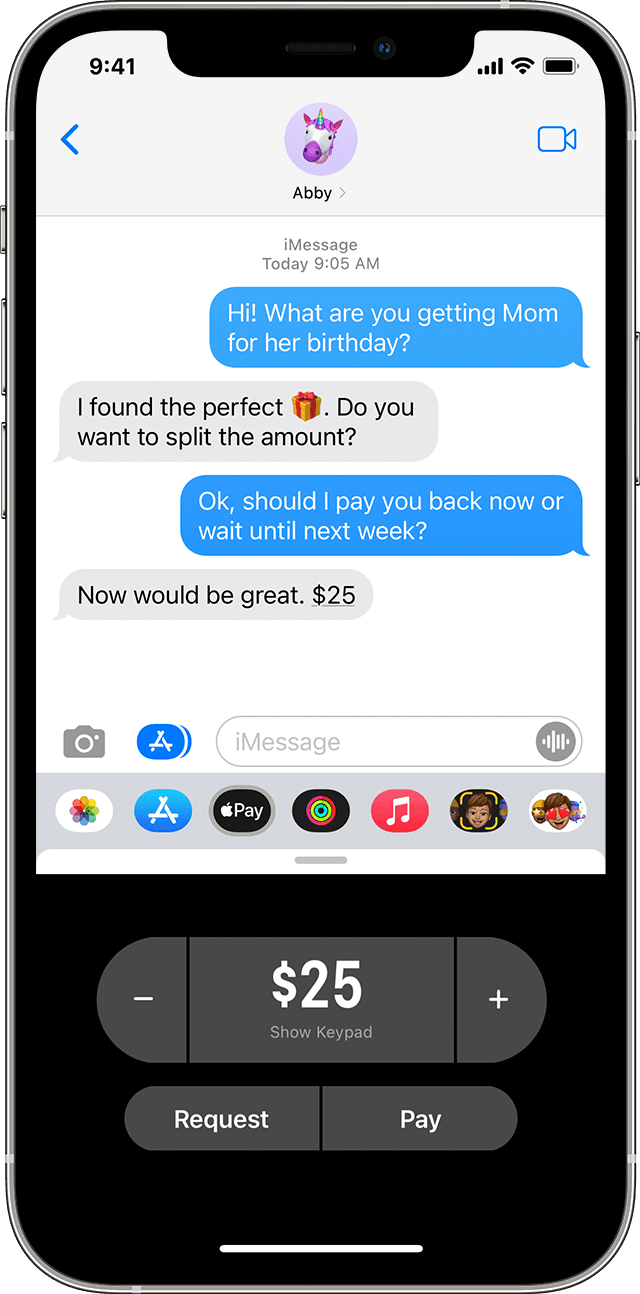
On your iPhone or iPad
- Open the Messages app, then start a new conversation or tap an existing one.
- Tap the Apple Pay button . If you don’t see the Apple Pay button, tap first.
- Enter the amount you want to send.
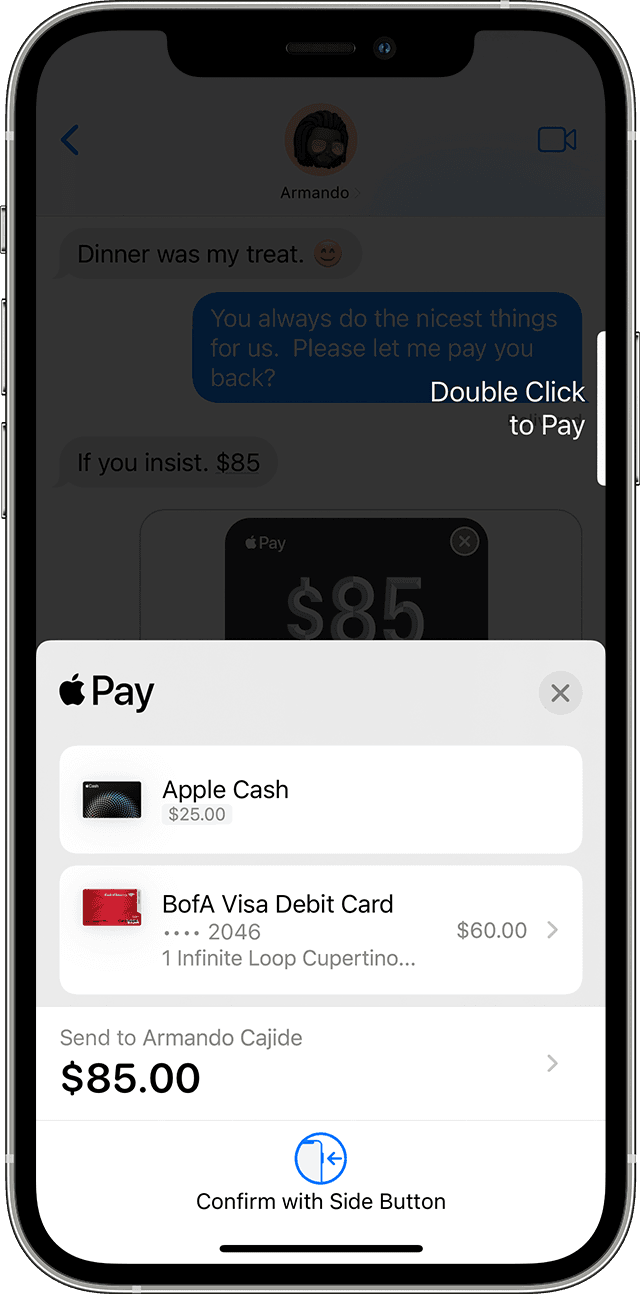
- Tap Pay, then tap the send button to review or cancel the payment.
- Confirm your payment with Face ID, Touch ID, or your passcode.
If the person you sent money to has not accepted the money yet, you can cancel the payment.
Respond to a request for money
- Open the request in the Messages app, then tap Pay on the message.
- Review the amount to send. Tap Pay to continue, or change the amount.
- Confirm using Face ID, Touch ID, or your passcode and send your payment.
To decline a request for money, just ignore the message.
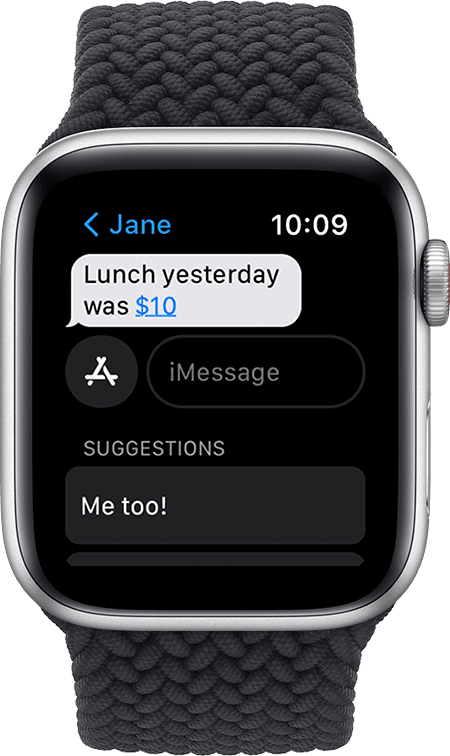
On your Apple Watch
- Open the Messages app, then tap an existing conversation.
- Tap the App Store button , then tap the Apple Pay button .
- Tap the minus sign or the plus sign to change the amount.
- Tap Pay, then review or cancel the payment.
- Double-click the side button to send your payment.
Respond to a request for money
- Open the request in the Messages app, then tap Pay on the message.
- Review the amount to send. Tap Pay to continue, or use the Digital Crown to change the amount.
- Double click the side button to confirm and send your payment.
Ask Siri
On your iPhone or Apple Watch, say «Hey Siri,» then say something like, «Send 25 dollars to Jane for movie tickets.» Then choose Wallet or Apple Pay.
How to accept a payment
The first time that you use Apple Cash, you have seven days to accept the money that you’ve been sent. After you accept the terms and conditions, payments are automatically accepted and added to your Apple Cash card. You might be asked to verify your identity.
When someone sends you money, it’s securely received and kept in Apple Cash. You can use the money right away 1 to send to someone, spend with Apple Pay, or you can transfer the money to your bank account or eligible debit card.
If you send money to someone and they don’t accept it, you can cancel the payment.
Choose your payment method
- After you open a conversation in the Messages app, tap the Apple Pay button , then enter an amount.
- Tap Pay, then tap the send button .
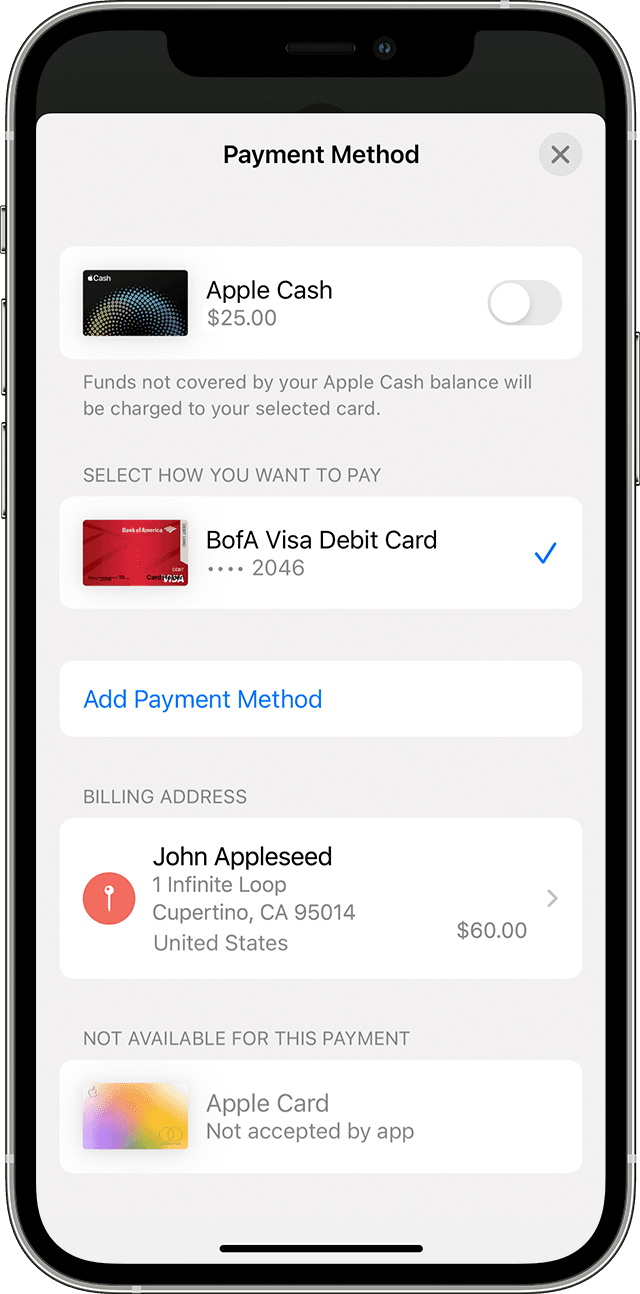
- By default, your Apple Cash card is used to pay first, unless you turn off Apple Cash as the default payment method and use a debit card in Wallet instead. If you pay with Apple Cash and see two cards on the payment sheet, your Apple Cash balance is less than the payment amount. The remainder will be funded by one of your debit cards in Wallet. Tap the arrow .
- Choose a debit card to pay the remainder, and check that the correct billing address is selected for that card.
If you have no Apple Cash balance, you can use a debit card in Wallet for the entire payment amount. You can see which card is being used on the confirmation screen.
Use your debit card
- On your iPhone or iPad, open a conversation in the Messages app.
- Tap the Apple Pay button , enter an amount, then tap Pay.
- Tap the send button , then tap the arrow .
- Turn off Apple Cash, then choose the debit card and billing address you want to use.
- Tap Back, then authenticate with Face ID, Touch ID, or your passcode.
If you turn off Apple Cash as the default method to pay someone in Messages on your iPhone, it’s also turned off on your paired Apple Watch. To use Apple Cash, you need to turn it on to make it your default payment method again.
How to send a request for payment
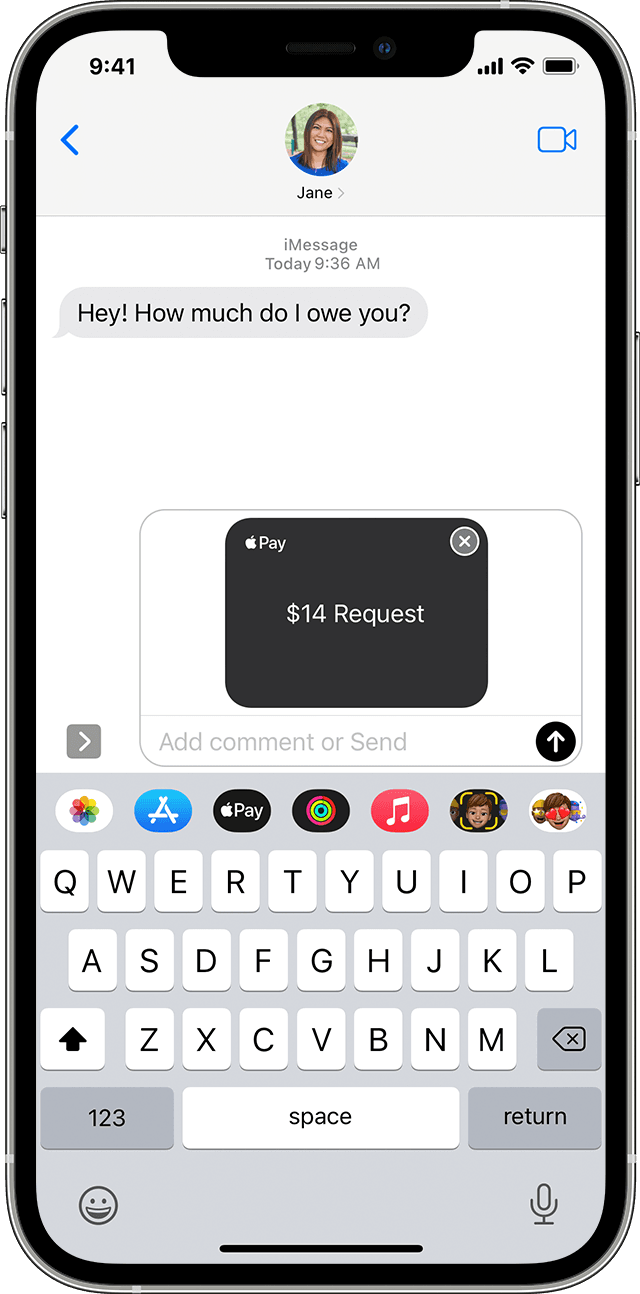
When you send someone a payment request using Apple Pay, they can tap Pay, then change or confirm the amount they want to send.
On your iPhone
- Open a conversation in the Messages app or start a new conversation.
- Tap the Apple Pay button . If you don’t see the Apple Pay button, tap the App Store button first.
- Enter an amount, then tap Request.
- Send your request.
On your Apple Watch
- Open the Messages app and choose a conversation.
- Tap the App Store button , then tap the Apple Pay button .
- Enter an amount, then swipe on the Pay button to show the Request button.
- Tap Request.
Automatically or manually accept payments
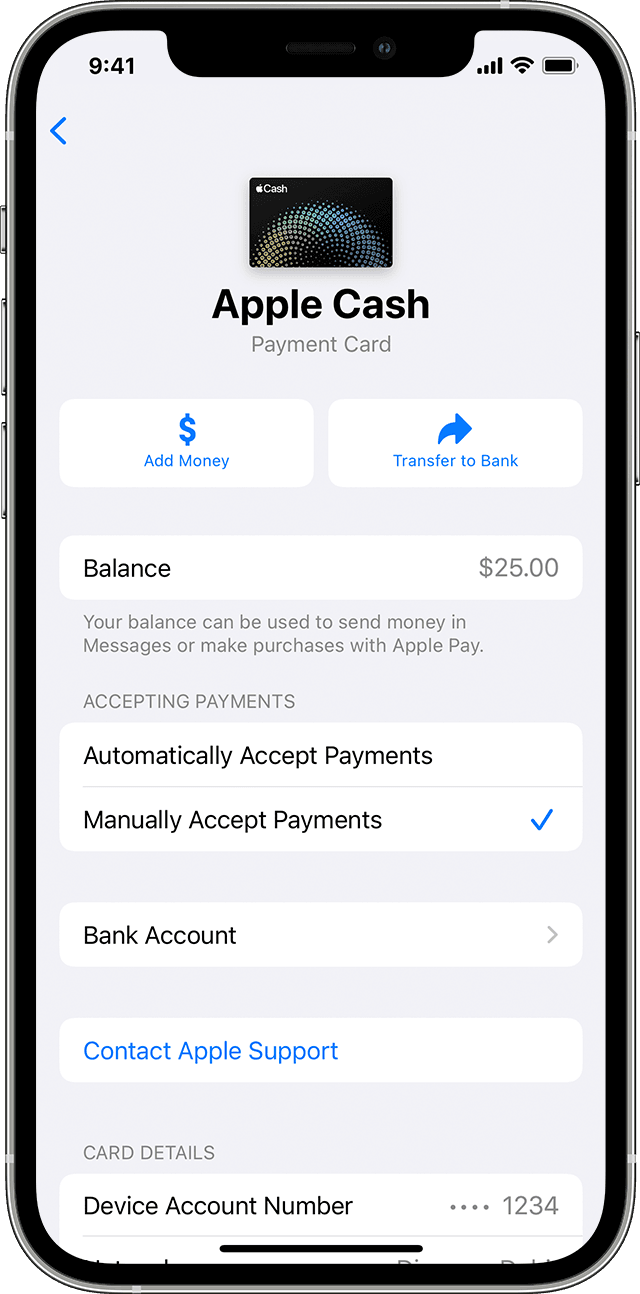
- Open the Wallet app on your iPhone, then tap your Apple Cash card.
- Tap the more button .
- Tap Automatically Accept Payments or Manually Accept Payments.
If you choose Manually Accept Payments, you’ll see Accept in the message when someone sends you money. You have seven days to accept the money.
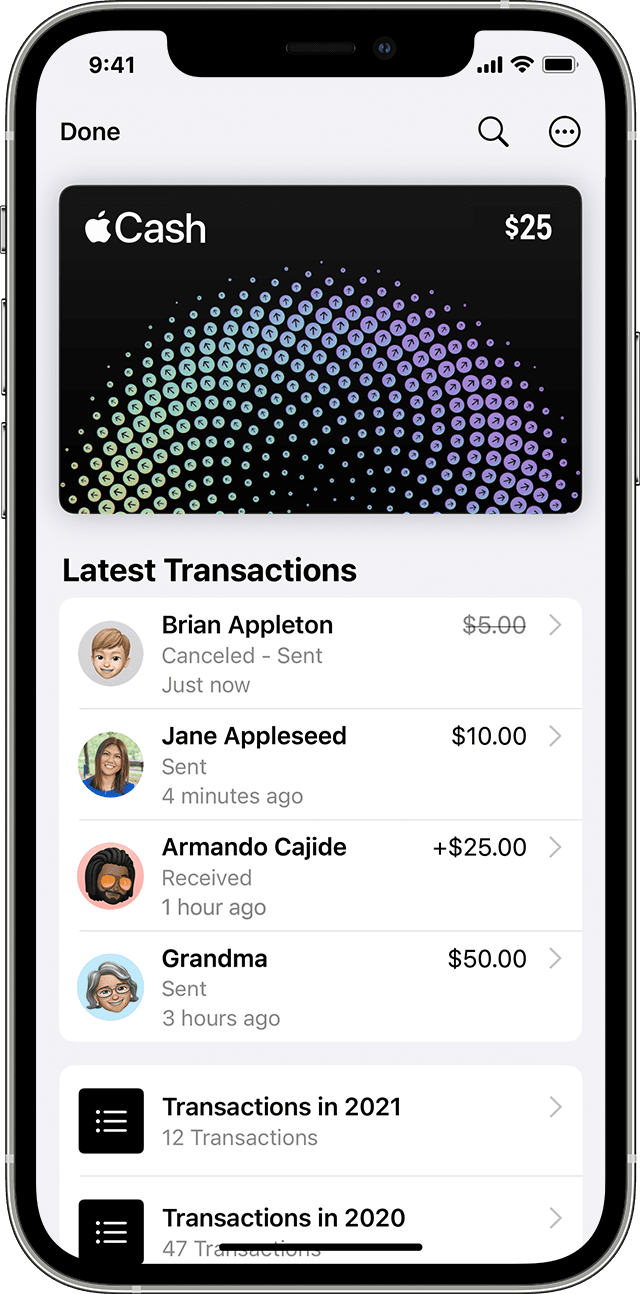
To reject a payment, open the Wallet app on your iPhone, tap your Apple Cash card and find the payment under Latest Transactions. Tap the payment, tap the payment again, then tap Reject Payment.
When you change the setting on one of your devices, it updates the setting on all of your devices.
On your iPad
- Open the Settings app.
- Scroll down and tap Wallet & Apple Pay, then tap your Apple Cash card.
- Tap Automatically Accept Payments or Manually Accept Payments.
On your Apple Watch
- Open the Apple Watch app on your iPhone.
- Scroll down and tap Wallet & Apple Pay, then tap your Apple Cash card.
- Tap Automatically Accept Payments or Manually Accept Payments.
How to cancel or dispute a payment
- Open the Messages app, then open the conversation and tap the payment.
- Your Apple Cash card will open in the Wallet app. Under Latest Transactions, tap the payment, then tap it again.
- Tap Cancel Payment.
If you don’t see Cancel Payment, the person has already accepted the payment. Try asking the recipient to send the money back to you instead.
It can take 1-3 business days for the money to be refunded, depending on your bank or card issuer.
Apple Pay person to person payments are just like any other private transaction between two people. If you’re unable to cancel or receive your money back from the recipient, you can contact us to open a dispute.
What you need
You and the person that you’re sending money to or receiving the money from must: 2
- Have a compatible device with the latest iOS or watchOS.
- Use two-factor authentication with your Apple ID and sign in to iCloud and iMessage with the same Apple ID on any device that you want to use to send or receive money.
- If you’re sending money to someone, make sure there’s enough money on your Apple Cash card or an eligible debit card in Wallet.
Источник
Set up Apple Pay
To set up Apple Pay, add a credit, debit, or prepaid card to the Wallet app on your iPhone, Apple Watch, or other compatible device.
To use Apple Pay, you need:
- A compatible device 1 with the latest version of iOS or iPadOS, watchOS, or macOS.
- A supported card from a participating card issuer.
- An Apple ID signed in to iCloud 2 .
Learn if your country/region supports Apple Pay. To check if your card is compatible with Apple Pay, contact your card issuer.
How to add a card for Apple Pay on your iPhone
Add a new debit or credit card to the Wallet app, or add a card you previously used on a device associated with your Apple ID.
Add a new card on your iPhone
- In the Wallet app, tap the Add button .
- Tap Debit or Credit Card.
- Tap Continue.
- Follow the steps on the screen to add a new card. If prompted, choose your bank or card issuer from the list or find them using the search bar.
- Verify your information with your bank or card issuer. They might ask you to provide additional information or to download an app before approving your card for use with Apple Pay.
- If you have a paired Apple Watch, you have the option to also add the card to your watch.
Add a previous card on your iPhone
- In the Wallet app, tap the Add button .
- Tap Previous Cards to see cards that you previously added to the Wallet app.
- Choose the card or cards that you want to add and tap Continue.
- Follow the steps on the screen to add your card.
- If necessary, verify your information with your bank or card issuer. They might ask you to provide additional information or to download an app before approving your card for use with Apple Pay.
- If you have a paired Apple Watch, you have the option to also add the card to your watch.
Once you’ve added your card, you can start using Apple Pay.
To remove a card from the Previous Cards screen, tap Edit > Remove button > Delete. Then, tap Delete Card to confirm and remove the card from all your devices.
How to add a card for Apple Pay on your Apple Watch
You can add a new debit or credit card, or a card you previously used on a device associated with your Apple ID, directly on your Apple Watch. You can also add a card with the Apple Watch app on your paired iPhone.
Add a card for Apple Pay on your Apple Watch
- On your Apple Watch, open the Wallet app.
- Scroll down and tap Add Card.
- Tap Debit or Credit Card to add a new card, or tap Previous Card to choose a card that you previously added to the Wallet app.
- Tap Continue.
- Follow the steps on the screen to enter your card information and add your card.
- If necessary, verify your information with your bank or card issuer using the Apple Watch app on your paired iPhone. They might ask you to provide additional information or to download an app before approving your card for use with Apple Pay.
Apple Watches managed with Family Setup might not be able to add cards directly on the Apple Watch.
Add a card for Apple Pay with the Apple Watch app on your iPhone
- On your paired iPhone, open the Apple Watch app.
- In the My Watch tab, tap Wallet & Apple Pay.
- Tap Add Card.
- Tap Debit or Credit Card to add a new card, or tap Previous Card to choose a card that you previously added to the Wallet app.
- Tap Continue.
- Follow the steps on the screen to add your card.
- If necessary, verify your information with the bank or card issuer. They might ask you to provide additional information or to download an app before approving your card for use with Apple Pay.
Once you’ve added your card, you can start using Apple Pay.
How to add a card for Apple Pay on your Mac or iPad
- Open Wallet settings on your device.
- On your Mac model with Touch ID, go to System Preferences > Wallet & Apple Pay.
- On your iPad, go to Settings > Wallet & Apple Pay.
- Tap Add Card. 3,4
- Follow the steps on the screen to add a card.
- Verify your information with your bank or card issuer. They might ask for more information.
Once you’ve added your card, you can start using Apple Pay.
On Mac models without built-in Touch ID, you can complete your purchase using Apple Pay on your compatible iPhone or Apple Watch: On your iPhone, go to Settings > Wallet & Apple Pay and turn on Allow Payments on Mac.
- Make sure that you sign in to iCloud on all your devices. On your iOS device, you need to set up Face ID, Touch ID, or a passcode. On your Apple Watch, you need to set up a passcode. If you sign out of iCloud or remove your passcode, all credit, debit, prepaid, transit, and student ID card will be removed from that device.
- If you’re less than 13 years old, Apple Pay isn’t available and you can’t add a card in the Wallet app. Age varies by country or region.
- In China mainland, you can use Apple Pay on the web in Safari only on compatible iPhone and iPad models using iOS 11.2 or later. In the Netherlands, you can use Apple Pay on the web only on a compatible iPhone or iPad.
- In Italy, you can’t add Maestro cards to iPad or Mac. In Australia, you can’t add eftpos cards to your iPad or Mac. In the Netherlands, you can add Maestro cards to all compatible devices except Mac.
Information about products not manufactured by Apple, or independent websites not controlled or tested by Apple, is provided without recommendation or endorsement. Apple assumes no responsibility with regard to the selection, performance, or use of third-party websites or products. Apple makes no representations regarding third-party website accuracy or reliability. Contact the vendor for additional information.
Источник

 or the Expand Menu button
  next to your default card.
