- Установите SELinux Permissive на Android с помощью переключателя SELinux
- Как изменить режим SELinux на Android с помощью приложения SELinux Switch
- Шаг 1. Установите приложение «SELinux Switch»
- Через APK
- Через TWRP (прошиваемый установщик ZIP)
- Шаг 2. Установите разрешение SELinux с помощью приложения
- Working with SELinux on Android
- Glossary
- What is SELinux?
- History of SELinux
- How does SELinux work?
- SELinux policy in a Nutshell
- How to write SELinux policy?
- Labeling an initiator (Not an App)
- Labeling an initiator (Android App)
- Labeling filesystems
- Labeling properties
- Allowing permission
- Suppressing a denial
- The concept of neverallow
- Macros
- Where should my sepolicy go?
- Stock SELinux policy as a reference
- Some useful tools
- Useful references
Установите SELinux Permissive на Android с помощью переключателя SELinux
Смена режима SELinux на вашем Android-устройстве больше не проблема. В этом руководстве мы покажем вам, как легко установить SELinux Permissive на вашем Android-устройстве с root-доступом, используя Переключатель SELinux приложение.
Что такое SELinux? — Linux с повышенной безопасностью, сокращенно «SELinux» — это модуль безопасности в ядре Linux. Он обеспечивает безопасный механизм для регулирования политик безопасности управления доступом.
Проще говоря, это мера безопасности, которая ограничивает объем и тип информации, к которой могут получить доступ пользовательские программы / приложения в случае Android.
SELinux Switch — это служебное приложение для опытных пользователей Android, которое помогает им переключать режим SELinux на своих устройствах.
Поскольку Android изначально поставляется с SELinux Enforcing, вы можете использовать этот простой, но очень эффективный инструмент / приложение для установки SELinux Permissive.
Коммутатор SELinux не вносит никаких постоянных изменений в сценарий загрузки. Итак, когда ваше устройство перезагружается, режим SELinux будет снова изменен на «Принудительный». Однако приложение SELinux Switch автоматически запустится после выполнения последовательности загрузки и снова установит SELinux Permissive, если вы захотите это сделать.
Как изменить режим SELinux на Android с помощью приложения SELinux Switch
Используя приложение SELinux Switch, переключаться между принудительным и разрешающим режимами SELinux проще, чем когда-либо. Приложение предлагает чистый и функциональный интерфейс, позволяющий выполнять работу всего за несколько нажатий.
Шаг 1. Установите приложение «SELinux Switch»
Чтобы изменить режим SELinux и установить SELinux Permissive, вам сначала нужно будет загрузить и установить приложение SELinux Switch. К сожалению, приложение недоступно в Play Store.
Вы можете установить приложение двумя разными способами — установив APK вручную, что является самым простым. Или, прошив установщик zip через TWRP. Последний доступен в случае, если способ установки APK по каким-либо причинам не работает.
Через APK
Для начала вы должны сначала включить «Неизвестные источники» (Nougat и ниже) или «Установить неизвестные приложения» (Android Oreo и Android Pie) в настройках. Это необходимо, если вы устанавливаете приложение из источников, отличных от Play Store.
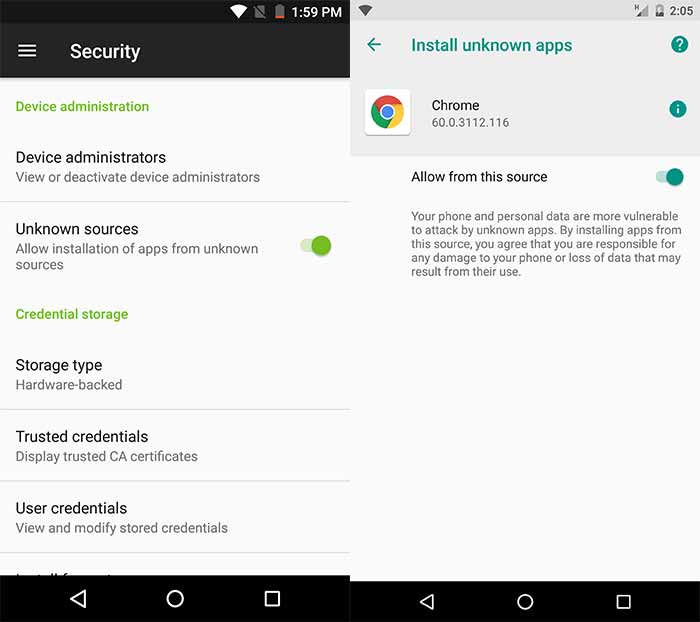 Слева: Неизвестные источники в Нуга и ниже | Справа: установка неизвестных приложений в Oreo
- Android Nougat или более ранняя версия: перейдите на Настройки>Безопасность.
- Android Oreo или Pie: перейдите в Настройки> Приложения и уведомления> Дополнительно> Доступ к специальным приложениям> Установить неизвестные приложения.
После того, как вы включили эту опцию, загрузите последнюю версию APK-файла «SELinux Switch»: Ссылка для скачивания
После того, как вы загрузили APK, используйте свое любимое приложение для управления файлами, чтобы перемещаться по хранилищу и устанавливать его с помощью установщика пакетов.
Через TWRP (прошиваемый установщик ZIP)
Маловероятно, что установка APK завершится неудачно. Но в случае неудачи вы решите установить приложение «SELinux Switch», установив файл * .zip установщика.
Итак, сначала скачать ZIP-файл установщика (например, The.SELinux.Switch.ver.6.2.7.build.627.zip) и поместите его в хранилище вашего устройства. Затем перезагрузите Android-устройство в режиме восстановления TWRP.
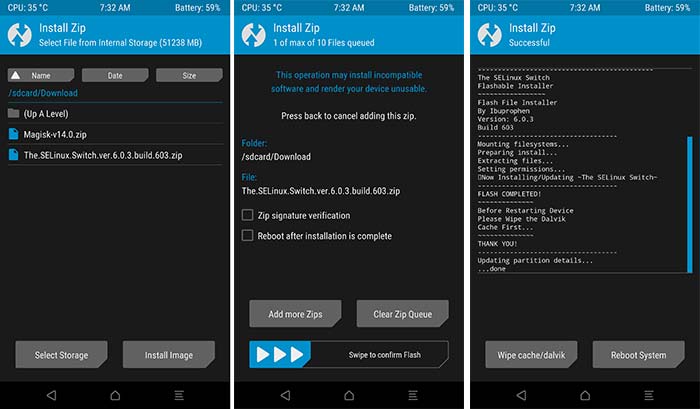
Как только ваше устройство находится в TWRP, нажмите кнопку «Установить». Затем просмотрите внутреннюю память / SD-карту вашего устройства и выберите zip-файл установщика. После выбора файла просто проведите по кнопке «Проведите для подтверждения Flash» внизу.
Установка займет не более нескольких секунд. По завершении нажмите кнопку «Перезагрузить систему».
Шаг 2. Установите разрешение SELinux с помощью приложения
Теперь, когда приложение установлено на вашем Android, вы можете легко использовать его для включить SELinux Permissive Режим.
Итак, перейдите в панель приложений и запустите приложение SELinux Switch. Как только интерфейс запустится, вы увидите запрос прав root. Обязательно предоставьте доступ.
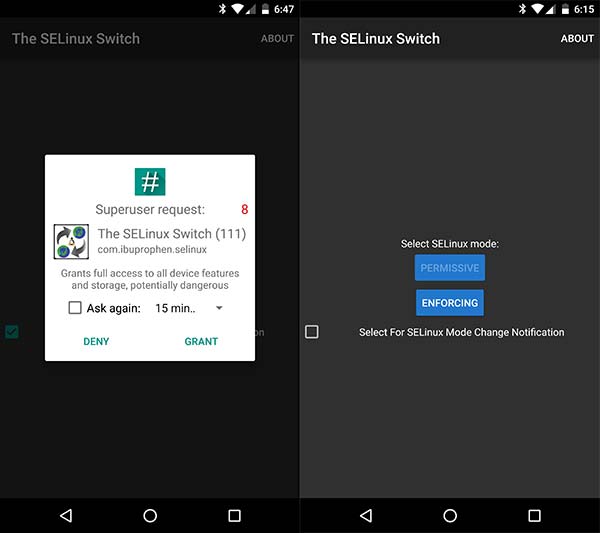
Теперь вы увидите экран приложения. Чтобы установить SELinux Permissive, просто нажмите кнопку «PERMISSIVE» один раз.
Чтобы изменить режим обратно, вы можете просто запустить приложение в любое время и нажать кнопку «ПРИНУДИТЬ». Для дополнительного удобства вы также можете выбрать параметр «Выбрать для уведомления об изменении режима SELinux».
Вот и все! Вы легко установили приложение SELinux Switch на свой Android и использовали его для установки SELinux Permissive. Это в конечном итоге избавило вас от многих проблем с установкой модифицированных сценариев загрузки или других обходных путей.
Если у вас возникнут проблемы при установке приложения, вы можете оставить комментарий ниже.
Источник
Working with SELinux on Android
Written on February 25, 2021 by Aayush Gupta (theimpulson) & Nolen Johnson (npjohnson)

Glossary
- AOSP: Short for Android Open Source Project.
- AVC: Short for Access Vector Cache, the cache used by SELinux to store its decisions regarding access control.
- comm: Short for Communication.
- CTS: Compatibility Test Suite, Google’s test suite for device wishing to ship GMS.
- LSM: Short for Linux Security Modules, a framework which is part of Linux, allows supporting various security implementations.
- MAC: Short for Mandatory Access Control, a type of access control via which an OS constrains the ability of the initiator to perform the action in question.
- macros: A single instruction that expands into a set of instructions when called.
- NSA: Short for National Security Agency of the United States of America.
- regex: Short for Regular Expression.
- scontext: Short for Source Context, also referred to as Domain.
- SELinux: Short for Security-Enhanced Linux.
- SELinux policy: Policy used by SELinux which specifies a set of permissions.
- SoC: Short for System on Chip.
- tclass: Short for Target Class.
- tcontext: Short for Target Context.
What is SELinux?
SELinux is an optional feature of the Linux kernel that provides support to enforce access control security policies to enforce MAC. It is based on the LSM framework.
History of SELinux
SELinux was originally developed by the NSA to demonstrate the value of MAC and how it can be applied to Linux. It was merged in Linux 2.6 on Aug 2003. Red Hat, and McAfee Corp. are some of the significant contributors to the development of SELinux. Later on, a separate project called Security Enhancements (SE) for Android was led by the NSA to integrate SELinux into Android. This project resulted in SELinux becoming a core part of Android. It was introduced defaulting to Permissive mode in Android 4.3, optionally Enforcing in Android 4.4, and was required by Google’s CTS to be Enforcing in Android 5.0 and above.
How does SELinux work?
SELinux can operate in 2 modes which are Enforcing and Permissive. The default mode is Enforcing.
In Enforcing mode, SELinux actively enforces the given policy which specifies what is allowed (permissions in general). If an initiator wants to perform an action, SELinux will check if it is allowed to do so in the installed policy, and if allowed, it will then permit the requested action to happen. If denied, it will be logged in the kernel log buffer along with logcat on Android.
In Permissive mode, SELinux will only log actions which are explicitly not allowed in the installed policy, and the initiators of those actions.
Below is an example of an SELinux denial printed in an android logcat :
avc: denied < write >for comm=»[email protected]» name=»tp_double_tap» dev=»proc» ino=4026533160 scontext=u:r:hal_power_default:s0 tcontext=u:object_r:proc:s0 tclass=file permissive=0
Permissive mode is used mostly by developers during the early stages of bringing up a new device. This allows developers to save time during the initial stages of development by logging all the policy, which is needed by different process, services, firmware, etc. and address them all together once the project has reached a state of stability.
SELinux policy in a Nutshell
SELinux policy is a set of rules (permissions) which states which initiators can perform which type of actions. If a particular action the process wants to perform is not permitted explicitly in the installed policy, SELinux will deny it. Therefore, on production devices, it’s of the utmost importance to have a complete set of rules in the SELinux policy to avoid breakages/bugs due to SELinux denials. With that said, SELinux must also be as strict as possible. A good rule of thumb to remember while writing SELinux policy is: ‘If it ain’t broke, don’t fix it’.
By default, Android provides an SELinux policy for the components which are specific to the AOSP platform. You can find these stored in the platform/system/sepolicy repository of AOSP. Downstream vendors modifying AOSP and adding additional functionality must write their own SELinux policies. For example, Qualcomm provides sepolicy for devices using it’s SoCs in the device/qcom/sepolicy repository of CAF (Code Aurora Forum). LineageOS provides sepolicy to the developers for its additions/features on AOSP in the device/lineage/sepolicy repository hosted in the LineageOS GitHub organization.
All of these different SELinux policy rules are compiled together to generate device-partitions specific SELinux policy. For example, SELinux policy rules which are specific to the system partition will end up in system image, vendor partition specific rules will end up in vendor image, etc. These device-partition-specific policies are compiled together into one single SELinux policy when an Android system boots up, and this is the final policy which SELinux audits processes against.
How to write SELinux policy?
As previously mentioned, SELinux policy is just a set of rules. Writing SELinux policy encompasses everything from labeling relevant services/apps to writing rules that allow the aforementioned services to initiate actions or access other nodes/files, etc. Additionally, one can force a process to be run in Permissive mode even when the device is in Enforcing mode, though this practice should be avoided. As you can see, writing SELinux policy can easily be chunked up into a lot of smaller parts, and therefore made more manageable.
There are a lot of rules and label types that are used while writing SELinux policy. However, given the scope of the article, we will only discuss those which are recurring and basic. These statements are used by device maintainers a lot while writing device-specific SELinux policy rules.
The first step is to label the initiator, if not already done. This ensures that the permissions granted are not towards a general target but a more restricted, specific one. This results in specific initiators having only those permissions which they require to perform a specific action. These labels live in a single file named file_contexts.
Pro-tip: If you need to examine the existing label of a file (say, on the stock ROM to compare), it is as simple as running ls -alZ /path/to/file .
Labeling an initiator (Not an App)
The blueprint is: /path/to/initiator u:object_r:context_name_you_want:s0
An example rule to label NFC service would be something like: /(vendor|system/vendor)/bin/hw/android\.hardware\[email protected]\.2-service\.sec u:object_r:hal_nfc_default_exec:s0
You should use regex to label an initiator. For example, please see platform/system/sepolicy/private/file_contexts.
Labeling an initiator (Android App)
The blueprint is: user=user_of_app seinfo=info name=name_of_app domain=scontext_to_assign type=type_of_file
An example rule to label qtidataservices app would be something like: user=radio seinfo=platform name=.qtidataservices domain=qtidataservices_app type=radio_data_file
All labels for applications go into a single file named seapp_contexts formatted as the partition requires. For example, please check platform/system/sepolicy/private/seapp_contexts.
Labeling filesystems
genfscon is a label type used to allocate contexts to file systems that don’t support any other type of labeling statements. The blueprint is: genfscon filesystem_name partial_path filesystem_context
An example rule to label /proc/hwmodel would be something like: genfscon proc /hwmodel u:object_r:proc_fih:s0
All genfscon statements go into a single file named genfs_contexts. For example, please check platform/system/sepolicy/private/genfs_contexts.
Labeling properties
Properties are strings that can be used to control the behavior of a specific feature, or advertise device features. These reside in .prop files which are parsed by init when the system is booting up. These properties also require a valid SELinux context regarding the initiator which will access them.
The blueprint is: property_name u:object_r:property_type:s0
An example log for denial related to a camera property:
avc: denied < set >for property=camera.tunning.live pid=756 uid=1047 gid=1005 scontext=u:r:hal_camera_default:s0 tcontext=u:object_r:default_prop:s0 tclass=property_service permissive=0
This should be addressed by labeling this specific property as camera_prop as it’s related to camera, e.g. camera.tunning.live u:object_r:camera_prop:s0
All property labels go into a single file named property_contexts. For example, please check platform/system/sepolicy/master/private/property_contexts.
Notice how labels for services, process, applications, file systems don’t end with ; unlike other statements used to grant or suppress permissions.
Once the initiator has a label, permissions can be granted to it as required to perform the desired action.
Allowing permission
If you want to allow an initiator permission for some action, you can use the allow statement. This is used to grant permission. The blueprint is: allow scontext tcontext:tclass permission;
An example in regard to this specific case:
avc: denied < read write >for pid=4565 comm=»init.qcom.post_» name=»read_ahead_kb» dev=»sysfs» ino=52742 scontext=u:r:qti_init_shell:s0 tcontext=u:object_r:sysfs_dm:s0 tclass=file
The given permission would be: allow qti_init_shell sysfs_dm:file < read write >;
Suppressing a denial
If your logs contain some denials that you want to hide/suppress for some reason, you can use the dontaudit statement. The blueprint is: dontaudit scontext tcontext:tclass permission;
An example in regard to this specific case:
avc: denied < read >for comm=»thermal-engine» name=»kgsl» dev=»sysfs» ino=29020 scontext=u:r:thermal-engine:s0 tcontext=u:object_r:sysfs:s0 tclass=dir permissive=0
The rule to suppress this log would be: dontaudit thermal-engine sysfs:dir read;
AOSP recommends keeping all rules (permissions, denials, log suppressions, Permissive mode) regarding a specific initiator under a separate file in the .te format having it’s scontext as the name. For example, all rules regarding an initiator having a scontext of hal_power_default would be stored in a file named hal_power_default.te. For example, please check platform/system/sepolicy/public/vold.te.
The concept of neverallow
A neverallow is an overarching rule that is used to mark specific rules that must not be generated. The word generated implies that it is a compile-time action and not runtime. Hence, if you mark a specific rule as neverallow and grant permission regarding the same in another rule, the compiler will trigger an error and the compilation will fail.
An example rule: neverallow my_gallery my_secret_passwords: < dir file >< read write open >;
In Android, you can find neverallows inside the system/sepolicy repository linked earlier in this post. Android marks several rules as neverallow which can potentially weaken the system security. For example, every file on the system has a type called system_data_file, now assume that you have an initiator which wants to access a specific file having system_data_file as type. Now, if you grant it such permission, that means you allow the initiator to read & write every file on the system (as every file in the system has the same file type). This significantly weakens security. Hence, it should be marked as a neverallow. A solution to this issue would be to label the file with a different, more specific context and then grant the initiator the required permissions. It is worth noting that if you’re on a legacy device, e.g. any QCOM chipset before msm8996 (UM-Family), that Lineage’s fork of device/qcom/sepolicy-legacy ignores neverallows, as legacy device’s proprietary binaries can’t comply with Android’s neverallows growing stricter.
While by default, a lot of rules are already marked as neverallows, not all possible exceptions are covered. It depends upon the developer to carefully grant permissions keeping all possible scenarios in mind. For reference, please check platform/system/sepolicy/public/vold.te.
Macros
By default, there are several macros available to use while writing the SELinux policy. These macros not only make writing SELinux policy easier but are also recommended to use for various reasons, such as granting a lot of permissions to a certain initiator, granting a specific set of permission for a specific task to an initiator, etc. They reduce the amount of code a developer has to write, group a specific set of rules for specific use cases, and make it easier for fellow developers to read, among many more benefits.
An example of using macros while writing SELinux policy to allow permissions would be:
Example 1: Macros used: r_file_perms
Without macros: allow hal_power_default sysfs:file < read open watch lock >;
With macros: allow hal_power_default sysfs:file r_file_perms;
Example 2: Macros used: r_dir_file
Without macros: allow ueventd firmware_file:dir < open search >; and allow ueventd firmware_file:file < read getattr open >;
With macros: r_dir_file(ueventd, firmware_file)
Notice how using macros shortens the amount of code and still granted the necessary permissions. You can check the available macros in global_macros and te_macros present in platform/system/sepolicy repository of AOSP.
Where should my sepolicy go?
Since the advent of Project Treble, sepolicy has moved from one file in the boot image, to various files on the partition relevant to those policies. For example, in device/lineage/sepolicy, under the “common” folder, we have system, vendor, public, private, and dynamic folders.
- system: Stores sepolicies for any system based modules
- vendor: Stores sepolicies for any vendor based modules
- public: Stores sepolicies accessible to both system and vendor
- private: Stores platform specific sepolicies accessible to system based modules
- dynamic: Stores sepolicies which will be included in vendor image if the target device builds (/system)/vendor inline, otherwise ends up in the system image, e.g. our own Trust HAL
Stock SELinux policy as a reference
Every stock firmware/ROM has a SELinux policy inside specific partition images. The general location of the policy is partition_name/etc/selinux/ . This means if you are looking for SELinux policy related to the system image, it would be available in /system/etc/selinux , for vendor image, it would be in /vendor/etc/selinux and so on. Remember that the partition path differs heavily depending upon the device. A developer when writing SELinux policy for their specific device may use this stock policy as a reference. This helps in not only speeding up the task of writing rules but also serves as a reference to which rule should be granted, which not, how to address specific cases, etc.
Some useful tools
There are some useful tools available that help working with SELinux and writing SELinux policy. Some of them are:
* chcon : Helps in changing the SELinux context of a target.
* audit2allow : Generates SELinux policy containing allow & dontaudit rules. Doesn’t cover neverallow exceptions.
* audit2allow.perl hosted at OpenDarwin-CVS/SEDarwin is a script which requires no external dependencies & runs on any platform unlike modern versions.
* restorecon : Restores the default SELinux contexts of the given target.
* sepolicy-inject : Injects allow rules into binary SELinux kernel policies.
Useful references
Here are links to some of the resources used for SELinux research during the development of this article. Feel free to check them out for more information related to SELinux in general.
Источник


