- Как добавить AppIcon и LaunchScreen в приложение на React Native
- Создаем React Native приложение
- Добавление AppIcon
- На iOS
- На Android
- Добавление LaunchScreen
- На iOS
- На Android
- How to Change App Icons on Android
- Make custom icons for your Android apps
- What to Know
- How to Get Custom App Icons on Android
- How to Get Custom App Icons on a Samsung Using Galaxy Themes
- Important:
- How Do You Change App Icons on Android?
- Changing App Icons Within the Application
- How Do You Change App Icons on Samsung?
- Warning
- Can You Change App Icons without a Launcher?
- How Do You Change App Icons and Names on Android?
- How Do You Install Shortcut Maker?
- How Do You Change App Names with Shortcut Maker?
- How Do You Change App Icons with Shortcut Maker?
- How Do You Make Custom Icons on Android?
- How to Change the Home Screen on Android?
Как добавить AppIcon и LaunchScreen в приложение на React Native
Не занимаясь никогда ранее нативной разработкой под мобильные платформы, и в этот раз решил пойти «легким путем» — освоить React Native. Наибольшей трудностью стало добавление иконки приложения(AppIcon) и экрана загрузки (Launch Screen). О чем и хочу рассказать в данной статье тем, кто осваивает React Native.
На момент написания статьи актуальная версия React Native 41.0, XCode 8.2 (эти данные указаны по той причине, что в более поздних версиях может что-то измениться и данный мануал не будет применим).
Создаем React Native приложение
Добавление AppIcon
На iOS
Идем в папку с iOS-частью приложения
и открываем там файл XCode-проекта habr.xcodeproj.
Далее, щелкаем по следующим кнопкам:
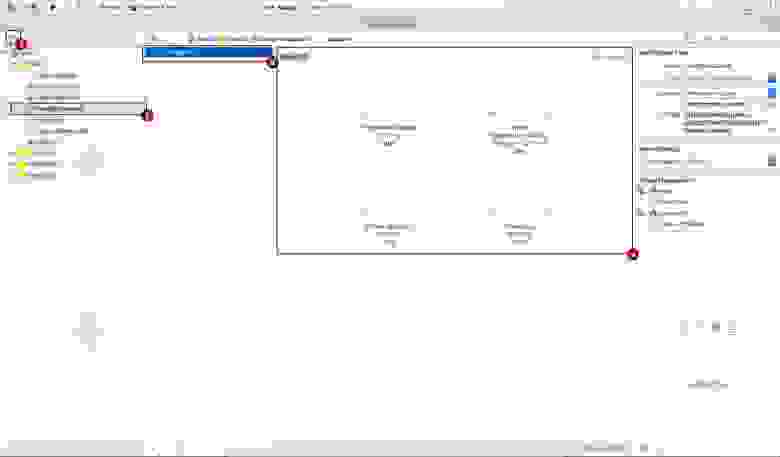
В поле 4 добавляем иконки путем перетаскивания их в пустые ячейки. Под ячейками указан размер иконки(в pt).
Получается примерно так:
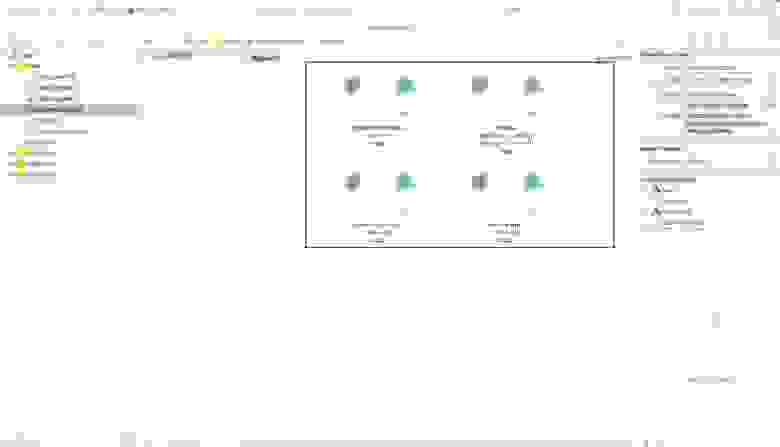
Важно: картинка иконки должна быть квадратная и, в идеале, их должно быть несколько версий разного размера(под каждую ячейку — свой размер). Если не охота возиться с созданием иконок разного размера — добавьте одну, размером 120x120px, в ячейку для iPhone 7-10:
Если добавить иконки не правильного размера, то получите ошибку «Images.xcassets: The app icon set named “AppIcon” did not have any applicable content.»
Полезно знать: иконки для ios удобнее всего создавать в программе Sketch(доступна только под OS X), поскольку в ней есть шаблоны нужных размеров, которые затем можно экспортировать в png-формат (File → Export. ):
Запускаем сборку ios-версии из корневой папки проекта:

(hit: для «сворачивания» приложения в эмуляторе нужно дважды нажать Cmd+Shift+H)
На Android
Из папки проекта идем в папку с Android-частью приложения, в место хранения ресурсов:
и видим здесь папки:
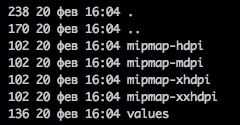
Заходим в каждую из них и в каждой видим файл ic_launcher.png. Заменяем каждый файл на свой, с таким же именем и такого же размера (в px).
Запускаем сборку Android-версии из корневой папки проекта:

С иконками закончили, переходим к экрану загрузки.
Добавление LaunchScreen
На iOS
Существует по крайней мере 2 способа добавить LaunchScreen на iOS. Опишу тот, который сработал у меня.
Первым делом, идем снова в XCode, по тому же маршруту, который показан на самом первом изображении в этой статье, но вместо папки Images.xcassets, выбираем файл LaunchScreen.xib.
При этом XCode спросит, для какой версии какого устройства отобразить содержимое данного файла. Выбираем любой iPhone.
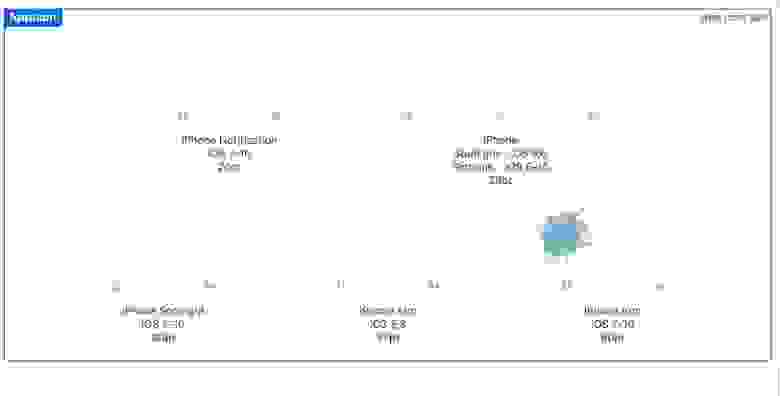
Далее, щелкаем по кнопкам под номером 3 и 4 на данном скриншоте:

Затем перетаскиваем элемент 5 (Image View) на рабочее поле 6. Имеющиеся в рабочем поле 6 элементы (текстовые надписи) можно удалить.
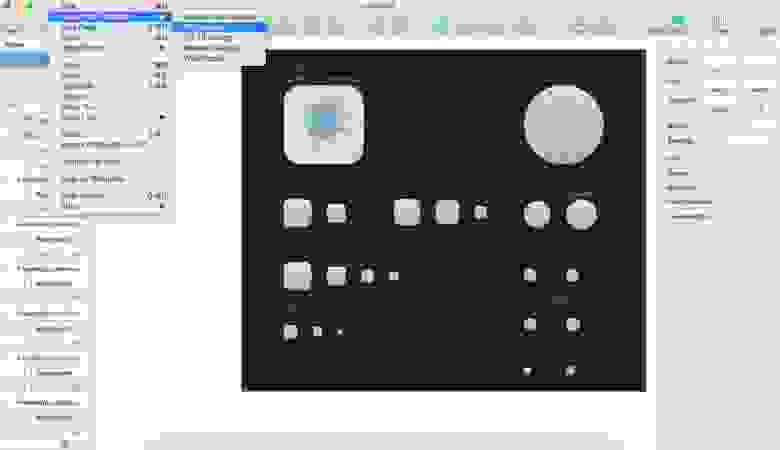
Следующим шагом добавляем в наш проект нужное нам файл с изображением(для начинающих маководов — контекстное меню вызывается прикосновением к тачпаду двумя пальцами одновременно).
Далее, щелкаем по элементу UIImageView в рабочей зоне и настраиваем его свойства:

В меню под номером 1 (на скриншоте) выбираем добавленную в предыдущем шаге картинку(если выпадающий список пуст, то щелкните в левой панели(там где выбирали файл LaunchScreen.xib по любому другому файлу, а затем снова вернитесь к файлу LaunchScreen.xib — файл появится в выпадающем списке. Это мелкий баг XCode).
В меню под номером 2 выберите «Aspect Fit», чтобы картинка масштабировалась пропорционально, независимо от размера экрана устройства, на котором будет запущено приложение.
Чтобы картинка располагалась строго по центру, щелкните самой картинке(на рабочей области) и нажмите на кнопку 1, как показано на следующем скриншоте:

В каждом из четырех полей «Add new constrains» установите значение 0.
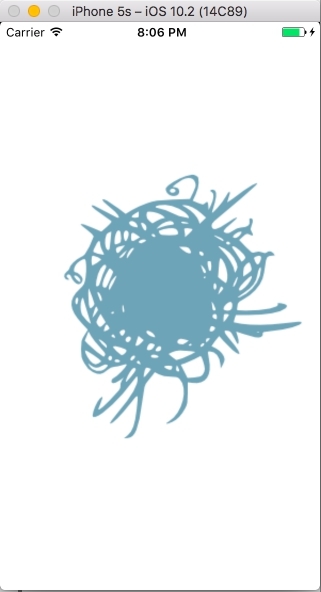
Запускаем сборку ios-версии из корневой папки проекта:
На Android
Из папки проекта идем в папку с Android-частью приложения, в место хранения ресурсов:
Добавляем здесь папку drawable. Создаем в ней файл splash_screen.xml такого содержания
Этот файл описывает новый «ресурс» приложения, и путь к внешним файлам ресурса(в нашем случае — к файлу с изображением для стартового экрана).
эта часть кода указывает расположение ресурса на экране. А эта:
путь к файлу ресурса, относительно папки res.
Создает фоновую подложку к экрану загрузки, а строка
указывает цвет фона. Значение цвета фона берется из файла colors.xml, который пока не существует и который вам нужно создать и расположить по адресу:
Содержимое файла может быть таким:
Здесь каждая строчка вроде
содержит цветовую константу. Задать цветовое значение фона напрямую(в файле splash_screen.xml) мне не удалось, поэтому добавил такой файл, как советовалось в одной из инструкций в Сети.
Далее, в папку drawable добавляем файл ic_launcher.png, представляющий собой изображение на стартовом экране.
Затем идем в папку
и редактируем файл styles.xml так, чтобы он выглядел следующим образом
Этим действием мы добавляем новую «тему оформления» для «активности»(activity).
«Активность»(Activity) в Android-приложениях представляет собой «экран» или «страницу». По умолчанию в React Native есть лишь одна «активность», мы же добавляем ещё одну.
Для этого переходим в папку с java-кодом:
(путь после /java/ в вашем проекте будет другим) и делаем следующее:
- переименовываем MainActivity.java в MainActivity2.java
- редактируем файл MainActivity2.java — меняем название класса в 6 строке с «MainActivity» на «MainActivity2»:
Создаем файл MainActivity.java, в который пишем такой код:
Смысл перечисленных выше 3-х шагов прост: мы меняем стартовый загрузочный экран(«активность») на наш экран(«активность) SplashScreen.
(В этом абзаце вы могли заметить, что LaunchScreen переименовался в SplashScreen. В Android-разработке(и не только) принято называть загрузочный экран SplashScreen’ом.)
Теперь осталось зарегистрировать нашу «активность» в файле-манифесте Android-приложения, чтобы она была доступна для вызова в коде.
Открываем файл AndroidManifest.xml, который находится по адресу
(относительно корневой директории проекта)
И приводим его к такому виду:
В итоге, в файле AndroidManifest.xml мы имеем 2 активности, причем в одной из них указано, что именно она — та, с которой начнется запуск Android-приложения. Это делается добавлением таких параметров:
в тело «активности».
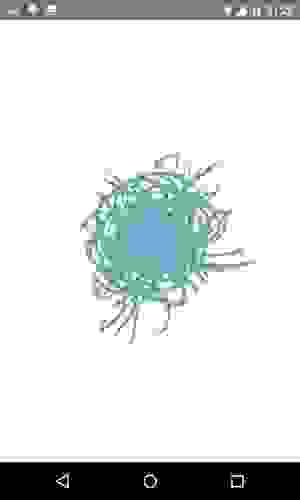
С приготовлениями закончено. Запускаем билд android-версии из корневой папки проекта:
Полный код проекта можно найти здесь.
Источник
How to Change App Icons on Android
Make custom icons for your Android apps
:max_bytes(150000):strip_icc()/BrileyS.Kenney-230171-83a0ab5cc2c8482091276c0ad4d74b44.jpg)
:max_bytes(150000):strip_icc()/ryanperiansquare-de5f69cde760457facb17deac949263e-180a645bf10845498a859fbbcda36d46.jpg)
What to Know
- You can use Shortcut Maker to customize app icons and names on any device.
- Go to Settings > Themes to download and apply icon packs on Samsung devices.
- You can download and install custom icons via Google Play Store on any Android device. You may need to install a launcher to change app icons.
This article covers how to change app icons on your Android smartphone, including applying custom icons on a Samsung phone or tablet.
How to Get Custom App Icons on Android
One of the best features of Android is the option to customize nearly anything you want, from the wallpaper and lock shortcuts to the way the icons look and feel. What’s more, there are many ways to apply custom icons. You can even create your own!
Before you can change app icons, you’ll need to download and install custom icon sets. You can find them at the Google Play Store.
Here’s how to install them:
Find a set of custom icons you like at the Google Play Store. The best way to find them is to type custom icons in the search bar (located at the top).
When you find an icon set you like, tap the entry in the search results. Then tap the green Install button.
Wait for it to finish, and then return to the home screen or tap Open.
:max_bytes(150000):strip_icc()/NEW35-027784f5055543c0a631c03e620d00f3.jpg)
How to Get Custom App Icons on a Samsung Using Galaxy Themes
Like the Galaxy Note 20, Samsung smartphones and tablets use a reskinned version of Android called One UI. That means you can also customize the home screen and interface with unique wallpapers, widgets, and app icons.
Before you can apply custom app icons, you must download theme packs from the Galaxy Themes app.
Important:
Custom themes used to be available at the Galaxy Store, but Samsung devices now have a separate application called Galaxy Themes. On older devices, Samsung added the new app in a recent software update. On newer devices, it comes pre-installed.
You can also use Google Play to download custom icon packs on Samsung, if you prefer.
Here’s how to install app icons using Galaxy Themes:
Open the Galaxy Themes app or go to Settings > Themes. If you’re not already logged in, tap the menu button in the top left and tap the profile button to do so. If you do not have a Samsung account, you will need to create one.
Tap the Icons button on the bottom (third from the left). Find an icon pack you like.
Some icon packs cost money. If you don’t want to spend anything, be sure to look for the packs listing Free underneath, not a price.
Tap the icon pack to open the store page and then select the Download button at the bottom of the screen. An advertisement may appear, and the download should start after it finishes playing.
Wait for it to finish.
If you want to apply the icon pack right away, tap the Apply button, which replaced the Download option.
:max_bytes(150000):strip_icc()/NEW37-69af1defd4884770b4928ff58ac46f5a.jpg)
How Do You Change App Icons on Android?
Even if you installed a custom app icon pack, you need to apply it first before seeing any changes. Just having the icon pack installed does not make them active or visible.
Some icon packs will display a prompt immediately after install, allowing you to apply them. However, not all of them do this.
Changing App Icons Within the Application
Sometimes, you can apply the custom icons using a tool that comes with the icon packs you install. Here’s how:
Open the icon app for the pack you downloaded. Accept any permission requests.
Depending on the app, you may or may not see an Apply button. Some icon packs require you to have a custom launcher to use them.
How Do You Change App Icons on Samsung?
If you haven’t already applied the icon packs previously installed on your Samsung, here’s how to activate them or swap them out.
Open Galaxy Themes either by clicking on the icon in your app tray or going to Settings > Themes.
Tap the menu button in the top left, and select My Stuff.
At the top of the screen, tap the Icons option. Then tap the icon pack you wish to apply.
At the bottom of the page, select the Apply option. You may or may not see a warning, tap Agree or Apply again to continue.
That’s it! Enjoy your new icons.
Warning
Most icon packs you download from Galaxy Themes will only change the appearance of official Samsung or system app icons. You will need to use another method to change the appearance of other app icons.
Can You Change App Icons without a Launcher?
The short answer is yes, you can.
With some icon packs, you can apply them directly from within the native app. If that doesn’t work, you can always use another app like Shortcut Maker.
How Do You Change App Icons and Names on Android?
If you want more freedom when changing app icons, like adding a custom name, you’ll need to install another app called Shortcut Maker.
How Do You Install Shortcut Maker?
Go to the Shortcut Maker Google Play Store page. Then, tap the green Install button and wait for it to download and install.
How Do You Change App Names with Shortcut Maker?
To change the display name of an app, you’ll create a shortcut which means creating an additional app icon with custom parameters. Here’s how:
Open Shortcut Maker. Choose the type of shortcut you wish to make from the list. Choose the Apps option for an app icon. Next, select the app icon you want to customize from the list of installed apps.
Use the Tap to Edit Label button (it will also show the app name) to change the name. Then, enter the new custom name or label and select Done.
Edit any other custom options you want (you can also choose a custom app icon). When you’re done, tap the big blue Create Shortcut button in the bottom right.
How Do You Change App Icons with Shortcut Maker?
If you want to apply app icons individually or apply icons from a pack you installed, you can use Shortcut Maker. Here’s how:
Open Shortcut Maker. Choose the type of shortcut you wish to make from the list. For an app icon, that would be the Apps option. Next, select the app icon you want to customize from the list of installed apps.
To apply a new icon, use the Tap to Edit Icon button (it will also show the current app icon).
You will see a list of available options for customizing the icon on the next screen. You may see custom icon packs you have installed, and you can also use text, emojis, gallery images, and system icons. Choose the source containing the icon you wish to use, and then select your image.
You will see the new icon you have selected on the right side of the page. To apply it, tap the blue checkmark in the top right.
Edit any of the other custom options you want (you can also change the name). When you’re done, tap the big blue Create Shortcut button in the bottom right.
:max_bytes(150000):strip_icc()/Untitleddesign16-15914e789e3c4a2889be087cd2b13454.jpg)
How Do You Make Custom Icons on Android?
Creating custom icons and adding them to a set is a lengthy and complex process, and explaining how to do it is best left for a separate guide.
It is possible, and it can be a lot of fun. It can also be a lucrative business opportunity if you’re good at it! You can sell custom themes on the Google Play Store or Samsung Themes store.
How to Change the Home Screen on Android?
On all Android devices, you can play around with app icons, including their look and feel. You can also customize your device by applying custom wallpaper, unique screensavers, changing the lock screen display, and much more.
An app like Shortcut Maker makes it easy to customize the appearance of individual app icons, even those not affected by installing a custom icon pack or a Samsung Galaxy Theme.
For most Android phones, you will need to use a third-party launcher. For most Samsung phones, you can go to Settings > Home Screen and select a different size for your Home Screen and Apps Screen grids, which will resize all of the icons on that screen.
On some phones, you can select alternatives for the icons of built-in apps. Long press the icon, choose Edit, and tap the icon you want to use.
Источник


