- Move from Android to iPhone, iPad, or iPod touch
- Before you begin
- Tap Move Data from Android
- Open the Move to iOS app
- Wait for a code
- Use the code
- Connect to a temporary Wi-Fi network
- Choose your content and wait
- Set up your iOS device
- Finish up
- If you need help with the transfer
- If you need help after the transfer
- If your computer doesn’t recognize your iPhone, iPad, or iPod
- Additional steps for Mac
- How to transfer data from your old phone to your new iPhone
- Products used in this guide
- Transfer data to new iPhone: Using Automatic Setup with your iPhone
- Transfer data to new iPhone: How to use iCloud backups and restoring
- Transfer data to new iPhone: How to transfer your data to your new iPhone on macOS Catalina and newer
- Transfer data to new iPhone: How to transfer your data to your new iPhone using macOS Mojave and older
- Get your new iPhone
- Mainstream flagship
- iPhone 13
- Budget friendly
- iPhone SE (2020)
- Additional Equipment
- Apple Lighting-to-USB-C cable (From $19 at Amazon)
- Anker Powerline II Lighting-to-USB-C cable ($13 at Amazon)
- Grab one of these cases for your iPhone 11 right now
- Protect your iPhone SE (2020) screen with a great screen protector
- Protect your iPhone 11’s screen with a screen protector!
- Joseph Keller
- Christine Chan
Move from Android to iPhone, iPad, or iPod touch
Ready to transfer to iOS? Download the Move to iOS app to get help switching from your Android device to your new iPhone, iPad, or iPod touch.
If you can’t use the Google Play Store, learn how to download Move to iOS.
Before you begin
- On your Android device, make sure that Wi-Fi is turned on.
- Plug your new iOS device and your Android device into power.
- Make sure that the content you’re moving, including what’s on your external Micro SD card, will fit on your new iOS device
- If you want to transfer your Chrome bookmarks, update to the latest version of Chrome on your Android device.

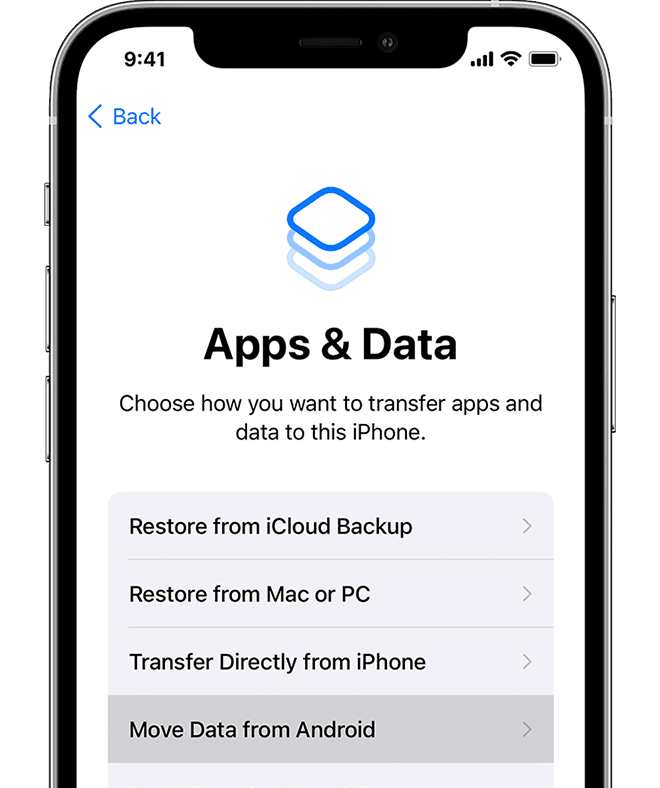
Tap Move Data from Android
While you set up your new iOS device, look for the Apps & Data screen. Then tap Move Data from Android. (If you already finished setup, you need to erase your iOS device and start over. If you don’t want to erase, just transfer your content manually.)
Open the Move to iOS app
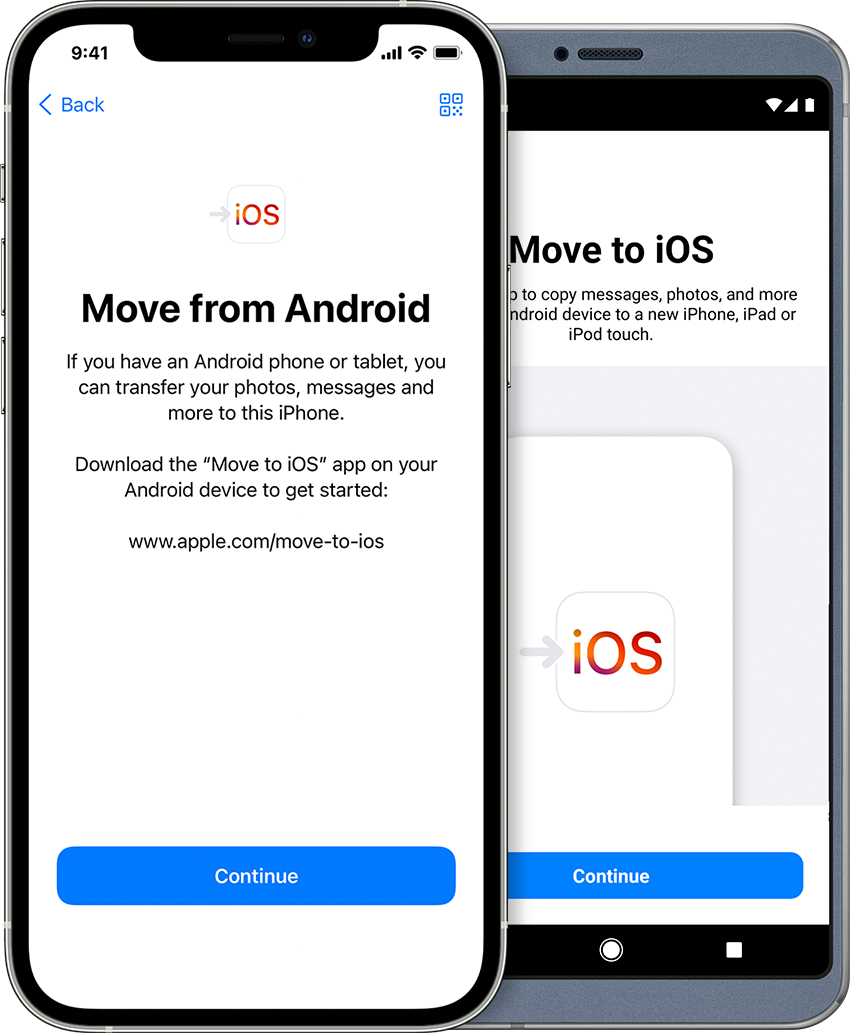
On your Android device, open the Move to iOS app. If you don’t have the Move to iOS app, you can tap the QR code button on your new iOS device and scan the QR code using the camera on your Android device to open the Google Play Store. Tap Continue, and read the terms and conditions that appear. To continue, tap Agree.
Wait for a code
On your iOS device, tap Continue when you see the Move from Android screen. Then wait for a ten-digit or six-digit code to appear. If your Android device shows an alert that you have a weak internet connection, you can ignore the alert.
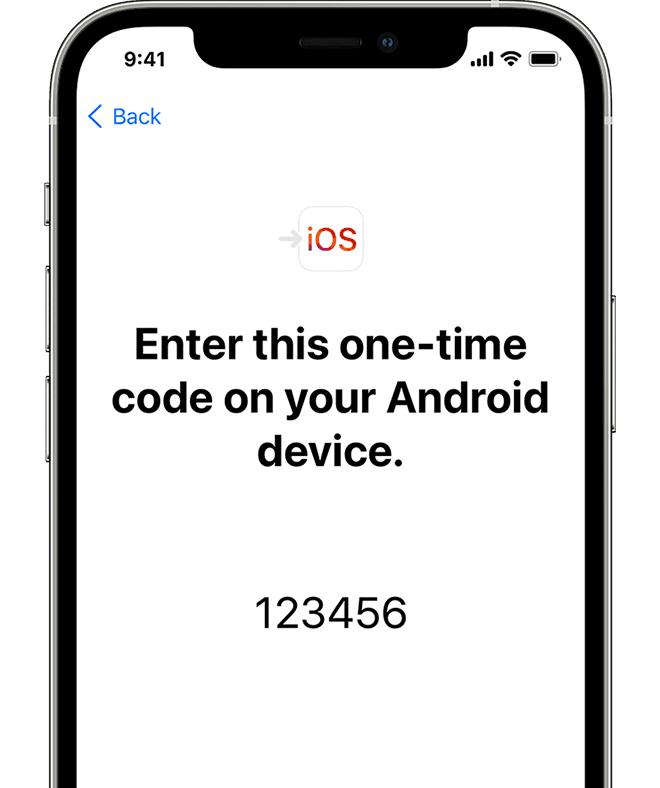
Use the code
Enter the code on your Android device.
Connect to a temporary Wi-Fi network
Your iOS device will create a temporary Wi-Fi network. When asked, tap Connect to join that network on your Android device. Then wait for the Transfer Data screen to appear.
Choose your content and wait
On your Android device, select the content that you want to transfer and tap Continue. Then—even if your Android device shows that the process is complete—leave both devices alone until the loading bar that appears on your iOS device finishes. The whole transfer can take a while, depending on how much content you’re moving.
Here’s what gets transferred: contacts, message history, camera photos and videos, photo albums, files and folders, accessibility settings, display settings, web bookmarks, mail accounts, and calendars. If they’re available on both Google Play and the App Store, some of your free apps will also transfer. After the transfer completes, you can download any free apps that were matched from the App Store.
Set up your iOS device
After the loading bar finishes on your iOS device, tap Done on your Android device. Then tap Continue on your iOS device and follow the onscreen steps to finish setup for your iOS device.
Finish up
Make sure that all of your content transferred. Music, books, and PDFs need to be moved over manually.
Need to get the apps that were on your Android device? Go to the App Store on your iOS device to download them.
If you need help with the transfer
- Make sure that you leave both devices alone until the transfer finishes. For example, on your Android device, the Move to iOS app should stay onscreen the whole time. If you use another app or get a phone call on your Android before the transfer finishes, your content won’t transfer.
- On your Android device, turn off apps or settings that might affect your Wi-Fi connection, like the Sprint Connections Optimizer or the Smart Network Switch. Then find Wi-Fi in Settings, touch and hold each known network, and forget the network. Then try the transfer again.
- Restart both of your devices and try again.
- On your Android device, turn off your cellular data connection. Then try the transfer again.
If you need help after the transfer
- Get help if Messages doesn’t work as expected after you transfer your content.
- If you don’t see apps from your Android device on your new iOS device, find and download them in the App Store on your new device.
- You might find that only some content transferred and your iOS device ran out of space, or your iOS device might appear full even though the transfer didn’t finish. If so, erase your iOS device and start the transfer again. Make sure that your Android content doesn’t exceed the available space on your iOS device.
Information about products not manufactured by Apple, or independent websites not controlled or tested by Apple, is provided without recommendation or endorsement. Apple assumes no responsibility with regard to the selection, performance, or use of third-party websites or products. Apple makes no representations regarding third-party website accuracy or reliability. Contact the vendor for additional information.
Источник
If your computer doesn’t recognize your iPhone, iPad, or iPod
If you connect your device to your computer with a USB cable and your computer doesn’t recognize your iPhone, iPad, or iPod, learn what to do.
If your computer doesn’t recognize your connected device, you might see an unknown error or a «0xE» error. Follow these steps and try to connect your device again after each step.
- Make sure that your iOS or iPadOS device is turned on, unlocked, and on the Home screen.
- Check that you have the latest software on your Mac or Windows PC. If you’re using iTunes, make sure you have the latest version.
- If you see a Trust this Computer alert, unlock your device and tap Trust. If you can’t unlock your device because you forgot your passcode, find out what to do.
- Unplug all USB accessories from your computer except for your device. Try each USB port to see if one works. Then try a different Apple USB cable.*
- Restart your computer.
- Restart your iPhone, iPad, or iPod touch.
- Follow these additional steps for your Mac or Windows PC.
- Try connecting your device to another computer. If you have the same issue on another computer, contact Apple Support.
Additional steps for Mac
- Connect your iOS or iPadOS device and make sure that it’s unlocked and on the Home screen.
- On your Mac, choose Finder > Preferences from the Finder menu bar, then click Sidebar at the top of the preferences window. Make sure that «CDs, DVDs and iOS Devices» is checked.
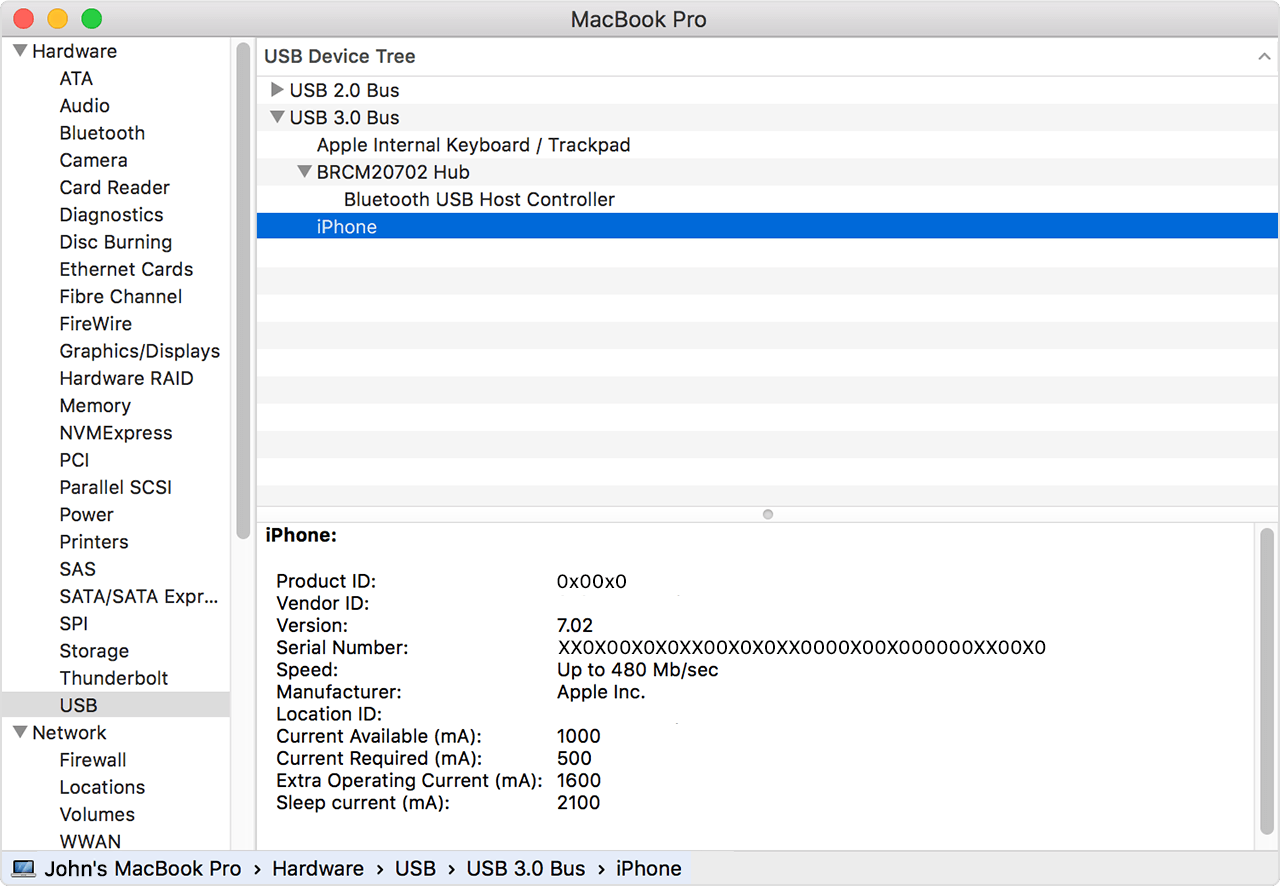
- Press and hold the Option key, then choose System Information from the Apple menu . From the list on the left, select USB.
- If you see your iPhone, iPad, or iPod under USB Device Tree, get the latest macOS or install the latest updates. If you don’t see your device or still need help, contact Apple Support.

Information about products not manufactured by Apple, or independent websites not controlled or tested by Apple, is provided without recommendation or endorsement. Apple assumes no responsibility with regard to the selection, performance, or use of third-party websites or products. Apple makes no representations regarding third-party website accuracy or reliability. Contact the vendor for additional information.
Источник
How to transfer data from your old phone to your new iPhone
 Source: Rene Ritchie
Now that the best iPhone lineup is here with the iPhone 13, you may have a shiny new iPhone in your hands. However, you want to transfer the data that you had on your previous iPhone to your new one — but how do you go about that? There are a few different ways that you can accomplish this, whether you want to just use iCloud or go through a hardwired connection with your Mac or PC. Here are the best ways to transfer data to a new iPhone.
Products used in this guide
- Sync over USB-C: Apple Lightning-to-USB-C cable
Transfer data to new iPhone: Using Automatic Setup with your iPhone
- Select your language on your new iPhone or iPad with your new and current devices nearby.
Tap Continue on your iPhone or iPad on the popup that appears asking you to set up your new iPhone or iPad with your Apple ID.
 Source: iMore
Set up Touch ID or Face ID on your new iPhone.
Source: iMore
Choose to restore your new device from an iCloud or iTunes backup, set up as a new iPhone or iPad, or transfer data from an Android device.
Source: iMore
Tap Continue under Express Settings to use the settings for Siri, Find My iPhone, Location, and usage analytics that were transferred over from your current iPhone and iPad.
Source: iMore
Transfer data to new iPhone: How to use iCloud backups and restoring
- Open Settings on your old iPhone.
- Tap the Apple ID banner.
Tap iCloud.
Source: iMore
Tap Back Up Now.
![]() Source: iore
Source: iore
Wait for the backup to complete before proceeding.
You can now set aside your old iPhone. Make sure that your new iPhone is off when you start these next steps.
- Insert your old SIM card into your new iPhone if you want to move it between devices.
- Turn on your new iPhone.
- Slide up or press the Home button depending on which device you’re setting up.
- Follow the directions to choose your language and set up your Wi-Fi network.
- Tap Restore from iCloud backup.
- Sign in to your iCloud account (This is your Apple ID).
- Tap Next.
- Tap Agree.
- Tap Agree again.
- Choose the backup you just made.
Transfer data to new iPhone: How to transfer your data to your new iPhone on macOS Catalina and newer
- Plug your old iPhone into your Mac running macOS Catalina.
- Click on the Finder icon in the Dock to open a new Finder window.
Click on your iPhone under Locations.
 Source: iMore
Click on Back Up Now.
Source: iMore
Wait for the backup to complete before proceeding.
- Put your SIM card into your new iPhone. (If it didn’t come with a new or different SIM card.)
- Turn on your new iPhone.
- Plug your new iPhone into your Mac.
- Slide to set up on your iPhone.
- Follow the directions to choose your language and set up your Wi-Fi network.
- Select Restore from Mac or PC.
- Click your new iPhone under Locations in the Finder window.
In Finder on your Mac, click the button next to Restore from this backup.
Source: iMore
Click Continue.
Source: iMore
Enter your password and click Restore if your backup was encrypted and the Finder asks.
Source: iMore
Transfer data to new iPhone: How to transfer your data to your new iPhone using macOS Mojave and older
- Make sure you’re running the most recent version of iTunes.
- Plug your old iPhone into your Mac or Windows PC.
- Launch iTunes.
- Click on the iPhone icon in the menu bar when it appears.
Click on Encrypt Backup; you’ll be asked to add a password if this is your first time encrypting a backup.
 Source: iMore
Click on Back Up Now.
Source: iMore
Wait for the backup to complete before proceeding.
- Put your SIM card into your new iPhone. (If it didn’t come with a new or different SIM card.)
- Turn on your new iPhone.
- Plug your new iPhone into your Mac or Windows PC.
- Slide to set up on your iPhone.
- Follow the directions to choose your language and set up your Wi-Fi network.
- Select Restore from iTunes backup.
- On iTunes on your Mac or Windows PC, select Restore from this backup.
Choose your recent backup from the list.
Source: iMore
Enter your password if your backup was encrypted and it asks.
Source: iMore
Keep your iPhone plugged into iTunes until the transfer is complete, and on Wi-Fi until all re-downloads are complete. Depending on how much data you have to re-download, including music and apps, it might take a while.
Get your new iPhone
Of course, to transfer data to your new iPhone, you’re going to need a new iPhone first.
Mainstream flagship

iPhone 13
Apple’s latest mainstream flagship iPhone, the iPhone 13 comes is powered by the brand new A15 system-on-a-chip and features beautiful new colors, serious camera improvements, and much more.
Apple’s latest flagship smartphone is a solid iteration that builds on the design language introduced in last year’s iPhone 12. Featuring a beautiful array of new colors, the iPhone 13ineup also boasts entirely new camera sensors, dramatic new photo and video features, and some of the biggeat year-over-year battery improvements that Apple’s made in the iPhone.
Budget friendly
![]()
iPhone SE (2020)
The iPhone for people who love a good Home button.
The low-cost iPhone SE is hard to pass up at that price, especially considering it has the fastest processor of any smartphone on the market, except, of course, the iPhone 11 and iPhone 11 Pro.
The iPhone SE is a great entry-model iPhone for those just waiting to dip their toes into the Apple ecosystem. Come on in, the water’s fine. At this price, you could even buy two.
Additional Equipment
If you want to transfer data to your new iPhone using a Mac with USB-C or Thunderbolt 3 ports, you should go ahead and pick up a USB-C-to-Lightning cable.
![]()
Apple Lighting-to-USB-C cable (From $19 at Amazon)
Apple includes a Lightning-to-USB-A cable with your iPhone, but you’ll want this if you have a Mac with USB-C/Thunderbolt 3.
![]()
Anker Powerline II Lighting-to-USB-C cable ($13 at Amazon)
This is a great alternative to Apple’s official cable. Anker’s Powerline II now comes in a USB-C-to-Lightning option.
We may earn a commission for purchases using our links. Learn more.
![]()
Grab one of these cases for your iPhone 11 right now
Whether you want to keep it clear to show off the color of your iPhone 11, love the feel of leather, or need a rugged case to protect you in the field, here are some of the best cases.
![]()
Protect your iPhone SE (2020) screen with a great screen protector
Keep your iPhone SE screen pristine. Here are some of the best screen protectors you can buy.
![]()
Protect your iPhone 11’s screen with a screen protector!
Anytime you buy a new iPhone, it’s best to put a screen protector on from the start. If your screen protector breaks, be sure to replace it right away if you want to avoid scratches and possibly breaks.

Joseph Keller
Joseph Keller is the Editor in Chief at iMore. An Apple user for almost 20 years, he spends his time learning the ins and outs of iOS and macOS, always finding ways of getting the most out of his iPhone, iPad, Apple Watch, and Mac.

Christine Chan
Lover of coffee, Disney, food, video games, writing, mechanical keyboards, and photography. I’ve been writing about Apple and video games for almost a decade. If I’m not writing, you can probably find me over at Disneyland. Don’t forget to follow me on Twitter and Instagram as @christyxcore.
Источник


