- Apple tree, the joy of biting your own sweet, crunchy apples
- A summary of Apple tree facts
- Planting an apple tree
- Pollinating an apple tree
- Planting, pruning, and caring for an apple tree
- Preserving apples during winter
- Apple tree diseases
- Apple scab
- European Brown rot
- Insects and parasites: aphids, scale insects…
- Species and varieties of apples
- The best varieties of apples for harvesting from September to December
- The best varieties of apples for harvesting from December to March
- Learn more about apple trees
- Smart tip about apple trees
- Preventive treatment against disease and parasites that attack apple trees
- Apple tree on social media
- Planting Apple Trees
- Planting Steps
- Post-Planting
- Planting Budded and Grafted Apple Trees
- Planting Potted Apple Trees
Apple tree, the joy of biting your own sweet, crunchy apples
The apple tree is among the most common fruit trees found in our orchards.
A summary of Apple tree facts
Name – Malus communis
Family – Rosaceae
Type – fruit tree
Height – 16 to 32 feet (5 to 10 m)
Climate – temperate
Exposure – full sun
Soil – rich, well drained
Foliage – deciduous
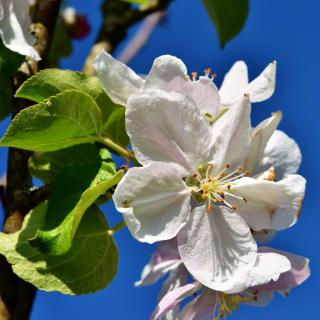
Flowering – spring
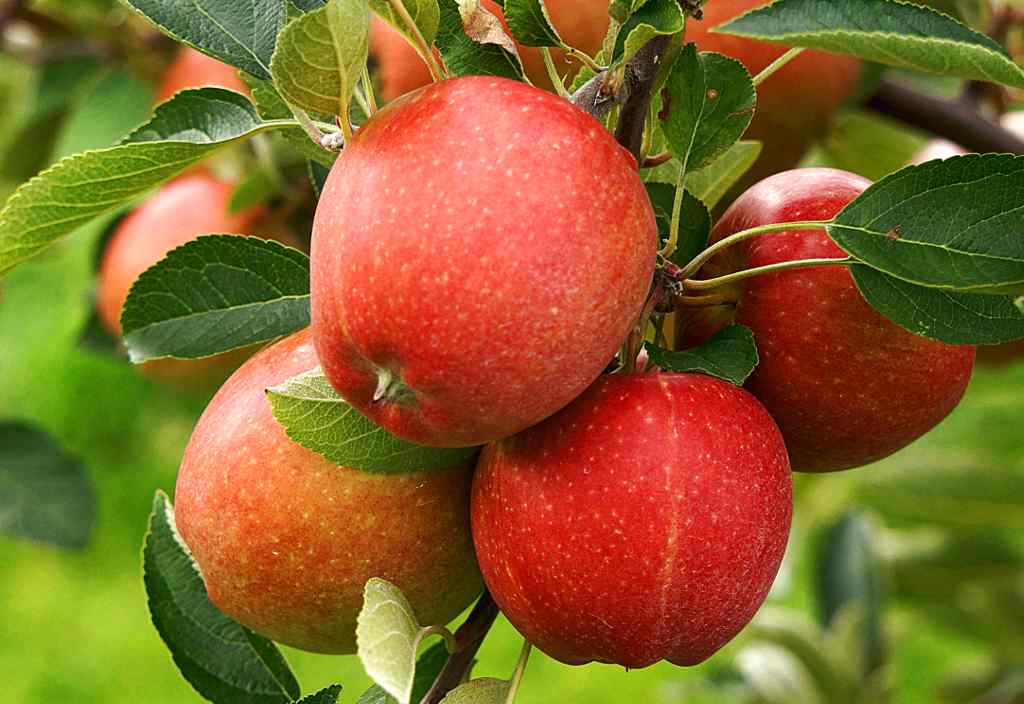
Harvest – August to November
Even though there is a great diversity in the varieties of apples, growing and caring for all apple trees is always the same. The only difference is how long some apple varieties take to mature, since some are early and others tardy.
Planting an apple tree
Fall is the best season for planting apple trees, as this lets the tree develop a sufficient root system before the onslaught of winter.
It is also possible to plant the tree anytime from fall to spring, as long as it isn’t done during frost spells; it is also possible during the summer except during heat waves.
When planting in spring and in summer, ensure regular watering.
- An apple tree requires sunlight to bloom and produce apples.
- It likes well drained soil.
- Adding fertilizer such as manure and seaweeds during planting will help the tree to take root.
- Water your apple tree regularly for the two first years after planting.
- To promote root growth, follow our recommendations on planting trees and shrubs.
Pollinating an apple tree
 Generally, apple trees are not self-pollinating, meaning that if you wish to have apples, you’ll need to plant at least 2 apple trees.
- Fertilization must take place between two distinct trees at least for the flowers to develop into fruits.
If you lack space to plant more than one apple tree, choose a self-pollinating variety such as: ‘Charles Ross’, ‘James Grieve’, ‘Egremont Russet’, ‘Arthur Turner’ or ‘Red Falstaff’.
- Note that planting only one variety, even if it is self-pollinating, might produce a smaller harvest than if you plant several varieties together.
Planting, pruning, and caring for an apple tree
In order to coax the tree into producing many beautiful apples, it is important to perform a fruit-inducing pruning before spring growth has started.
Pruning your apple tree should hence take place at the end of winter, when freezing no longer occurs.
- Adding special fruit tree fertilizer in spring boosts yields. Add a good-sized handful of fertilizer granules and rake them lightly into the surface of the soil.
- It is important to water regularly during the first 2 years after planting.
- Look up more information on the different pruning stages over the apple tree’s life cycle.
Preserving apples during winter
The best way to keep apples in winter for a long time is to place them in wooden crates, in a cool, ventilated and rather dark place.
- The ideal preservation temperature ranges from 40°F to 50°F (5°C to 10°C).
As regards fruits that have fallen to the ground, eat them as soon as possible because they’ve been damaged by the fall and would not keep for very long.
Apple tree diseases
Apple trees, like most fruit trees, are vulnerable to several common diseases, like fungus.
The most common apple tree diseases are scab and apple rot.
Apple scab
If an onslaught appears at the end of the cycle, when apples are already well-formed, degradation is limited and perhaps only a slight coloration of the apples may be observed. The harvest is not lost, but it is more difficult to keep the apples
However, if scab appears early in the season, it is recommend to treat it in order to stop the spread of the disease. An early onslaught of scab may hinder fruit development and compromise the harvest.
- A regular application of fermented stinging nettle tea as soon as buds have formed on the apple tree can prevent scab altogether.
- Spraying with Bordeaux mixture also protects against the spread of scab.
- There are a number of efficient chemical scab-fighting fungicides, both preventive or curative, but it is best to use them only once scab has already invaded the apple tree.
- Do not treat if you are only a few weeks from harvest.
- At the end of the season, gather all the leaves and destroy them to avoid letting scab hibernate in your garden over the winter.
- Read our page dedicated to fighting scab
European Brown rot
Another common ailment of apple trees is European brown rot, where Monilinia fungus strands rot fruits while still on the branch. This fungus can cause extensive damage to the apple tree and it is preferable to prevent it altogether.
- Similar treatments to those fighting scab are recommended.
- Fermented horsetail tea also produces very positive results against European brown rot.
- Read our page dedicated to fighting European brown rot and rotting fruits
Insects and parasites: aphids, scale insects…
If you observe that leaves of your apple tree become sticky and roll themselves up, you are certainly faced with an onset of either aphids or scale insects.
- Here is how to fight aphids
- Here is how to fight scale insects
- Set up pheromone traps in the tree
- A collar of sticky glue wrapped around the trunk protects the tree from many insects that would otherwise set up shop in the tree and on its leaves.
Species and varieties of apples
The best varieties of apples for harvesting from September to December
- ‘Red Astrakhan’ – ripens end of August, keeps until October. Resists strong cold. Good fruit, average size. Best when eaten at time of harvest.
- ‘Belle de Boskoop’ – ripens in December, keeps until February. Vigorous, ideal for cold and damp climates. Huge fruit, a bit tart.
- ‘Chantecler (Belchard)’ – ripens in September, keeps until November. Smooth flesh, crisp, tart. Blooms late, is well adapted to cold climates.
- ‘Cox Orange Pippin’ – ripens in October, keeps until January. Average caliber, sweet fruit, must be pruned to low, flat shapes since it is a weak variety.
- ‘Delbarestivale’ – ripens in August, keeps until October. Big fruit, crisp flesh, slight taste of licorice or aniseed. For semi-free tree shapes.
- ‘Florina (Querina Florina)’ – ripens in October, keeps until February. Resists diseases very well. Firm flesh, slightly tart, cultivate in windy locations.
- ‘Grand Alexander’ – ripens in September, keeps until October. Eat quickly, can be pruned to all tree shapes. Pleasant fruit, juicy, crisp.
- ‘Idared’ – ripens in October, keeps until February. Keeps very well, smooth flesh, soft, sweet. Quite vulnerable to powdery mildew.
- ‘King of the Pippins’ – ripens in November, keeps until December. Strong and productive. Adapted to all climates, ideal for free-form tree shapes.
- ‘Royal Gala’ – ripens in October, keeps until February. Productive and vigorous. Meaty fruit, crisp, excellent.
- ‘Starkrimson’ – ripens in October, keeps until December. Productive and hardy. Bears fruit very young. Slightly mealy flesh.
- ‘White Transparent’ – ripens in August, keeps until September. Very good fruit, tangy. Eat quickly, as fruits fall off the tree too easily.
The best varieties of apples for harvesting from December to March
- ‘Calville Blanc d’Hiver’ – ripens in November, keeps until February. One of the best! Big fruit, vulnerable to scab.
- ‘Delbard Jubilee’ – ripens in October, keeps until February. Resists diseases well. Can be shaped to espalier patterns.
- ‘Gloster’ – ripens in October, keeps until March. Excellent fruit, vigorous tree. Bears fruit very young. Perfect for pastries.
- ‘Golden Delicious’ – ripens in December, keeps until March. Ideal for cold climates. Tasty when grown in a garden.
- ‘Granny Smith’ – ripens in November, keeps until March. One of the tangiest. The best apple for low-cholesterol diets.
- ‘Jonagold’ – ripens in November, keeps until January. Very vigorous tree, productive. Relatively tender flesh. Quite vulnerable to powdery mildew.
- ‘Jonathan’ – ripens in November, keeps until January. Big fruit, soft flesh. Bears fruits very young. Adapted to windy locations.
- ‘Ontario’ – ripens in January, keeps until March. Average vigor. Espalier patterns. Melting flesh, delicate.
- ‘Canadian Reinette’ – ripens in December, keeps until February. Very fragrant flesh. Appreciates damp climates and high altitudes, up to 3 300 feet (1 000 m).
- ‘Reinette Clochard’ – ripens in December, keeps until March. Perfect for west France. Cultivate in semi-free tree shapes. Firm flesh, juicy, tart.
- ‘Reinette Grise du Canada’ – ripens in December, keeps until February. Good vigor, tree tends to bear in alternate years. Rather soft flesh, very fragrant.
- ‘Winter Banana’ – ripens in November, keeps until January. Smells slightly of bananas. Very fertile, good pollinator. Grows well in cordon espalier shapes.
Learn more about apple trees
 Apple trees are often cultivated for the quality of their fruits, but also simply for its very decorative value beginning of spring. Indeed, ornamental apple trees are very trendy in many urban landscapes.
Its beautiful blooms are magnificent, ranging in color from pure white to pink-shaded white.
Towards summer’s end, apples’ rich colors will also enchant your garden and fill your appetite!
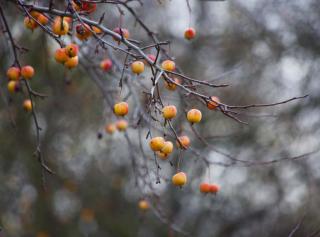
In winter, tardy apple tree varieties will display their fruits for all to see.
Caring for them is easy and growing them is something every gardener can do well!
From the end of summer deep into fall, harvest your apples for a natural treat, eat them baked in pies or in applesauce. They’re delicious also prepared in jams.
Smart tip about apple trees
In order to enhance apple trees’ yields, especially at the beginning, give it organic soil conditioner such as manure and seaweed in fall and in spring.
Preventive treatment against disease and parasites that attack apple trees
- Powdery mildew – white velvet covering apple tree leaves
- European brown rot – apples rot while still on the tree
- Codling moths or fruit worm – brown stains on leaves and fruits
- Apple scab – brown stains on leaves and fruits
- Rust – brownish-orange lesions appear on the underside of apple tree leaves
- Aphids – leaves lose their original color and curl themselves into tube shapes
- Scale insects – Techniques and organic treatments to avoid them
Apple tree on social media
Click to open posts in a new tab. Follow us there, comment, and share!
Also nice: create or join a topic on our orchard forum, too.
Источник
Planting Apple Trees
Successfully establishing a young apple tree in your yard starts with your planting site and planting method. Once an apple tree is established, it needs little assistance to grow and bear fruit, but you’ll first need to make sure you give your trees a strong foundation.
NOTE: This is part 4 in a series of 11 articles. For a complete background on how to grow apple trees , we recommend starting from the beginning.
Apple trees require fertile soil for good growth, so, before you plant, test the soil where your trees will be planted – including a test of the soil pH. Refer back to the section on Soil Preparation for tips on testing your soil.
If the soil pH where you plan to plant your tree is 6.0-7.0, you’re in good shape – this is an ideal range for apple trees. Take a look at the established trees and plants around the site. Check to see that they look healthy and are growing well. This will help give you an idea of the success of new plantings in the area. Remember to steer clear of soils that are extremely heavy or poorly drained.
Apple trees may be planted even when temperatures are quite cool, especially if they arrive bareroot and dormant. If a hard frost is expected, it is advisable to delay planting for a while until temperatures become more moderate. Do not expose roots to temperatures that are freezing or below. Generally, as long as your soil is workable, it is fine to plant.
Planting Steps
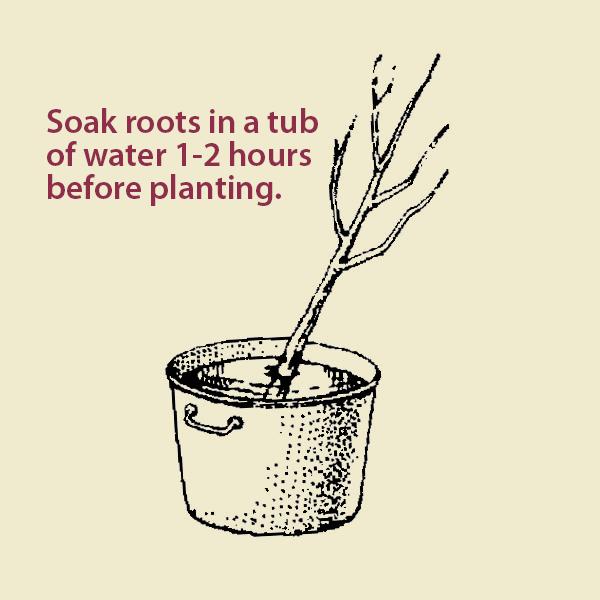
- Before planting: soak the apple tree’s roots in a bucket or large tub of water for one to two hours. This helps keep the roots from drying out while you dig the planting hole. Avoid soaking roots for more than six hours. Remember: do not expose roots to freezing temperatures (or below) prior to planting.
- Dig the planting hole deep and wide enough so the root system has plenty of room and room to spread and grow. When digging the planting hole, make sure it is deep and wide enough so the apple tree’s root system has plenty of room to easily expand. Keep the more-nutritious topsoil in a separate pile so you can put it in the bottom of the hole, where it’ll do the most good.
- To loosen the soil, mix aged/rotted manure, garden compost, coir or peat moss (up to 1/3 concentration) into your pile of topsoil. The peat moss you get should either be baled sphagnum or granular peat. Note: Peat has a low pH, so if you use this rather than neutral coir, it may affect the soil pH around the roots. Coir, like our Coco-Fiber Growing Medium, can be added instead of peat – or just evenly work in 2 or more inches of organic material with the existing soil.
- Place the apple tree in the center of the planting hole with its roots down and spread out. Holding onto the trunk to keep it vertical, backfill the hole, putting the topsoil back in first. You can avoid creating air pockets by working the soil carefully around the roots and tamping down firmly as you refill the planting hole around your apple tree.
- Especially if you’re planting on a slope, create a rim of soil around the planting hole about two inches above ground level. This is called a “berm” and it works to catch water so that it can soak in rather than running off and causing soil erosion. Spread soil evenly around tree and mulch to prevent damage from water pooling and injury from freezing around the apple tree’s trunk in fall going into winter.
Post-Planting
Thoroughly water your newly planted apple tree. A deep soaking with about a gallon of water is best. If you need to fertilize your apple trees at planting time, you can water them in with a water-soluble solution like Stark® Tre-Pep® Fertilizer. If planting in the fall, wait until spring instead to make any fertilizer applications. After watering, if soil appears to settle and sinks into the planting hole, just add more soil – enough to fill the hole to ground level again.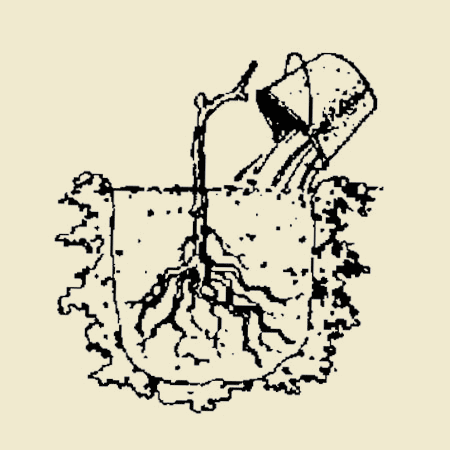
Apply a layer of organic material like wood mulch (rather than inorganic material like rocks), about 2-3 inches thick, around the root zone of your apple tree. Mulching helps discourage weeds while also keeping water from quickly evaporating away from the root zone. In the fall, double the mulch layer or add a layer of straw for winter protection.
Note: Rodents and other small gnawing critters could take advantage of mulch that is applied too thickly, and they may chew the tree’s bark for sustenance – a type of injury that can be fatal, especially to new apple trees.
Planting Budded and Grafted Apple Trees
All Stark Bro’s apple trees are grafted or budded to ensure growth of true-to-name planting stock. You can see where the fruiting variety on top is joined to the root variety on the bottom by a bump in the lower trunk, by a change in the bark color, or by a slightly offset angle in the tree.
Grafted apple trees need special planting attention. For most apple trees, especially dwarf apple trees, it’s very important to keep the graft above the soil level; otherwise, roots could develop from above the graft and your apple tree could grow to its full size by bypassing its dwarfing parts. Budded apple trees are manually fitted to specially selected clonal rootstocks.
For dwarf, semi-dwarf, and columnar apple trees, the bud union should be planted 2- to 3-inches above the soil line. For ideal anchorage, standard-size apple trees, as well as our Stark® Custom Graft® trees, like the Stark® Double Delicious® apple tree, should be planted 1- to 2-inches deeper than the visible soil lines from when they grew in our nursery rows.
Planting Potted Apple Trees
Apple trees that are grown and shipped in our Stark® EZ Start® bottomless pots are part of our continuing quest for producing better and stronger trees for the home grower. By following these simple instructions, you will be assured of getting your new potted apple tree off to the best possible start.
- Before planting: When your apple tree arrives, carefully take it out of the package. Rest assured, your potted tree has been watered prior to shipment and should arrive with damp soil around the roots; however, it does need another drink when it arrives at your home. Be sure the water reaches the entirety of the roots within the container. If you can’t plant your tree immediately upon arrival, keep the roots hydrated until you can plant, and keep the tree in a sheltered location. Do not place your potted apple tree in a bucket of water. This could cause the roots to rot and weaken or even kill your apple tree.
- Your potted apple tree is ready for planting as soon as it arrives. To remove the tree from its temporary container, simply grasp the sides of the pot and carefully slide the tree out. Note: If the tree’s roots do not easily slide out of the container, you may need to gently pry the inside edges of the container away from the root system, and loosen it until the roots slide freely from the pot.
- While some might shake loose, most of the potting soil should remain around the apple tree’s roots. Gently separate, untangle, and spread out the tree’s roots and place it, soil and all, into the prepared planting hole. Backfill the hole with top soil, same as you would a bare-root apple tree (see above), and water thoroughly.
- Your potted apple tree may have come with a bamboo stake, which helped straighten the tree as it grew in its pot. We recommend that you keep the tree staked when you plant, since all new trees can benefit from staking in their first years. You may remove the bamboo stake and replace it with a different tree stake if you prefer.
Note: At planting time, do not plant the Stark® EZ Start® bottomless pot in the ground. It is not intended to break down over time as your apple tree grows, and it will cause root restriction, injury, and may even be fatal to the apple tree. The pot your apple tree arrives in is intended to be a temporary container only.
One final point: Please be sure to remove the name tag from your apple tree. As the tree grows, this small piece of plastic can choke off its circulation, causing damage like girdling and even tree death. If you’d like to keep the tag on your tree, retie it loosely with soft twine and be sure to keep it from becoming restricted as the tree grows.
Источник


