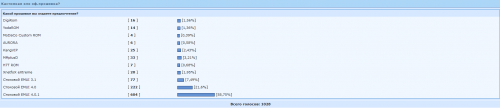
Plk l01 android 7
В теме нет куратора. Если в теме есть пользователь, желающий стать Куратором и соответствующий Требованиям для кандидатов, он может подать заявку, создав новую тему в разделе Хочу стать Куратором (предварительно изучив Правила и рекомендации для Кураторов).
До назначения куратора, по вопросам наполнения шапки, обращайтесь к модераторам раздела через кнопку  под сообщениями, на которые необходимо добавить ссылки.
Сообщение отредактировал destroyer71 — 04.08.21, 13:55
Внимание! Ознакомьтесь с информацией!
Разблокировку проводить на Android 5.x! Пути отката с 6.х на 5.х ищите в шапке!
1. Устанавливаем HiSuite, либо драйвера adb вручную.
2. Переписываем на компьютере в Блокнот серийный номер и IMEI1 устройства (Настройки – О телефоне – Общая информация), а также Product ID (набрать в номеронабирателе *#*#1357946#*#*).
3. Запасаемся терпением в огромных количествах, сайты в Китае для нас открываются совсем «неспешно».
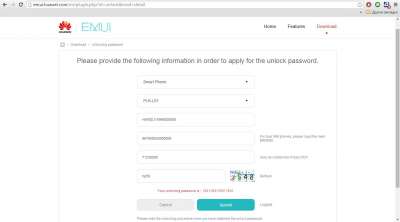
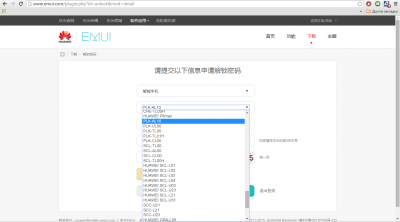
4. Идем на англоязычный сайт Huawei для разблокировки бутлоадера. Заполняем все поля, нажимаем Submit. Получаем код разблокировки бутлоадера.
Еще один вариант (спасибо уходит пользователю m1tr1ch):
Качаем Huawei Product ID Generator.
Запускаем, выбираем модель HUAWEI Y300-0000. Вставляем свой IMEI1, получаем сгенерированный Product ID.
Идем на этот сайт Huawei, соглашаемся с Unlocking Agreement.
Для входа используем аккаунт Facebook! Выбираем из списка модель HUAWEI Y300-0000, вводим S\N, IMEI1 и сгенерированный Product ID.
Получаем код разблокировки.
На один аккаунт Facebook можно разлочить не более 2 устройств в течении 6 месяцев.
5. Заходим в Настройки – О телефоне, тыркаем 7 раз строку меню «Номер сборки», получаем пункт меню «Для разработчиков» в основном меню. Заходим туда, включаем отладку по USB.
6. Качаем архив. Распаковываем, например в корень диска C:\
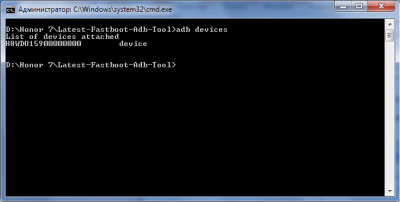
7. Заходим в распакованную папку, зажимаем Shift+правую клавишу мыши, выбираем «Открыть окно команд». Подключаем телефон, убеждаемся что все драйвера установлены и устройство определяется, введя команду:
adb devices
В ответ должно вывести серийный номер устройства. Если все так, переходим дальше, если нет – проверяйте драйвера.
где XXXXXXXXXXXXXXXX – код разблокировки, полученный ранее.
Загрузчик разблокирован!
Сообщение отредактировал skull_perm — 24.04.17, 17:42

Кастомный рекавери установлен!
Сообщение отредактировал skull_perm — 24.04.17, 17:40
Перед получением ROOT необходимо сделать бэкап через TWRP
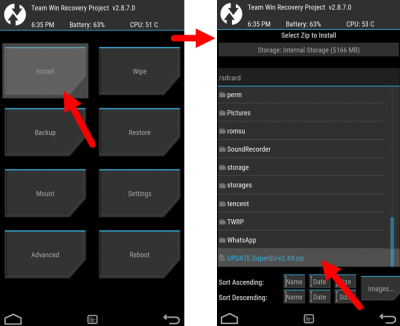
1. Должен быть установлен кастомный рекавери (TWRP). Для каждой версии Android он разный, смотрим шапку.
2. Качаем нужный SuperSU. Для Android 5.0.х гарантированно подходит BETA-SuperSU-v2.49.zip, для PLK-L01 на Android 6.х — SuperSU v2.62 и выше.
3. Кидаем архив SuperSU в память телефона или на карту памяти.
4. Выключаем телефон.
5. Зажимаем кнопки «Громкость+» и «ВКЛ» до вибрации.
6. Прошиваем архив SuperSU
Сообщение отредактировал skull_perm — 11.07.16, 10:50
Актуально только для версии Android 5.х!
- Обязательно наличие стокового рекавери!
- Системные файлы не должны быть измененными или удаленными!
- Root должен отсутствовать!
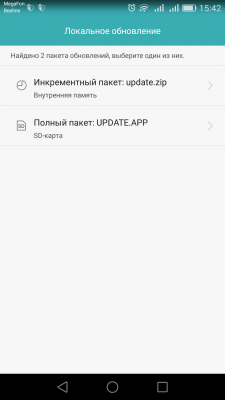
- Файл Update.zip кидаем в папку dload, Настройки — Обновление — Меню — Локальное обновление — Инкрементный пакет: update.zip
Распаковывать Update.zip не нужно!
Сообщение отредактировал skull_perm — 30.07.16, 10:08
Предупреждение: Проще использовать HONOR 7 Multi-Tool by inside!out 4PDA edition.
При прошивке «неправильных» рекавери или других разделов, легко получить SoftBrick (Кирпичик). Данная инструкция вернёт работоспособность.
- Качаем Minimal ADB. Распаковать в корень любого диска.
- Качаем ПОЛНУЮ прошивку для своей модели.
- Выдергиваем с помощью Huawei Update Extractor v0.9.9.3 из UPDATE.APP следующие файлы:
boot.img, recovery.img, system.img, cust.img - Создаем текстовый файл со следующим содержанием (скриптом):
Сообщение отредактировал inside!out — 05.02.16, 13:29
Чтобы получить рут, нам нужно разблокировать загрузчик.
За основу берем статью китайских ромоделов из команды ATX
https://docs.google.co…XMuK4/edit?usp=sharing
Далее, самый простой вариант установить TWRP рекавери
И из-под него установить ® SuperSU
Качаем файл в формате .zip
Если все же с кастомным рекавери не хочется связываться, то пытаемся освоить инструкцию
от китайцев на примере Huawei P8
https://docs.google.co…exunSvQSre52eWc-o/edit
В данном случае, нужны навыки работы с ADB
ADB и все что с помощью него можно сделать
Сообщение отредактировал olegusss — 25.07.15, 13:20
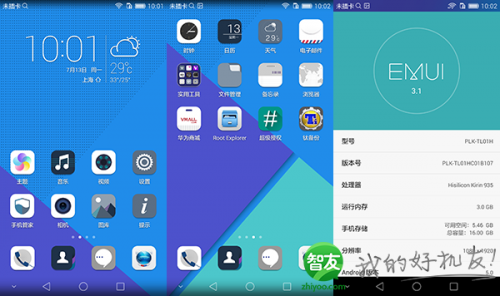
system adjustment and optimization:
Based on the latest official packet creation B107 bottom.
Compact comes with a large number of official applications.
Carefully rearrange the order of the desktop icons.
USB debugging turned on by default, eliminating the worry mad by the developer options.
Automatic off-screen time to 2 minutes.
Perfect ROOT privileges.
Add BUSYBOX support.
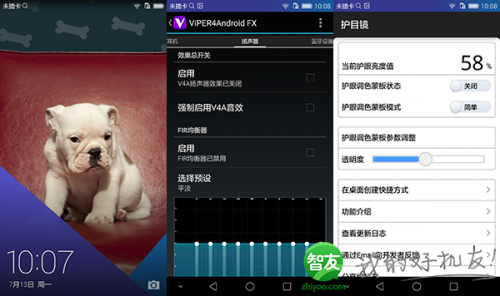
Add V4A audio processing applications.
Add goggles.
[On the internal application]
ROM Although a small number of integrated third-party APP, but they can be free uninstalled by the user (non-integrated in SYSTEM, and no different from ordinary installed APP), if you like this ROM and support us, After activating the use (APP feel good of course, if you can keep continue to use) and then unloaded.
[Brush protocol]
Brush this ROM may cause damage to your phone, FC, power, brick or unable warranty!
Post reply by default visible as you respond and downloaded and brush ROM package, that you represent tacit consent own risk! Please choose carefully!
Note: Please keep the habit of backing up your data before the brush to avoid data loss!
After downloading the file, please proofread MD5 value, if different files may be damaged or people modify, re-download.
[Card Brush Pack Brush process]
Install the phone driver, you can use the official tools like automatic or wall installation.
Unlock your machine, unlock code Application Address: emui.com/plugin.php & mod = unlock & action = apply, please ferry about specific unlock tutorial?.
After downloading Recovery brush into Download: http://bbs.zhiyoo.com/thread-9673908-1-1.html , you can choose the brush into the official or third party RECOVERY a).
After downloading the Zip package will be placed in an external card or the built-in card.
Use Recovery Tools menu to enter Recovery Mode or turn the computer off and then (hold the power + volume button, see the screen after screen release the power button) to enter.
Wipe at the previous data and cache.
Сообщение отредактировал olegusss — 25.07.15, 14:01
New features and optimization as follows:
. Join dpi switch setting. Alternatively 480 (default), 450,430,410,390, dpi greater viewing area is smaller.
Dpi screen display in a small delicate feel cleaner, eyesight good students deserve ^ _ ^
recommended 410dpi, good results.
Small dpi desktop icons after switching correspondingly smaller, with a more coordinated 5X5 desktop layout.
When small dpi, quick pull-down button layout will automatically switch to 4 line.
Specific effects we all experience! . Join the call automatically recording and remove recording tone, call recording can be set to end, do not show recorded message
. Join calls flashlight function, flash frequency can be adjusted
. kernel supports init.d script, and has built-root privileges
. Status Bar Time Options , can be centered, left and right of abode and hidden.
. Join the status bar displays the number of icon set
. Add to goggles feature, you can start from the dropdown shortcut button, or press the relevant button to start to define
. Join the lock screen calendar display (in the Advanced Settings> Lock screen settings on / off)
. After adding the lock screen bright screen, double-click to open the flashlight function (in the Advanced Settings> Lock screen settings on / off)
. Join desktop weather calendar display
. Add to decline action is set by default to the drop-down notification bar navigation bar to join the lock screen button, height can be adjusted and completely hidden. Home key, back key, menu key, hidden key, press the function key lock screen to select the following options: Torches | Shortcut menu | screenshots | Locker | suspension program | Advanced Settings | voice assistant | the end of the current program | Goggle | pull-down notification bar | add volume | volume down | menu keys | No action lock screen buttons when you need to display the menu button will automatically hide the status bar, double-click action: The following options are available: Torches | Shortcut menu | screenshots | Locker | suspension program | Advanced Settings | voice assistant | the end of the current program | Goggle | Return key | Home key | MENU | add volume | volume down | No action battery icon is set, the following options: Default does not show the percentage of show only percentage percentage hide icon at the top of the linear power at the top of the linear power + percentage . The status bar displays real-time network traffic, with the following options: Hide line display also shows upload / download traffic modify the resurgence screen assistant (specific effects see photo): Press and actions are all keys The following options are available: Torches | Shortcut menu | screenshots | Locker | suspension program | Advanced Settings | voice assistant | end of the current program | Goggle | add volume | volume down | menu keys | Minimize screen assistant | No action increase the screen assistant Minimize function (by pressing achieve), watching movies or playing games can appear as a small dot memory screen assistant position, consistent reopen after closing (also the case after the restart the phone) before and closed join ZTE Screenshots (by length Press implementation), when shots directly matting, graffiti . reboot option to join a fast reboot | Recovery Mode | Fastboot mode. The notification bar is added invisible button: you can select Left / center / right of abode. Tap / long press have the following options: Torches | Shortcut menu | screenshots | Locker | suspension program | Advanced Settings | voice assistant | the end of the current program | Goggle | Return key | Home key | MENU | add volume | volume down | No action join operator to customize the display settings. Added volume keys wakeup option, volume down key lock screen is occupied by the snapshot camera, so only the volume increase can wake up the screen. . Added on / off the Mute option on and off Google Services options (Advanced Settings> More settings)
Источник
Plk l01 android 7
В теме нет куратора. Если в теме есть пользователь, желающий стать Куратором и соответствующий Требованиям для кандидатов, он может подать заявку, создав новую тему в разделе Хочу стать Куратором (предварительно изучив Правила и рекомендации для Кураторов).
До назначения куратора, по вопросам наполнения шапки, обращайтесь к модераторам раздела через кнопку под сообщениями, на которые необходимо добавить ссылки.
Сообщение отредактировал destroyer71 — 04.08.21, 13:55
Внимание! Ознакомьтесь с информацией!
Разблокировку проводить на Android 5.x! Пути отката с 6.х на 5.х ищите в шапке!
1. Устанавливаем HiSuite, либо драйвера adb вручную.
2. Переписываем на компьютере в Блокнот серийный номер и IMEI1 устройства (Настройки – О телефоне – Общая информация), а также Product ID (набрать в номеронабирателе *#*#1357946#*#*).
3. Запасаемся терпением в огромных количествах, сайты в Китае для нас открываются совсем «неспешно».
4. Идем на англоязычный сайт Huawei для разблокировки бутлоадера. Заполняем все поля, нажимаем Submit. Получаем код разблокировки бутлоадера.
Еще один вариант (спасибо уходит пользователю m1tr1ch):
Качаем Huawei Product ID Generator.
Запускаем, выбираем модель HUAWEI Y300-0000. Вставляем свой IMEI1, получаем сгенерированный Product ID.
Идем на этот сайт Huawei, соглашаемся с Unlocking Agreement.
Для входа используем аккаунт Facebook! Выбираем из списка модель HUAWEI Y300-0000, вводим S\N, IMEI1 и сгенерированный Product ID.
Получаем код разблокировки.
На один аккаунт Facebook можно разлочить не более 2 устройств в течении 6 месяцев.
5. Заходим в Настройки – О телефоне, тыркаем 7 раз строку меню «Номер сборки», получаем пункт меню «Для разработчиков» в основном меню. Заходим туда, включаем отладку по USB.
6. Качаем архив. Распаковываем, например в корень диска C:\
7. Заходим в распакованную папку, зажимаем Shift+правую клавишу мыши, выбираем «Открыть окно команд». Подключаем телефон, убеждаемся что все драйвера установлены и устройство определяется, введя команду:
adb devices
В ответ должно вывести серийный номер устройства. Если все так, переходим дальше, если нет – проверяйте драйвера.
где XXXXXXXXXXXXXXXX – код разблокировки, полученный ранее.
Загрузчик разблокирован!
Сообщение отредактировал skull_perm — 24.04.17, 17:42
Кастомный рекавери установлен!
Сообщение отредактировал skull_perm — 24.04.17, 17:40
Перед получением ROOT необходимо сделать бэкап через TWRP
1. Должен быть установлен кастомный рекавери (TWRP). Для каждой версии Android он разный, смотрим шапку.
2. Качаем нужный SuperSU. Для Android 5.0.х гарантированно подходит BETA-SuperSU-v2.49.zip, для PLK-L01 на Android 6.х — SuperSU v2.62 и выше.
3. Кидаем архив SuperSU в память телефона или на карту памяти.
4. Выключаем телефон.
5. Зажимаем кнопки «Громкость+» и «ВКЛ» до вибрации.
6. Прошиваем архив SuperSU
Сообщение отредактировал skull_perm — 11.07.16, 10:50
Актуально только для версии Android 5.х!
- Обязательно наличие стокового рекавери!
- Системные файлы не должны быть измененными или удаленными!
- Root должен отсутствовать!
- Файл Update.zip кидаем в папку dload, Настройки — Обновление — Меню — Локальное обновление — Инкрементный пакет: update.zip
Распаковывать Update.zip не нужно!
Сообщение отредактировал skull_perm — 30.07.16, 10:08
Предупреждение: Проще использовать HONOR 7 Multi-Tool by inside!out 4PDA edition.
При прошивке «неправильных» рекавери или других разделов, легко получить SoftBrick (Кирпичик). Данная инструкция вернёт работоспособность.
- Качаем Minimal ADB. Распаковать в корень любого диска.
- Качаем ПОЛНУЮ прошивку для своей модели.
- Выдергиваем с помощью Huawei Update Extractor v0.9.9.3 из UPDATE.APP следующие файлы:
boot.img, recovery.img, system.img, cust.img - Создаем текстовый файл со следующим содержанием (скриптом):
Сообщение отредактировал inside!out — 05.02.16, 13:29
Чтобы получить рут, нам нужно разблокировать загрузчик.
За основу берем статью китайских ромоделов из команды ATX
https://docs.google.co…XMuK4/edit?usp=sharing
Далее, самый простой вариант установить TWRP рекавери
И из-под него установить ® SuperSU
Качаем файл в формате .zip
Если все же с кастомным рекавери не хочется связываться, то пытаемся освоить инструкцию
от китайцев на примере Huawei P8
https://docs.google.co…exunSvQSre52eWc-o/edit
В данном случае, нужны навыки работы с ADB
ADB и все что с помощью него можно сделать
Сообщение отредактировал olegusss — 25.07.15, 13:20
system adjustment and optimization:
Based on the latest official packet creation B107 bottom.
Compact comes with a large number of official applications.
Carefully rearrange the order of the desktop icons.
USB debugging turned on by default, eliminating the worry mad by the developer options.
Automatic off-screen time to 2 minutes.
Perfect ROOT privileges.
Add BUSYBOX support.
Add V4A audio processing applications.
Add goggles.
[On the internal application]
ROM Although a small number of integrated third-party APP, but they can be free uninstalled by the user (non-integrated in SYSTEM, and no different from ordinary installed APP), if you like this ROM and support us, After activating the use (APP feel good of course, if you can keep continue to use) and then unloaded.
[Brush protocol]
Brush this ROM may cause damage to your phone, FC, power, brick or unable warranty!
Post reply by default visible as you respond and downloaded and brush ROM package, that you represent tacit consent own risk! Please choose carefully!
Note: Please keep the habit of backing up your data before the brush to avoid data loss!
After downloading the file, please proofread MD5 value, if different files may be damaged or people modify, re-download.
[Card Brush Pack Brush process]
Install the phone driver, you can use the official tools like automatic or wall installation.
Unlock your machine, unlock code Application Address: emui.com/plugin.php & mod = unlock & action = apply, please ferry about specific unlock tutorial?.
After downloading Recovery brush into Download: http://bbs.zhiyoo.com/thread-9673908-1-1.html , you can choose the brush into the official or third party RECOVERY a).
After downloading the Zip package will be placed in an external card or the built-in card.
Use Recovery Tools menu to enter Recovery Mode or turn the computer off and then (hold the power + volume button, see the screen after screen release the power button) to enter.
Wipe at the previous data and cache.
Сообщение отредактировал olegusss — 25.07.15, 14:01
New features and optimization as follows:
. Join dpi switch setting. Alternatively 480 (default), 450,430,410,390, dpi greater viewing area is smaller.
Dpi screen display in a small delicate feel cleaner, eyesight good students deserve ^ _ ^
recommended 410dpi, good results.
Small dpi desktop icons after switching correspondingly smaller, with a more coordinated 5X5 desktop layout.
When small dpi, quick pull-down button layout will automatically switch to 4 line.
Specific effects we all experience! . Join the call automatically recording and remove recording tone, call recording can be set to end, do not show recorded message
. Join calls flashlight function, flash frequency can be adjusted
. kernel supports init.d script, and has built-root privileges
. Status Bar Time Options , can be centered, left and right of abode and hidden.
. Join the status bar displays the number of icon set
. Add to goggles feature, you can start from the dropdown shortcut button, or press the relevant button to start to define
. Join the lock screen calendar display (in the Advanced Settings> Lock screen settings on / off)
. After adding the lock screen bright screen, double-click to open the flashlight function (in the Advanced Settings> Lock screen settings on / off)
. Join desktop weather calendar display
. Add to decline action is set by default to the drop-down notification bar navigation bar to join the lock screen button, height can be adjusted and completely hidden. Home key, back key, menu key, hidden key, press the function key lock screen to select the following options: Torches | Shortcut menu | screenshots | Locker | suspension program | Advanced Settings | voice assistant | the end of the current program | Goggle | pull-down notification bar | add volume | volume down | menu keys | No action lock screen buttons when you need to display the menu button will automatically hide the status bar, double-click action: The following options are available: Torches | Shortcut menu | screenshots | Locker | suspension program | Advanced Settings | voice assistant | the end of the current program | Goggle | Return key | Home key | MENU | add volume | volume down | No action battery icon is set, the following options: Default does not show the percentage of show only percentage percentage hide icon at the top of the linear power at the top of the linear power + percentage . The status bar displays real-time network traffic, with the following options: Hide line display also shows upload / download traffic modify the resurgence screen assistant (specific effects see photo): Press and actions are all keys The following options are available: Torches | Shortcut menu | screenshots | Locker | suspension program | Advanced Settings | voice assistant | end of the current program | Goggle | add volume | volume down | menu keys | Minimize screen assistant | No action increase the screen assistant Minimize function (by pressing achieve), watching movies or playing games can appear as a small dot memory screen assistant position, consistent reopen after closing (also the case after the restart the phone) before and closed join ZTE Screenshots (by length Press implementation), when shots directly matting, graffiti . reboot option to join a fast reboot | Recovery Mode | Fastboot mode. The notification bar is added invisible button: you can select Left / center / right of abode. Tap / long press have the following options: Torches | Shortcut menu | screenshots | Locker | suspension program | Advanced Settings | voice assistant | the end of the current program | Goggle | Return key | Home key | MENU | add volume | volume down | No action join operator to customize the display settings. Added volume keys wakeup option, volume down key lock screen is occupied by the snapshot camera, so only the volume increase can wake up the screen. . Added on / off the Mute option on and off Google Services options (Advanced Settings> More settings)
Источник


