- Polar Scope Align Pro for Android
- Polar Scope Align Pro for Android Screenshots
- Download and install Polar Scope Align Pro APK on Android
- Step 1: Download the Polar Scope Align Pro.apk on your device
- Step 2: Allow Third Party apps on your device.
- Step 3: Goto Your File manager or browser location
- Step 4: Enjoy
- Are APK Files Safe?
- Polar Scope Align Pro v6.2 APK Download Mirrors
- Whats new in Polar Scope Align Pro v6.2
- Polar scope align pro android
- Polar Alignment for Beginners – Step by Step
- Polar alignment for beginners
- 1. Finding Polaris – The North Star
- 2. Level the Tripod
- 3. Adjust the Altitude
- My latitude happens to be 43° N, so the altitude adjustment scale is set to 43.
- 4. Position Polaris using PolarFinder
- 5. Adjust the Azimuth
- 6. Finishing Up
- 7. Fine Tuning
- The QHY PoleMaster
- The Importance of Polar Alignment for Astrophotography
- Helpful Resource:
Polar Scope Align Pro for Android
— REQUIRES ANDROID | Category: Utilities
Polar Scope Align Pro for Android Screenshots
Download and install Polar Scope Align Pro APK on Android
In other to have a smooth experience, it is important to know how to use the APk or Apk MOD file once you have downloaded it on your device. APK files are the raw files of an Android app similar to how .exe is for Windows. The APK means Android Package Kit (APK for short). It is the package file format used by the Android operating system for distribution and installation of mobile apps.
In 4 Simple Steps, I will show you how to use Polar Scope Align Pro.apk on your Phone once you are done downloading it.
Step 1: Download the Polar Scope Align Pro.apk on your device
You can do this right now, by using any of our download mirrors below. Its 99% guaranteed to work . If you download the apk on a computer, make sure to move it to your android device.
Step 2: Allow Third Party apps on your device.
To install the Polar Scope Align Pro.apk, you must make sure that third party apps are currently enabled as an installation source. Just Go to Menu > Settings > Security > and check Unknown Sources to allow your phone to install apps from sources other than the Google Play Store.
On Android 8.0 Oreo, rather than check a global setting to allow installation from unknown sources, you will be prompted to allow your browser or file manager to install APKs the first time you attempt to do so.
Step 3: Goto Your File manager or browser location
You will now need to locate the Polar Scope Align Pro.apk file you just downloaded.
If you prefer, you can also download a file manager app here so you can easily find files on your Android device.
Once you have located the Polar Scope Align Pro.apk file, click it and it will start the normal installation process. Tap «Yes» when prompted for anything. However, be sure to read all on-screen prompts.
Step 4: Enjoy
Polar Scope Align Pro is now installed on your device. Enjoy!
Are APK Files Safe?
Disregard any rumors or a site that says otherwise. APK files are generally as safe as an .exe windows pc file hence, the most important thing to note is that you should always download it from trusted sites. You generally do not have anything to worry about as we have provided some of the safest sites in our Apk download mirrors below.
Thank you for reading this tutorial. Download your app below!
Polar Scope Align Pro v6.2 APK Download Mirrors
Whats new in Polar Scope Align Pro v6.2
Apart from the most reliable app for polar alignment (with or without a polar scope), PS Align pro has become the astronomer’s swiss-army knife with all the tools added over the years. Remember, all features & updates are free forever, the only in-app purchases are donations (tip jar). Polar Scope Align will calculate the position of Polaris or σ Octantis in your Polar Scope reticle for your location (using your phone’s GPS or manually), allowing a quick and accurate polar alignment. It is one of the few programs that are accurate in lower latitudes by correcting for atmospheric refraction (so expect results to agree only with precise software and not most simplistic «polar align» apps — see the «Accuracy» section in help for details). In the settings you can select the polar scope reticle that matches your own, from a vast collection: iOptron old & new, Astro-Physics RAPAS & PASILL, various versions of Takahashi EM-10/11/200/400/500, NJP, PM-1, P2-Z, the latest Orion / Skywatcher, the Classic Skywatcher / Orion / Celestron / Meade / EXOS2 / Bresser, the Telrad, Rigel QuikFinder, a couple for Astrotrac / Losmandy / Kenko / Avalon, the Vixen PF-L/Atlux/SX/SXD/SXP/AXD/GP/GP-DX/Polarie Polar Axis Scopes, a Konus and several Polar Finders: Tuthill, Explore Scientific 8×50, Meade 9×60, Vixen Polaris, Celestron 7×50, Carton Optical. PoleMaster help view for South Hemisphere users. If you have one not included, just ask the developer to add it! Feature list: -Accurate calculation of Polaris or Sigma Oct for any date and location, including effect of atmospheric refraction (and annual aberration, nutation). Most other apps do not perform precision calculations, so please only compare app readings to accurate sources (USNO, scientific software etc). -Use device time/date/location, or enter your own, or pick from online & offline world databases via the Location Manager. -Approximate daytime / no polarscope polar alignment tool. Great for visual use, solar imaging (inc. eclipses) and even limited short focal length astrophotography. Now with sun shadow calibration for more accuracy! -Laser / Hop Align for nighttime alignment using a calibration star for obstructed or not visible polar star, or for improving laser align. -Full app in red-color (or alternative green, white) night mode — tools switchable to daytime view. -Deep Space Object (DSO) Database with 22000+ objects from several catalogs (Messier, Caldwell, NGC, IC, Herschell 400, Sharpless 2, Barnard), along with stars (Yale Bright Star) & planets. Search, apply filters, sorting, download DSS color images for all items, or get help finding them with your non-goto telescope with the Push-To function. -Connect to and control WiFi-enabled iOptron mounts. -Over 30 calculators useful for observing and astrophotography, from eyepiece magnification and field of view, to imaging resolution and reducers. -Xasteria: World astro-weather report based on 7Timer! data -Water vapor satellite images. -List of visible ISS and bright satellite passes. -Moon phase & lunar Calendar with solar/lunar rise/set and twilight times. -Wizard to calculate your reticle centering offset and correct or compensate for it. -Zoomable reticle view and customized routines & tools: Alt-az alignment error display for mounts that calculate it after star alignment (e.g. iOptron iEQ45, CEM60), polar alignment when your scope is not in zero position (for mounts like iOptron ZEQ/CEM on which you can always access the polar scope), remember zero position on Celestron / Skywatcher / Orion etc reticles. -Bubble level (using either gyro or accelerometer) and Compass heading, as well as magnetic declination reading. -GPS accuracy & elevation data. -Red/White/LED light. -Dimming slider. -iOptron, NexStar and Meade LX200 Star Lists. -Support for iPhone & iPad from iOS 9 (and iPod Touch, except tools that require the compass).
Apk Mirror 1: : Download APK
Источник
Polar scope align pro android

Polar Alignment for Beginners – Step by Step
Polar alignment is an essential first step towards a night of visual observation or astrophotography. Why is it so important? By aligning the axis of your telescope mount with the motion of the sky, you can accurately track objects in space. It’s a rather simple process for German equatorial mount (GEM) owners.
The same process applies to a portable star tracker and is completed via the built-in polar finder scope. Accurate polar alignment is essential for all types of long exposure astrophotography from wide-angle nightscapes , to high magnification deep-space imaging.
Once you’ve got the basics down, the entire polar alignment process can be done in less than 10 minutes.
Polar alignment is the process of accurately aligning the polar axis of your mount with the north (or south) celestial pole. The polar axis does not move when you move the telescope. Simply put, you need to make sure that your telescope mount is rotating on the exact same angle the sky turns on. This process should be well understood before diving into astrophotography.
Polar alignment for beginners
This tutorial is for users in the Northern Hemisphere, who are able to view the “North Star”, Polaris. For instructions on polar alignment using Drift Align in the Southern Hemisphere, visit How to Polar Align Easily in PHD2 Drift Align. The Drift align method can be used in either hemisphere by using free software called PHD2 guiding.
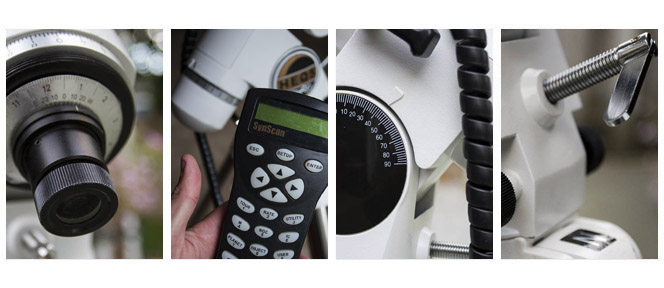
The equipment used in this example a Sky-Watcher HEQ5 German equatorial mount. This is a very popular telescope mount for beginner to intermediate astrophotography enthusiasts. It is very similar to the following models:
The Sky-Watcher HEQ5 in this example features a built-in polar scope with an illuminated reticle. All of the telescope mounts on the list above include a polar alignment scope (depending on the version you order), with the exception of the Celestron CGEM. A polar scope makes aligning the polar axis of this mount with the North celestial pole much easier.
Celestron telescope mounts are equipped with a feature called All-Star Polar Alignment. Rather than using a polar scope, it uses a system of alignment stars. This method is handy if you own a Celestron mount, and Polaris is not in view.
You’ll want to use an illuminated reticle eyepiece with a crosshair to center the star in your field of view. It’s not absolutely necessary, but at least you’ll know that the star is completely centered, rather than “close enough”.
1. Finding Polaris – The North Star
Start by roughly aligning your telescope mount in the direction of the North Celestial Pole. This can be accomplished by physically moving your tripod and mount at dusk, and aiming the polar axis in a general North direction. Polaris can be spotted in the sky quite easily, as it is much brighter than any surrounding stars in the immediate area.
Use the two outer stars in the bowl of the Big Dipper to help you locate Polaris.
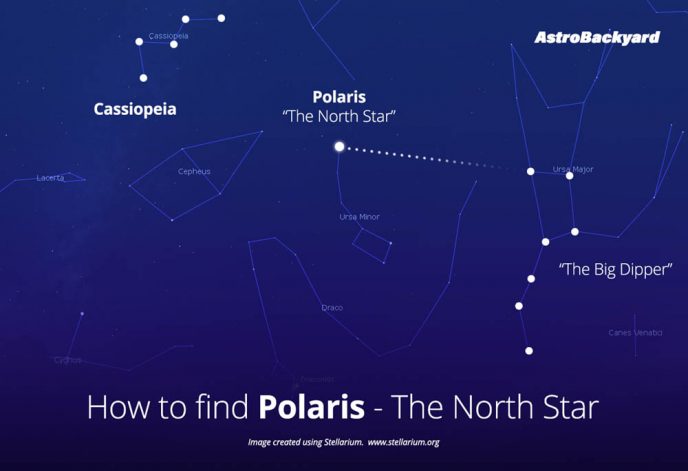
Use the Big Dipper to find Polaris – “The North Star”
Still having trouble finding Polaris?
Use a free planetarium software such as Stellarium to help you learn the night sky and its constellations from your location on Earth. The mobile version of Stellarium is a fantastic tool to use when you are outside under the stars. It offers a live-view overlay of the night sky to confirm the constellations and stars you are observing.
What if I can’t see Polaris from my location?
If your view of the Big Dipper or Polaris is completely obstructed, you may need to polar align using the Drift Align method I mentioned earlier.
2. Level the Tripod
Make sure that the tripod of your telescope mount is as level as possible. An uneven tripod will result in an inaccurate position of your mount in relation to the altitude scale. Many german equatorial mounts have a bubble level built-in. I like to place a level on the tripod before the mount is attached and make sure it is level on each axis.
It is important to note that the tripod needs to be pointing North before leveling. Otherwise, you’ll have to rotate the tripod and possibly re-level. I prefer to make a visual observation at nightfall to align with Polaris. If you are setting up during the day, a compass will do the trick.

Leveling the tripod before attaching the telescope mount
3. Adjust the Altitude
Next, you’ll want to find the latitude and longitude coordinates for your location. It’s the latitude we’re interested in.
This is the coordinate we will use to adjust the position of the telescope mount to align with the North celestial pole. The telescope mount should have a latitude scale posted on one side, with an indicator of what latitude your mount is currently in line with. You will need to adjust the mount to your current latitude using its altitude adjustment bolts.
My latitude happens to be 43° N, so the altitude adjustment scale is set to 43.

The altitude adjustment bolts can be a little difficult to get the hang of. To turn one bolt, the other has to be loosened.
If your telescope has already been attached to the mount, turning these bolts can be hard. The overall weight of the telescope attached will determine how hard it will be to turn the bolts.
By this point, the telescope mount should be roughly aligned with the height of the North Star. You may be able to crouch down and see Polaris through the polar scope reticule at this point.
It is now a matter of moving the mount left or right until Polaris comes into view.
I can’t see anything!
Depending on the telescope mount, the view through the polar scope may be obstructed when the telescope is in the rest position. On the Sky-Watcher HEQ5, the declination needs to be rotated 90° for a clear view through the polar scope.
4. Position Polaris using PolarFinder
A mobile app such as PolarFinder will tell you the exact spot to position the North Star for a near-perfect polar alignment.
The app uses your mobile device’s GPS to automatically calculate the position of Polaris for your latitude and longitude. It will display the correct position of Polaris in relation to the North celestial pole.
You will then simply mimic this location by adjusting in your telescope mount.
Android users can download PolarFinder, and iPhone users have Polar Scope Align Pro . See the rest of the astronomy apps I recommend.

Click to enlarge this image
The graphic above portrays an example of the PolarFinder app screen, next to the view through the Sky-Watcher HEQ-5 polar scope.
The cross in the middle of the circle is the North Celestial Pole (NCP), and the ring that circles it is the path of Polaris throughout the year.
What if I don’t want to use my phone?
If you do not have a mobile device or internet connection where you are setting up your telescope, you can try Polar FinderScope software online. Print the polar alignment charts out beforehand and bring them with you.
5. Adjust the Azimuth
A German equatorial mount will have azimuth adjustment knobs for moving the mount left to right. These knobs work in the same way that the altitude adjustment bolts did.
Loosen one, tighten the other. Turn the knobs a few times while looking through the polar scope. Polaris should have moved to either the left or the right. Continue this balancing act until the North star appears in the approximate horizontal plane that was displayed in PolarFinder.

6. Finishing Up
Now, go back to the Altitude adjustment bolts to raise or lower the mount further. At this point, Polaris should be very close to the exact position for a near-perfect Polar Alignment for the night.
Remember to tighten the adjustment bolts and knobs when you are satisfied with the accuracy of your placement. This will ensure that nothing moves or shifts during your observations or astrophotography.
If you are experiencing tracking issues or severe star-trailing in your images, it may be useful to re-check your Polar alignment later on. Make sure to view the current position of Polaris in your mobile app, and make any adjustments necessary to your mount.
![]()
7. Fine Tuning
Want even more accuracy when Polar Aligning your telescope mount? Try the Polar Alignment feature in SharpCap to increase your accuracy. SharpCap can help you align the RA axis of your telescope mount with the NCP by comparing images.
The same process applies when using a small star tracker to take wide-angle nightscapes using a camera and lens. These compact little mounts can rotate along with the night sky for long-exposure astrophotography, but they must be polar aligned accurately to work properly.
The QHY PoleMaster
It’s worth mentioning the PoleMaster device here, although I have not used one myself. The QHY PoleMaster is a high-precision electronic polar alignment scope. Along with the device, you’ll need to order the correct adapter for your specific EQ mount model.
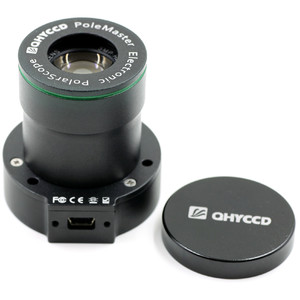
The QHY PoleMaster Electronic Polar Alignment Device
The QHY PoleMaster uses a high sensitivity camera to capture an image of the northern sky to calculate where true north is. It displays this information on a screen so you can quickly make the adjustment to the mount.
The nice part about the PoleMaster is, you don’t need to kneel down or contort your body to look through the polar finder scope, or worry about entering the time and date to the handset.
The Importance of Polar Alignment for Astrophotography
Polar alignment doesn’t just “help” you take better images, it’s absolutely imperative for success. For those lucky enough to have a permanent home observatory , you can be sure that every measure was taken to ensure that the telescope mount and pier were precisely polar aligned.
The beauty of a permanent setup in an observatory is, that the polar alignment process only needs to be done once. For those that set up and tear down their equipment each night like me, you’ll quickly become a master in polar alignment through experience.
A precise polar alignment can provide you with many benefits when it comes to astrophotography, including better autoguiding accuracy. This means that you’ll be able to capture longer exposures without the worry of tracking errors.
Even without the use of autoguiding, you may be able to capture long exposures with sharp stars depending on the mount you use. I recall being able to shoot 2-minute subs on my old Celestron CG-5 without autoguiding, thanks to the All-Star Polar Alignment routine.
Helpful Resource:
I hope that you now have a better understanding of how to polar align your telescope for a successful night of astronomy. For a closer look at the rest of the gear I use for astrophotography in my backyard, please visit the astrophotography equipment page.
For more video tutorials and astrophotography tips, please subscribe to AstroBackyard on YouTube
Источник


