- Android Debug Bridge (ADB) Connect to Device over USB, WiFi
- What is Android Debug Bridge (ADB)?
- USB debugging and ADB Configuration-
- How to Connect to an Emulator
- How to Connect Android Device with ADB (Android Debug Bridge)
- How to Configuring ADB for Wi-Fi Support
- [GUIDE/TIPS] How to Port OEM Apps / Vendor Apps to Your Current ROM
- Breadcrumb
- Rizal Lovins
- [guide] guide to port android rom from other device to optimus device[NEW GUIDE]
- Breadcrumb
- Ron G
- Porting android to device
Android Debug Bridge (ADB) Connect to Device over USB, WiFi
Updated October 7, 2021
What is Android Debug Bridge (ADB)?
Android Debug Bridge (ADB) is a command-line tool that allows you to communicate with a device. It is used to bridge communication between an emulator instance (Android device) and the background running daemon process (server). It helps you perform different actions like installing or debugging a device and run various commands on a device by providing access to a Unix shell.
Using any real device for mobile automation Testing has always been a challenge for testers. But, Android offers a handful of solutions to connect a real device over USB (Universal Serial Bus), i.e., Android Debug Bridge (ADB).
In this tutorial, you will learn-
USB debugging and ADB Configuration-
APPIUM offers an advantage to execute test on real devices. But prior to run the test, we need to setup following pre-requisite.
- USB debugging should be enabled
- ADB configuration
- Desired capability setup as per the hardware changes.
Here we will see both, connecting to emulator as well as with real device for testing. See steps below for connecting to an emulator.
How to Connect to an Emulator
Pre-Requisite- SDK (Software Development Kit) should be installed on the machine. ADB in Android is packaged with Google’s Android SDK (Software Development Kit).
Steps to enable ADB from SDK Manager.
Step 1) Open Android SDK folder
Step 2) Double click on SDK Manager
Step 3) From the list of all packages select Tools and mark the checkbox for
- Android SDK Tools and
- Android SDK Platform-tools.

How to Connect Android Device with ADB (Android Debug Bridge)
Step 1) Enable USB Debugging on your device
Enable USB debugging option from ‘Developer Option’ in Android phone. Now, connect your Android device to the computer using USB cable.

Step 2) Go to the Android SDK folder
Open the local folder where Android SDK files has been saved ‘Android SDK >> Platform-tools’ eg: C:\android-sdk\platform-tools

Step 3) Open the Command window
Inside folder hold Shift + Right click menu >> Select ‘Open command window here’ option.
It will open the folder using command prompt.
Note– you can also open the folder path directly from the Run command in command prompt.

This command window will directly open the folder in command prompt window.

Step 4) Connect an external Android device
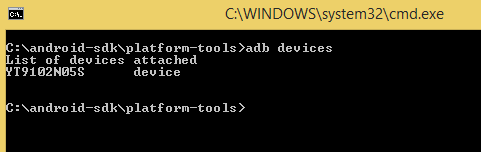
Now, prior to check the device, user have to connect an external Android device (mobile phone). To connect use the device USB cable connector to the system. Then in above command prompt type command-
It will display all list of all the connected devices.
But, prior to this we should check that ADB server. Check whether it is running as background process or not. Just open the command prompt from above mentioned procedure and write ‘adb’ and press enter. It should display all the adb’s process running.
When server starts, it always bind the local TCP port 5037. All ADB clients listen to 5037 TCP port to communicate with server request.
Now, the running ADB server can scan all connected emulator or device instances by scanning the port.
Always remember that ADB daemon runs on odd numbered port between the ranges of 5555 to 5558.
ADB daemon process runs with console connection that acquires even number port for connection.
For example: If single device connected then server automatically scan the device and get connected but if multiple device or emulator running the user need to give ADB connect to device USB command line instruction to connect.
The emulator instance connected on odd numbered port 5557 has the same console running over even numbered 5556 port ie. Each running devices has 1 odd and 1 even connected port.
Command to detect all connected device –
Command detecting a single device from multiple connected devices-
It will detect the adb connection for device -5554 and install the application.
So, this way user can set up a successful connection to access ADB USB connect instances using ADB commands.
How to Configuring ADB for Wi-Fi Support
Just like configuring ADB connect USB, user can also configure ADB over wi-fi.
Pre-requisite
- Both Android device and the host computer should be connected to same wireless network and
- Device Bluetooth option should disabled.
Steps to connect-
- Connect device using USB cable to the host computer. Confirm USB debugging is enabled in device.
- Set target device to connect TCP/IP on port 5555

- Now, disconnect the USB cable from the device.
- In Android device find the IP address from Settings >> wi-fi Setting >> Advanced >> IP Address.Use the same Android Debug Bridge IP address to connect the device via ADB connect device USB connection
Hence, the final configuration done and ‘adb’ successfully configured over wireless network.
NOTE- If any connection error occurred just reset or kill the adb host connection. For that use following command
Источник
[GUIDE/TIPS] How to Port OEM Apps / Vendor Apps to Your Current ROM
Breadcrumb

Rizal Lovins
Recognized Developer / Themer / Contributor

Hello XDA Community
I just want to share TIPS how to port OEM/VENDOR Apps to your current ROM
1. Knowledge in decompile/recompile/sign/zipalign apk file (apps)
— If you don’t know how to do this, visit this thread http://forum.xda-developers.com/showthread.php?t=2195680
2. Knowledge to find library file (*.so file) and framework file (*.jar) whats needed from apps
3. You should understand MANAGING APPLICTAIONS it help on making update into system like porting APPS
— if you don’t know how to do this, visit this post http://forum.xda-developers.com/showpost.php?p=60829642&postcount=2
4. Knowledge to use LogCat
— if you don’t know how to do this, visit this thread http://forum.xda-developers.com/showthread.php?t=2274119
1. First times you need download Full ROM is there already deodexed so you can take some file you need to ported or you make it by yourself
2. If you already understand what i said above, lets start to final section
3. If you already take all file what you need to port, collect all the files, and prepare update.zip updater, add the file to zip with right folder
*.Apk file must be in system>app or priv-app
*.So file must be in system>lib
*.jar file must be in system>framework
*.xml file permissions framework must be in system>etc>permissions
How can I know what’s library is needed? :
1. Knowledge is in need if the library doesn’t exist in apk file, locate the name of the library file (*.so file) that may be related to the application (the file name may be a bit the same with the application) you can search in system>lib or use using a logcat after installing apps, you will see a missing library like :
FATAL error can’t find class blablabla something like that
2. If library file already exist in apk file /folder lib>armeabi (You just need to extract it from apk file and take the file *.so)

(Taking *.so files)
Example for all applications
NOTE For Lollipop : Google has change structure of an applications in system that every applications having lib folder itself, it make more easy to locate lib files
Источник
[guide] guide to port android rom from other device to optimus device[NEW GUIDE]
Breadcrumb

Ron G
Senior Member
guide to port roms for optimus device
this guide tested on optimus me,one and gt540
Requirements for rom porting
android kitchen
2 ROM-one from your device and 2nd from from that device that you want to port.
now you need download android kitchen first. download android kitchen from this link then setup your android kitchen. after set up first copy rom that you want to port. now open android kitchen folder. go to the original_update folder and paste porting rom in this folder. now open android kitchen. setup working folder. rename to port folder.
after do this. extarct rom from your device. rename extarcted folder to base.
ok now our folder process complete. now you need to go base folder and need to copy files from base to port.
so now we start porting.
when you open base folder you will see boot.img(it’s kernel) first copy this boot.img from base folder to port folder. boot.img is main. after boot.img copy. you need to go bin folder. bin folder is under system folder open bin folder in base and copy following files to port bin folder
am
ami304d
bmgr
brcm_patchram_plus
hci_attach
fix_permissions
ime
input
monkey
pm
port-bridge
rild
servicemanager
vold
copy this all files from base bin folder to port bin folder. all files need beacuse for bluetooth,gsm sensor and other working
after bin folder open etc folder in base and port. now copy following files and folderto port bin folder
folders
before copy folder delete following folder from port then copy following folder from base to port.
bluetooth
dhcpd
firmware
permissions
ppp
wifi
wl
copy this folder from base to port affter deleting folder from port
now we need to copy files from base to port. copy following files
apns-conf.xml
dbus.conf
gps.conf
hosts
media-profiles.xml
resolv.conf
vold.fstab
copy this files from base etc to port etc
after etc go to the lib folder. open lib folder in base and port
folder
now you need to copy following folder from base to port. but before copy delete following folder from port then copy.
modules
hw
egl
copy this folder from base to port. after deleting folder in port.
now time for files. copy following files from base to port
libauth.so
libcm.so
some time you need to copy all audio file from base to port. but some time libbluedroid
libbluetooth
libbluetoothd
libcamera
libcameraservice
libdiag.so
libdbus.so
libdss.so
libdsm.so
libdll
libgsl.so
libgstk_exp.so
libmiscta.so
libmmgsdilib.so
libmmipl.so
libmmjpeg.so
liblog
libnv.so
liboem_rapi.so
liboemcamera.so
libhardware_legacy
liboncrpc.so
libpbmlib.so
libqmi.so
libqueue.so
libril.so
libril-qc-1.so
libsensorservice
libwebcore
libwms.so
libwmsts.so
copy this all files from base lib to port lib
after lib. now time to go usr folder. open usr folder in base and port.
delete following folder in port then copy and following folder from base to port
keychars
keylayout
copy this folder from base to port after delete folder in port
now go to the xbin folder.open xbin folder in base and port. then copy following file from base to port
hcitool
hcidump
hciconfig
now we need to do final step. open build.prop file in base and port. and change following lines from base build.prop to port build.prop
ro.product.board=
ro.product.model=
ro.product.brand=
ro.product.name=
ro.product.device=
ro.product.manufacturer=
ro.build.product=
ro.sf.lcd_density=
ro.sf.hw_lcd_density=
change this lines from base to port. now all done. now in android kitchen type 99 to build rom then follow kitchen. after all done you can find your ported rom in output zip folder in kitchen folder then copy ported rom to your phone sdcard reboot into recovery and flash your ported rom.
tip: optimus me users you can port roms from p500 or gt540. p500 roms can be work better then gt540 ported roms. and don’t port nbb(new baseband) roms because nbb roms need .35 kernel to work and p350 don’t have good working .35 kernel. also i’m tyring to work nbb roms in p350 but not 100% done. when i will done to port nbb roms i will post.
this guide only tested on p350,p500 and gt540. and best work with p350
if you have any problem to port roms post on this thread don’t send me pm.
if this guide helped to port roms then don’t forgot to press thnks.
my next project for optimus me p350.
AOSP/OMFBG ROM FROM SOURCE
MIUI ROM PORT
Источник
Porting android to device
 Foreword — This paper describes the how Android 1.0 was first ported to Nokia’s N810 Internet tablet. A fascinating, well-told tale in its own right, it may also help others with similar porting projects to gauge the time and resources that may be required.
The paper was written by Peter McDermott, an American expatriate who lives in Beijing and serves as CEO of NthCode. NthCode is a consulting firm specializing in Linux device development, in markets that include mobile phones, set-top boxes, and “converged” multimedia devices. Enjoy . . . !
Porting Android to a new device
by Peter McDermott
If you’re having trouble estimating the time and complexity of porting Google’s Android mobile platform to your embedded device, our experience porting Android to a Nokia N810 Internet Tablet may provide you with useful information.
Android is a mobile phone software platform created by Google. It is based on the Linux kernel, a number of software libraries written in ‘C,’ a Java-like virtual machine for running application code, and a full suite of mobile phone applications.
Android costs nothing and the source code is freely available. Its license terms (see the Apache license link at the end) are commercial-friendly, saying, in essence, “Do what you like with it, just don’t sue us if something goes wrong.” The one exception to this rule is the Linux kernel, which is licensed under the GNU Public License. Because of this, manufacturers must release their device’s Linux kernel source code after product shipment.
Taiwan’s HTC shipped the first Android phone, the G1, in October 2008. Other mobile manufacturers, including Motorola, LG, and Samsung are all reportedly creating Android-based phones. Additionally, from NthCode’s home base in China, we see many startups and smaller manufacturers leveraging Android in an attempt to gain a foothold in the global smartphone market.
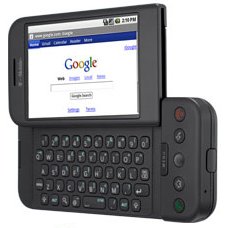
T-Mobile G1, the first Android phone
The Android platform provides all the services one would expect in a mobile phone, including phone calling, networking, messaging, and multimedia. Our analysis of the source code so far is that these services are complete and built on top of an excellent architecture, but do not implement every last feature found in modern mobile phones. This is the 1.0 release, after all.
For application developers, Android builds on top of the popular open-source Eclipse integrated development environment. Developers can use Eclipse to write Java applications, which are then compiled to Java bytecode before being translated for running on Android’s Dalvik Virtual Machine (VM).
Google claims their Dalvik VM runs more efficiently in terms of speed and memory tradeoffs than Java — slyly suggesting that Google wrote their own VM for performance reasons. However, while we haven’t seen supporting data, we suppose Google really created Dalvik to escape from needing to cede control or pay a license fee to Sun, the creator and steward of the Java platform.
By translating from Java to Dalvik bytecode, Google is able to leverage the mature tools and large existing community of Java developers. The downside is that developers will need to take the additional step of running the Google translation tool on their compiled Java code before their application will run on an Android phone (Google automates this step in their Android Eclipse plug-in, however).
Android emulator screenshot
Google also provides an Android emulator. The emulator is a virtualized ARM microprocessor that runs the same system code — and almost exactly the same Linux kernel — that runs on a device. Google provides an Eclipse add-on so that Android programs can be compiled and debugged in Eclipse while running in their emulator. The Android emulator is as complete an emulator as we have ever seen — just make sure your developers have enough RAM in their PCs to be able to run Eclipse and the emulator together.
So what’s in it for Google?
Google has given mobile phone manufacturers everything they want — a free, open, mobile operating system — and, in return, only asked that the devices they create can run Android applications. We can only speculate that Google expects to eventually earn more from consumers using Google services on Android devices than it costs Google to develop and maintain Android.
Overview of the Nokia N810
We work with embedded Linux systems at NthCode, so we thought it would be a fun challenge (and would help with a project we’re working on) if we could port Android to an existing Linux device.
Luckily, we already had two Nokia N810 Internet Tablets in the office. The N810 is a handheld mobile device that comes with a high-resolution 4.1-inch touch screen and a slide-out QWERTY keyboard. The N810 has a 400 MHz Texas Instruments OMAP 2420 CPU, 128MB RAM, and WiFi networking. The one thing the N810 can’t do is make phone calls — this is why Nokia markets it as an Internet Tablet that can surf the web, rather than a phone. At the time of this writing, the N810 costs about USD $425.
An active community of enthusiasts enjoys hacking the N810’s Linux-based software. While some of those enthusiasts had already ported a pre-release version of the Android SDK to the N810, we discovered that no one had yet ported the Android 1.0 release to it. So we decided to see how long it would take us, and what we could learn in the process.
As mentioned earlier, the Android system software runs on top of a Linux kernel. This Linux kernel provides services to applications — such as file access, process scheduling, and inter-process communication.
Google made a number of modifications to the standard Linux kernel for Android. Likewise, Nokia modified the standard Linux kernel to support their hardware, such as the keypad, touch screen, and file system.
We quickly discovered that Nokia’s N810 changes are made against an earlier 2.6.21 Linux kernel. And, unlike earlier Android prereleases, the Android 1.0 modifications are made against a later 2.6.25 Linux kernel. We investigated and discovered that between these two versions, a year had elapsed and the Linux community had made thousands of changes to kernel source code.
So, to make both Nokia’s and Google’s modifications work together on the N810 we either needed to port the N810 changes to work on the newer 2.6.25 Linux kernel, or port the Android changes to the N810’s earlier 2.6.21 Linux kernel.
What did Google change in the kernel?
We checked the differences between the Android kernel and the standard Linux kernel and found that Google had changed 75 files and added an additional 88. We have prepared an annotated list of changed files at the end of this document, and a brief summary here.
- Goldfish — 44 Files — The Android emulator runs a virtual CPU that Google calls Goldfish. Goldfish executes ARM926T instructions and has hooks for input and output — such as reading key presses from or displaying video output in the emulator.
These interfaces are implemented in files specific to the Goldfish emulator and will not be compiled into a kernel that runs on real devices. So we safely ignored these files in our work.
YAFFS2 — 35 Files — Unlike PCs, which store files on disks, mobile phones store files in sold-state flash memory chips. The HTC G1 uses NAND flash, a type of flash memory that is becoming more popular due to its combination of high density and low cost.
YAFFS2 is an acronym for “Yet Another Flash File System, 2nd edition.” It provides a high-performance interface between the Linux kernel and NAND flash devices. YAFFS2 was already freely available for Linux. However, it is not part of the standard 2.6.25 Linux kernel, and so Google added it to Android.
Android also adds a new real-time clock, switch support, and timed GPIO support. We list the impacted files for these new modules at the end of this document.
Port the N810 changes forward or the Android changes backward?
As you can see from the above, Android makes significant changes to the standard Linux kernel. Additionally, Google’s system software checks to make certain the kernel version is 2.6.25 or newer. This led us to wonder if Android requires features in the standard 2.6.25 Linux kernel that are not in earlier releases.
On the other hand, the N810 kernel changes were only to add hardware support. Nokia did not change core operating system services or add new interfaces.
We decided that we would have a higher chance of success by porting the N810 changes forward to the 2.6.25 Linux kernel.
So, without further ado…
Step 1: Port the N810 kernel changes to the 2.6.25 Linux kernel
This work took one developer seven days to complete, and included the following steps:
- Downloaded the latest Linux-OMAP-2.6 kernel from Montavista
- Selected the 2.6.25 version from the kernel download (used ‘git reset –hard v2.6.25-omap1’))
- Patched the 2.6.25 kernel with the following patches from the N810’s 2.6.21 kernel:
- N810 Multi Media Card (MMC) driver
- N810 I2C serial bus controller chip driver
- N810 touch screen driver
- N810 keyboard mapping
- N810 audio and video DSP driver
- N810 DMA driver
- N810 board revision patch
After a number of software build/flash/test/debug cycles, our new kernel was able to boot the N810’s default software and function well.
One issue we did have is that the kernel driver for the CX3110 WiFi chip is provided as a binary-only kernel module, not source code that we could recompile on the new kernel. This meant that we were not able to make our new kernel support WiFi on the N810.
This is an important note for those trying to do similar ports: if you have binary-only drivers, make sure they’ve been compiled against the kernel baseline that you plan to use.
Step 2: Add the Android kernel patches to the 2.6.25 N810 Linux kernel
With our new N810 Linux kernel up and running, we could now apply the Android patches. This was mostly straightforward and took one developer two and a half days of applying patches, flashing the kernel, and verifying the patches worked.
If you are using a kernel baseline different from the one in the Android SDK, you should plan to spend more time and resources to make it work correctly.
Luckily, the Android and N810 patches do not touch any of the same kernel parts. This made merging these two change sets much easier.
Step 3: Bring-up Android on our new kernel
After two weeks of patching and testing, we were finally ready to try to boot the full Android system. Software development would not be any fun if everything worked the first time, so, luckily, there were issues (that is a joke).
Here is the list of what we worked through:
- The N810’s jffs2 file system lacked a feature Android needs in the mmap system call
- So we switched to using the ext2 file system, but it reported data corruption
- So we switched to using the ext3 file system, and the corruption went away
- The system hung while booting, and while we were trying to debug, it would reboot
- We discovered the watchdog timer was rebooting the system, so we disabled it
- After that, the system sometimes successfully booted, but the screen was blank
- We could see graphics after we applied a double-buffered video patch to the N810
- After this, we could sometimes boot to the home screen, but the system often crashed
- We recopied some system libraries to the N810, and the crashes went away
- We enabled the touch screen by changing a power setting in the system software
- We enabled the keypad by fixing a keymap file in the system software
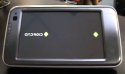
And, finally, afer 19 days, it worked. The Android robot would show while powering up, and then we could see the main menu and use the applications.
Android 1.0 booting on the N810
(Click to play)
Step 4: Play Around
This, of course was the pay off. If you get this far, we recommend that you take a photo and email it to your nerdiest friends and colleagues to show off your accomplishment.
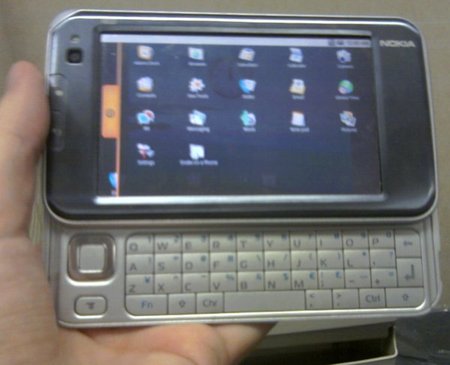
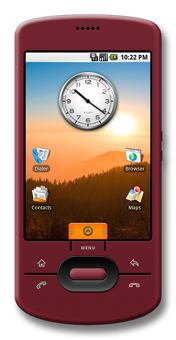
Android 1.0 running on Nokia’s N810 Internet tablet
(Click to enlarge)
We want to be able to create our own Android applications and run them on the N810. To do that, we will need to add support for the Android Debug Bridge, fix an intermittent system crash, and see if we can enable battery charging when the power supply is plugged in. Additionally, our application needs Internet access, so we either need to make the WiFi chip work, or enable USB Ethernet to send network data through the USB cable to a host PC, which can then route the N810’s data to the Internet.
Before we’re done, we will release the changes we made back to the Android and N810 communities so that they can take advantage of the work we have done and have a bit of fun.
Things to consider in your project
If you’re porting Android to a new device, we recommend you consider the following points:
First, this is a just a milestone along the way to any kind of shipping product. We still have work to do before the N810 will be good enough for us to develop custom applications. Likewise, the N810 isn’t a phone, so we didn’t have to spend time debugging the call stack. And then there are the pieces that don’t work — power management, WiFi, etc. — that could all take more time to make work than we spent on this initial port. So the hard work is ahead, not behind.
Second, the N810 is a shipped commercial product that has gone through Nokia’s strenuous quality control processes and is well loved by lots of hackers. We have worked on other projects with flakey hardware and no vendor support (yeah, that was a huge mistake — and it was made even worse by doing it fixed-bid). If you are porting Android to your own hardware, be sure to factor time and resources into dealing with hardware risks. We highly recommend that you make sure there are software people assigned to making the hardware drivers work.
Third, figure out which baseline kernel version you will use at the start. This way, you can verify or add tasks for making sure your hardware has the kernel drivers developed for that version of the Linux kernel. And since an outside vendor often provides binary drivers, make certain that you will have those drivers compiled against your Linux kernel when you need them.
Fourth, use the right tools and processes — preferably the same ones that the Linux and Android developers use. We’ve worked with big companies who import open-source software into closed-source development models. While this makes it easier to get started, these teams later pay a price when they are not able to easily merge new versions of open-source software into their code base. Additionally, if your developers want to use Windows at all, we recommend you push them out of their cocoon and into the Linux world. A highly effective team would be one running Linux on their desktop, git for source control, and vim or emacs to edit ‘C’ code.
Finally, assemble the right team. While we’re new to Android, we’ve been hacking embedded Linux systems for a long time. So check your teams’ experience and plan accordingly.
First, I’d like to thank Tang Yongjun, the NthCode developer who actually ported Android to the N810. I don’t know that I would have been as patient as he was.
He and I would both like to also thank PenguinBait, B-man, and QWERTY-12 (yes, awesome names), who made the original port of the pre-release Android SDK to the N810. We were able to follow many of their steps to make our port of the Android 1.0 release easier.
Finally, this is a living document. If you spotted a mistake, or think others would benefit some piece of piece of information we don’t have here, please email me so I can consider the change.
We have placed our kernel patch, a complied kernel image, a compiled userspace image, and a few notes at the following SourceForge.Net page: Android-N810 Downloads.
This paper was originally published by NthCode, here. It is reproduced with permission.
 About the author — Beijing resident and American expatriate Peter McDermott founded NthCode in 2005 to tap into the talent he saw in his Chinese co-workers while creating some of the world’s first Linux-powered mobile phones. Peter enjoys running NthCode to this day and maintains a personal weblog, Beijing Analog to Digital where he discusses technology, business, and life in Beijing. Click the photo at left for an NthCode staff photo.
Источник


