- Power Management
- Introduction
- Wake Locks
- Driver API
- User-space API
- Types of Wake Locks
- Exploring a Wake Lock Example
- PowerManager class
- Registering Drivers with the PM Driver
- Early Suspend
- Настройки в смартфонах на Android, о которых вам стоит знать
- Настройки в смартфонах на Android, о которых вам стоит знать
- Режим энергосбережения на смартфоне — что это и зачем нужно?
- Ускоряем телефон в пару кликов
Power Management
Introduction
Android supports its own Power Management (on top of the standard Linux Power Management) designed with the premise that the CPU shouldn’t consume power if no applications or services require power. For more information regarding standard Linux power management, please see Linux Power Management Support at http://kernel.org.
Android requires that applications and services request CPU resources with «wake locks» through the Android application framework and native Linux libraries. If there are no active wake locks, Android will shut down the CPU.
The image below illustrates the Android power management architecture.
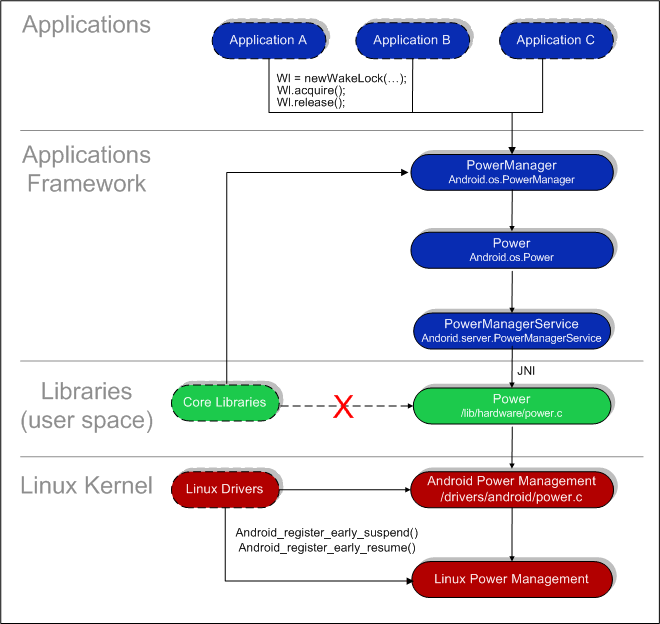
Solid elements represent Android blocks and dashed elements represent partner-specific blocks.
Wake Locks
Wake locks are used by applications and services to request CPU resources.
A locked wakelock, depending on its type, prevents the system from entering suspend or other low-power states. This document describes how to employ wakelocks.
There are two settings for a wakelock:
- WAKE_LOCK_SUSPEND : prevents a full system suspend.
- WAKE_LOCK_IDLE : low-power states, which often cause large interrupt latencies or that disable a set of interrupts, will not be entered from idle until the wakelocks are released.
Unless the type is specified, this document refers to wakelocks of type WAKE_LOCK_SUSPEND .
If the suspend operation has already started when locking a wakelock, the system will abort the suspend operation as long it has not already reached the suspend_late stage. This means that locking a wakelock from an interrupt handler or a freezeable thread always works, but if you lock a wakelock from a suspend_late handler, you must also return an error from that handler to abort suspend. You can use wakelocks to allow the user-space to decide which keys should wake the full system and turn on the screen. Use set_irq_wake or a platform-specific API to ensure that the keypad interrupt wakes up the CPU. Once the keypad driver has resumed, the sequence of events can look like this:
- The Keypad driver receives an interrupt, locks the keypad-scan wakelock, and starts scanning the keypad matrix.
- The keypad-scan code detects a key change and reports it to the input-event driver.
- The input-event driver sees the key change, enqueues an event, and locks the input-event-queue wakelock.
- The keypad-scan code detects that no keys are held and unlocks the keypad-scan wakelock.
- The user-space input-event thread returns from select/poll, locks the process-input-events wakelock, and calls read in the input-event device.
- The input-event driver dequeues the key-event and, since the queue is now empty, unlocks the input-event-queue wakelock.
- The user-space input-event thread returns from read. It determines that the key should not wake up the full system, releases the process-input-events wakelock, and calls select or poll.
The simple sequence diagram below illustrates these steps:
Driver API
A driver can use the wakelock API by adding a wakelock variable to its state and calling wake_lock_init , as illustrated in the snippet below:
When the driver determines that it needs to run (usually in an interrupt handler), it calls wake_lock :
When it no longer needs to run, it calls wake_unlock :
It can also call wake_lock_timeout to release the wakelock after a delay:
This works whether or not the wakelock is already held. It is useful if the driver woke up other parts of the system that do not use wakelocks but still need to run. Avoid this when possible, since it will waste power if the timeout is long or may fail to finish needed work if the timeout is short.
User-space API
Write lockname or lockname timeout to /sys/power/wake_lock lock and, if needed, create a wakelock. The timeout here is specified in nanoseconds. Write lockname to /sys/power/wake_unlock to unlock a user wakelock.
Do not use randomly generated wakelock names as there is no API to free a user-space wakelock.
Types of Wake Locks
| Wake Lock | Description |
|---|---|
| ACQUIRE_CAUSES_WAKEUP | Normally wake locks don’t actually wake the device, they just cause it to remain on once it’s already on. Think of the video player app as the normal behavior. Notifications that pop up and want the device to be on are the exception; use this flag to be like them. |
| FULL_WAKE_LOCK | Wake lock that ensures that the screen and keyboard are on at full brightness. |
| ON_AFTER_RELEASE | When this wake lock is released, poke the user activity timer so the screen stays on for a little longer. |
| PARTIAL_WAKE_LOCK | Wake lock that ensures that the CPU is running. The screen might not be on. |
| SCREEN_BRIGHT_WAKE_LOCK | Wake lock that ensures that the screen is on at full brightness; the keyboard backlight will be allowed to go off. |
| SCREEN_DIM_WAKE_LOCK | Wake lock that ensures that the screen is on, but the keyboard backlight will be allowed to go off, and the screen backlight will be allowed to go dim. |
Exploring a Wake Lock Example
All power management calls follow the same basic format:
- Acquire handle to the PowerManager service.
- Create a wake lock and specify the power management flags for screen, timeout, etc.
- Acquire wake lock.
- Perform operation (play MP3, open HTML page, etc.).
- Release wake lock.
The snippet below illustrates this process.
PowerManager class
The Android Framework exposes power management to services and applications through the PowerManager class.
User space native libraries (any hardware function in //device/lib/hardware/ meant to serve as supporting libraries for Android runtime) should never call into Android Power Management directly (see the image above). Bypassing the power management policy in the Android runtime will destabilize the system.
All calls into Power Management should go through the Android runtime PowerManager APIs.
Registering Drivers with the PM Driver
You can register Kernel-level drivers with the Android Power Manager driver so that they’re notified immediately before power down or after power up. For example, you might set a display driver to completely power down when a request comes in to power down from the user space (see the Android MSM MDDI display driver for a sample implementation).
To register drivers with the Android PM driver, implement call-back handlers and register them with the Android PM, as illustrated in the snippet below:
It is critical in a drive to return immediately and not wait for anything to happen in the call back.
Early Suspend
The early-suspend API allows drivers to get notified when user-space writes to /sys/power/request_state to indicate that the user visible sleep state should change. Suspend handlers are called in order of low to high (4 — 1 below) and resume handlers are called in order of high to low (1 — 4 below).
- EARLY_SUSPEND_LEVEL_BLANK_SCREEN :
- on suspend: the screen should be turned off but the framebuffer must still be accessible.
- on resume: the screen can be turned back on.
- EARLY_SUSPEND_LEVEL_STOP_DRAWING :
- on suspend: this level notifies user-space that it should stop accessing the framebuffer and it waits for it to complete.
- on resume: it notifies user-space that it should resume screen access. Two methods are provided, console switch or a sysfs interface.
- EARLY_SUSPEND_LEVEL_DISABLE_FB : Turn off the framebuffer
- on suspend: turn off the framebuffer
- on resume: turn the framebuffer back on.
- EARLY_SUSPEND_LEVEL_STOP_INPUT :
- on suspend: turn off input devices that are not capable of wakeup or where wakeup is disabled.
- on resume: turn the same devices back on.
Источник
Настройки в смартфонах на Android, о которых вам стоит знать
Настройки в смартфонах на Android, о которых вам стоит знать
Сегодня расскажем про еще одни скрытые настройки в телефоне. Мало кто про них знает, но они постоянно мониторят все процессы, которые происходят в операционной системе Android. Они записывают отчеты и ошибки всех ваших приложений. Они отслеживают показатели графики, процессора и много что еще. Все это происходит в фоновом режиме, поэтому ваш телефон разряжается быстрее.
Переходим к настройкам.
Заходим в меню для разработчиков. Теперь возвращаемся в главные Настройки — Расширенные настройки — Для разработчиков. Находим настройку Уровень журнала. Нажимаем на эту настройку. Появятся дополнительные настройки.
По умолчанию будет стоять галочка напротив Wam. Рекомендую выставить галочку напротив Off. Как раз эта настройка записывает все отчеты и ошибки приложений. Она ведет постоянный мониторинг, а обработанные данные отправляются разработчикам.
Следующая настройка — Трассировка системы. Заходим в нее и отключаем Запись действия на телефоне и Запись действия приложений, доступных для отладки.
А теперь зайдем в Категории. Здесь оставляем галочку только напротив power:Power Management, а все остальные галочки рекомендую убрать. Здесь фиксируются разные показатели самой системы. Это все происходит в фоновом режиме.
Возвращаемся в Режим для разработчиков. Отключаем Не отключать мобильный интернет, так как эта настройка вдвойне разряжает батарею смартфона.
Эти настройки помогут сохранить заряд батареи и предотвратят отправку различных отчетов от приложений.
Источник
Режим энергосбережения на смартфоне — что это и зачем нужно?
Современный смартфон является настоящим коммуникационным центром и помощником, выполняющим множество полезных функций.
Наша жизнь теперь всецело привязана к телефону. Когда мы находимся в движении и видим небольшой остаток заряда батареи, который быстро уменьшается, стараемся поддержать его всеми доступными способами.
Операционная система Android дает пользователю массу возможностей посредством своих сервисов и приложений, а смартфон с достойными характеристиками обеспечивает быструю работу программ и высокую производительность. Расплачиваться за это приходится значительным энергопотреблением. При активном использовании гаджета мало кому хватает полного заряда аккумулятора на весь день — он быстро разряжается . К счастью, существует масса способов, позволяющих не остаться с выключенным смартфоном в самый неподходящий момент.
Любое устройство на Android позволяет включить режим энергосбережения. При переходе в данный режим происходит ограничение работы или отключение основных потребителей энергии в операционной системе.
Дисплей . Именно он расходует большую часть заряда аккумулятора. От степени яркости, таймаута подсветки и разрешения экрана напрямую зависит срок работы батареи.
Фоновые процессы . Установленные приложения незаметно, но регулярно обновляют свой контент для пользователя, а мессенджеры и почтовые клиенты уведомляют нас о новых сообщениях и письмах, используя интернет-трафик и заряд аккумулятора.
Производительность процессора . Этот показатель определяет то, как устройство справляется с многозадачностью, и с какой скоростью работают приложения. Высокая производительность требует значительных энергоресурсов. При переходе в режим энергосбережения и уменьшения скорости процессора при выполнения стандартных задач можно заметить ухудшения работы смартфона.

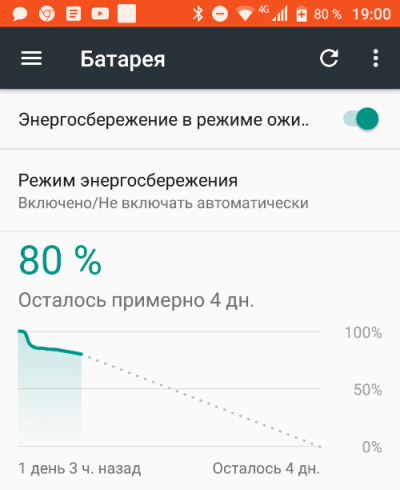
Режим энергосбережения в Android может активироваться как автоматически (при достижении небольшого остатка заряда аккумулятора) и вручную — через настройки устройства. После этого смартфон сообщит, на сколько часов без подзарядки пользователь может рассчитывать. Разумеется, это оценочные данные.
Некоторые производители смартфонов добавляют еще один режим — «экстремальное/максимально энергосбережение». В этом случае пользователю становятся недоступны многие приложения за исключением SMS, телефонных звонков и каких-то основных функций.
Для более экономного использования заряда батареи можно воспользоваться не только стандартными режимами смартфона, но и самостоятельно проанализировать некоторые параметры его работы. Часто в устройстве активированы функции, которые на данный момент не используются, но продолжают потреблять заряд аккумулятора:
- автоповорот экрана, датчик положения которого находится в постоянно работающем режиме;
- живые обои и многочисленные виджеты;
- активная синхронизация аккаунтов и контактов;
- запущенные беспроводные соединения: Bluetooth, Wi-Fi, GPS и мобильный интернет (особенно 4G).
Важно обращать внимание за количеством одновременно работающих приложений. При активной работе со смартфоном запускается много программ, которые остаются открытыми длительное время, быстро уменьшая заряд аккумулятора. Особо прожорливые процессы рекомендуется закрывать вручную.
Источник
Ускоряем телефон в пару кликов
У вас зависает телефон при запуске приложений или сильно нагружается система?
Сегодня я расскажу, как без сторонних приложений ускорить свой смартфон. Для этого нужно включить всего пару настроек, которые находятся в режиме разработчика. Как туда попасть?
1. Заходим в главные «Настройки» — «О телефоне». Здесь несколько раз быстро нажимаете на версию MIUI, пока не появится сообщение, что вы стали разработчиком.
Для других телефонов нужно найти пункт «Номер сборки». Нажимаете несколько раз, пока не появится сообщение, что вы стали разработчиком.
2. Теперь переходим в «Расширенные настройки» на телефоне. Заходим в пункт «Для разработчиков».
3. Нажимаем «Буфер журнала» и видим, что по умолчанию стоит 256 Кб. Необходимо выставить 16 Мб.
4. Теперь ищем блок настроек «Трассировка системы» . Заходим в него и первым делом отключаем «Записывать действия приложений, доступных для отладки» . После этого открываем блок «Категории» . Здесь ищем пункт «power:Power Management» и ставим галочку — Ок.
Эти простые настройки должны ускорить ваш телефон.
А теперь предлагаю зайти в интересный блок настроек «Настройки Game Driver» Что же это за настройка?
Бывает так, что когда нагружаете свой смартфон «тяжелыми» приложениями, то он виснет?
Если у вас такое происходит зайдите в блок «Настройки Game Driver» и выставьте для «тяжелого» приложения «Game Driver» по умолчанию. После этого вы заметите, что все притормаживания и лаги исчезнут.
Этот Game Driver реально работает. Он повышает производительность телефона, когда вы используете «тяжелые» приложения или игры. Просто выберите приложение и установите по умолчанию использовать Game Driver.
Пробуйте и пишите в комментариях о полученном результате.
Источник


