- 8 ways to do asynchronous processing in Android and counting
- AsyncTask
- IntentService
- Loader
- JobScheduler and GcmNetworkManager
- CountDownTimer
- Java Threads or Android HandlerThread
- FutureTask
- Java Timer / ScheduledThreadPoolExecutor
- Do you know more?
- Процессы и потоки в Android: пишем AsyncTask правильно
- Introduction to background processing in Android — Tutorial
- 1. Background processing in Android
- 1.1. Why using concurrency?
- 1.2. Main thread
- 1.3. Threading in Android
- 2. Handler
- 2.1. Purpose of the Handler class
- 2.2. Creating and reusing instances of Handlers
- 2.3. Example
- 3. AsyncTask
- 3.1. Parallel execution of several AsyncTasks
- 3.2. Example: AsyncTask
- 4. Background processing and lifecycle handling
- 4.1. Retaining state during configuration changes
- 4.2. Using the application object to store objects
- 5. Headless Fragments and background processing
8 ways to do asynchronous processing in Android and counting

May 29, 2015 · 7 min read
Android provides several API’s to do asynchronous processing, compound these with what Java provides and you have (probably) dozens of ways to perform asynchronous tasks.
There is a tendency to just use Java threads or Android AsyncTasks for everything since they are well known and can do what you want. However, not all API is equal, choosing the right method for your requirements can make your code stable, cleaner, easier to read and more intuitive.
With that said, let’s jum p into 7 ways of performing asynchronous jobs in Android. The options are sorted first by being part of the Android API or Java, then by how frequently I have encountered or used them.
AsyncTask
Perhaps the best known of the asynchronous API, AsyncTask is easy to implement and returns results on the main thread. There are some issues with AsyncTask, for example, they are not aware of the activity or fragment lifecycle and so it is the programmer’s responsibility to handle the AsyncTasks behaviour when the activity is destroyed. This means that they are not the best option for long running operations and also, if the app is in the background and the app is terminated by Android, your background processing is also terminated.
IntentService
This is the defacto choice for long running processing on Android, a good example would be to upload or download large files. The upload and download may continue even if the user exits the app and you certainly do not want to block the user from being able to use the app while these tasks are going on.
Loader
Loaders are a complex topic, any single implementation of Loaders probably deserved a post all for itself. For now it would be worth pointing out that Loaders were introduced in Android Honeycomb and are part of the compatibility library. They are aware of Fragment and Activity lifecycle and can even cache loaded data.
I would like to bring attention to AsyncTaskLoaders as they solve a lot of problems that are inherent to AsyncTask. Android Design Patterns has an amazing write-up on Loaders and I recommend reading it to get a deeper understand of Loaders.
JobScheduler and GcmNetworkManager
The reason I’m bundling these 2 together is because they effectively are similar. JobScheduler was released in API 21 and as yet there is not official compatibility version from Google (Evan Tatarka has filled the void with JobSchedulerCompat). However, GcmNetworkManager that is bundled as part of Google Play 7.5 is something similar but specifically for network operations.
Using JobScheduler is a little complex, luckily there is a sample of how to use JobScheduler from Google. Effectively, you have to create a Service and create a job using JobInfo.Builder that specifies your criteria for when to run the service; such as being on a unmetered network, or when the app is charging. It is important to remember that there is no guarantee that your code will be executed as soon as these conditions are met or the order of the execution. Below is an extract from Google’s code on how to schedule a job.
I’ll let you see the GcmNetworkManager page for example code on how to use it. The general concept is similar where you have to schedule a Service to run when certain criteria are met. The Scheduled Tasks can be One-off or Periodic.
CountDownTimer
No prizes for guessing what this is used for. This is very easy to use however it is context sensitive, so if you exit your Activity or Fragment, you need to clean this up by cancelling it. To be clear, there really is nothing Asynchronous about CountDownTimer. If you look at it’s source, it simply posts delayed messages on a Handler which means that it will run on whatever thread you launch it from and onTick() and onFinish() will be executed on whatever thread you run the CountDownTimer from so you can do UI updates in it. For this reason, it’s also important to not do any heavy operations onTick() or onFinish(). The reason CountDownTimer is included in the list is because using this class does not block the user from using the app even when the CountDownTimer is initialised from the main thread, effectively giving a asynchronous effect. Also keep in mind, if your update intervals are small and your processing is time consuming, you can have a back-pressure problem which will result in blocking of your execution thread.
Java Threads or Android HandlerThread
Java Threads are rather straight forward to implement. However, they are best to avoid in Android. I have seen them used in all sorts of instances however they are limiting as Android doesn’t really allow UI updates on the background thread. A better option may be to use AsyncTask.
Android HandlerThread, can be used to handle messages of a background thread. While the use for this is rather limited as Message handling tends to do more of a redirection rather than processing, it nonetheless provides us a way to perform some tasks on the background thread. A possible use may be to run a Service in a background thread.
FutureTask
FutureTask performs asynchronous processing, however, if the result is not ready yet or processing has not complete, calling get() will be block the thread.
Surprisingly I’ve used this a few time. Sometimes you want to execute a request in Google Volley in a blocking manner. Below is an example of how to do this. Note, if you do this, make sure you’re not blocking the UI thread.
It will always block you can use future.get(30, TimeUnit.SECONDS); after that time it will throw timeout exception rather than waiting indefinitely
Java Timer / ScheduledThreadPoolExecutor
An example of using Java Timer to do something after 5 seconds. These can be used to schedule some processing on a background thread. There are other ways to handle the same in Android, you could use a Handler with postDelayed or Handler with sendMessageDelayed() and the handler can run on a background thread as shown above. Also, keep in mind that since this API is not aware of the Android lifecycle, any hard reference to an Activity, Fragment or View in here is a possible memory leak.
From Java API: A ThreadPoolExecutor that can additionally schedule commands to run after a given delay, or to execute periodically. This class is preferable to Timer when multiple worker threads are needed, or when the additional flexibility or capabilities of ThreadPoolExecutor (which this class extends) are required. Delayed tasks execute no sooner than they are enabled, but without any real-time guarantees about when, after they are enabled, they will commence. Tasks scheduled for exactly the same execution time are enabled in first-in-first-out (FIFO) order of submission.
The ScheduledThreadPoolExecutor suffers from a lot of the same problems on Android as Timer and Java Threads. If you need to update the UI you’ll need to use a Handler to post messages to the UI thread or pass in a Listener. A ScheduledThreadPoolExecutor is part of Java, it’s not aware of the Activity or Fragment lifecycle and as such any Listeners will have to be cleaned up or replaced manually in order to prevent memory leaks.
Do you know more?
If you know of more useful ways to do asynchronous processing in Android, let me know in the comments. Also, feel free to follow me on LinkedIn, Google+ or Twitter.
Источник
Процессы и потоки в Android: пишем AsyncTask правильно
Продолжаю свои повествования об Android. И в этот раз хочу поделиться ценной информацией о процессах и потоках, которая должна быть хорошо усвоена и всегда оставаться под рукой во избежании ошибок и недопонимания при написании приложений. В конце статьи приведу пример реализации AsyncTask, который загружает в ImageView картинку по нажатию на кнопку.
Прежде всего отмечу, что подробнее о данной теме можно прочесть в данном руководстве — developer.android.com/guide/topics/fundamentals/processes-and-threads.html
На заметку о процессах и потоках в Android
Когда запускается компонент приложения и приложение не имеет других запущенных компонентов, Android создает новый процесс для приложения с одним потоком исполнения. По умолчанию все компоненты одного приложения запускаются в одном процессе, в потоке называемом «главный». Если компонент приложения запускается и уже существует процесс для данного приложения(какой-то компонент из приложения существует), тогда компонент запущен в этом процессе и использует его поток выполнения. Вы можете изменить данное поведение, задав разные процессы для разных компонентов вашего приложения. Кроме того вы можете добавить потоки в любой процесс.
Задать отдельный процесс для компонента можно с помощью файла манифеста. Каждый тег компонента(activity, service, receiver и provider) поддерживает атрибут android:process. Данный атрибут позволяет задать процесс, в котором будет выполняться компонент. Также вы можете задать процесс в котором будут выполняться компоненты разных приложений. Также данный атрибут поддерживается тегом application, что позволяет задать определенный процесс для всех компонентов приложения.
Android пытается поддерживать процесс приложения как можно дольше, но когда потребуются ресурсы старые процессы будут вытеснены по иерархии важности.
Существует 5 уровней иерархии важности: (процессы первого уровня из списка будут удалены последними)
1.Процесс с которым взаимодействует пользователь(Foreground process)
К таким процессам относится например: активити с которым взаимодействует пользовать; сервис(экземпляр Service), с которым взаимодействует пользователь; сервис запущенный методом startForeground(); сервис, который выполняет один из методов своего жизненного цикла; BroadcastReceiver который выполняет метод onReceive().
2.Видимый процесс
Процесс, в котором не выполнены условия из пункта №1, но который влияет на то, что пользователь видит на экране. К примеру, вызван метод onPause() активити.
3.Сервисный процесс
Служба запущенная методом startService()
4.Фоновый процесс
Процесс выполняемый в фоновом режиме, который невиден пользователю.
Отмечу, что в компонентах приложения существует метод onLowMemory(), но полагаться на то, что данный метод будет вызван нельзя, также как нельзя на 100% полагаться на метод onDestroy(), поэтому логику сохранения данных или каких-либо настроек можно осуществить в методе onStop(), который(как уверяют) точно вызывается.
Когда запускается приложение, система создает «главный» поток выполнения для данного приложения, который также называется UI-потоком. Этот поток очень важен, так как именно в нем происходит отрисовка виджетов(кнопочек, списков), обработка событий вашего приложения. Система не создает отдельный поток для каждого экземпляра компонента. Все компоненты, которые запущенны в одном процессе будут созданы в потоке UI. Библиотека пользовательского интерфейса Android не является потоково-безопасной, поэтому необходимо соблюдать два важных правила:
1) Не блокировать поток UI
2) Не обращаться к компонентам пользовательского интерфейса не из UI-потока
Теперь, предположим, что у нас возникла задача — загрузить картину в ImageView из сети и тут же ее отобразить. Как мы поступим? По логике: мы создадим отдельный поток, который и сделает всю нашу работу, примерно так:
Выглядит правдоподобно, так как мы вынесли операцию загрузки картинки в отдельный поток. Проблема в том, что мы нарушили правило №2. Исправить эту проблему можно с помощью следующих методов:
Activity.runOnUiThread(Runnable)
View.post(Runnable)
View.postDelayed(Runnable, long)
К примеру, воспользуемся первым из них:
Теперь реализация потоково-безопасная: сетевая операция выполняется в отдельном потоке, а к ImageView обращаемся из потока UI.
К счастью, данные операции можно объединить с помощью наследования класса Handler и реализации нужной логики, но лучшее решение — наследовать класс AsyncTask.
AsyncTask позволяет выполнить асинхронную работу и делать обновления пользовательского интерфейса.
Для обновления реализуйте метод onPostExecute(), а всю фоновую работу заключите в метод doInBackground(). После того, как вы реализуете свою собственную задачу, необходимо ее запустить методом execute().
Привожу обещанный пример AsyncTask, в котором реализована задача загрузки и отображения картинки(вариант с аннотациями и отклонением от применения стандартного протокола диалогов):
А теперь рассмотрим самый правильный вариант с точки зрения работы с диалогами:
Кода стало побольше, но лучше использовать стандартный протокол работы с диалогами.
Также я убрал все аннотации, чтобы новичкам было проще попробовать данный код.
Не забудьте добавить в свою разметку кнопочки атрибут с указанным значением: android:onClick=«runButtonHandler»
И добавлю: в оффициальном документе(Тыц ) также, как и в моем случае, не используется preExecute(), но если вам понадобится выполнить какие-то действия с вашим пользовательским интерфейсом до начала выполнения задачи, то смело используйте данный метод.
Параметры передаваемые в AsyncTask:
1. Параметры(в нашем случае адрес URL).
2. Прогресс (единицы задающие ход изменения задачи). В нашем случае не используется.
3. Результат выполнения задачи(в нашем случае объект Bitmap)
Код довольно прост: всю фоновую работу мы выполняем в методе doInBackGround(), вызывая метод publishProgress(), чтобы во время загрузки картинки крутился наш ProgressDialog при вызове метода onProgressUpdate(). После выполнения фоновой работы вызывается метод onPostExecute() в который передается результат работы метода doInBackGround(), в нашем случае это объект Bitmap и тут же мы его загружаем в ImageView.
Отмечу пару важных моментов, которые нужно учитывать:
1) Метод doInBackGround() выполняется в фоновом потоке, потому доступа к потоку UI внутри данного метода нет.
2) Методы onPostExecute() и onProgressUpdate() выполняются в потоке UI, потому мы можем смело обращаться к нашим компонентам UI.
Да, я снова применил библиотеку android-annotations, так что не пугайтесь аннотациям.
Хочу отметить важность понимания модели работы процессов в Android, чтобы не допустить ошибок при разработке приложений.
Данная статья это переработка доступной информации + личный опыт при реализации указанной задачи и работе с потоками.
Как всегда пожелания и замечания по поводу материала статьи в личку. Если вам есть что-то добавить или дополнить — смело пишите в комментарии.
UPD Статья обновленна добавлением более правильной версии в плане работы с диалогами.
Источник
Introduction to background processing in Android — Tutorial
This tutorial introduces the concept of asynchronous processing in Android applications.
1. Background processing in Android
1.1. Why using concurrency?
By default, application code runs in the main thread. Every statement is therefore executed in sequence. If you perform a long lasting operation, the application blocks until the corresponding operation has finished.
To provide a good user experience all potentially slow running operations in an Android application should run asynchronously. This can be archived via concurrency constructs of the Java language or of the Android framework. Potentially slow operations are for example network, file and database access and complex calculations.
| Android enforces a worst case reaction time of applications. If an activity does not react within 5 seconds to user input, the Android system displays an Application not responding (ANR) dialog. From this dialog the user can choose to stop the application. |
1.2. Main thread
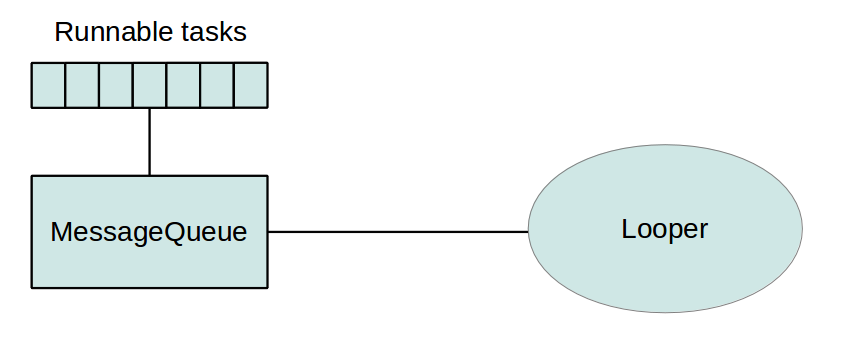
Android modifies the user interface and handles input events from one single thread, called the main thread. Android collects all events in this thread in a queue and processes this queue with an instance of the Looper class.
1.3. Threading in Android
Android supports the usage of the Thread class to perform asynchronous processing. Android also supplies the java.util.concurrent package to perform something in the background. For example, by using the ThreadPools and Executor classes.
If you need to update the user interface from a new Thread , you need to synchronize with the main thread. Because of this restrictions, Android developer typically use Android specific code constructs.
Standard Android provides the android.os.Handler class or the AsyncTasks classes. More sophisticated approaches are based on open source solutions which are using callbacks.
For example, the RxJava open source framework allow to specify an observer of an observable stream of data. Once the events happen the observer is called by the framework. You can configure in which thread the observer and observable run.
2. Handler
2.1. Purpose of the Handler class
A Handler object registers itself with the thread in which it is created. It provides a channel to send data to this thread, for example the main thread. The data which can be posted via the Handler class can be an instance of the Message or the Runnable class. A Handler is particular useful if you have want to post multiple times data to the main thread.
2.2. Creating and reusing instances of Handlers
To implement a handler subclass it and override the handleMessage() method to process messages. You can post messages to it via the sendMessage(Message) or via the sendEmptyMessage() method. Use the post() method to send a Runnable to it.
To avoid object creation, you can also reuse the existing Handler object of your activity.
The View class allows you to post objects of type Runnable via the post() method.
2.3. Example
The following code demonstrates the usage of an handler from a view. Assume your activity uses the following layout.
With the following code the ProgressBar get updated once the users presses the Button .
3. AsyncTask
The AsyncTask class allows to run instructions in the background and to synchronize again with the main thread. It also reporting progress of the running tasks. AsyncTasks should be used for short background operations which need to update the user interface.
To use AsyncTask you must subclass it. The parameters are the following AsyncTask .
An AsyncTask is started via the execute() method. This execute() method calls the doInBackground() and the onPostExecute() method.
TypeOfVarArgParams is passed into the doInBackground() method as input. ProgressValue is used for progress information and ResultValue must be returned from doInBackground() method. This parameter is passed to onPostExecute() as a parameter.
The doInBackground() method contains the coding instruction which should be performed in a background thread. This method runs automatically in a separate Thread .
The onPostExecute() method synchronizes itself again with the user interface thread and allows it to be updated. This method is called by the framework once the doInBackground() method finishes.
3.1. Parallel execution of several AsyncTasks
By default, AsyncTask tasks are executed sequence (for Android versions higher than Android 3.0). To run AsyncTasks in sequence use the executeOnExecutor() method specifying AsyncTask.THREAD_POOL_EXECUTOR as first parameter.
3.2. Example: AsyncTask
The following code demonstrates how to use the AsyncTask to download something from the Internet. The code requires the android.permission.INTERNET permission in your Android manifest.
4. Background processing and lifecycle handling
4.1. Retaining state during configuration changes
One challenge in using threads is to consider the lifecycle of the application. The Android system may kill your activity or trigger a configuration change which will also restart your activity.
You also need to handle open dialogs, as dialogs are always connected to the activity which created them. In case the activity gets restarted and you access an existing dialog you receive a View not attached to window manager exception.
4.2. Using the application object to store objects
You can implement an Application class for your Android application.
To use your application class assign the classname to the android:name attribute of your application.
The application class is automatically created by the Android runtime and is available unless the whole application process is terminated.
This class can be used to access objects which should be cross activities or available for the whole application lifecycle. In the onCreate() method you can create objects and make them available via public fields or getter methods.
The onTerminate() method in the application class is only used for testing. If Android terminates the process in which your application is running all allocated resources are automatically released.
You can access the Application via the getApplication() method in your activity.
5. Headless Fragments and background processing
Fragments which do return null in the onCreateView methods are called headless fragments, as the provide no views. Headless fragments can retain there fields between configuration changes via the setRetainInstance(true) method call.
For example, if you define an AsyncTask as field in a headless fragment, it can continue to run during configuration changs.
Источник


