- Processing for Android
- Developing with Android Studio
- General steps
- Using Bintray packages
- Processing for Android
- Getting started
- Installing the SDK
- Writing a simple sketch
- Running the sketch on your device
- Running the sketch on the emulator
- Get Started With Processing for Android
- 1. Project Setup
- 2. Creating a Canvas
- 3. Displaying the Canvas
- 4. Drawing Simple Shapes
- 5. Handling Touch Events
- 6. Working With Pixels
- Conclusion
Processing for Android
Developing with Android Studio
Use Android Studio for advanced Android development with Processing’s core library.
General steps
Android Studio is the tool recommended by Google for Android development. If you’ve already have experience on how to develop Android applications using Android Studio (separately from Processing), and want to make use of the Processing core library in your Android Studio projects, this tutorial can be useful.
All our core code is bundled inside the processing-core.zip, which is inside the AndroidMode folder. You just need to copy this file as processing-core.jar and add it as a dependency to your project. Step by step procedure for Android Studio is as follows:
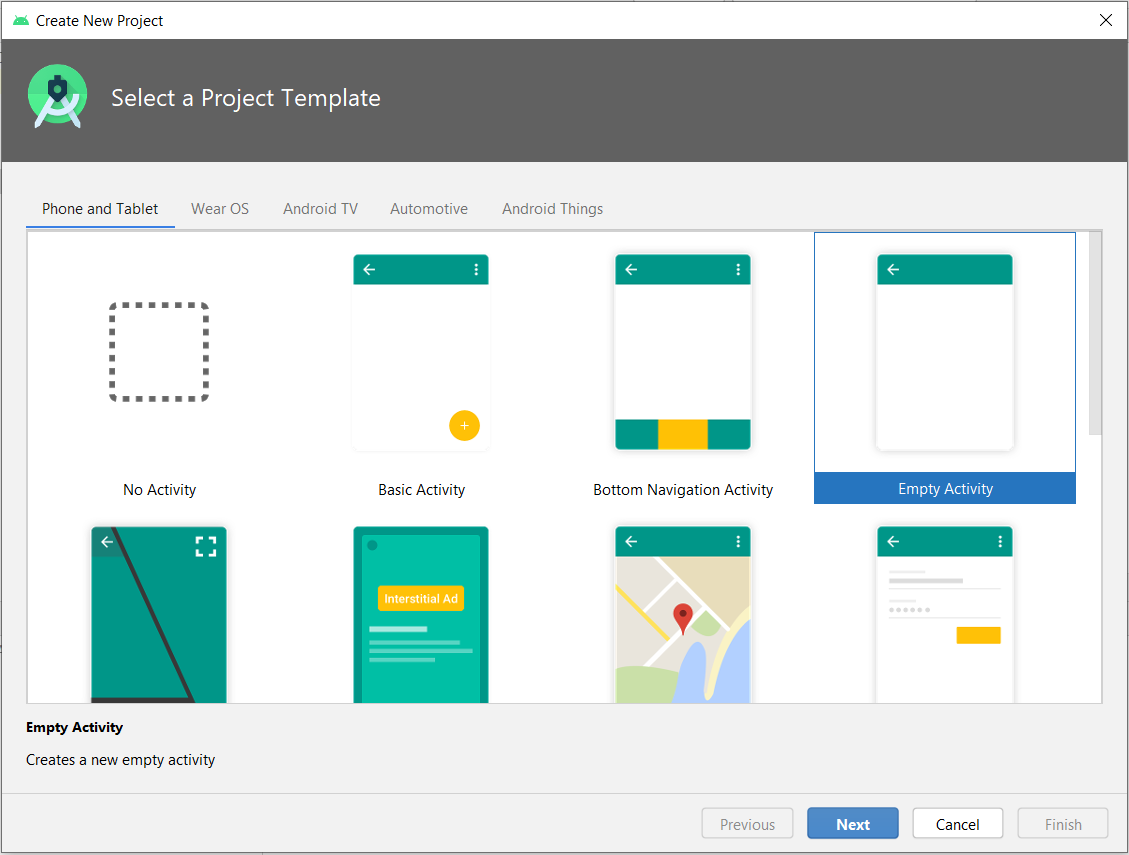
1. Create an Android project if you haven’t already created one. Start with selecting an Empty Activity:
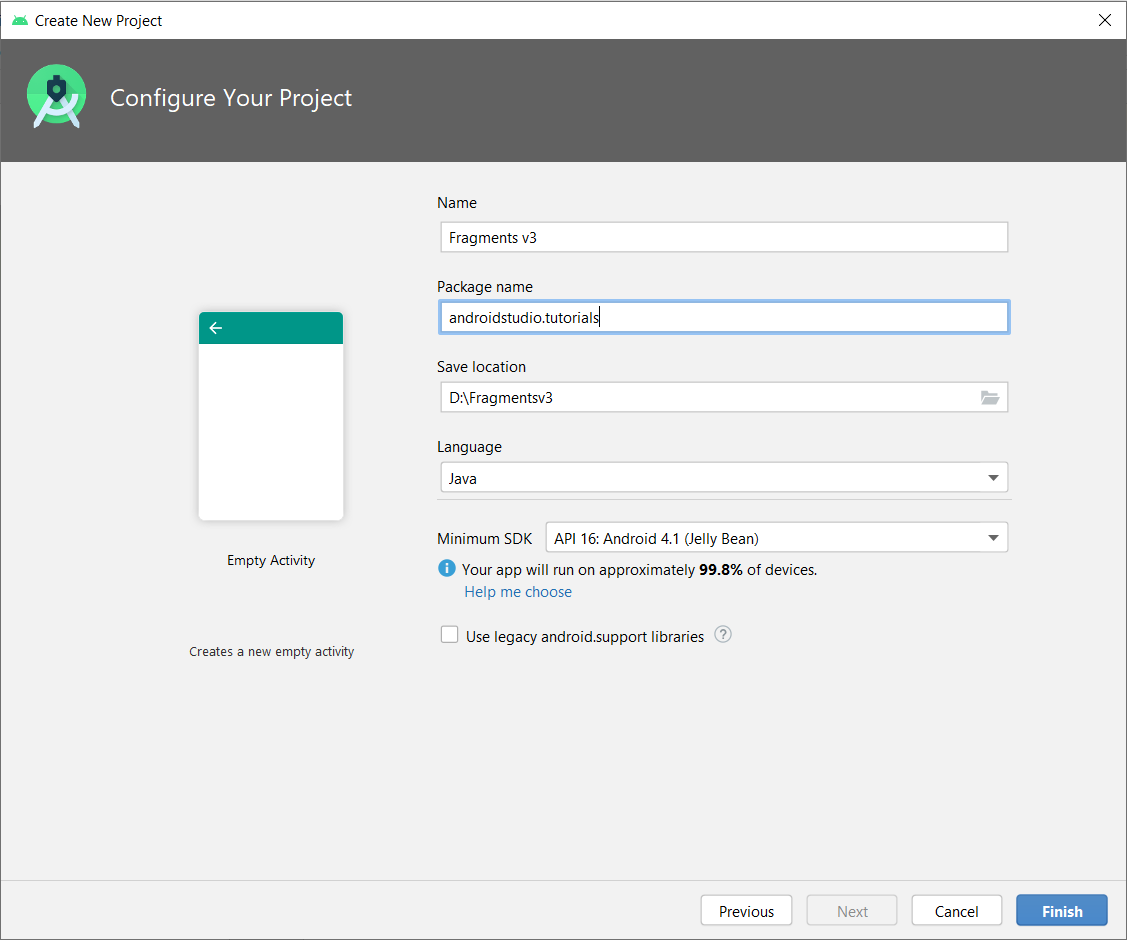
2. Enter project name, package name and minimum SDK version. Keep the ‘Use legacy android.support libraries’ option unchecked as the latest android processing core is migrated to androidx. After that click on ‘Finish’ button:
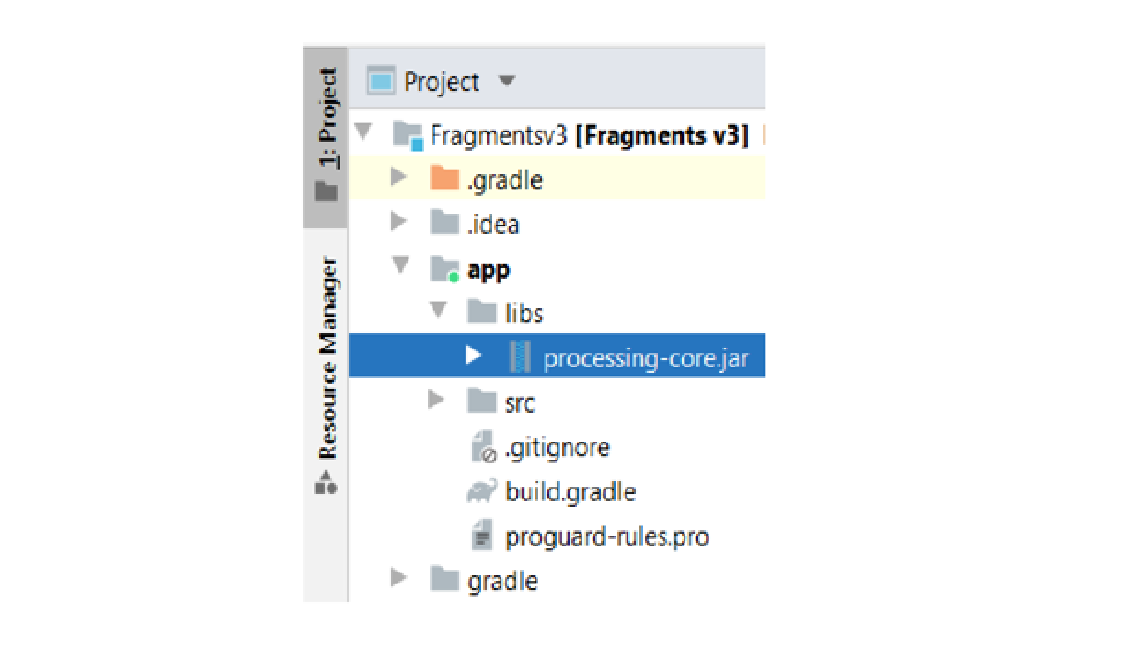
3. Copy processing-core.zip (located in the AndroidMode folder in Processing) to /app/libs, rename it to processing-core.jar:
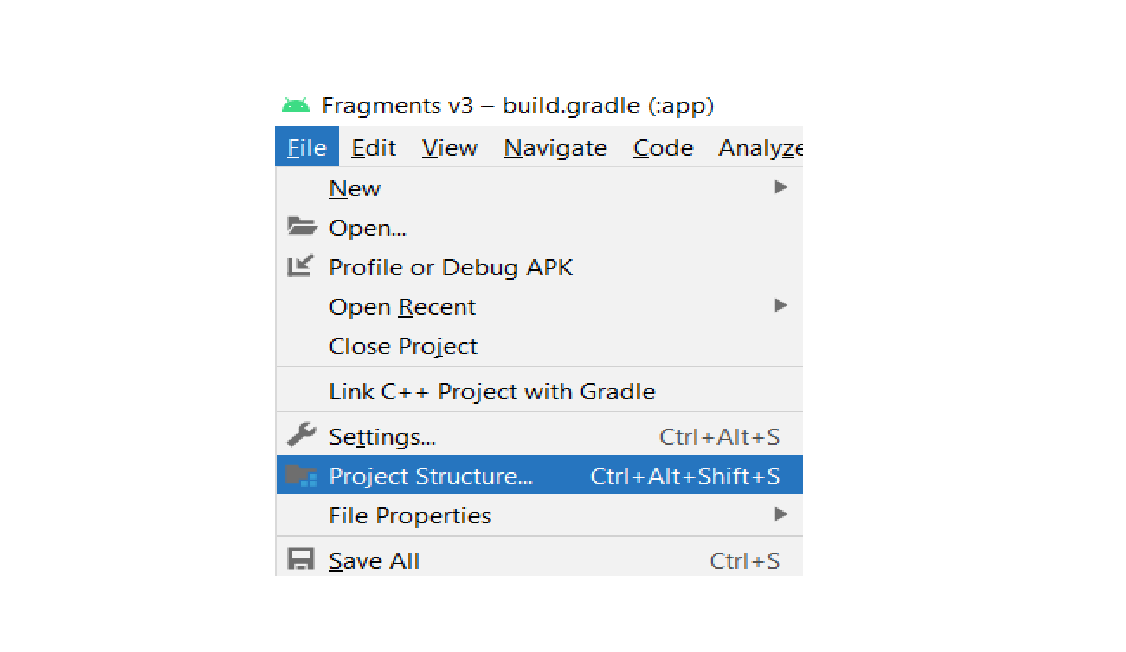
4. To add it as a jar dependency, Click on File -> Project Structure. A dialog box will appear:
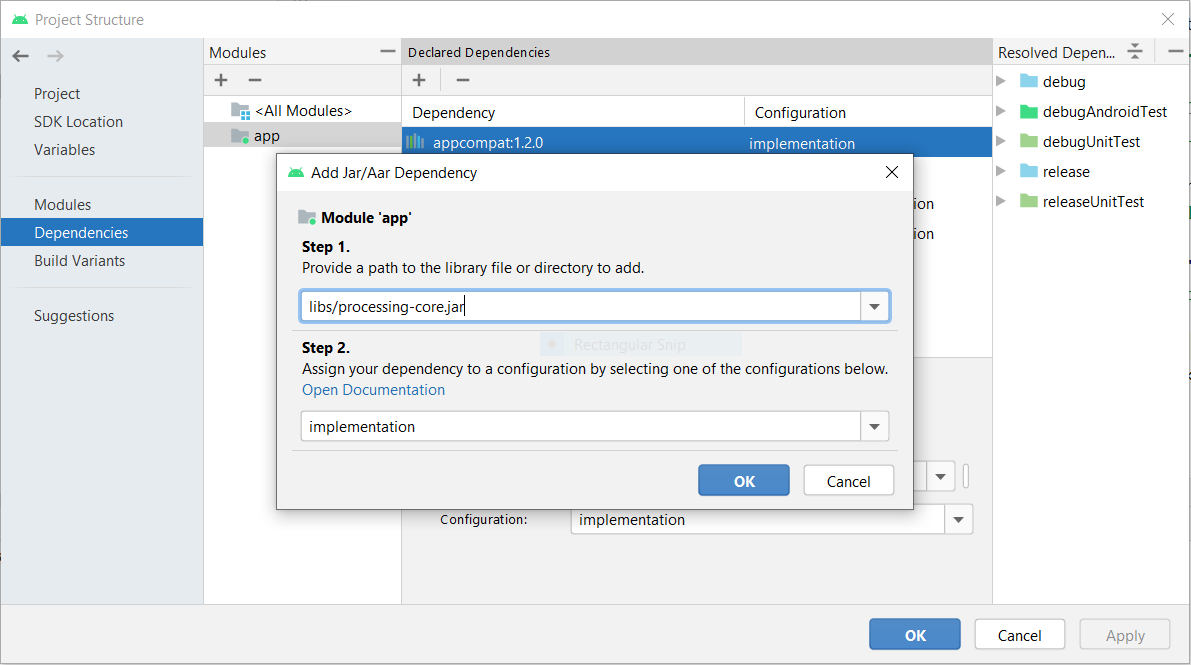
5. Select ‘dependencies’ in the left most panel and then click on ‘app’ in modules panel. Click on plus button under Declared Dependencies and then click on Jar Dependency. Another dialog box will appear:
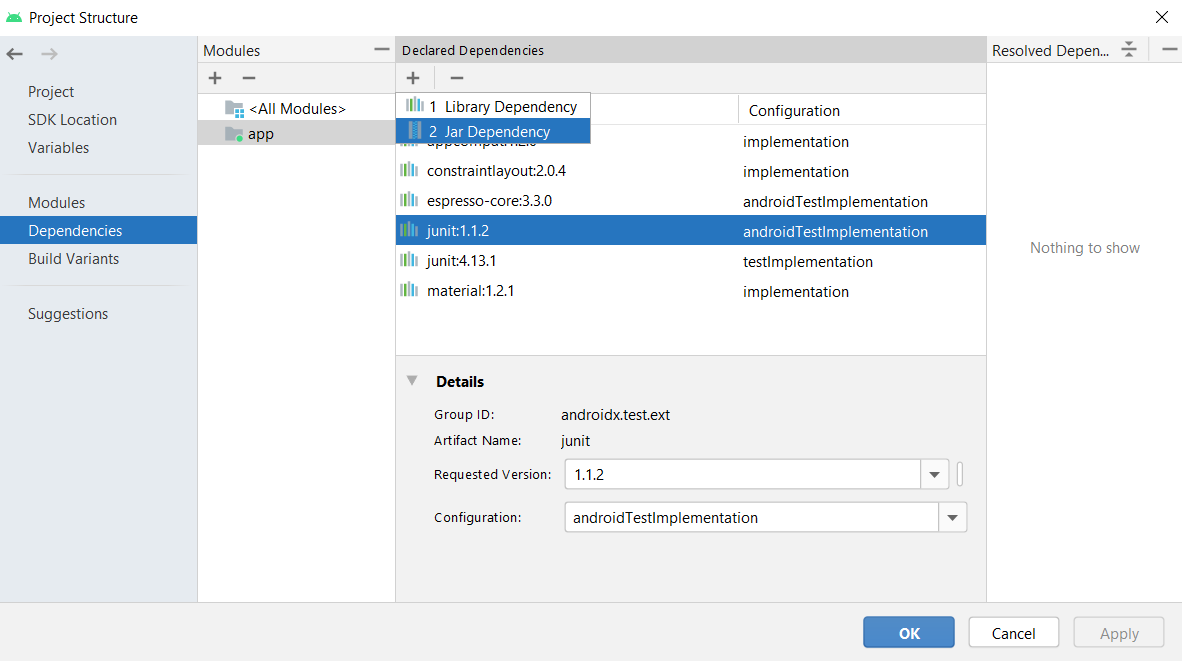
6. In the add jar dialog enter path as ‘libs/processing-core.jar’ and in Step 2, enter scope as ‘implementation’. Click on ‘OK’, ‘Apply’ and then again ‘OK’:
7. Then, write your sketch code by extending PApplet, for example:
8. Initialize the sketch in the main activity:
9. Finally, create a simple layout for the main activity:
The complete Android Studio project is available here.
Using Bintray packages
The processing-core library is also available as a package on Bintray. This package can be easily imported into a Gradle project using the following dependency snippet:
Источник
Processing for Android
Getting started
Welcome to Processing for Android! In this tutorial you will learn how to use the Android Mode in Processing to run your sketches on an Android device or in the emulator.
Installing the SDK
The first time you open the Android mode after installing it through the CM or manually, you will see this window, asking to either locate a pre-installed Android SDK, or download the Android SDK automatically:
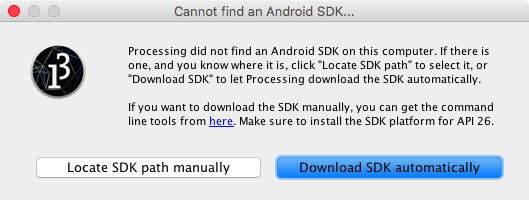
If you still want to use an SDK already downloaded to your computer, choose the «Locate SDK path manually» option and select the folder containing the SDK. However, this SDK should include Android 8.0 (API level 26) or higher. In order to manually download and install the SDK, go to this page, scroll down to the command line tools section and select the one for your Operating System. Doing this could be convenient if you plan to use the same SDK from different development tools (command line, Android Studio, etc.) in addition to Processing. However, keep in mind that the SDK that Processing downloads and installs automatically gets stored inside the mode folder, and does not interfere with any other SDK installed in your computer.
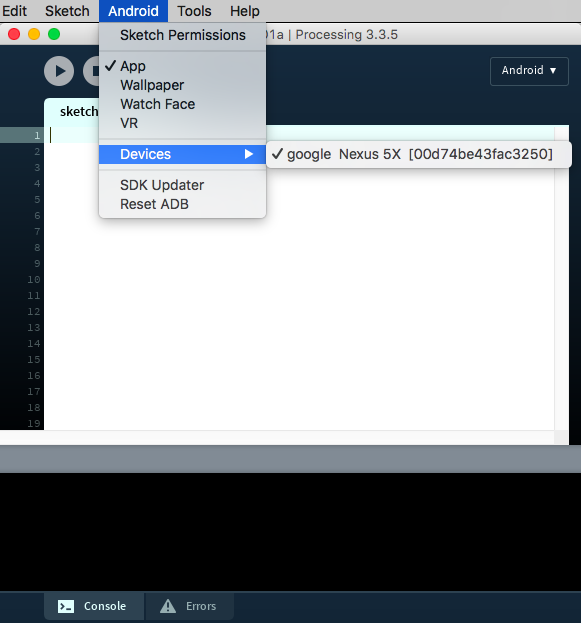
If the SDK was located or installed succesfully, you should see your Android device in the «Select device» list after connecting it to the computer:
Writing a simple sketch
Let’s write a short Processing sketch to run on your Android phone or tablet and make sure everything works as expected. In the following code, we paint the half of the screen receiving a touchpress with the color black. Note that nothing in this sketch is really specific to Android, so you could run it in the Java mode as well. This portability of Processing sketches (as long as they don’t rely on any platform-specific features) is useful for testing, as the Java mode includes an integrated debugger that can help to spot errors in the code more easily.
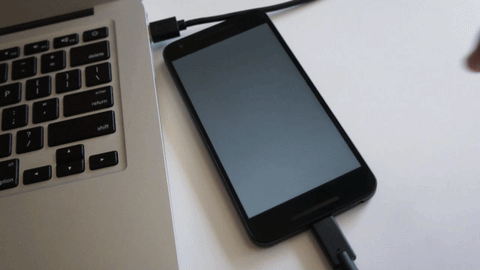
Running the sketch on your device
Before hitting the run button or selecting «Run on Device» under the Sketch menu, make sure to:
- Turn on «USB Debugging» on the device — this process varies by device and which version of the OS you have installed. In most of the cases, this setting is located in the Developer Options, under system Setting. On Android 4.2 and higher the Developer Options are hidden by default, but you can enable them by following these instructions.
- If you are running Windows, you need to follow Google’s documentation to install a special USB driver and take care of additional settings. If you downloaded the Android SDK automatically in Processing, then the latest USB drivers will be inside the mode folder, under the temp subfolder.
If everything goes well, then your sketch should do something like this on your phone:
Running the sketch on the emulator
If you don’t have a device to run your sketch on, you can still use the software emulator. The first time you run a sketch in the emulator, Processing will ask you to download the system image needed by the emulator to work:
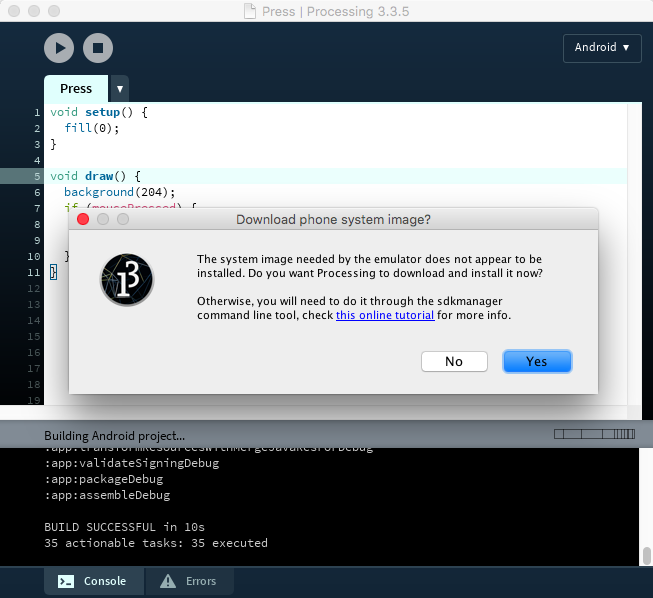
After finishing the download, which can take several minutes depending on your internet connection (the system images are around 1GB in size), Processing will boot up the emulator, and then will launch the sketch in it.
Another important tip is not to close the emulator after testing one sketch, just leave it open so you don’t need to wait for the emulator to boot up again the next time!
Depending on what sketch you are testing, the emulator appear in a separate window, looking more or less like this:
Источник
Get Started With Processing for Android
Processing is one of the most powerful libraries available today for creating visual algorithmic artworks, both 2D and 3D. It is open source, based on Java, and comes with a large variety of functions geared to making drawing and painting with code both fun and easy.
By using Processing’s core library in your Android apps, you can create high-performance graphics and animations without having to deal with Android’s OpenGL or Canvas APIs. Usually, you won’t even have to bother with low-level tasks such as managing threads, creating render loops, or maintaining frame rates.
In this tutorial, I’ll show you how to add Processing to an Android app and introduce you to some of its most useful features.
1. Project Setup
Processing comes with its own integrated development environment, which can be used to create Android apps. However, if you are an Android app developer already, I’m sure you’d prefer to use Android Studio instead. So go ahead and download the latest version of Processing’s Android Mode.
Inside the ZIP file you downloaded, you’ll find a file named processing-core.zip. Extract it and rename it to processing-core.jar using the command line or your operating system’s file explorer.
Lastly, add the JAR file as one of the dependencies of your Android Studio project by placing it inside the app module’s libs folder.
You now have everything you need to start using Processing.
2. Creating a Canvas
Almost all of Processing’s core functionality is available through the PApplet class, which essentially serves as a canvas you can draw on. By extending it, you get easy access to all the methods it has to offer.
To configure the canvas, you must override its settings() method. Inside the method, you can specify two important configuration details: the desired dimensions of the canvas and whether it should use the 2D or the 3D rendering engine. For now, let’s make the canvas as large as the device’s screen and use the default 2D rendering engine. To do so, you can call the fullScreen() shortcut method.
The settings() method is a special method that’s needed only when you are not using Processing’s own IDE. I suggest you don’t add any more code to it.
If you to want to initialize any variables or change any drawing-related parameters—such as the background color of the canvas or the number of frames it should display per second—you should use the setup() method instead. For example, the following code shows you how to use the background() method to change the background color of the canvas to red:
3. Displaying the Canvas
Because the canvas is still not a part of any activity, you won’t be able to see it when you run your app. To display the canvas, you must first create a container for it inside your activity’s layout XML file. A LinearLayout widget or a FrameLayout widget can be the container.
A PApplet instance cannot be directly added to the container you created. You must place it inside a PFragment instance first and then call the setView() method of the PFragment instance to associate it with the container. The following code shows you how to do so:
At this point, if you run the app, you should be able to see a blank canvas covering the entire screen of your device.


4. Drawing Simple Shapes
Now that you are able to see the canvas, let’s start drawing. To draw inside the canvas, you must override the draw() method of the PApplet subclass you created earlier.
It might not seem obvious immediately, but Processing, by default, tries to call the draw() method as often as 60 times every second, as long as the canvas is being displayed. That means that you can easily create both still graphics and animations with it.
Processing has a variety of intuitively named methods that allow you to draw geometric primitives such as points, lines, ellipses, and rectangles. For instance, the rect() method draws a rectangle, and the ellipse() method draws an ellipse. Both the rect() and ellipse() methods expect similar arguments: the X and Y coordinates of the shape, its width, and its height.
The following code shows you how to draw a rectangle and an ellipse:
Many of the methods are overloaded too, allowing you to slightly modify the basic shapes. For example, by passing a fifth parameter to the rect() method, a corner radius, you can draw a rounded rectangle.
If you run your app now, you should see something like this:


If you want to change the border color of the shapes, you can call the stroke() method and pass the desired color as an argument to it. Similarly, if you want to fill the shapes with a specific color, you can call the fill() method. Both the methods should be called before you actually draw the shape.
The following code draws a blue triangle with a green outline:
If you run your app now, you’ll be able to see the blue triangle, but you’ll also notice that every other shape has also turned blue.


If the reason isn’t obvious to you already, remember that the draw() method is called repeatedly. That means that any configuration parameter you change during a draw cycle will have an effect on subsequent draw cycles. So in order to make sure that all your shapes are drawn with the right colors, it is a good idea to always explicitly specify the color of every shape you draw, right before you draw it.
For instance, by adding the following code at the beginning of the draw() method, you can make the other shapes white again.
At this point, the canvas will look like this:


5. Handling Touch Events
With Processing, handling touch events is extremely easy. You don’t need any event handlers whatsoever. All you need to do is check if a boolean variable named mousePressed is true to know when the user is touching the screen. Once you’ve confirmed that the user is touching the screen, you can use the mouseX and mouseY variables to determine the X and Y coordinates of the touch.
For example, the following code draws a new rectangle wherever the user touches the canvas.
If you run your app now and drag your finger across the screen, you should see a lot of yellow rectangles being drawn.


Before we move on, here’s a quick tip: if at any point you wish to clear the canvas, you can simply call the background() method again.
6. Working With Pixels
There’s only so far you can get with simple primitives. If you are interested in creating intricate and complex artwork, you’ll probably need access to the individual pixels of the canvas.
By calling the loadPixels() method, you can load the colors of all the pixels of the canvas into an array named pixels . By modifying the contents of the array, you can very efficiently modify the contents of the canvas. Lastly, once you’ve finished modifying the array, you should remember to call the updatePixels() method to render the new set of pixels.
Note that the pixels array is a one-dimensional, integer array whose size is equal to the product of the width and height of the canvas. Because the canvas is two-dimensional, converting the X and Y coordinates of a pixel into a valid index of the array involves use of the following formula:
The following example code, which sets the color of each pixel of the canvas based on its X and Y coordinates, should help you better understand how to use the pixels array:
The Color.rgb() method you see above converts individual red, green, and blue values to an integer that represents a single color value that the Processing framework understands. Feel free to modify the arguments you pass to it, but do make sure that they are always within the range 0 to 255.
If you choose to run the code without any modifications, you should see a pattern that looks like this:


Conclusion
You now know how to create 2D graphics using the Processing language. With the skills you learned today, you can not only make your Android apps more appealing, but also create full-fledged games from scratch. You are limited only by your creativity!
To learn more about Processing, I suggest you spend some time browsing through the official reference pages.
And while you’re here, check out some of our other posts on Android app development!
Источник


