- Processing for Android
- The Android Mode
- Stable releases
- The 4.1 release: integrated debugger and Augmented Reality
- The 4.0 release: wallpapers, watch faces, and Realidad Virtual
- Processing for Android
- Distributing apps
- Setting custom icons
- Setting version and package name
- Creating the signed app package
- Processing for Android
- Getting Started
- Using Sensors
- Distributing Apps
- Using Android Studio
- Live wallpapers
- Watch Faces
- Location and permissions
- Introduction to VR
- Advanced VR
- AR in Processing
- …code, cg, electronics, 3d printing…
- Android Adventures, part 6: Building a signed .apk from Processing
- Part 1: Export the sketch
- Part 2: Signing the sketch
- Processing android create apk
Processing for Android
The Android Mode
The main component of Processing for Android is the Android mode, a programming mode for the Processing Development Environment (PDE) that adds all the options needed to run Processing sketches on Android devices and also in the emulator.
You could also use only the Android core library to develop Android apps with the IDE of your choice, see this tutorial for more details.
Stable releases
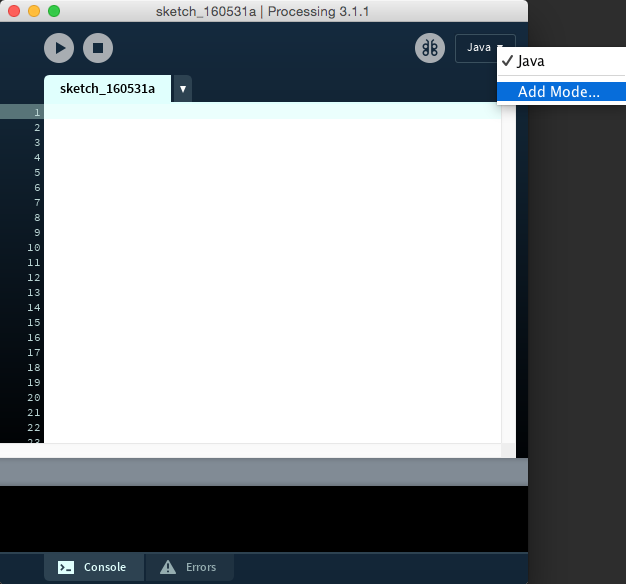
The latest stable release of the Android mode can be installed through the Contribution Manager (CM) in the PDE. To open the CM, click the arrow in the mode selector in the menu bar, and choose «Add Mode. «:
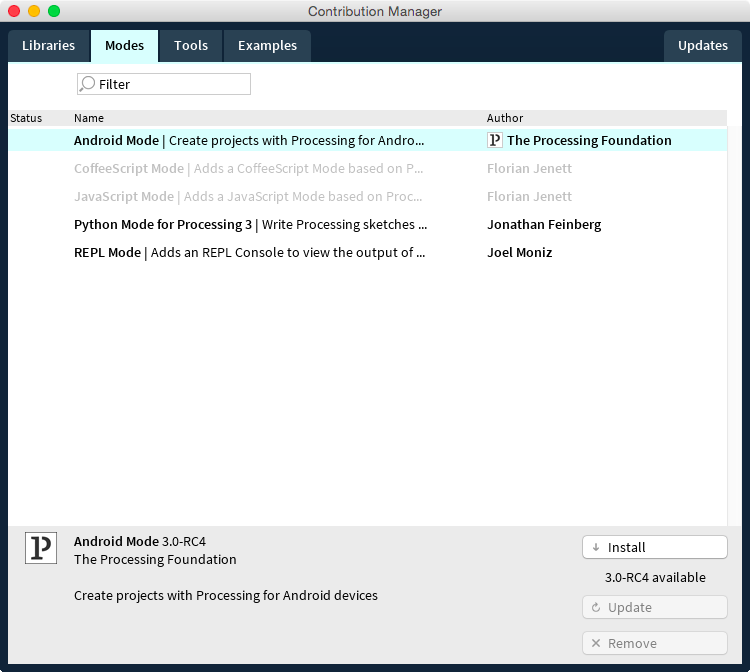
Once the CM window shows up, select the Android Mode from the list, and then click the install button in the bottom of the window:
After installing the mode, you will be able to switch into it using the mode selector in the menu bar. Follow the Getting Started tutorial for the first steps with the Android mode.
The 4.1 release: integrated debugger and Augmented Reality
Version 4.1 introduces two significant additions to Processing for Android: an integrated debugger, just like the one available in the Java mode, and a new AR library based on ARCore.
The 4.0 release: wallpapers, watch faces, and Realidad Virtual
Version 4.0 brings several improvements to the Android mode, incuding new functionality for creating live wallpapers, watch faces, and VR apps. You will find more on how to use this functionality in the tutorials and the reference pages of this site.
Источник
Processing for Android
Distributing apps
In this tutorial we will cover the steps to publish your Processing sketch as an app in the Google Play store.
Before packaging the app for release, it is required that you set the icons for your app, wallpaper, or watch face, because Processing will not use the default generic icons for the release package of your app. It is very important that you also choose a package name that will uniquely identify your app in the store.
Setting custom icons
Android mode uses a set of default launcher icons for the app. You should use your own icons for release by creating the files icon-36, 48, 72, 96, 144, and 192 in .PNG format, and placing them in the sketch’s folder before exporting the signed package. Follow the icon design guidelines from Google in order to create your icons.
If you are creating a watch face, you also need to provide the files preview_circular.png and preview_rectangular.png, which will be used to show a preview of the watch face in the Android Wear companion app that runs on the phone, or in the watch face selector on the watch. The resolutions of these icons are 320×320 for the circular preview, and 280×280 for the rectangular preview.
Setting version and package name
Note that the package name of you app is unique, since there cannot be two apps on the Google Play store with the same package name.
Creating the signed app package
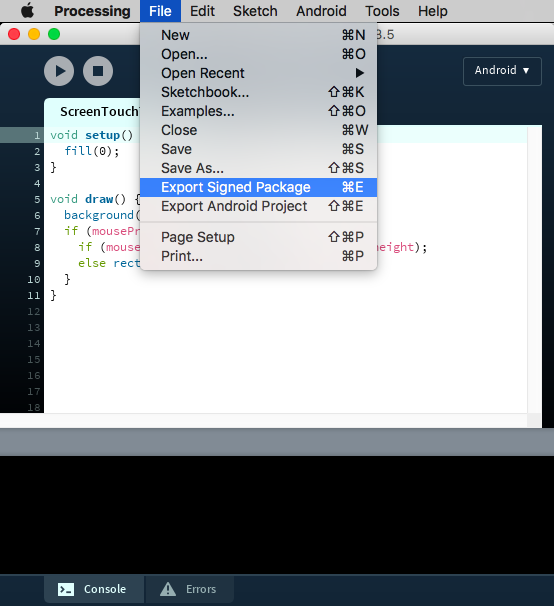
The Android Mode simplifies the publishing of your sketch by signing and aligning the app, so you can upload it to the Google Play Developer Console without any extra additional steps. All you need to do is to select the «Export Signed Package» option under the File menu:
After selecting this option, Processing will ask you to create a new keystore to store the release key to sign the app package:
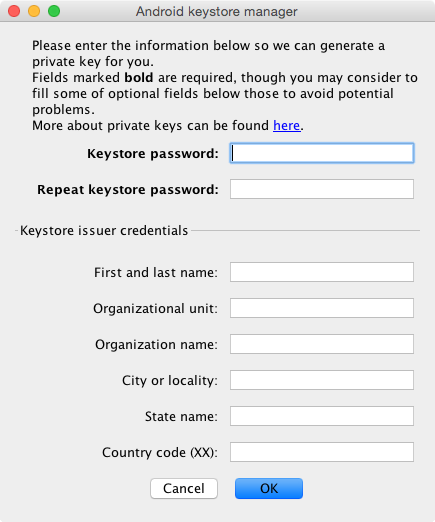
Remember this password, as you will have to use it every time you export a new signed package. Even though you can reset it and create a new key, as long as an app is identified with the same package name, it has to have the same release key.
Источник
Processing for Android
Getting Started
By the Processing Team
Welcome to Processing for Android! In this tutorial you will learn how to use the Android Mode in Processing to run your sketches on an Android device or in the emulator.
Using Sensors
By the Processing Team
This tutorial gives you the basics of reading sensor data from Processing.
Distributing Apps
By the Processing Team
In this tutorial we will cover the steps to publish your Processing sketch as an app in the Google Play store.
Using Android Studio
By the Processing Team
Use Android Studio for advanced Android development with Processing’s core library.
Live wallpapers
By Andres Colubri
Use the Android Mode to develop interactive live wallpapers.
Watch Faces
By Andres Colubri
Use the Android Mode to develop interactive watch faces.
Location and permissions
By Andres Colubri
Learn to access location using GPS, and properly set the sketch permissions in Android 6+ devices.
Introduction to VR
By Andres Colubri
Get started with Google VR to write immersive apps using Processing.
Advanced VR
By Andres Colubri
Designing experiences in Virtual Reality through interaction and movement.
AR in Processing
By Andres Colubri
How to create Augmented Reality apps using Processing for Android.
Источник
…code, cg, electronics, 3d printing…
Android Adventures, part 6: Building a signed .apk from Processing
Processing makes it really easy to “Present” a sketch to your Android phone via it’s “Present” button. This creates a special ‘debug’ apk that can run on your specific device, but isn’t distributable (and I can’t even find it on the phone) to others. There is no easy way (yet) to get these sketches to other users via the apk format. But thanks to the great user community (and one specific post in question) I was able to get a signed apk built and installed on my phone. Follow-up post will expose this apk to the world 😉
First Export the sketch. Then Sign the Sketch. Sounds easy. The first part is… 😉 Below is the process I took to get my “floater08″ sketch “apk’ed”, so it’s what I’ll use as an example:
Part 1: Export the sketch
- From the Processing PDE, open the sketch (go into ‘Android -> Android Mode’), and press the “Export” button (arrow facing to right). This will export the android data and put it in an \export folder under the sketch:
- C:\sketchbook\floater08\android
That’s the easy part.
Part 2: Signing the sketch
The Android-Processing wiki (under the ‘Distributing Apps’ section) links to these Android Docs for signing an APK. But I followed the steps on this incredibly helpful post (the ones by user ‘ckamath‘ specifically) to get me going. Below is an overview of my process working with this information.
Install Tools:
Like the post says, make sure you can run these commands from a shell: keytool, jarsigner, zipalign, ant. I didn’t have ant, so I installed it from here, following these steps (specifically everything it says to do under “The Short Story” & “Setup”). jarsigner and keytool are provided via the JDK which I’d already installed.
Like the post says, I also (apparently) needed cygwin which provides OpenSSL. After downloading and running the setup.exe cygwin installer, I figured out I needed to filter the install list for ‘openssl’, and then I needed to select each entry for install. It was all a bit clunky and cryptic, and the installer seemed to crash a couple times. But it did install (with a bunch of other stuff too apparently).
Run Code:
These are my steps, which more or less follow ckamath’s tutorial in the above post:
- Open a shell.
- Browse to the \android folder where your export data is. In my case that was:
- C:\sketchbook\floater08\android
- In the below examples, this is the presumed path from the shell that the code is being entered from.
- A: Make your secret key!
- Create the ‘secret key’ that is required for signing your application:
- Here is a template of what to type:
- \android>keytool -genkey -v -keystore -release-key.keystore -alias -keyalg RSA -keysize 2048 -validity 10000
- This is what I typed:
- \android>keytool -genkey -v -keystore floater08-release-key.keystore -alias AKEric -keyalg RSA -keysize 2048 -validity 10000
- Here is a template of what to type:
- It will then ask you several question like “What is your first and last name?”, What is the name of your City or Locality?”, etc.
- When its done (successfully) it will finish by printing:
- [Storing floater08-release-key.keystore]
- And will store the corresponding file: \android\floater08-release-key.keystore
- B: Create ‘unsigned .apk’
- Execute ant to build the unsiged apk:
- \android>ant release
- This should spit out a bunch of stuff in the shell. When complete you should see something like:
- BUILD SUCCESSFUL
Total time: 18 seconds
- BUILD SUCCESSFUL
- If you didn’t have one before, you should now have a \bin folder with the unsigned apk in it:
- C:\sketchbook\floater08\android\bin\floater08-unsigned.apk
- C: Sign the unsigned .apk with the secret key:
- Here is a template of what to type:
- \android>jarsigner -verbose -keystore -release-key.keystore \android\bin\ -unsigned.apk
- This is what I typed:
- \android>jarsigner -verbose -keystore floater08-release-key.keystore C:\sketchbook\floater08\android\bin\floater08-unsigned.apk akeric
- The shell should have several lines of “adding” and “signing”.
- D: Verify that jarsigner did its thing:
- Here is a template of what to type:
- \android>jarsigner -verify \android\bin\ -unsigned.apk
- This is what I typed:
- \android>jarsigner -verify C:\sketchbook\floater08\android\bin\floater08-unsigned.apk
- If this works you should see in the shell:
- jar verified.
- E: Make signed (and distributable) apk file:
- Here is a template of what to type:
- \android>zipalign -v 4 \android\bin\ -unsigned.apk .apk
- This is what I typed:
- \android>zipalign -v 4 C:\sketchbook\floater08\android\bin\floater08-unsigned.apk floater08.apk
- The shell will start by saying:
- Verifying alignment of floater08.apk (4)…
- Print a bunch more stuff, and finally:
- Verification successful
- You’ll now find a .apk file in your \android directory:
- \android\floater08.apk
That apk is now directly consumable by an Android device. As a test I put it on my ftp, browsed to it from my phone, and it installed immediately.
The next step would be to get it on the Android market, but I’ll work in that in another post. Happy Holidays!
Источник
Processing android create apk
The process of exporting from .pde to .apk may look like a herculean task especially for beginners such as me. I spent a good amount of time researching this stuff and finally nailed it down. So here goes,
If you have the app you built in processing running on your phone the you probably have all the environment variables set in the PATH. Oh I am using windows 7 and processing 0190 build. To begin with make sure you have keytool, jarsigner, ant etc. commands working from your command prompt. If not then install them, just google for those packages.
You will require OpenSSL as well required to generate your secret key for the application. Installing this is slightly tricky but the easiest way is to install Cygwin and during the installation you can choose to install OpenSSL. After this you will mostly be set to create your .apk.
Step 1: Hit the Export button on Processing’s IDE
Step 2: Goto the /android folder and you will see bin, lib, res etc. (i could not find an apk file kind of freaked out the first time but not to worry all the files needed for creating the .apk are in here)
Step 3: Open command prompt and get to your /android folder
Step 4: Type the following command to generate your secret key that will be required for signing your application:
It will then ask you the following questions:
Enter keystore password:
Re-enter new password:
What is your first and last name?
What is the name of your organizational unit?
What is the name of your organization?
What is the name of your City or Locality?
What is the name of your State or Province?
What is the two-letter country code for this unit?
Is CN=name , OU=name, O=name, L=blah, ST=PA, C=US correct?
Generating 2,048 bit RSA key pair and self-signed certificate (SHA1withRSA) with a validity of 10,000 days
for: CN=name, OU=name, O=name, L=blah, ST=PA, C=US
Enter key password for
(RETURN if same as keystore password):
Re-enter new password:
Step 5: Now we create the .apk file which is unsigned. So type in the following:
Total time: 12 seconds
Step 6: You can now see in your bin folder the .apk file named as -unsigned.apk (Yay!)
Step 7: Now you will need to sign this with your secret key in order to release it on the android market. So here goes, (you can choose to copy the keystore file into your bin folder and execute the following command (too lazy to type too many characters) or keep it where it is.
Then you will get a bunch of statements such as
Enter Passphrase for keystore:
Step 7: We are almost done! So we need to verify the previous step i.e. we need to make sure that jarsigner has signed the app correctly.
So execute the following:
You should get JAR VERIFIED else something maybe wrong.
Step 8: Now to create your signed and distributable .apk file
Verifying alignment of .apk (4).
50 META-INF/MANIFEST.MF (OK — compressed)
973 META-INF/ALIAS.SF (OK — compressed)
1958 META-INF/ALIAS.RSA (OK — compressed)
3094 assets/ComicSansMS-25.vlw (OK — compressed)
23456 assets/CurlzMT-150.vlw (OK — compressed)
205025 assets/SegoePrint-60.vlw (OK — compressed)
7002884 res/drawable/icon.png (OK)
7005452 res/layout/main.xml (OK — compressed)
7005745 AndroidManifest.xml (OK — compressed)
7006548 resources.arsc (OK)
7007504 res/drawable-hdpi/icon.png (OK)
7011152 classes.dex (OK — compressed)
Hurray we are all set. Now you can happily distribute you android app built using processing to your friends! You may not able to run it on Samsung Captivate unrooted phone as it does not permit non-market app installation (ofcourse they can install it once you release it to market) Hate that X-|
I hope this helps as I have learned a lot in the last few weeks and soon I should be releasing a game in the market 🙂 so wait for it.
Источник


