- Processing for Android
- Developing with Android Studio
- General steps
- Using Bintray packages
- Processing for Android
- Distributing apps
- Setting custom icons
- Setting version and package name
- Creating the signed app package
- Parsing XML data in Android Apps
- Creating a simple User Interface
- Defining XML data to parse
- Creating a Player POJO
- Preparing the XML Parser
- Parsing the XML data
- Displaying the XML data
- Our App in Action
- XML Processing in Android and Java: XmlPull Example
- 1 What is XmlPull
- 2 Install
- 3 Example codes
- 3.1 Sample XML
- 3.2 JavaBean
- 3.3 Parsing XML using XmlPull
- Processing and Parsing XML in Android
- Before Proceeding
- Let’s create a project to better understand the situation
- What is the cause behind this?
Processing for Android
Developing with Android Studio
Use Android Studio for advanced Android development with Processing’s core library.
General steps
Android Studio is the tool recommended by Google for Android development. If you’ve already have experience on how to develop Android applications using Android Studio (separately from Processing), and want to make use of the Processing core library in your Android Studio projects, this tutorial can be useful.
All our core code is bundled inside the processing-core.zip, which is inside the AndroidMode folder. You just need to copy this file as processing-core.jar and add it as a dependency to your project. Step by step procedure for Android Studio is as follows:
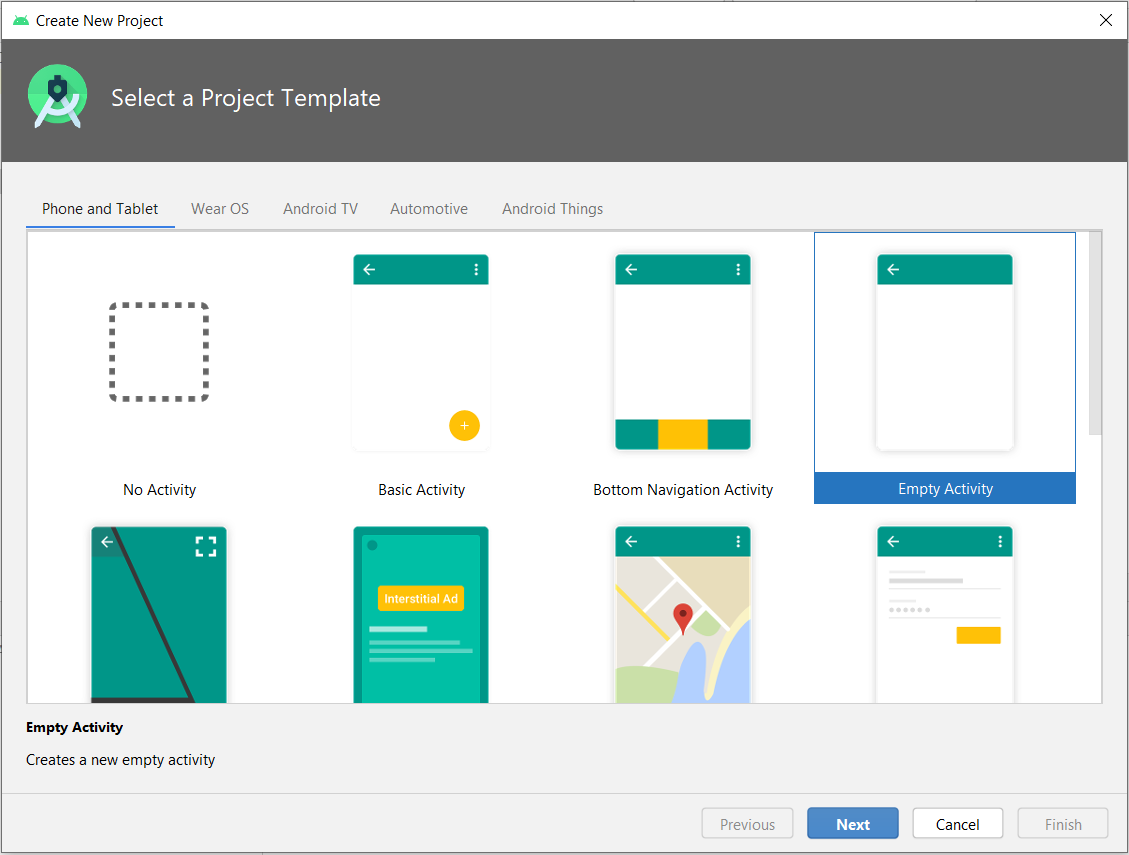
1. Create an Android project if you haven’t already created one. Start with selecting an Empty Activity:
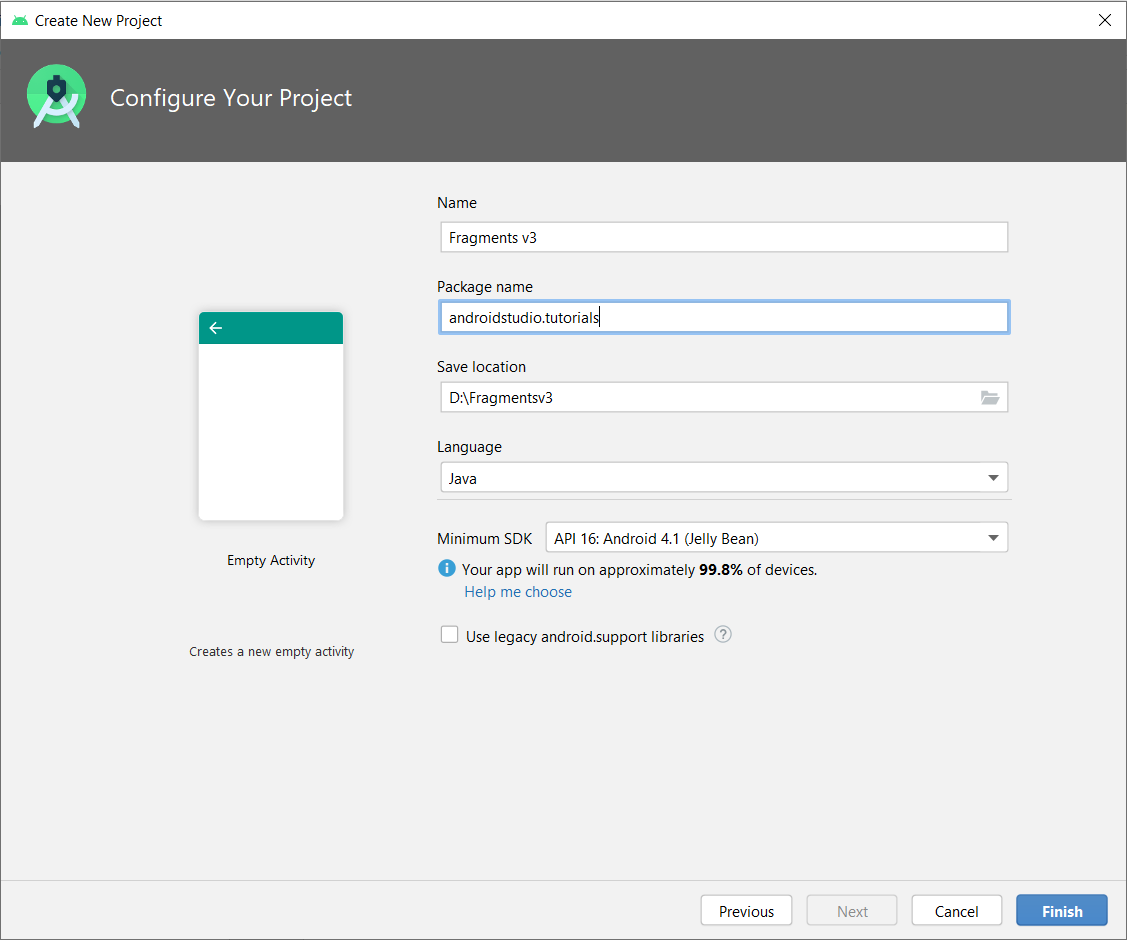
2. Enter project name, package name and minimum SDK version. Keep the ‘Use legacy android.support libraries’ option unchecked as the latest android processing core is migrated to androidx. After that click on ‘Finish’ button:
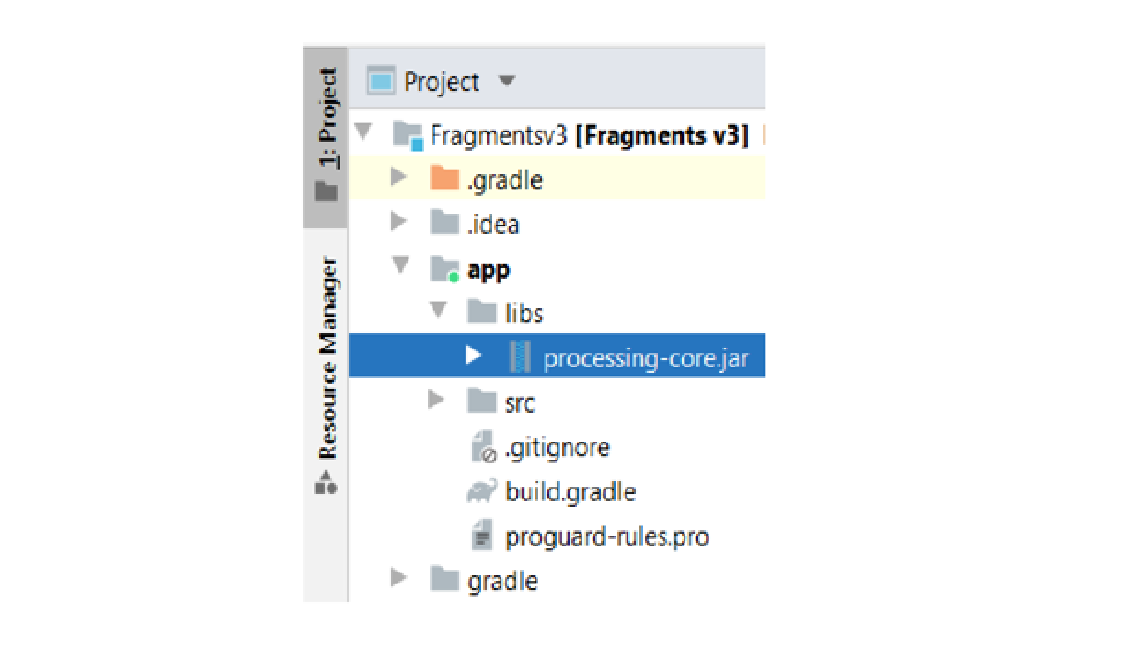
3. Copy processing-core.zip (located in the AndroidMode folder in Processing) to /app/libs, rename it to processing-core.jar:
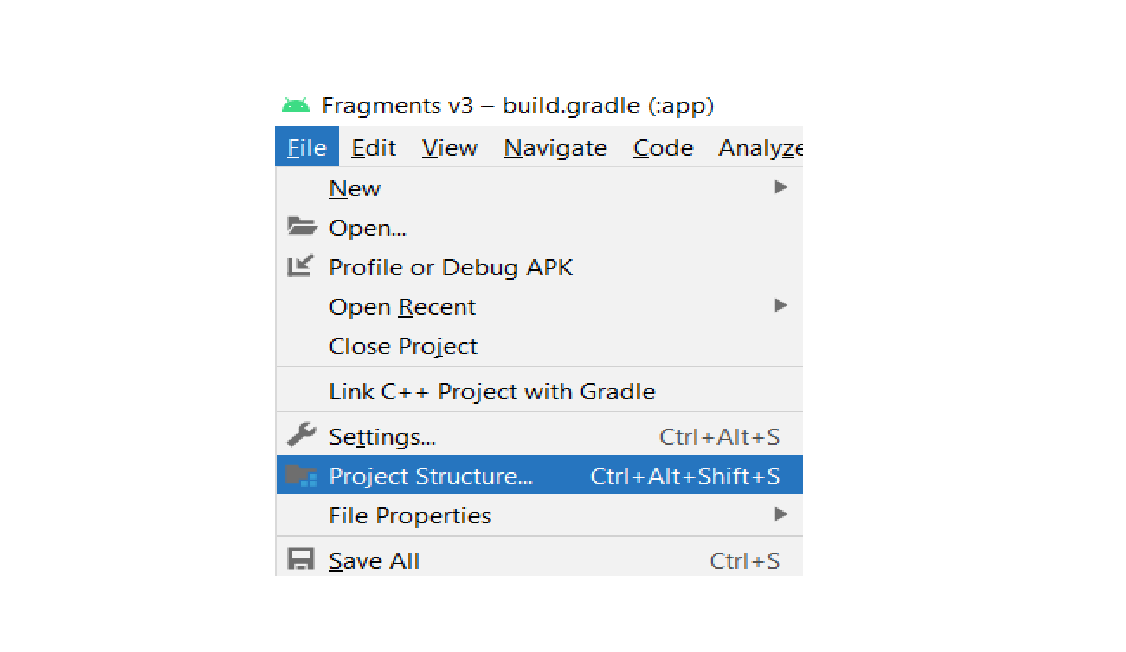
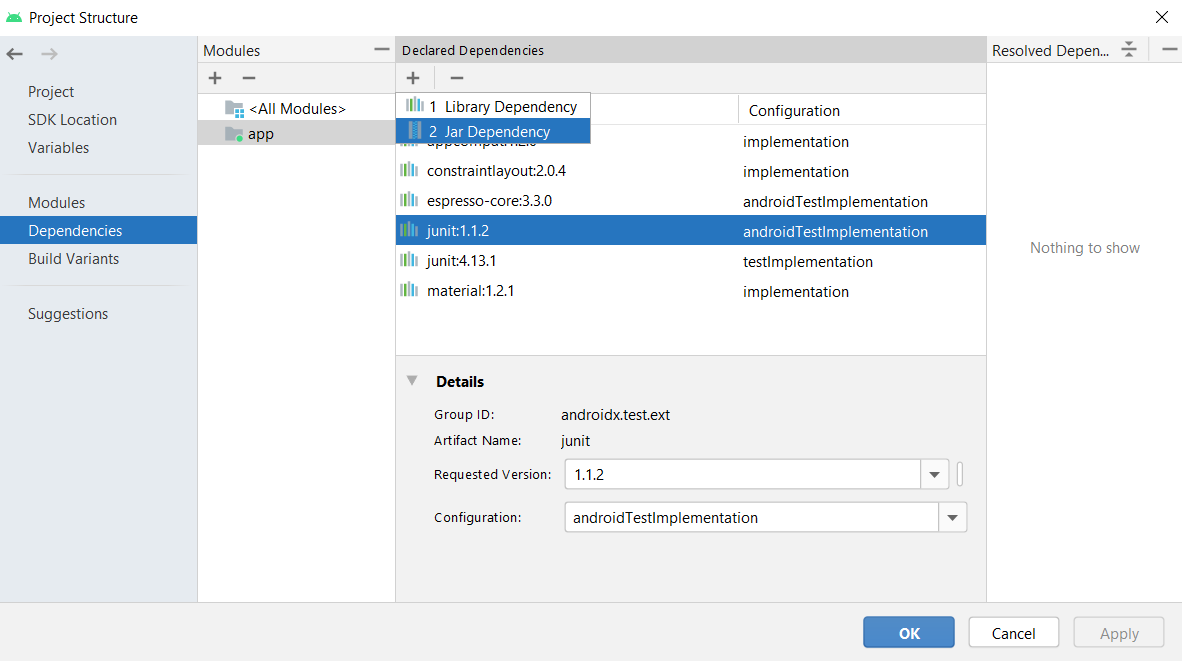
4. To add it as a jar dependency, Click on File -> Project Structure. A dialog box will appear:
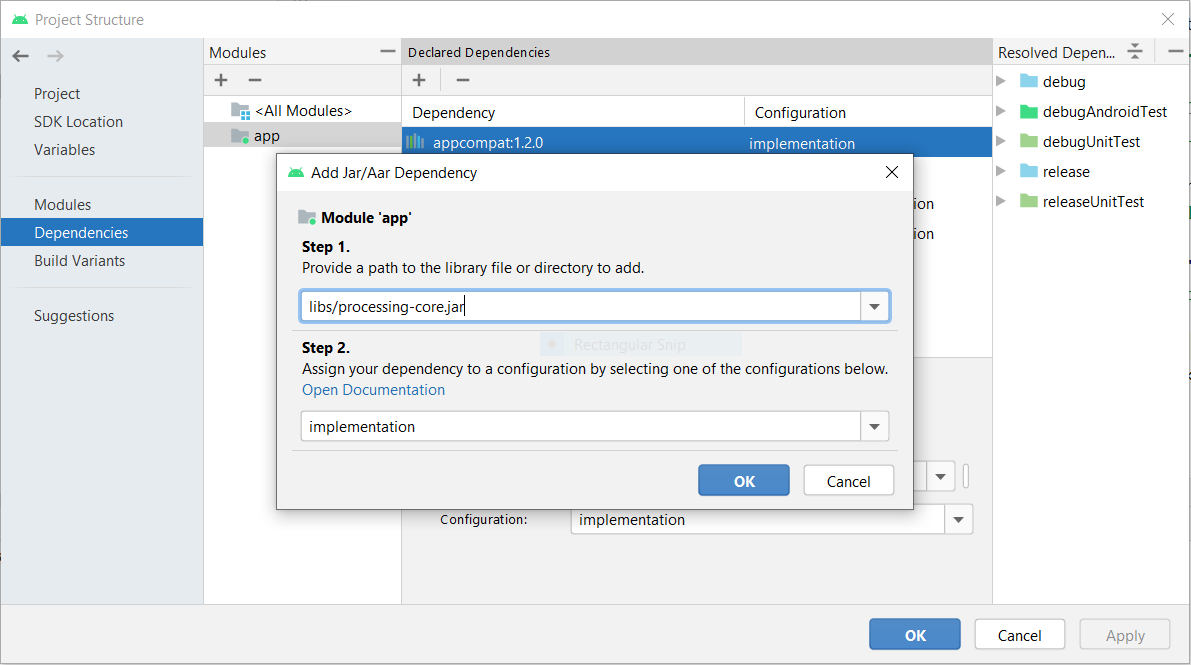
5. Select ‘dependencies’ in the left most panel and then click on ‘app’ in modules panel. Click on plus button under Declared Dependencies and then click on Jar Dependency. Another dialog box will appear:
6. In the add jar dialog enter path as ‘libs/processing-core.jar’ and in Step 2, enter scope as ‘implementation’. Click on ‘OK’, ‘Apply’ and then again ‘OK’:
7. Then, write your sketch code by extending PApplet, for example:
8. Initialize the sketch in the main activity:
9. Finally, create a simple layout for the main activity:
The complete Android Studio project is available here.
Using Bintray packages
The processing-core library is also available as a package on Bintray. This package can be easily imported into a Gradle project using the following dependency snippet:
Источник
Processing for Android
Distributing apps
In this tutorial we will cover the steps to publish your Processing sketch as an app in the Google Play store.
Before packaging the app for release, it is required that you set the icons for your app, wallpaper, or watch face, because Processing will not use the default generic icons for the release package of your app. It is very important that you also choose a package name that will uniquely identify your app in the store.
Setting custom icons
Android mode uses a set of default launcher icons for the app. You should use your own icons for release by creating the files icon-36, 48, 72, 96, 144, and 192 in .PNG format, and placing them in the sketch’s folder before exporting the signed package. Follow the icon design guidelines from Google in order to create your icons.
If you are creating a watch face, you also need to provide the files preview_circular.png and preview_rectangular.png, which will be used to show a preview of the watch face in the Android Wear companion app that runs on the phone, or in the watch face selector on the watch. The resolutions of these icons are 320×320 for the circular preview, and 280×280 for the rectangular preview.
Setting version and package name
Note that the package name of you app is unique, since there cannot be two apps on the Google Play store with the same package name.
Creating the signed app package
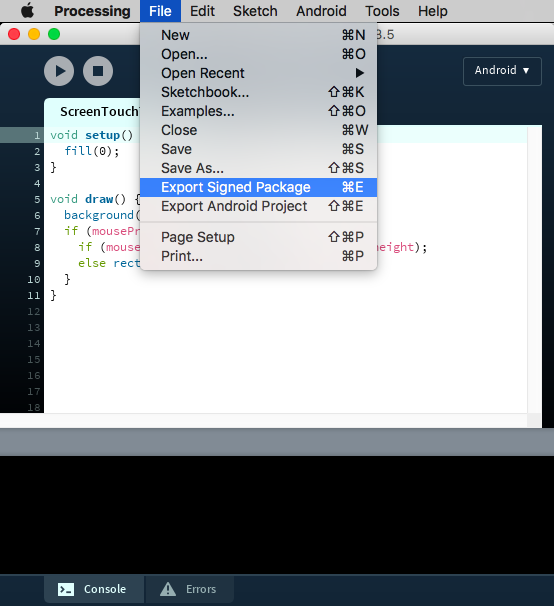
The Android Mode simplifies the publishing of your sketch by signing and aligning the app, so you can upload it to the Google Play Developer Console without any extra additional steps. All you need to do is to select the «Export Signed Package» option under the File menu:
After selecting this option, Processing will ask you to create a new keystore to store the release key to sign the app package:
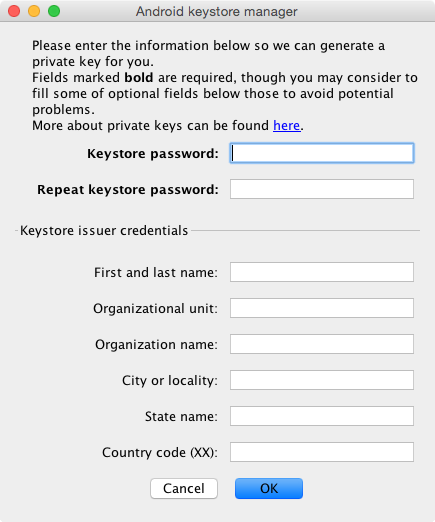
Remember this password, as you will have to use it every time you export a new signed package. Even though you can reset it and create a new key, as long as an app is identified with the same package name, it has to have the same release key.
Источник
Parsing XML data in Android Apps

Jun 28, 2018 · 4 min read
JSON is become a very widespread format for the Web Services but in some cases, you would have to parse data in the good old XML format. In that tutorial, you are going to learn how to parse a XML file on Android.
Note that there are various XML parses available in the Android SDK in standard. Thus, you can use the following solutions :
- XMLPullParser API
- DOM Parser API
- SAX Parser API
As usual, each parser has its advantages and drawbacks.
The recommendation on Andr o id is to use the XMLPullParser API which consumes less memory than the DOM Parser API which loads the complete XML file in memory before parsing it.
So, in this tutorial, we will use the XMLPullParser API. Note that you can also discover this tutorial in video on YouTube :
Creating a simple User Interface
To display the parsed XML data, we need to create a simple User Interface. It will consist in a simple TextView centered on the screen :
Defining XML data to parse
Then, we define some XML data to parse inside a file under the assets directory of our Android project. This file will be named data.xml and will contain some NBA players with data like name, age and position played :
Creating a Player POJO
To map the data for each player, we create a Player POJO (Plain Old Java Object) :
Preparing the XML Parser
The first step is to load the XML file from the assets of our Android Application. For that, we define a parseXML method. We create a new instance of the XMLPullParserFactory class. Then, we create a new XMLPullParser instance by calling the newPullParser method of the XMLPullParserFactory got previously.
We got an InputStream on the XML file by calling the open method of the AssetManager instance. With that instance, we can set the input on the XMLPullParser instance. It gives us the following code :
Parsing the XML data
Now, we need to parse the XML data. The parsing will be processed in the processParsing method. We start by getting the current event type from the parser by calling the getEventType method.
Then, we enter in a loop while the event type is different of the XmlPullParser.END_DOCUMENT constant. In the loop, when we meet a XmlPullParser.START_TAG event type, we get the name of the current tag by calling the getName method.
When we have a player tag, we create a new Player instance and we add it in an ArrayList of Player. This list will be used to store all the players read from the XML file.
If the current player is not null, we are reading data for a player. We have to check if the tag is name, age or position. For each case, we call the nextText method of the parser to get the value associated to the tag. Then, we set the value on the current player.
At the end of the loop, we have stored all the players from the XML file on the ArrayList of Player. Note that just before the end of the loop, you need to call the next method of the parser to pass to the following event.
It gives us the following code :
Displaying the XML data
The last step is also the simplest. We need to display the players in our TextView via the printPlayers called at the end of the processParsing method.
In that method, we iterate on the ArrayList of Player and for each player we add its properties (name, age and position) on a StringBuilder instance. Finally, we display the text on the TextView by calling its setText method with the value of the StringBuilder instance.
It gives us the following complete code for the MainActivity :
Our App in Action
Best part of the tutorial is coming since it’s time to put our App in Action. When, you will launch the Application, you should have the following result :

That’s all for that tutorial.
To discover more tutorials on Android development, don’t hesitate to subscribe to the SSaurel’s Channel on YouTube :
Источник
XML Processing in Android and Java: XmlPull Example
XmlPull example in Java or Android.
1 What is XmlPull
XmlPull is another way to parse XML document besides DOM and SAX.
In fact, XmlPull works like SAX in some respects.
- XmlPull needn’t create a DOM tree in memory, either.
- XmlPull will also read the XML document as a stream and do parsing work once the XML node token in the stream is recognized.

On the other hand, there are important differences between XmlPull and SAX.
- SAX parser need a events handler; XmlPull parser will handle the events itself.
- SAX can only receive the events passively; XmlPull will process the events on his own initiative.
- SAX can’t stop the course of parsing once you start; XmlPull will take full control of parsing «cursor» and can quit the parsing conveniently.
Video illustration of how XmlPull works.
2 Install
For Java application, you can download XmlPull implementation library from xmlpull.org. kXML is recommended.
After downloading the jar library file, paste it to your project and then add it to build path of your project.

Android has already provided XmlPull API implementation which is located in package org.xmlpull.v1.* .
3 Example codes
XmlPull example project.

3.1 Sample XML
Given a sample XML file.
3.2 JavaBean
JavaBean class for book item in BookBean.java .
3.3 Parsing XML using XmlPull
If you are using XmlPull in Android application, you should initialize your XmlPullParser as follows.
Источник
Processing and Parsing XML in Android
In this blog, we will learn about one of Android’s most fascinating topics. Even most of us are unaware of it, despite the fact that it is one of the most essential ideas in Android development. But, before we get into our topic, take out your phones and count the number of apps you have on your smartphone. On average there must be more than 30 applications. However, we only use 5–6 of these 30 apps on a daily basis. Other apps, albeit little utilized, are critical. So, on our home screen or the main screen of our phone, we make shortcuts to commonly used programs. These launchers are used to start the application’s MainActivity or Launcher Activity.
So, in this article, we’ll learn how to make application shortcuts on the home screen? No way, we’re all well aware of it. We are all Android Developers, and we must consider the technical aspects of the platform. As a result, anytime we open a mobile application via a shortcut, the MainActivity or Launcher Activity is invoked. The shortcut’s job is to maintain or save your launcher, and every time you open an app, it will launch the launcher or just MainActivity for you.
However, the problem becomes more complicated when you modify your application’s Launcher Activity. So, try changing your application’s Launcher Activity and running it on your device. Is the shortcut still visible on your home screen? What occurred just now? What happened to the shortcut? Don’t worry, you’ll find out the answers to all of these questions towards the end of this blog. So, in this article, we’ll go over Activity Aliases on Android.
Before Proceeding
We’ve noticed that if we alter the Launcher Activity of our application, the application’s shortcut on the home screen is gone. But why should the Launcher Activity be changed? The explanation is simple: every time you make a new version for your program, you may need to modify your Launcher Activity owing to new features, or you may have changed the package name and the associated Activity name. As a result, in this situation, the name of your Launcher Activity will be altered but the content stays the same.
Let’s create a project to better understand the situation
Navigate to the app > res > layout > activity_main.xml and add the below code to that file. Below is the code for the activity_main.xml file.
Now, create a new Activity with the name NewActivity. Below is the code for the activity_new.xml file.
In the NewActivity.kt file, we haven’t written any code. Open the AndroidManifest.xml file now. The following code will be present:
Because we used the intent-filter> in the OldActivity tag, our OldActivity is the Launcher activity. As a result, anytime we run the program, the OldActivity is also launched. Install the app on your smartphone and create a shortcut to it on your home screen. Change the Launcher activity to NewActivity once you’ve created a shortcut. As a result, the following code will be added to our AndroidManifest.xml file:
Now, launch the app and look for the shortcut you made on the home screen. There are no shortcuts on the home screen.
What is the cause behind this?
When we create a shortcut to a certain application on our home screen, that shortcut remembers the name of the Launcher Activity.
Activity-Alias
So, to retain the shortcut on the home screen even when the Launcher Activity name changes, we employ the notion of Activity-Alias. The activity-alias > tag is used to launch an Activity while keeping the launchers intact. So what’s stopping you from using the activity alias pal? But how should this Activity-Alias be used? Simply paste the following code into your AndroidManifest.xml file:
To declare our Launcher Activity, we utilized the activity-alias> tag. See the tags listed below for a better understanding When the Launcher is used, the term “Purani” is used to specify the targeted activity. Create a shortcut to the app on your home screen, then change the Launcher Activity to NewActivity and start it. You can see that even after altering the Launcher Activity, our shortcut remains on the home screen. But what is the cause behind this?
Hence, the name would be remembered by the user. Change the name in the activity-alias> and run the program again. You will encounter an identical issue, in which the shortcut will be deleted from the screen due to a name change.
Geek Tip: To utilize activity-alias>, you must define all of your Activities (including the Launcher Activity) above the activity-alias> tag rather than below it.
Источник


