- How to Setup Android Work Profile on Android Devices
- In this article
- Categories
- Requirements
- New to Miradore?
- Why set up Android Enterprise Work Profile?
- How to enable Work Profile for legacy enrolled Android devices
- How to set up the Work Profile on Android devices
- Modern Profile UI Design In Android Studio – Material Design 2020
- Steps to create a Profile UI Design in android
- 1- Create a new activity
- 2- Change layout to Linear Layout in XML file
- 3- Design the profile page
How to Setup Android Work Profile on Android Devices
Updated on October 21st, 2021
In this article
Categories
This article shows how you can set up Android Work Profile on your Android devices.
In this article
Requirements
- Your Miradore site must have either the Premium Plan or the free trial activated
- Managed Google Play Enterprise has been configured for your site
- Devices are running Android 6.0 or newer
- Devices are connected to the Internet via Wifi or mobile data
- Devices are not work managed devices
While most do, some older Android devices don’t support the managed profiles. If you run into errors and are not sure whether your device supports managed profiles, download Google’s TestDPC from Google Play and try creating a managed profile using the app.
New to Miradore?
Discover how Miradore can help you manage your Android devices with ease.
Why set up Android Enterprise Work Profile?
Once the requirements are met, administrators can create a work profile on the managed devices. The purpose of the work profile is to create a secure container for your work data and separate the private applications from the work applications. Administrators can then remotely manage the work container and deploy applications silently to any device running Android 5.1 or above.
This is a particularly important solution for the companies that support personal devices deployment scenarios, allowing the employees to bring personally-owned devices to work and to use those devices to access privileged company information and applications securely, making sure that e.g. work contacts won’t get leaked via private instant messaging apps.
When a work profile is created on the device, the Miradore Client operates as the profile owner of the work data and has only limited control outside of the work profile. This means that our client is no longer the device administrator of the device and can’t, for example, install Samsung KNOX/SAFE configuration profiles or wipe the device. It can, however, lock the device, install Wi-Fi networks, collect device location and enforce passcode policies like it normally would. The work profile can also be at any time removed from the device both by an administrator as well as the user.
How to enable Work Profile for legacy enrolled Android devices
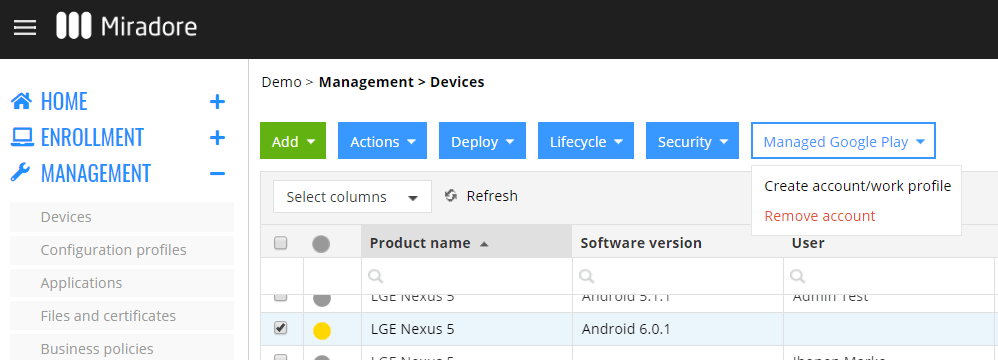
If you already managing an Android device in the device administrator mode, you can enable the work profile from the Management > Devices page using the Managed Google Play > Create account/Work profile action button.
How to set up the Work Profile on Android devices
The following video explains what the Android work profile is and walks you through the easy enrollment process. You can also follow the written instructions below.
1. If the device is not yet managed with Miradore, go to Enrollment > Enroll device page on your Miradore site and choose the platform Android.
2. Select Light to enroll a device using the Work Profile mode.

3. Add a device user: enter the user’s email address and choose Work profile. You can also choose to send the enrollment invitation via email and/or SMS to the user if needed.
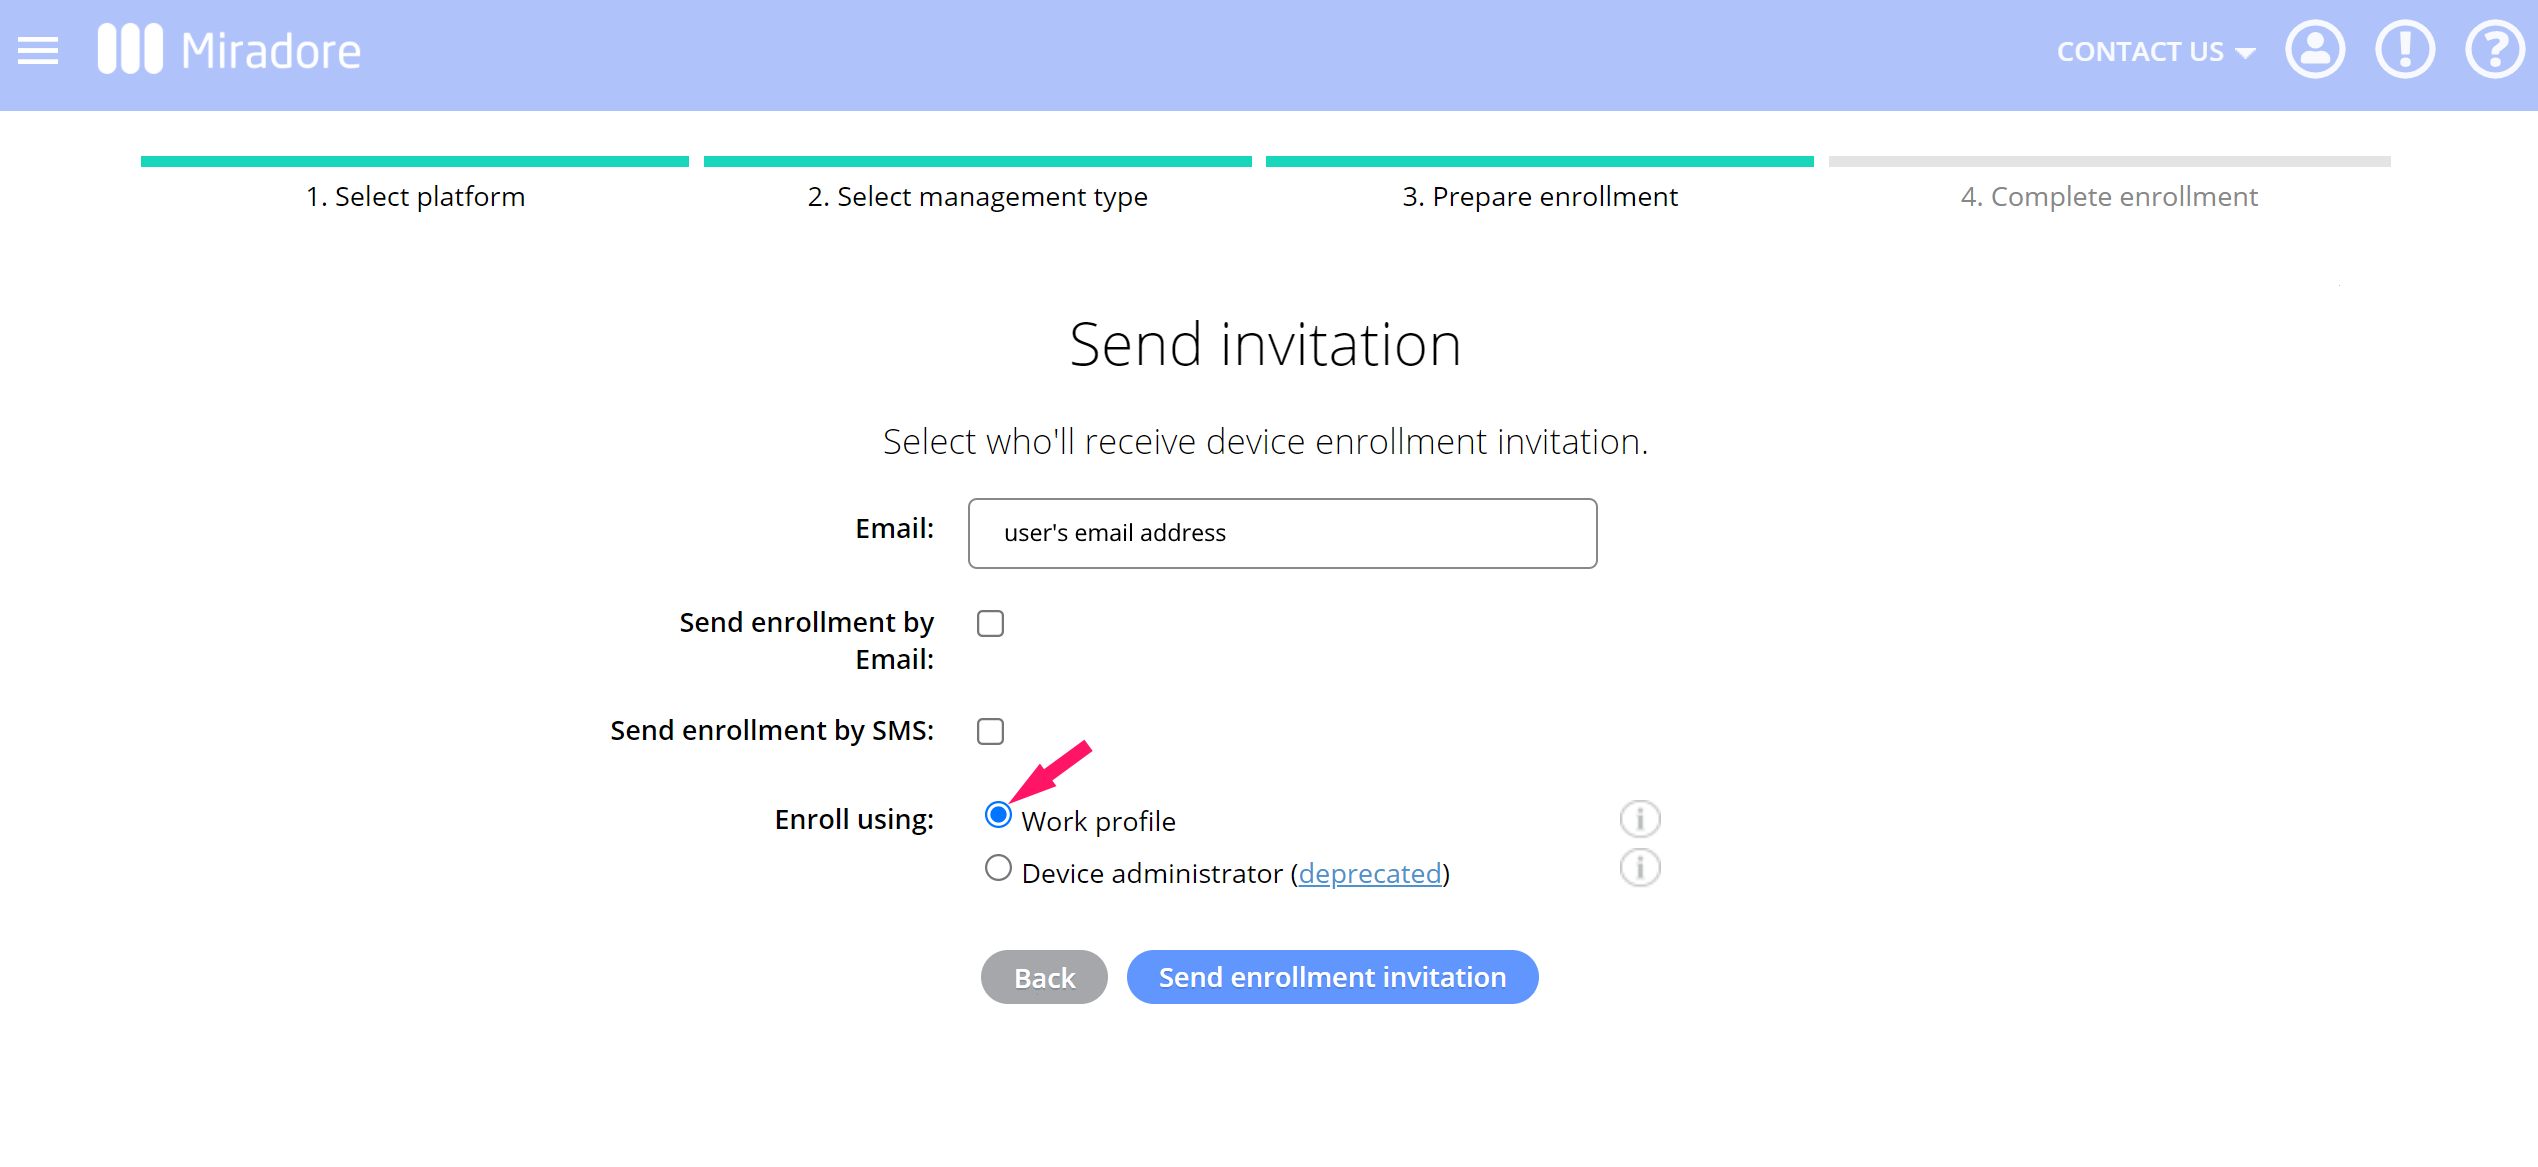
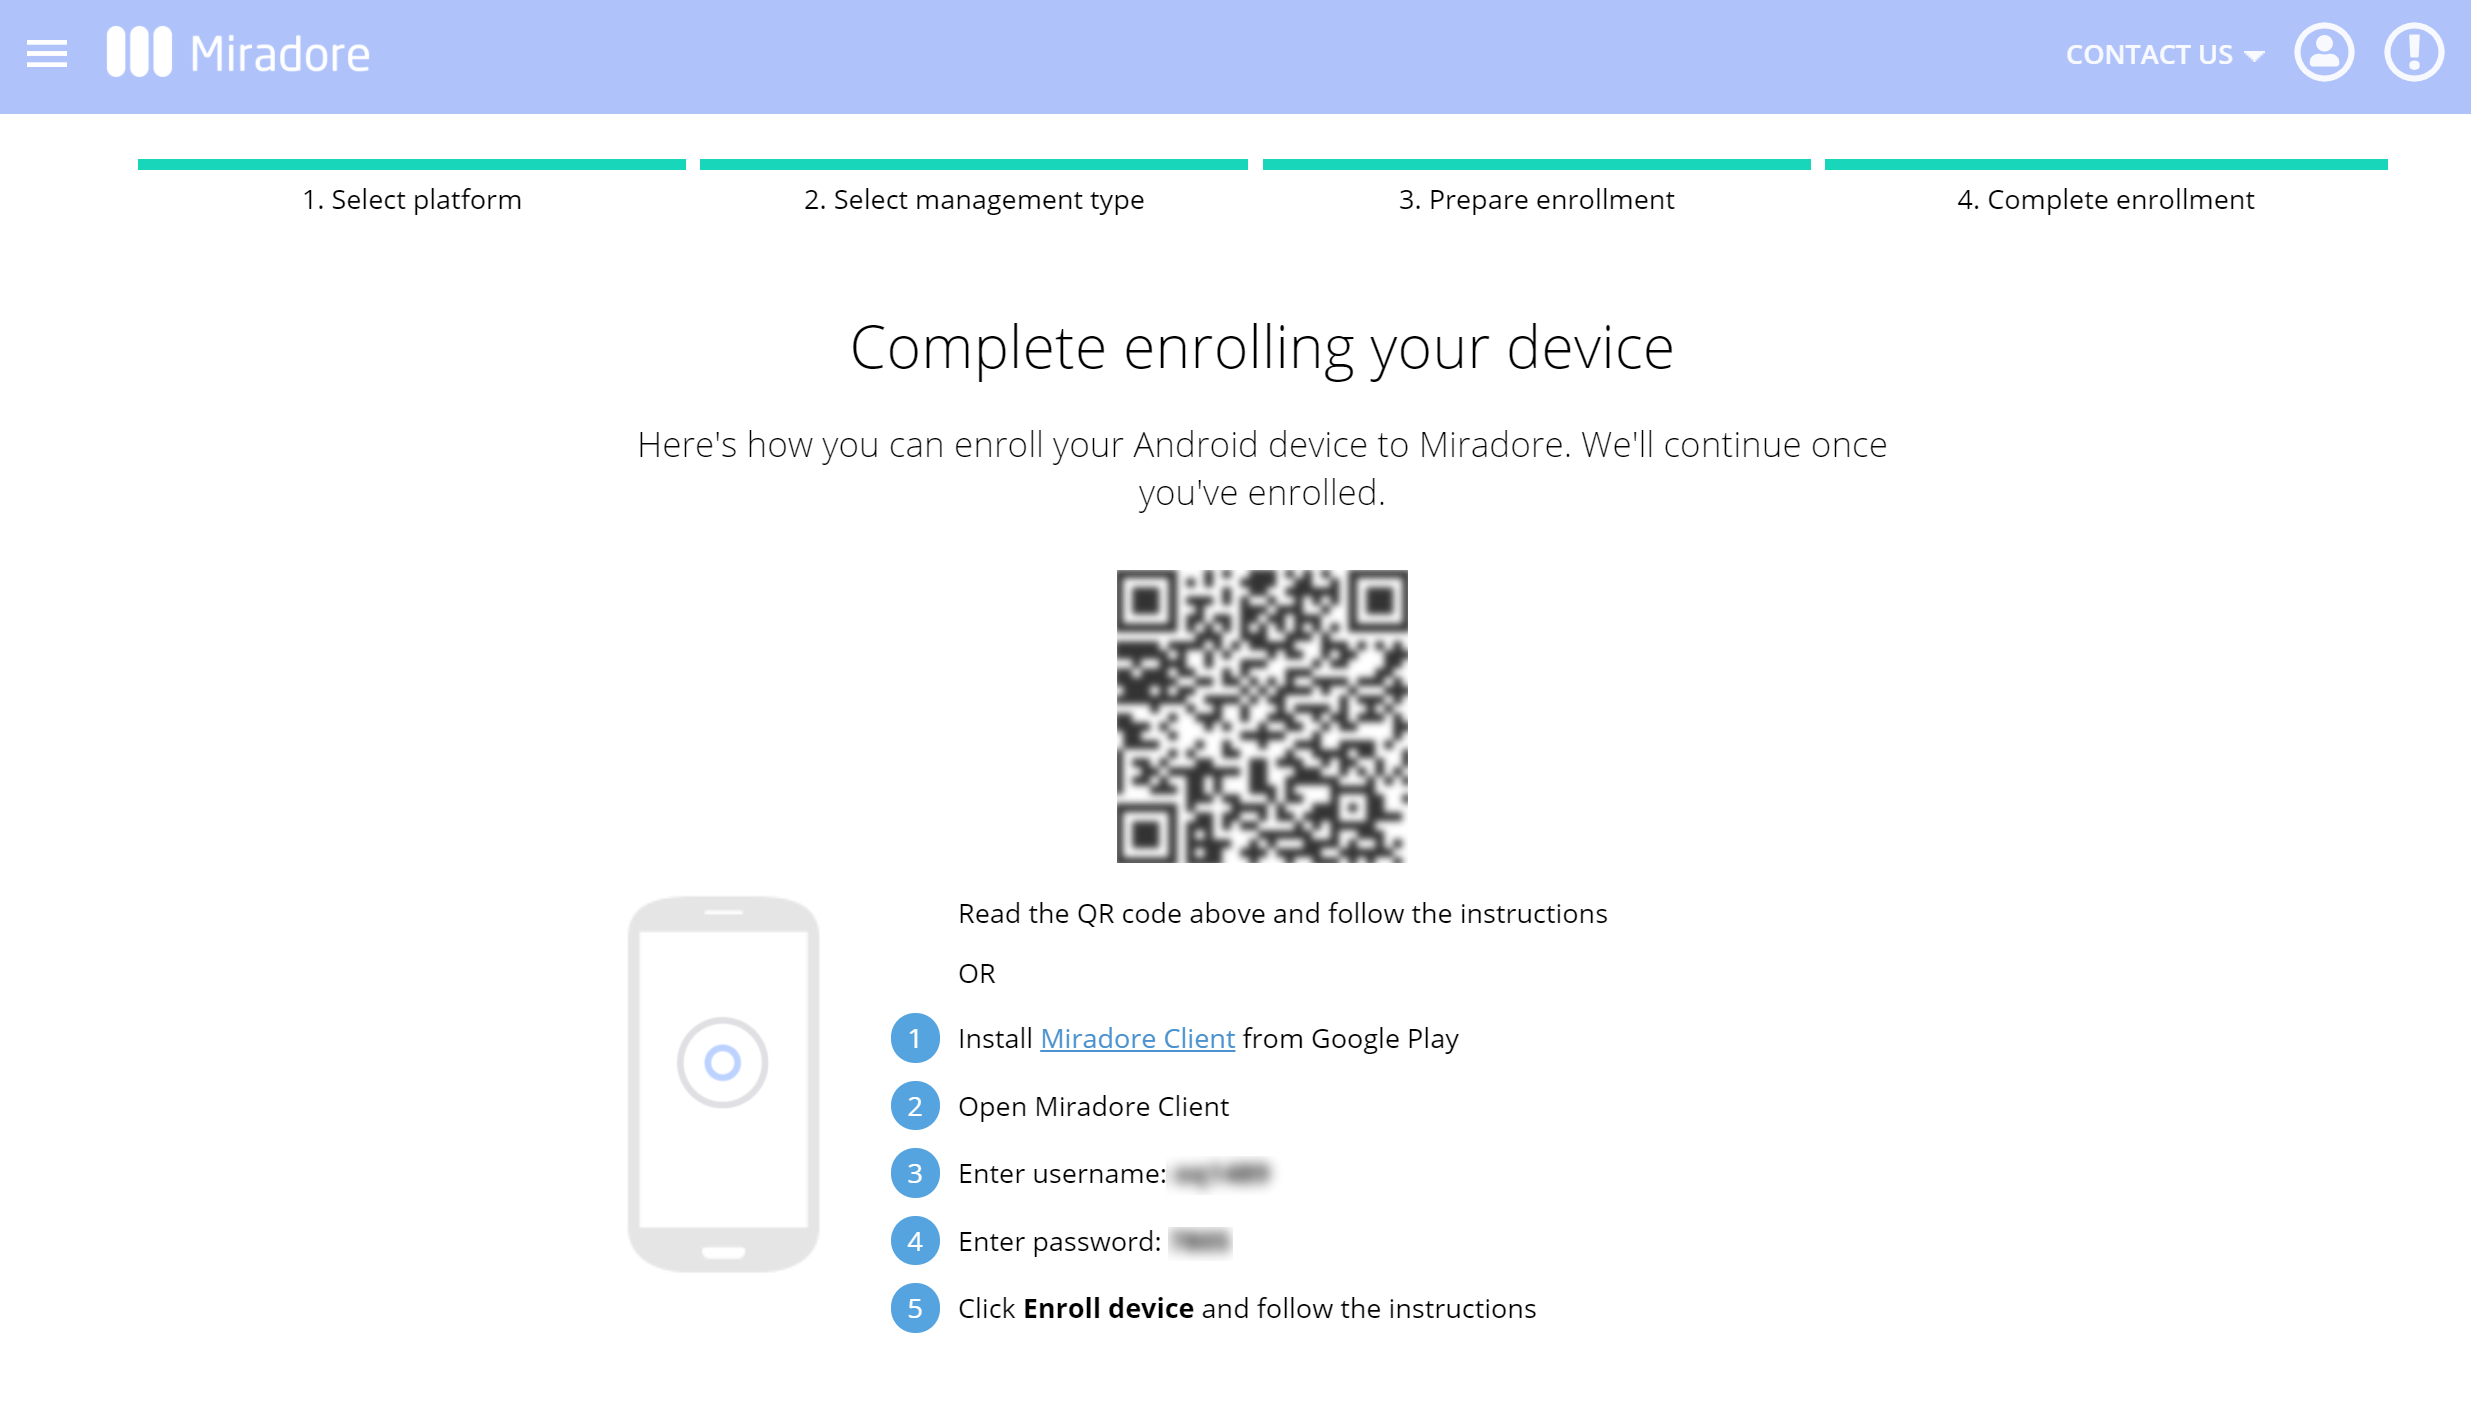
The system generates credentials for enrollment. Read the QR code with the device or follow the steps to enroll in the Work profile. If you have chosen to send the invitation to the device user, the system sends the credentials to the device user.
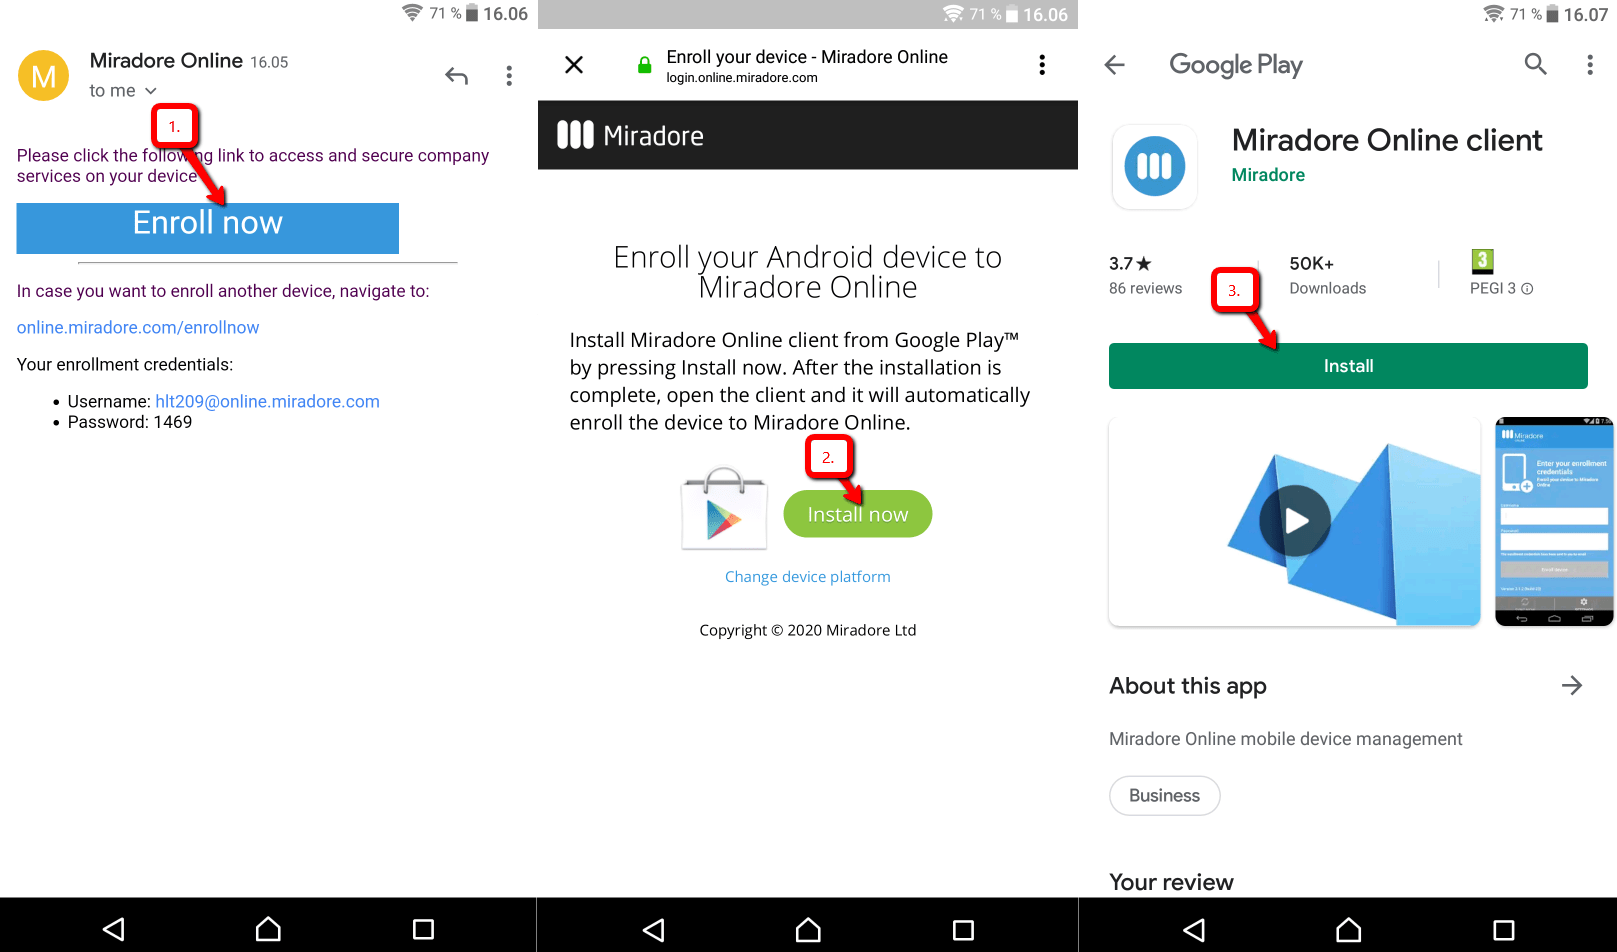
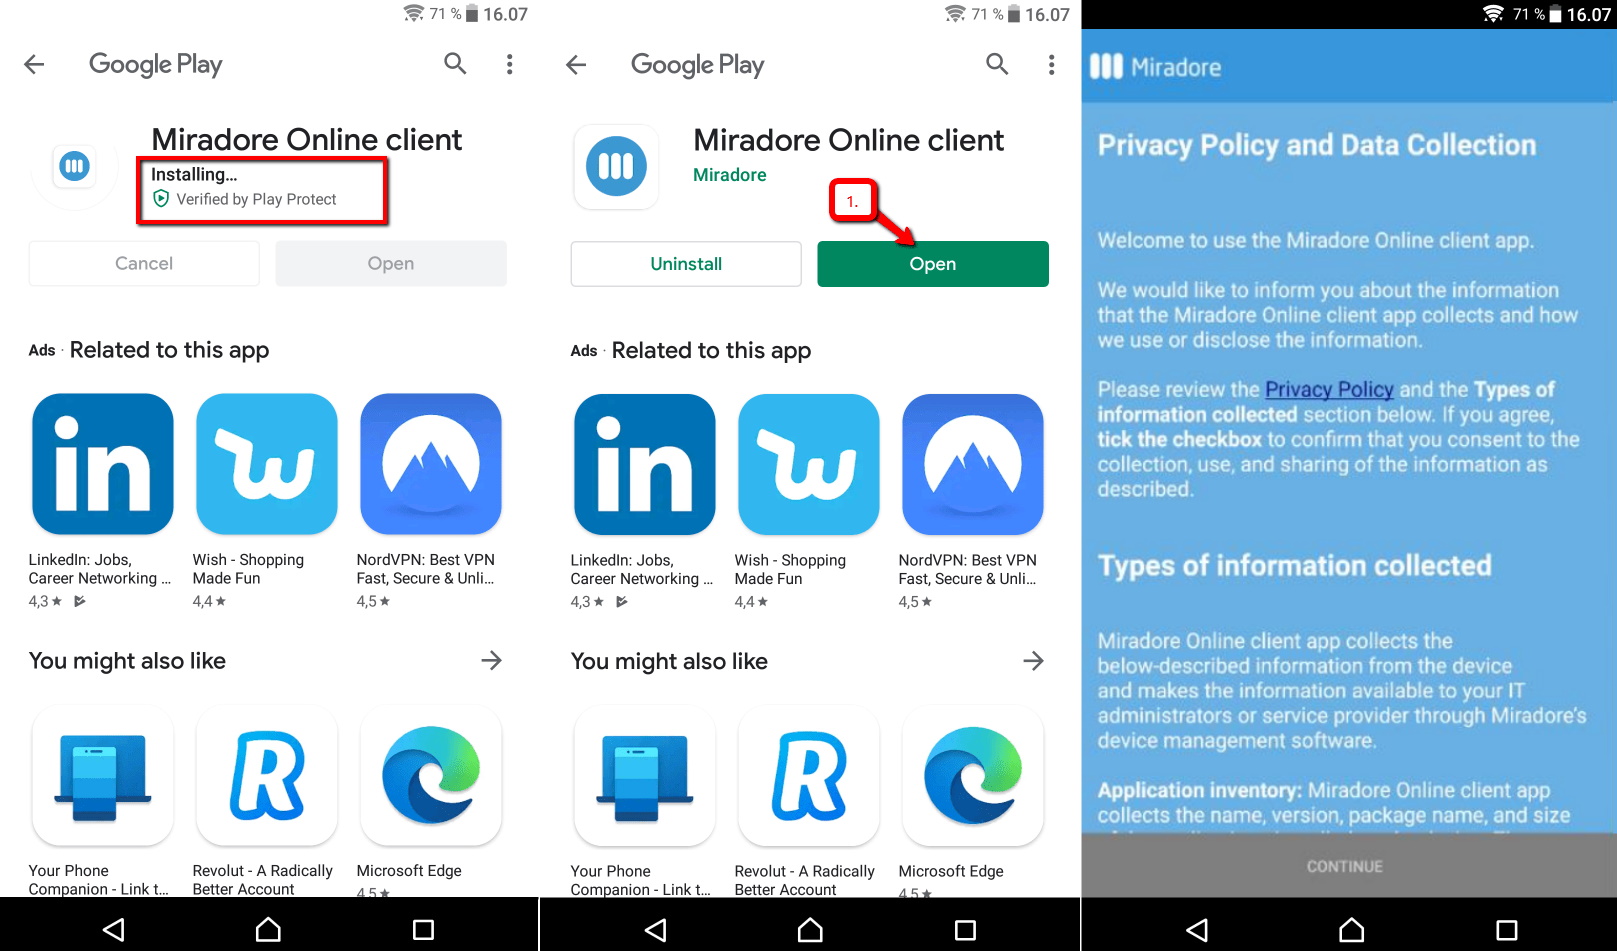
The next pictures show how the enrollment process continues at the device end. First, user must click the Enroll now button from the email. This will take him/her to Google Play store. Next he/she clicks Install now and Install which starts the installation of the Miradore Client application.
User waits until the Miradore Online Client installation completes and clicks Open to open up the app. After that, the app shows a privacy closure explaining what data the app collects and what is it used for. The user must read the provided information carefully and give his/her consent for the data collection before continuing.
Next, the device user needs to allow all permission requests from the Miradore app.
Notice note that Miradore respects user’s privacy and security. It is not possible for anyone to access the user’s personal contacts, phone calls, text messages, instant messages, files, or photos through Miradore.
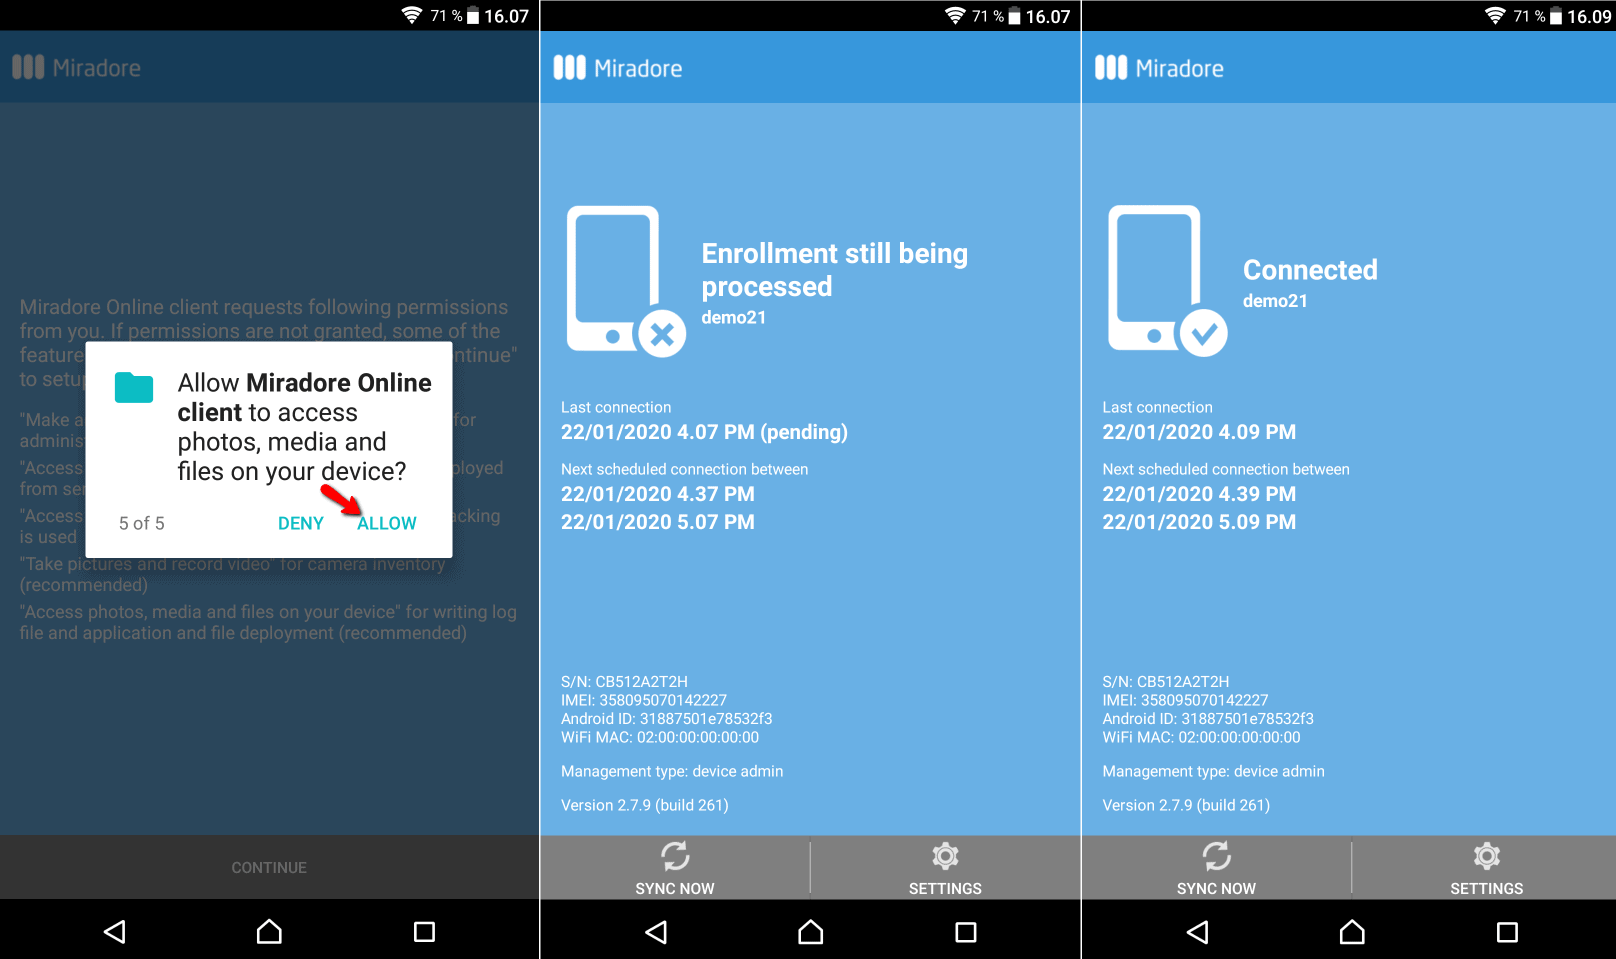
The actual creation of the Work Profile begins immediately after the Miradore Online Client installation has been completed and the Client has successfully connected to your Miradore site for the first time.
The device user can see a round Miradore icon on the notification area when the Client asks the user to approve the creation of the Work Profile.
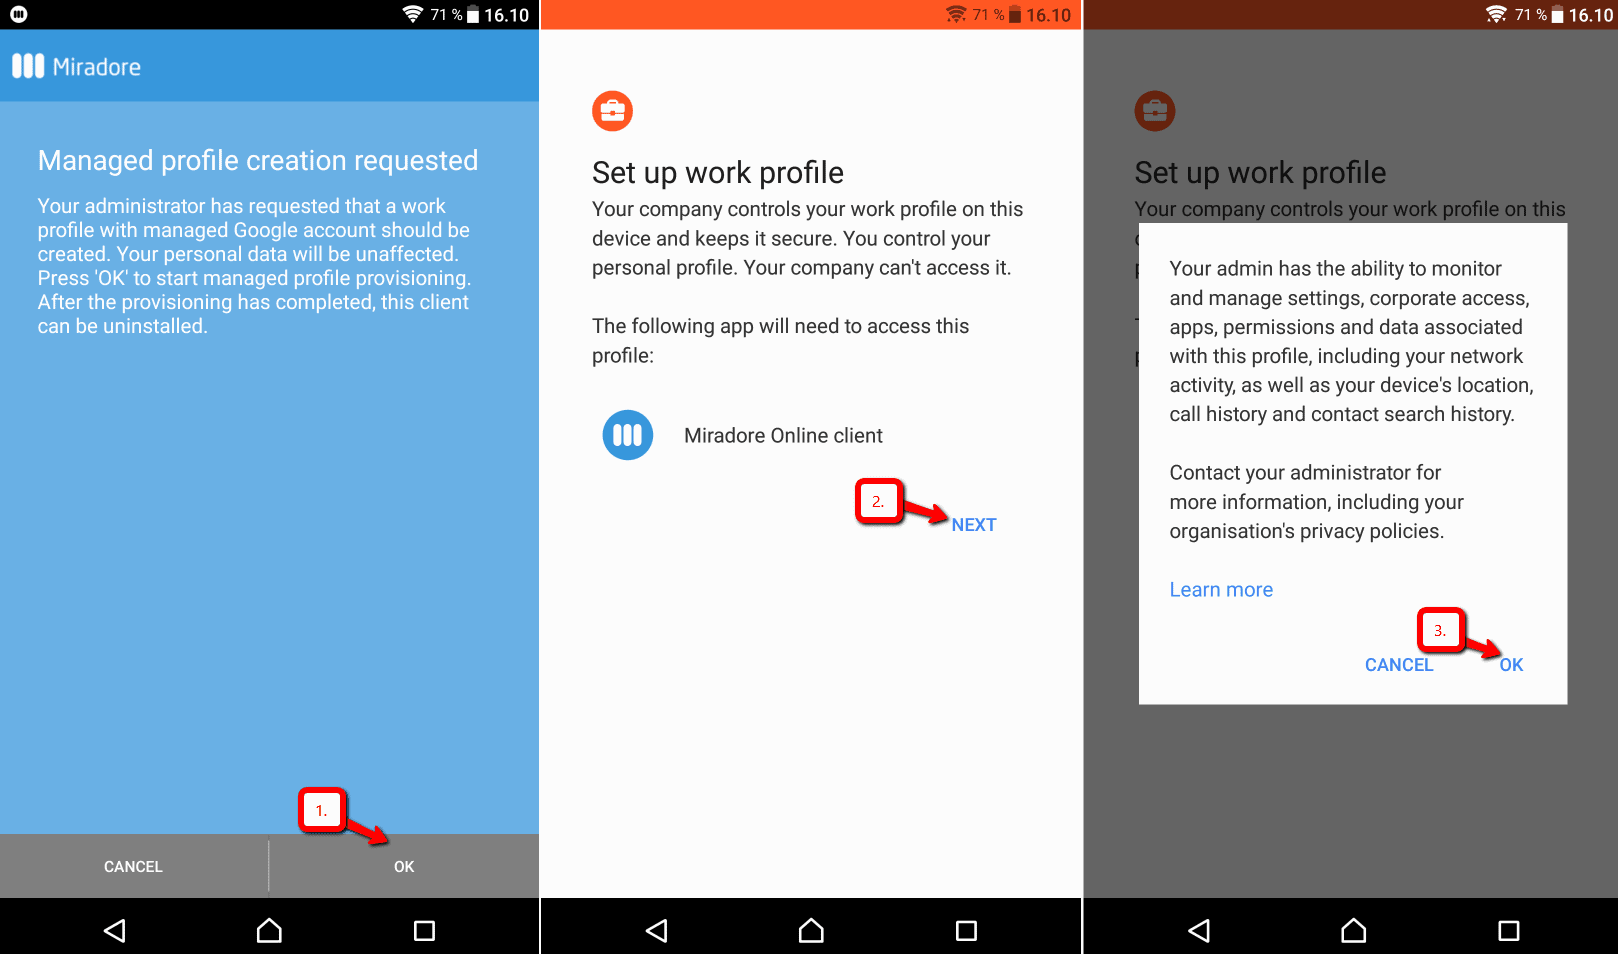
Please note, that the device must be encrypted before proceeding. The encryption process may require that the device battery is charged up to 80% and the device is plugged in. When the encryption is complete, the managed profile creation continues.
Setting up Android Enterprise Work Profile takes a few minutes. Miradore app will show the Managed profile created screen to the device user when after the profile creation has been completed successfully.
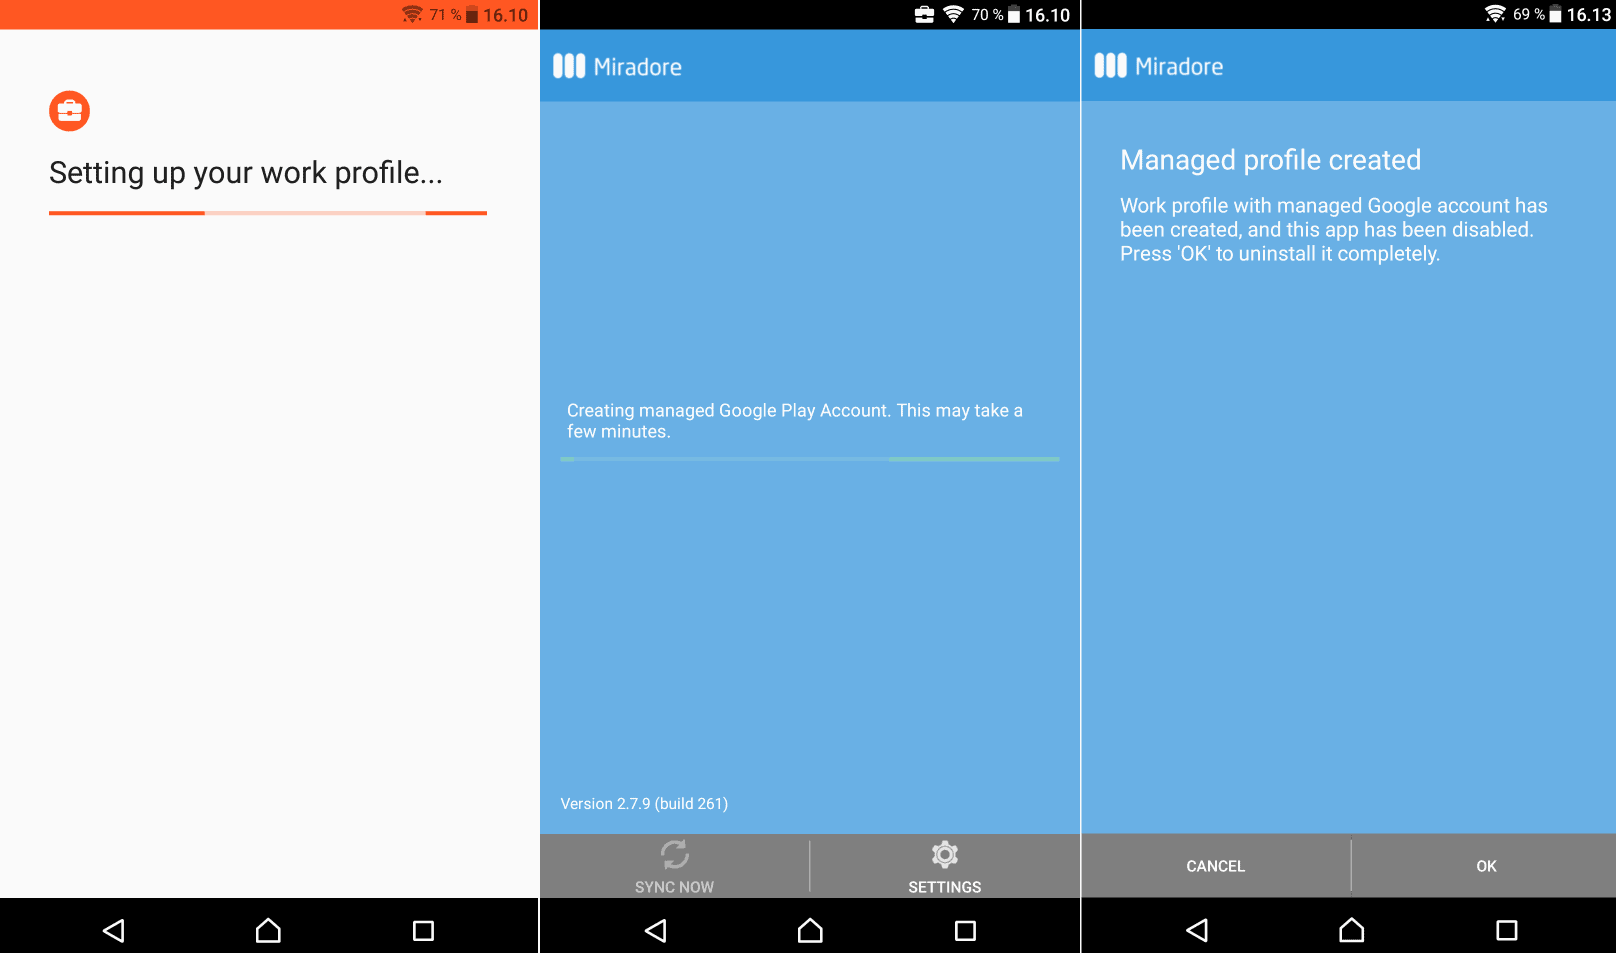
After a successful Work profile setup, the Miradore Online Client can be removed from the primary user profile running on the device. The uninstallation will be requested from the user automatically. After the Client uninstallation, the setup is ready at the device end. The device user can recognize the Work Profile apps by the orange briefcase icon.
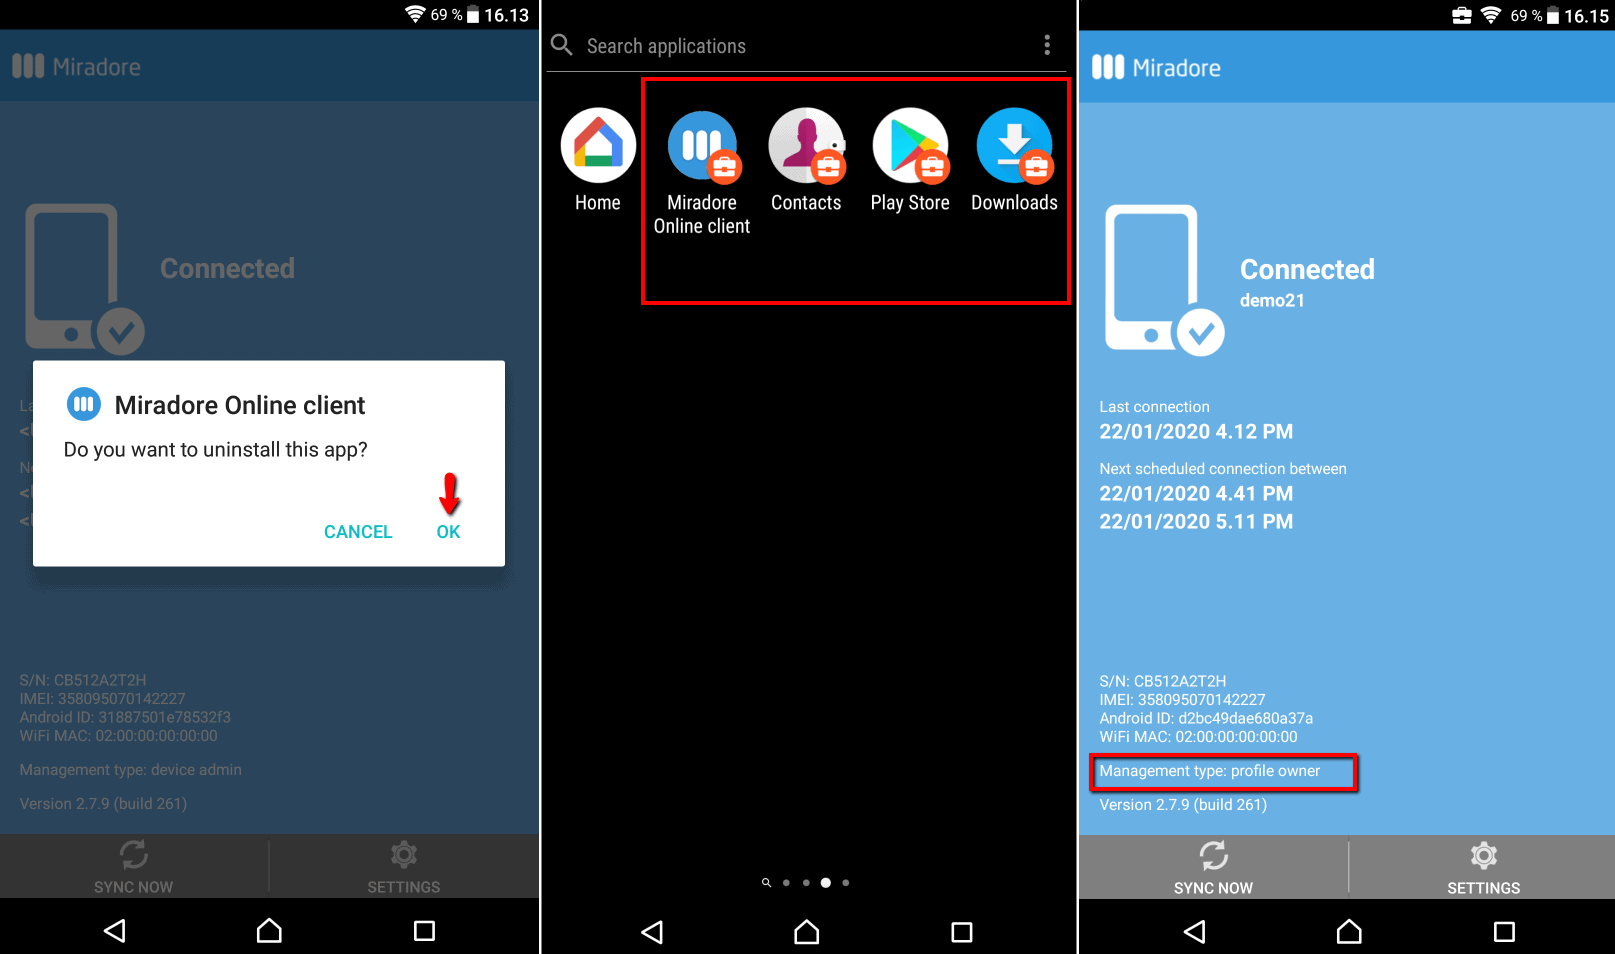
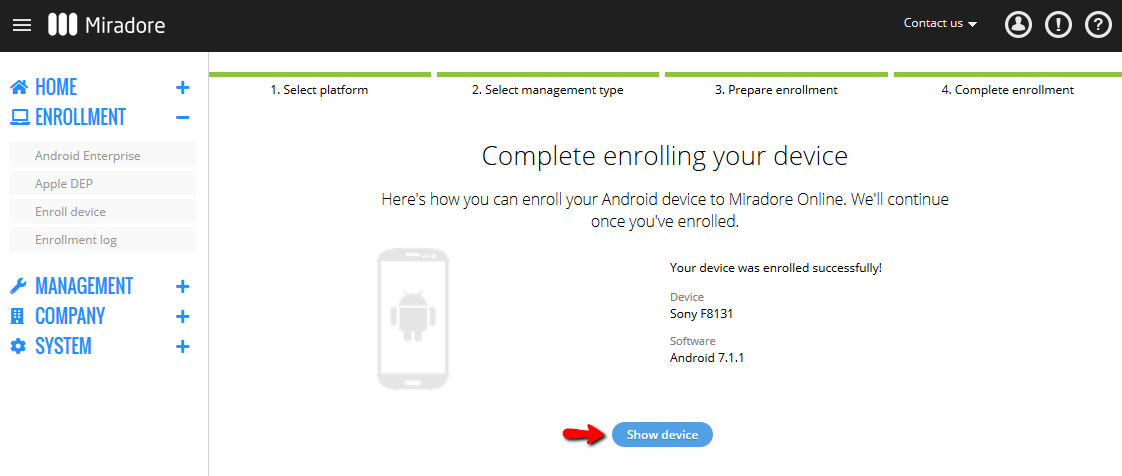
The Show device button becomes active in Miradore after the enrollment has been completed. You can open up the device form to see details about the device. You can follow the enrollment on the Device’s Action log, and also on the Enrollment log page.
The default tag Profile owner is added for each device where the work profile has been successfully enabled. This helps to identify work profile devices in your Miradore site and can be used, for example, to create a separate business policy for work profile enabled devices.
A Work profile can also be automatically enabled to the devices during the device administrator enrollment process. Just add a tag afw to the enrollment or user and the work profile is automatically installed to the Android device that is enrolled with the created credentials.
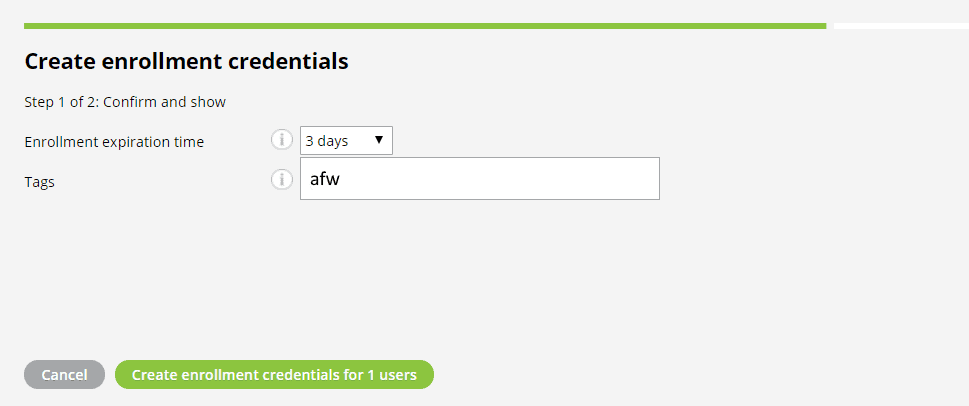
Notice that after a successful Work Profile enrollment, the «Profile owner» tag (not «afw») will be added for the device in Miradore.
If the device’s Google Play store is older than the required version, it must be updated to ensure that managed Google play account can be created in the work profile. Play store should be updated automatically in the background, as long as the user has signed in to Google Play.
Источник
Modern Profile UI Design In Android Studio – Material Design 2020

In this tutorial, we will create a modern profile UI design for showing the detail of the user in our app.
Previously, we have created our design for the sign-up.
Subsequently, we have created the design of the login pageВ using material design.
And now in this tutorial, we are creating a profile screen of the user having a username, Email, Password, and phone number.
After successful verification of theВ Login Screen, this profile screen will appear to show the details.
From where the user can update his/her profile.
Generally, every online app has a user profile page from where you can edit your profile.
So now let’s get started.
. «,»phone»:» «>>,»slug»:»et_pb_text»>» data-et-multi-view-load-tablet-hidden=»true» data-et-multi-view-load-phone-hidden=»true»>
Subscribe Us at Youtube
Steps to create a Profile UI Design in android
To create a profile screen we have to do the following steps.
1- Create a new activity
In the first place, we have to make a new activity.
For instance, decide either we want to create a new project having a new activity or we want to create a new activity in already created project.
Create a new project
If you are new to the android studio then you have to check our tutorial of how to create a new project.
Create an activity
- Thus, to create a new activity right-click on app>java>”first folder” as shown in the picture.

2. After right-click, you have some options to the right.
So then go to new>Activity>Empty Activity.
![]()
3 – Finally give the name of the activity as “UserProfile”.

2- Change layout to Linear Layout in XML file
1- Open XML File
In the first place open the XML file named “activity_user_profile.xml”.
For that, open file name activity_user_profile.xml from android’s top tabs.

if you can’t find the activity in top tabs then select app>res>layout>activity_user_profile.xml
as shown in the picture below.

Next click on the “text” tab at the bottom left side of XML page near “design”
2- Write the code in the XML file
When you open the text of the design your code is like this.

As we are making a profile screen and want everything in linear form.
Linear means that all the components are vertically or horizontally arranged.
So for that, we have to use a Linear Layout.
Hence remove the selected code of constraint layout and add “LinearLayout” as shown in the above picture
In the meantime add its orientation to Vertical.

3- Design the profile page
Our Design is divided into 3 parts. Thus to design your profile you have to follow these steps:
1- Header of profile page
3- Detail of the user
1- Header of profile page
The header of our modern profile UI design will show the picture of the user and with that, it will show the user-name.
a- Design Header
So then, we have to use a relative layout, with a width equals toВ match_parent.В
Because we have to make a header on a small part of the screen, so then we use height equals “300dp“.
After that add, the padding equals 20dp so that the data in that layout leaves 20dp space from all sides.
Now add the background-color by using background=”#fece2f”
android:layout_width=»match_parent» android:layout_height=»300dp» android:background=»#fece2f» android:padding=»20dp»>
b- Design Image view of user profile
To show the profile picture of the user we have to use the image-view.
Therefore to make a profile picture of equal size we have to make its height and width equal.
In this case, we will use width AND height equal to 100dp.
Next, we have to show the picture in the center of the header so make layout_centervertical equals “true“.
Finally gives the id of the image view as profile_image.
android:id=»@+id/profile_image» android:layout_width=»100dp» android:layout_height=»100dp» android:layout_centerVertical=»true» android:src=»http://www.taimoorsikander.com/modern-profile-ui-design-in-android-studio-material-design-2020/@drawable/profile_image»/>
c- Show name of user after profile picture
Lastly, we have to make a field where we have to show the name and username of the user.
Here we have to use textView and make the width and height to wrap-content.
wrap-content means that the size of the TextView is equal to the size of the username.
After that give the dummy username in text, give the text size to 20sp, font-family to bungee.
Finally, make the name to the right of the profile image. for that use layout_toRightOf and give the id of ImageView as profile_image and make text to vertically center by making layout_centerVertical equals to “true“.
Источник


